- How to Use DD-WRT Router as Wireless Adapter – Client Mode
- How to Use DD-WRT Router as Wireless Adapter – Client Mode
- Client Mode
- Contents
- [edit] Introduction
- [edit] Client (Station) Mode Setup
- [edit] Client Restrictions
- [edit] Troubleshooting
- Client Mode
- Contents
- [edit] Introduction
- [edit] Client (Station) Mode Setup
- [edit] Client Restrictions
- [edit] Troubleshooting
How to Use DD-WRT Router as Wireless Adapter – Client Mode
DD-WRT firmware supports Wireless Client Mode which enable your router into fully capableWireless Adapter. Client mode is just wireless connection between two routers. You can connect your router to the another Wireless Network or to the Hotspot. You can also share your android phone data connection to your home network on multiple devices which are not capable to connect via wi-fi.
Normally I used Client Mode on DD-WRT when my ISP shutdown for some days. I could connect my android device to my home network and share 3G connection to the multiple PC which are connected to the router via LAN port.
Here I’m going to show you today, how to set up Client Mode on DD-WRT Router in simple steps!, It is a quite simple method that by change Wireless Mode of your DD-WRT Router.
How to Use DD-WRT Router as Wireless Adapter – Client Mode
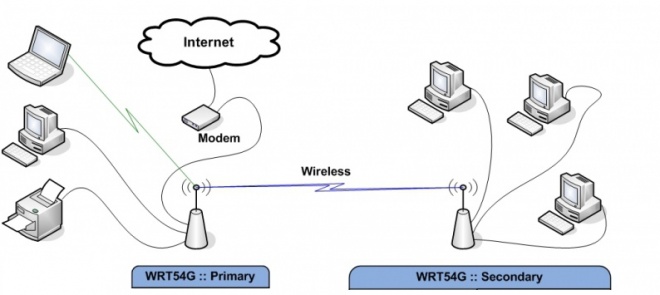
Here, Primary Router is Source Router or Main Router.
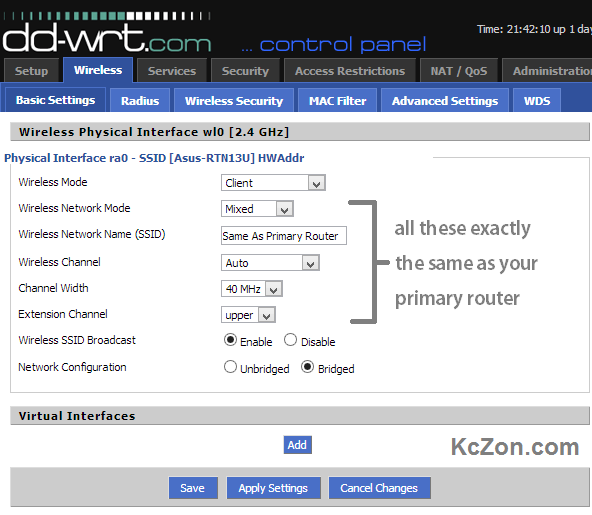
1. Wireless > Basic Settings > Wireless Physical Interface
Change Wireless Mode to the Client Mode.
2. On the Same tab > Set all these following options exactly the same as your primary router
- Wireless Network Mode
- Wireless Network Name (SSID)
- Wireless Channel
- Channel Width
- Extension Channel
3. Now navigate to the Wireless Security on the same Wireless tab.
Set all these following options exactly the same as your primary router

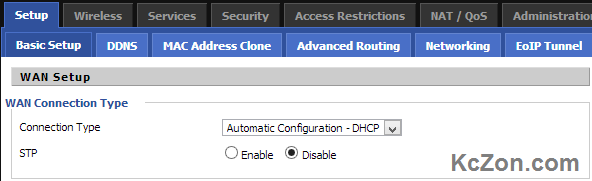
4. Now navigate to the Setup > Basic Setup > WAN Setup > WAN Connection Type
Set Connection Type to the Automatic Configuration – DHCP
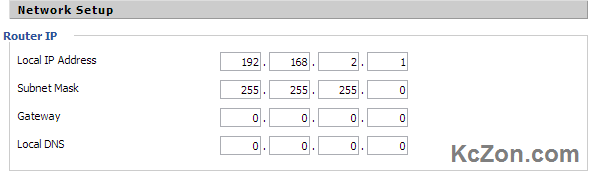
5. On the Same tab in the Network Setup > Router IP
Set the Local IP Address to 192.168.2.1 (Your Client subnet must differ from the Primary Router subnet).
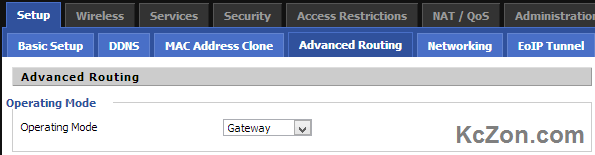
6. Now navigate to the Advanced Routing on the same Setup tab.
Change Operating Mode to the Gateway Mode instead of Router Mode.
7. Apply all Settings and Reboot the Router.
Now you can able to use DD-WRT Router as Wireless Adapter.
Client Mode
The secondary (client) router is unbridged in a different subnet (with NAT), while a Client Bridge is the same subnet as the host.
Contents
[edit] Introduction
This mode is NOT for WIRED connections between two routers, like an Access Point. It is a wireless connection between two routers only, usually to the primary gateway router. A Client Mode router connects to a Wireless Access Point (WAP) wireless connection as the WAN interface, and shares the internet connection only to the LAN ports, or a separate WAP for multi-radio routers. It is not seen as a WAP, nor accepts wireless connections by other client devices.
The primary (host) router is not required to be running DD-WRT firmware. The primary and secondary (DD-WRT Client Mode) routers must be on separate subnets, and NAT is used between them. Thus, when port forwarding is needed it must be configured at both routers — not just on the host router.
A Client Mode router uses its own DHCP server for IP Address, Gateway, and DNS server to connected devices. To have computers connected to both routers (main and secondary) and co-exist in the same subnet, set up DD-WRT as a Client Bridge, Repeater Bridge or use WDS. Further explanation of bridging modes is at Linking Routers.
- If using a multi-band router, do not set more than one band to CB. The other radio(s) would normally be set as AP. For example, the 2.4GHz radio can a CB while the 5GHz is an AP, or vice versa.
[edit] Client (Station) Mode Setup
The secondary client router will be on a different subnet than the primary host router. For example, if the host router IP address is 192.168.1.1, configure the client router to 192.168.2.1.
- These instructions assume a reset router. Broadcom routers: read the Peacock thread
- Connect a cable from your computer to the LAN port on your router.
- (Optional) Set your computer to a static IP address (e.g. 192.168.1.7, subnet 255.255.255.0)
- Connect to the DD-WRT GUI at 192.168.1.1 in a browser
- Set a username and password — if not asked for this, do a proper reset!
- Go to Wireless: these settings must match the primary host router — Check spelling and case!
- In Wireless->Basic Settings and change the Wireless Mode to «Client»
- Set the Wireless Network Name (SSID) to exactly match the primary router. Click Save (notApply)
- If multiple routers broadcast the same SSID, to connect to a specific one (i.e. the primary router, instead of a repeater), enable MAC Filtering on the Wireless Tab, and add the specific device’s MAC Address.
- MAC Address can be found on the «Site Survey» page, linked from the Wireless tab in Status
- Wireless Security: set the Security Mode and other information same as primary router. Click Save (notApply)
- (Optional) If available, in Wireless tab (or under Advanced), set (or disable) the Ack Timing in meters
- Go to Setup->Basic Setup: if needed, change Connection Type to Static IP from «Automatic Configuration — DHCP»
- Static IP allows easier access remote GUI, SSH, or telnet access is enabled under Administration
- If the client router requires external management, go to Setup->Basic Setup, set the WAN port protocol as needed and enter info provided by your ISP. This is the setting that is bonded to the wireless interface.
- In Network Setup set the Local IP Address to a different subnet from the primary host router (e.g. 192.168.2.1)
- Set the Gateway address to the primary host router gateway or internet will not work (e.g. 192.168.1.1)
- The device should be in GATEWAY Advanced Routing mode, not ROUTER, or Masquerade/NAT does not happen.
- (Optional) Set your local DNS to the IP address of your client router
- (Optional) Set Static DNS servers in Network Address Server Settings (DHCP) if not provided or wanted from WAN
- (Recommended) Change the Time Zone and DST settings as needed.
- (Optional) Set a «Server IP/Name» in Time Setting section for NTP (blank uses a default server)
- Click Save (notApply)
- (Optional) In Security->Firewall, disable SPI Firewallif security between AP & Client is not needed
- Click Apply, then change the computer back to auto IP/DNS if needed (replug the LAN cable if not working)
- Let the client router reboot and connect to the host, then configure on the new Client IP address as needed
- If not working, unplug the router for 30sec and retry
[edit] Client Restrictions
To allow internet access but prevent 192.168.1.x clients from seeing each other on br0, use this firewall script (iptables):
iptables -I FORWARD -i br0 -d 192.168.1.0/24 -j DROP
[edit] Troubleshooting
If the preceding instructions do not work, it is usually an encryption or password problem. Disable encryption on the primary router and retry the setup. Using proper encryption and the correct case-sensitive password is key. Do a reset and start over. Note: WPA2-AES (aka CCMP) is required for 802.11N (and newer) devices.