- Sysadminium
- GRUB 2
- Настройка GRUB 2
- Параметры конфигурации
- Своя картинка в меню
- Добавление параметров ядра в меню GRUB 2
- Командная строка GRUB 2
- Меню GRUB 2 с несколькими системами
- Каталог со скриптами (/etc/grub.d/)
- Change the grub boot order in Debian Linux
- Change grub boot order
- Additional settings you can edit from /etc/default/grub
- Conclusion
- About the author
- David Adams
Sysadminium
В этой статье рассмотрим подробнее самый популярный загрузчик для операционных систем Linux, а именно GRUB 2.
GRUB 2
GRUB 2 (GRand Unified Bootloader / большой единый загрузчик) — это кроссплатформенный загрузчик операционных систем.
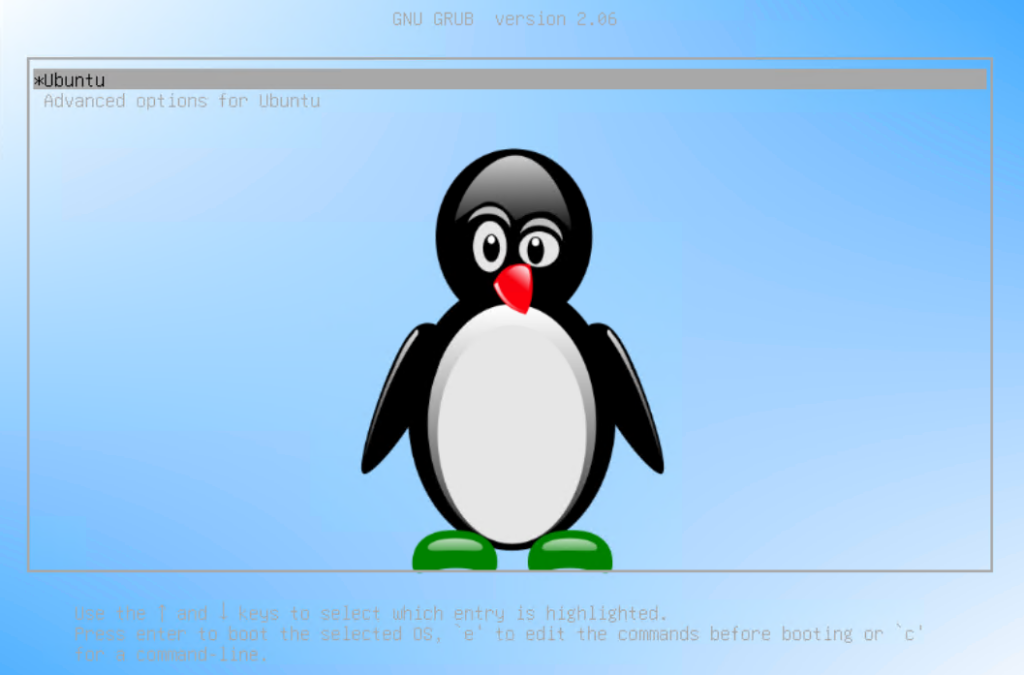
При старте системы, когда запускается GRUB 2 вы видите следующее меню:
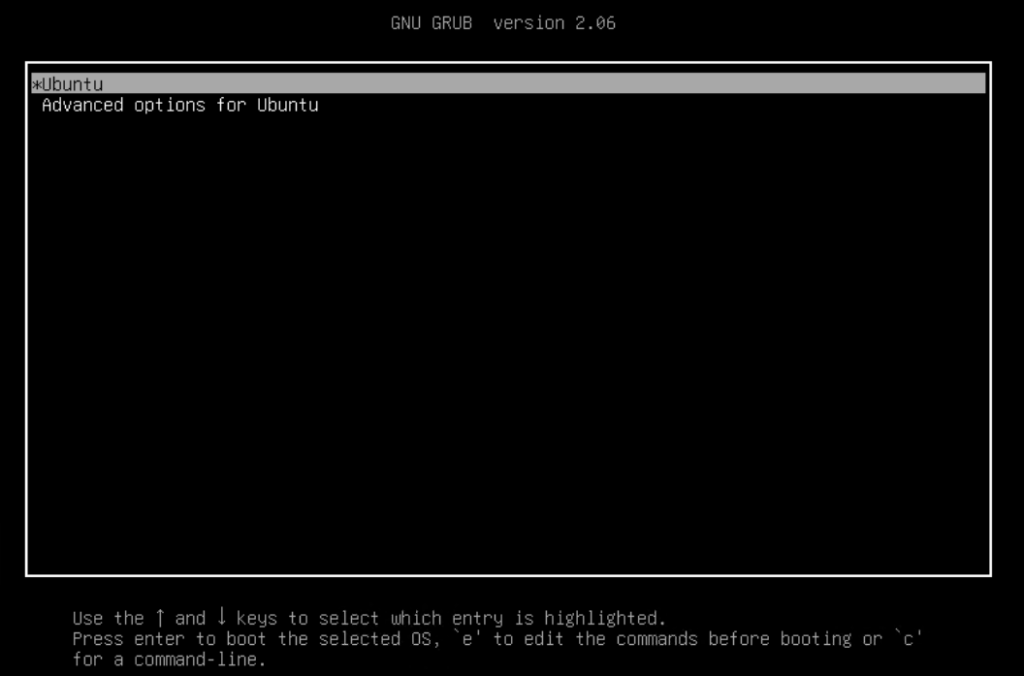
Хотя, по умолчанию в Ubuntu 22.04 вы не увидите это меню, так как система загружается сразу, не показывая его в отличие от Debian 11. А в Debian 11 по умолчанию это меню появляется на 5 секунд.
В обоих системах управление осуществляется следующими клавишами:
- Стрелки «вверх/вниз» — переход по пунктам меню;
- «Enter» — загрузка выбранного пункта;
- «e» — редактирование выбранного пункта;
- «c» — запуск командной строки.
Настройка GRUB 2
При загрузки GRUB 2 читает конфигурационный файл /boot/grub/grub.cfg, но редактировать вручную его не нужно, об этом даже предупреждают в начале этого файла (на английском):
alex@deb-11:~$ head /boot/grub/grub.cfg # # DO NOT EDIT THIS FILE # # It is automatically generated by grub-mkconfig using templates # from /etc/grub.d and settings from /etc/default/grub # ### BEGIN /etc/grub.d/00_header ### if [ -s $prefix/grubenv ]; then set have_grubenv=true
Выше я использовал команду head, чтобы посмотреть первые строки из файла /boot/grub/grub.cfg. А вообще, работать с текстовыми файлами мы научимся чуть позже в этом курсе.
Основной конфигурационный файл, который нужно редактировать для настройки этого загрузчика, это /etc/default/grub.
Для Ubuntu 22.04 и Debian 11 настройки по умолчанию немного отличаются. Ниже я вывожу содержимое файлов без комментариев.
Для Debian 11:
alex@deb:~$ cat /etc/default/grub | grep -v '^#' GRUB_DEFAULT=0 GRUB_TIMEOUT=5 GRUB_DISTRIBUTOR=`lsb_release -i -s 2> /dev/null || echo Debian` GRUB_CMDLINE_LINUX_DEFAULT="quiet" GRUB_CMDLINE_LINUX=""
Для Ubuntu 22.04:
alex@ubu:~$ cat /etc/default/grub | grep -v '^#' GRUB_DEFAULT=0 GRUB_TIMEOUT_STYLE=hidden GRUB_TIMEOUT=0 GRUB_DISTRIBUTOR=`lsb_release -i -s 2> /dev/null || echo Debian` GRUB_CMDLINE_LINUX_DEFAULT="maybe-ubiquity" GRUB_CMDLINE_LINUX=""
Параметры конфигурации
Давайте рассмотрим какими параметрами можно настроить наш загрузчик:
- GRUB_DEFAULT — отвечает за номер строки, которая будет загружена по умолчанию. Отсчет начинается с нуля, то-есть 0 — это первая строчка меню, 1 — это вторая строчка меню и так далее.
- GRUB_TIMEOUT — отвечает за время (в секундах), после истечения которого, если ничего не нажать, загрузится строка под номером указанным в GRUB_DEFAULT. Чтобы меню не появлялось следует указать 0, а чтобы выключить таймер то -1.
- GRUB_TIMEOUT_STYLE — с помощью этого параметра можно скрыть или отобразить меню:
- hidden — меню будет скрыто в течении GRUB_TIMEOUT, а затем начнется загрузка системы;
- menu — меню будет отображаться, тоже самое будет если полностью удалить этот параметр.
- quiet — означает, не выводить сообщения во время загрузки;
- splash — вывести заставку загрузки;
- selinux=0 — выключить selinux;
- rootfstype=ext4 — можем указать тип файловой системы, чтобы он не вычислялся.
- console — отключает графический терминал, при этом меню будет показано в текстовом виде;
- gfxterm — включает графический терминал;
GRUB_INIT_TUNE="1750 523 1 392 1 523 1 659 1 784 1 1047 1 784 1 415 1 523 1 622 1 831 1 622 1 831 1 1046 1 1244 1 1661 1 1244 1 466 1 587 1 698 1 932 1 1195 1 1397 1 1865 1 1397 1"
После изменения настроек GRUB 2 нужно всегда выполнять команду update-grub2 для применения настроек. Но выполнять её нужно с правами администратора, поэтому в Debian переключаемся на root пользователя:
alex@deb:~$ su - Пароль: root@deb:~# update-grub2 Generating grub configuration file . Found linux image: /boot/vmlinuz-5.10.0-13-amd64 Found initrd image: /boot/initrd.img-5.10.0-13-amd64 Found linux image: /boot/vmlinuz-5.10.0-10-amd64 Found initrd image: /boot/initrd.img-5.10.0-10-amd64 done
А в Ubuntu можем это выполнить с помощью команды sudo:
Своя картинка в меню
На задний фон меню загрузки можно поместить какую-нибудь картинку. Для этого нужно положить файл картинки в /boot/grub и выполнить команду update-grub2. Файл должен быть обязательно в формате .png.
Вот пример для Ubuntu с использованием sudo, а в Debian вам нужно будет переключиться на пользователя root:
alex@ubu:~$ sudo cp ./пингвин.png /boot/grub/ alex@ubu:~$ sudo update-grub2 Sourcing file `/etc/default/grub' Sourcing file `/etc/default/grub.d/init-select.cfg' Generating grub configuration file . Found background image: пингвин.png Found linux image: /boot/vmlinuz-5.15.0-30-generic Found initrd image: /boot/initrd.img-5.15.0-30-generic Warning: os-prober will not be executed to detect other bootable partitions. Systems on them will not be added to the GRUB boot configuration. Check GRUB_DISABLE_OS_PROBER documentation entry. done
И после перезагрузки системы увидим нашу картинку (для перезагрузки используйте команду sudo reboot):

Добавление параметров ядра в меню GRUB 2
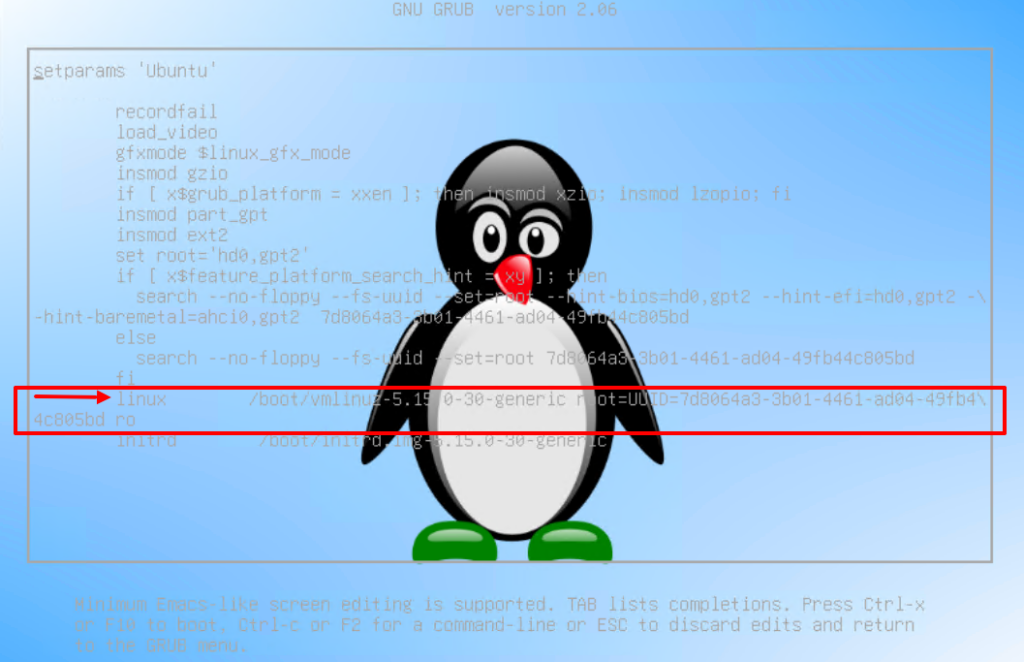
Добавлять параметры ядра можно не только редактируя файл /etc/default/grub, но и в самом меню. Для этого нужно отредактировать выбранный пункт меню нажав клавишу «e», после чего у вас откроется вот такой редактор:

Опции загрузки добавляются в строке начинающейся с linux, это строка выделена на рисунке выше.
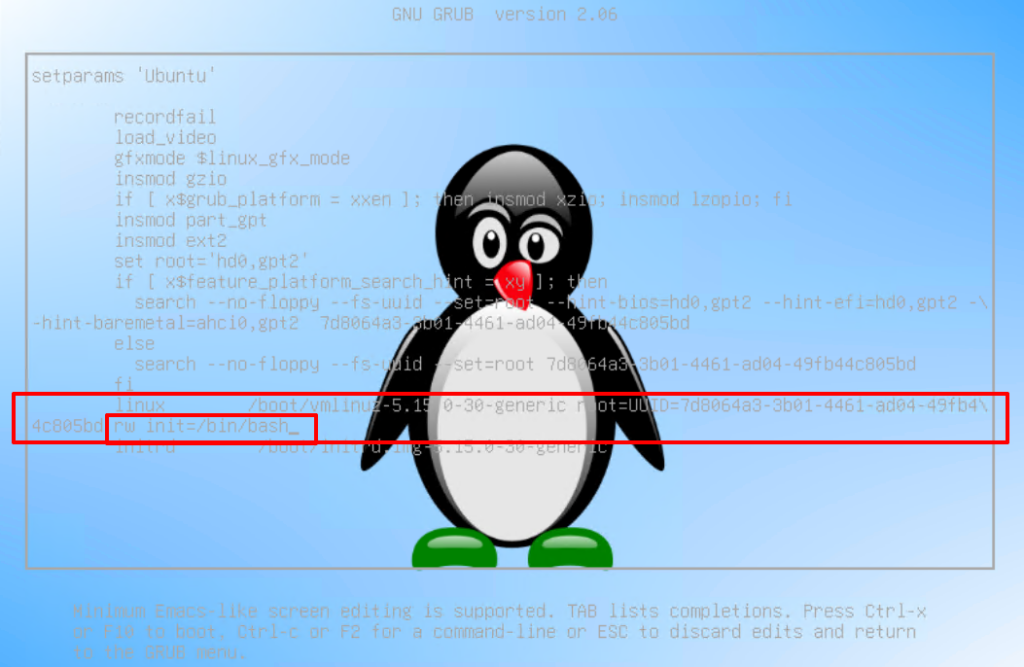
Редактируя здесь параметры ядра можно например сбросить пароль root пользователя в системе. Для этого нужно ro изменить на rw, и дописать init=/bin/bash:

Дальше нажимаем Ctrl+x или F10 для загрузки и попадаем в систему под пользователем root, без ввода пароля.
Осталось только поменять пароль и перезагрузить сервер.
Командная строка GRUB 2
Чтобы попасть в командную строку нажимаем клавишу «c». Рассмотрим пока только две команды:

- ls — позволяет просматривать файлы на файловой системе, а также блочные устройства;
- search — позволяет производить поиск.
- Команда ls без параметров покажет нам список разделов;
- С помощью команды search -f /путь_к_файлу можем найти раздел, на котором лежит определённый файл;
- Если к команде ls добавить раздел ls (hd0,gpt2) , то получим информацию о нём;
- А если после раздела поставить слеш ls (hd0,gpt2)/ , то увидим содержимое этого раздела;
- Ну и в конце концов можем посмотреть содержимое определённого каталога ls (hd0,gpt2)/boot/grub/ ;
- Если вы хотите перезагрузить систему, то выполните reboot .
Меню GRUB 2 с несколькими системами
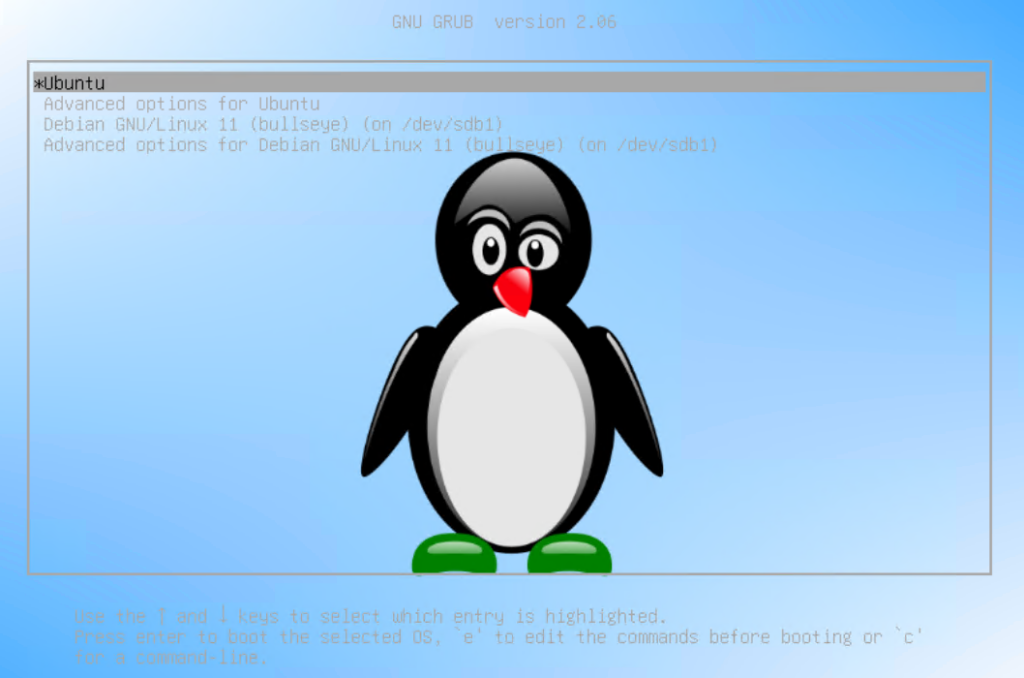
Если на компьютере установлено несколько систем, то меню GRUB 2 выглядит следующим образом:

Как установить 2-е системы на один компьютер и при этом использовать загрузчик GRUB 2 мы разберём в следующей статье.
Каталог со скриптами (/etc/grub.d/)
В каталоге /etc/grub.d/ находятся специальные скрипты написанные на языке сценариев «sh«. Они выполняются при обновлении GRUB 2, то есть когда мы выполняем команду «update-grub2«.
alex@deb:~$ ls /etc/grub.d/ 00_header 05_debian_theme 10_linux 20_linux_xen 30_os-prober 30_uefi-firmware 40_custom 41_custom README
alex@ubu:~$ ls /etc/grub.d/ 00_header 05_debian_theme 10_linux 10_linux_zfs 20_linux_xen 30_os-prober 30_uefi-firmware 35_fwupd 40_custom 41_custom README
Рассмотрим предназначения некоторых из них:
- «10_linux» — отвечает за поиск ядер linux;
- «30_os-prober» — отвечает за поиск других ос;
- «40_custom» — позволяет добавлять свои пункты загрузки.
Change the grub boot order in Debian Linux
This tutorial explains how to change the grub boot order in Debian from the command line in a few easy steps. The steps described in this article are useful for other Debian-based Linux distributions, including Ubuntu.
GRUB is a boot loader that allows users to boot multiple operating systems and kernel configurations. After reading this tutorial, you’ll know how to define a different OS or kernel to boot by default and how to customize some boot options.
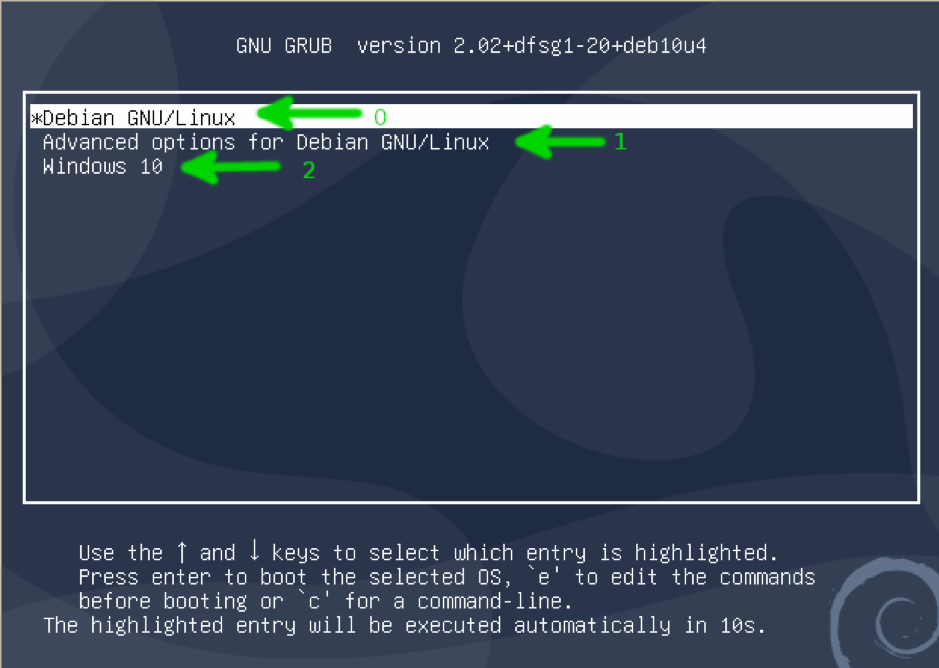
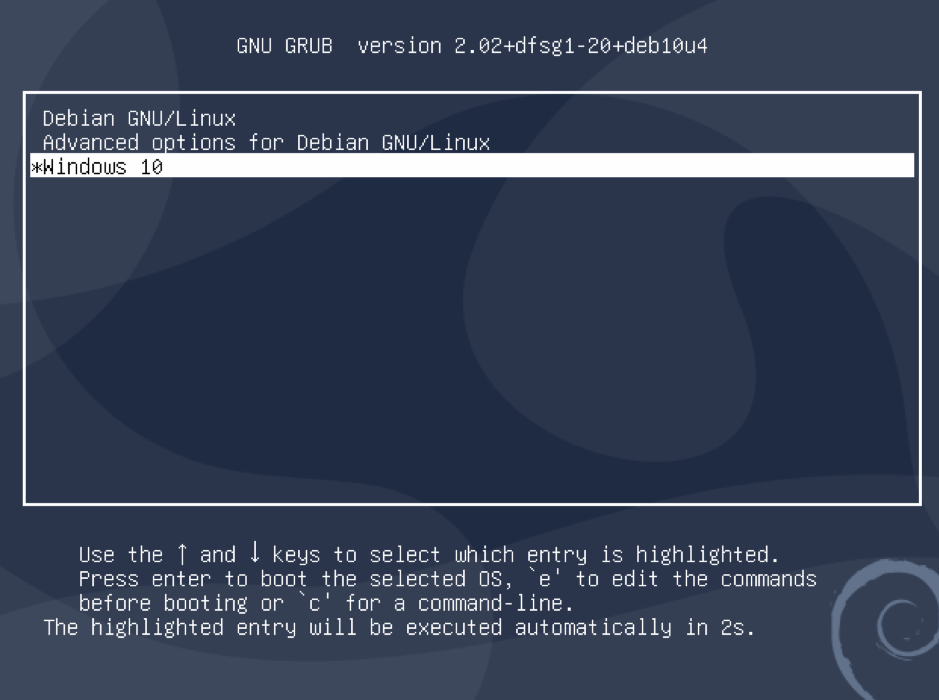
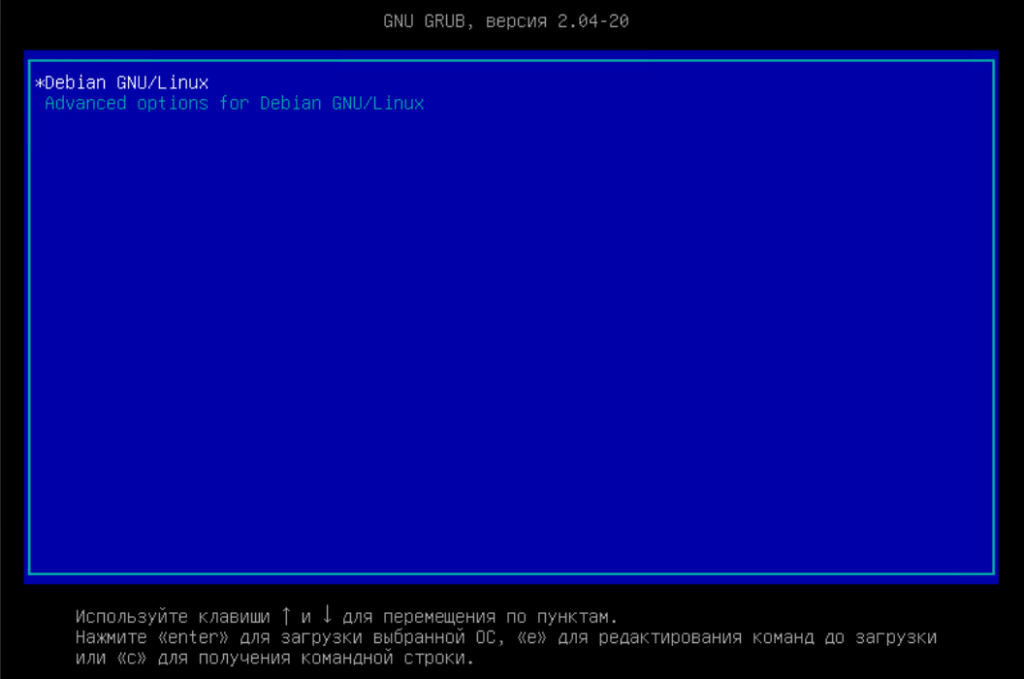
In the image below, you can see a grub menu with 3 items: Debian GNU/Linux, Advanced options for Debian GNU/Linux, and Windows 10. Because the counting starts from zero, the first item (Debian) is 0, the second item (Advanced options) is 1, and the third item (Windows) is 2.
By default, grub will boot item 0. Thus to change the boot order, you need to define the number of items you want to boot by default in the grub configuration file /etc/default/grub.
Change grub boot order
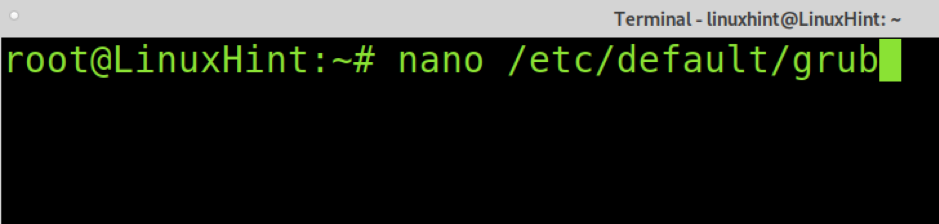
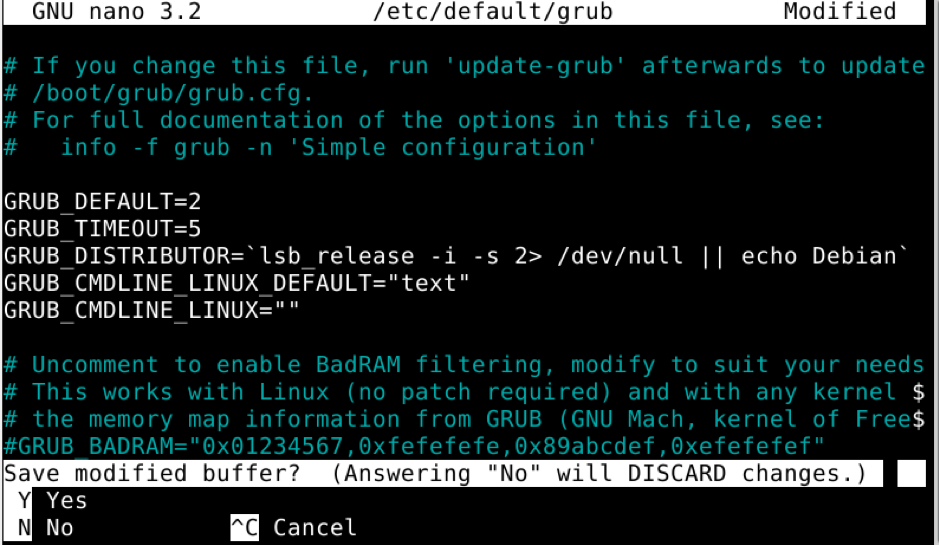
To change the boot order, prioritize a different OS or kernel configuration edit the file /etc/default/grub using any text editor you want. You can edit it using nano, as shown in the example below. Remember, you need superuser privileges to edit the grub configuration file.
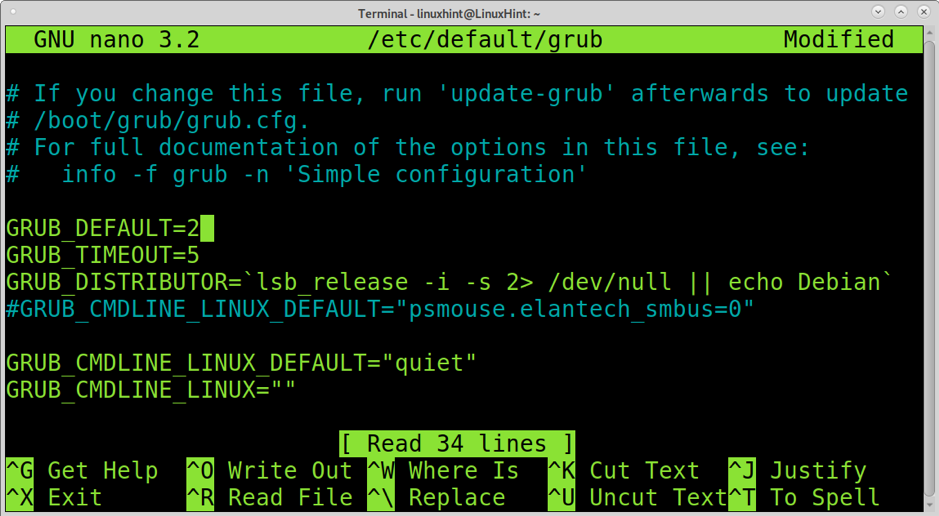
Edit the line replacing 0 by the item number you want to boot by default. In my case, I want to change the default boot to Windows. Thus I set the third item, 2 (because the count starts from 0).
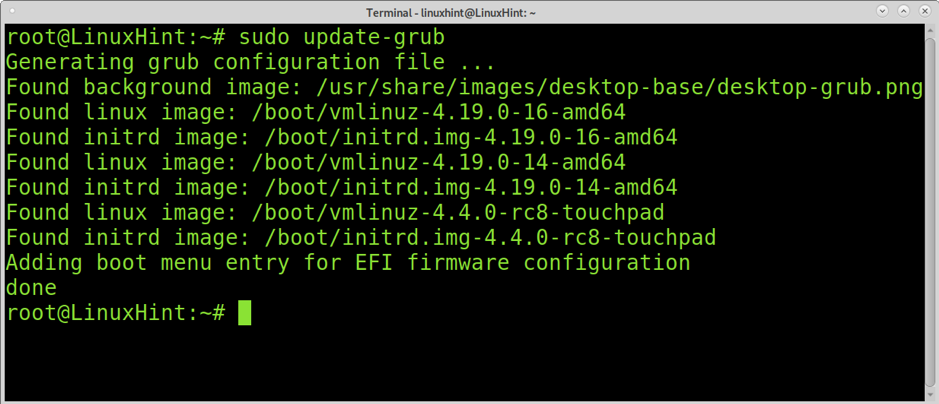
If you are editing the file using nano, exit saving the change by pressing CTRL+X and Y.
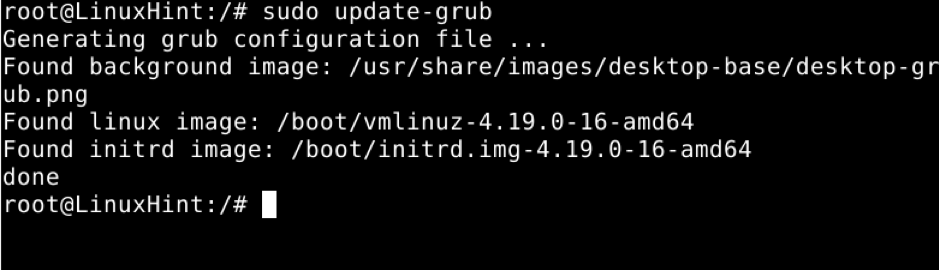
Then update grub by executing sudo update-grub as shown below.
As you can see now, Windows will boot by default.
Additional settings you can edit from /etc/default/grub
You can edit additional settings defined in the /etc/default/grub configuration file.
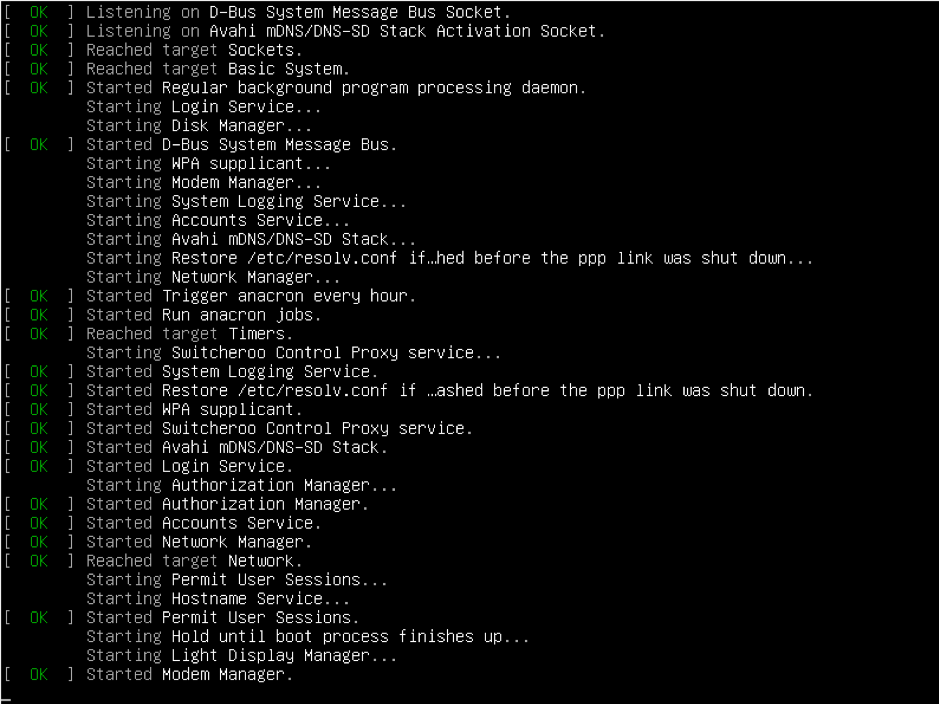
As you can see in the following image, below the line GRUB_DEFAULT=0, there is the line GRUB_TIMEOUT=5. This line defines the time grub will wait until booting automatically. Replace the 5 for the number of seconds you want grub to wait. For example, for grub to wait 10 seconds to boot the GRUB_DEFAULT=0, replace that line with the following line.The line GRUB_CMDLINE_LINUX_DEFAULT=”quiet” is used to pass kernel boot options. In the screenshot above, the option is “quiet”, which means the boot process will be shown in text mode as in the screenshot below.
The quiet option provides additional transparency to the boot process allowing the user to see steps and succeed or fail.
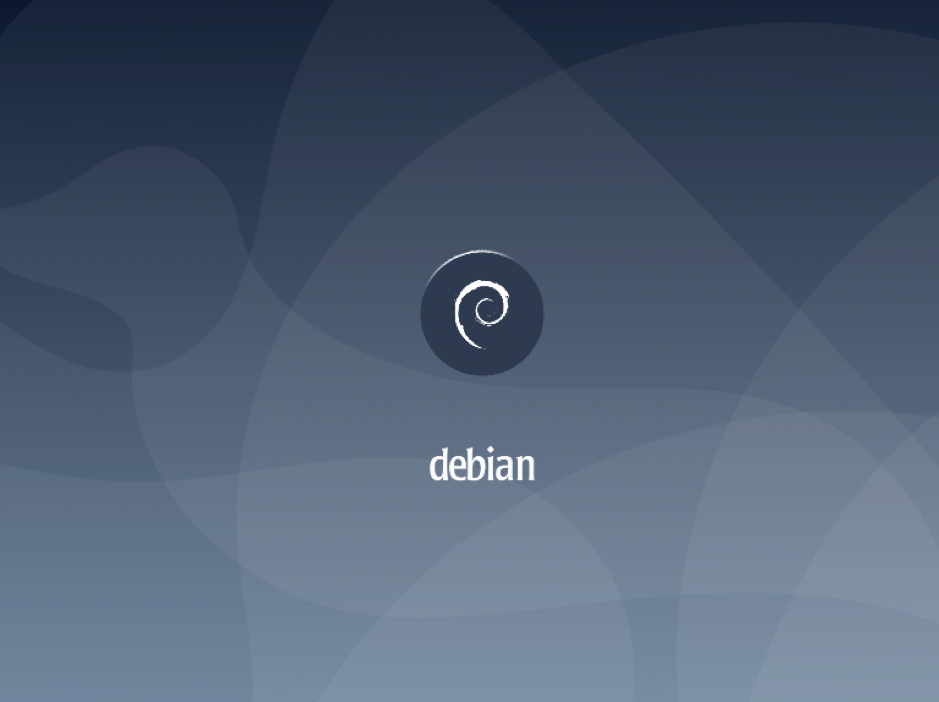
Another option you can pass to the line GRUB_CMDLINE_LINUX_DEFAULT= is the option “splash”. If you replace “quiet” with “splash” like in the line below, the boot process won’t be displayed in text mode; you will see a logo loading instead, as shown in the following image.
Even if some people consider this option a better format (you can customize it), this option doesn’t give users a live view of the boot process.
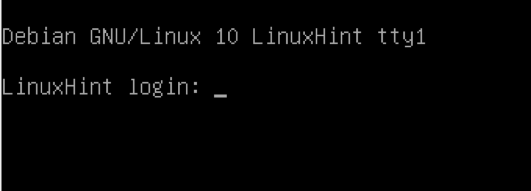
The line GRUB_CMDLINE_LINUX_DEFAULT= can also be used to boot the system in text mode. To boot in text mode, instead of quiet or splash, you need to use the option text as shown in the screenshot below.
Exit saving the change and run:
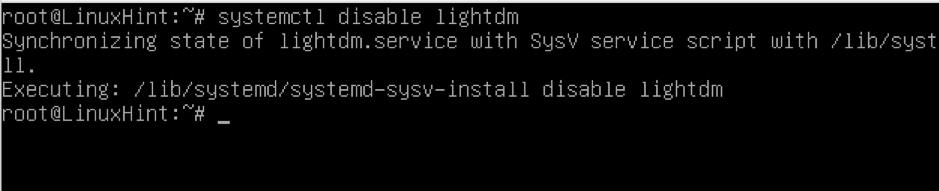
Disable the display manager using systemctl. In my case, my display manager is LightDM. Replace lightdm with your current display manager and run the command below.
Now you can log in in text mode. If you want to launch a graphical session, run:
Where must be replaced by your display manager name (e.g., gdm3).
Conclusion
As you can see, dealing with grub is very easy, and you can control the way your system boots in a few steps any Linux user level can learn. When dealing with it, the most common mistake is not remembering to run update-grub every time the file is edited. Remember, when selecting the boot order, the counting starts from zero; if you type a wrong order number, your system will not boot as expected.
The quiet option at line GRUB_CMDLINE_LINUX_DEFAULT= may be better than splash because it allows the user to see the boot process transparently.
The last section of this tutorial showing how to boot from a terminal or console is useful if your graphical environment fails to prevent you from booting the system. Also, there are associated security bugs to the graphical boot process; that’s why some users prefer to boot their systems in text mode. This would be the proper configuration for servers or devices which need to save or optimize resources. Once logged in text mode, users can start X manually with commands startx or systemctl.
I hope this tutorial was useful. Keep following Linux Hint for more Linux tips and tutorials.
About the author
David Adams
David Adams is a System Admin and writer that is focused on open source technologies, security software, and computer systems.