- How to deny a specific user access to an application?
- Access.conf Security Configuration For Linux and Unix
- Syntax
- Allow Rule
- Deny Rule
- Allow Only Root Access
- Specify Allowed User
- Specify Allowed Group
- Specify Allowed Hosts
- Specify Allowed Network
- Deny Only Root Access
- Specify Denied User
- Specify Allowed Group
- Specify Denied Hosts
- Specify Denied Network
- Exception Definition
- Deny All
- Можно ли разрешить или запретить доступ по SSH определенному пользователю или группе?
- 1. Разрешить SSH-доступ пользователю или группе
- 2. Запретить доступ по SSH пользователю или группе
- 3. Отключить вход в систему через SSH-root
How to deny a specific user access to an application?
For the purpose of this question let’s attempt to deny user n the ability to play The Battle for Wesnoth (while still allowing users m and p to do so). One obvious way to try to do this is to set permissions of relevant files ( /usr/games/wesnoth* and the directory /usr/share/games/wesnoth ) so that user n can neither execute them nor read them, while other users can. As of now, the permissions of these files seem to be set as follows:
$ ls -l /usr/games/wesnoth-1.12 -rwxr-xr-x 1 root root 18325576 May 22 2016 /usr/games/wesnoth-1.12 Well, I’d suppose changing the ownership from user root to someone else wouldn’t be a good idea, so it’d seem I’ll have to mess with the group ownership instead… I have basically two ideas: ‘Blacklisting’: Give the game’s files group noplay , and prohibit anyone with group noplay from using them:
sudo addgroup noplay sudo adduser n noplay sudo chown :noplay /usr/games/wesnoth* /usr/share/games/wesnoth sudo chmod g-rx /usr/games/wesnoth* /usr/share/games/wesnoth ‘Whitelisting’: Give the game’s file group play , and prohibit others from using using them:
sudo addgroup play sudo adduser m play sudo adduser p play sudo chown :play /usr/games/wesnoth* /usr/share/games/wesnoth sudo chmod o-rx /usr/games/wesnoth* /urs/share/games/wesnoth Is any of the above a good idea? Won’t changing the files’ group ownership from root to anything else make things awkward in the future? What if the game gets updated by the package manager – will it fail because of screwed permissions, or will it reset the permissions back to original, thus allowing all users to play the game? If this matters, it’s Linux Mint here.
Access.conf Security Configuration For Linux and Unix

access.conf is the configuration file used to logins to the Linux or Unix systems. This file is locate at /etc/security/ path. With this file logins of users, groups, hosts, tty, network are defined to allows or disallowed status. Each line specifies a rule.
Syntax
permission:users/groups:origins
Show Services Using Access.conf
Allow Rule
As we stated before each line is a rule. The aim of the rules are allowing or denying access with related parameters. Allow rule is sign is + . Each line starting with + means allow. After the sign there is : to delimit rule parameters. In the example we allow some access for the root user.
+ : root : 192.168.200.1 192.168.200.4 192.168.200.9
Deny Rule
Deny rule is used to deny access with specified parameters. Deny rules tarts with — sign and delimited with : from the rule parameters. Following example rules denies access for the root account.
Allow Only Root Access
There are different type of access restrictions. One of them is only allowing root user to access to the server. In this rule root user can access from everywhere to the system.
Specify Allowed User
We can specify the user account which can access to the server. We will give the user ismail access right to the server from everywhere.
Specify Allowed Group
While specifying access for the user name if there area lot of users those can access to the server can be a problem for definition and management. Acess.conf supports Linux user groups. These groups can be used to give access to the server. We assume we have a group named remoteacess and this group members can access to the server from anywhere.
Specify Allowed Hosts
Another useful option is setting hosts those can be connect to the system. Host names or IP addresses can be specified like below. In the example we only allow IP address 192.168.200.1 to connect to the system.
Specify Allowed Network
Specifying IP ranges one by one is daunting task. We can use network and netmask specification do define networks to allow access. In the following example we allow root user access from network 10.0.0.0/24 or 10.0.0.0-255 with 10.0.0. expression.
Deny Only Root Access
Previous examples we have looked how to allow some users, groups, IP addresses and networks to the system. But security comes from deny operation. Up to new we will look how to deny users with specified parameter to access to the system. In this example user root can not access system remotely from anywhere.
Specify Denied User
We can specify user to deny access to the system. In this example user ismail can not access to the system from anywhere.
Specify Allowed Group
As shown previous examples a Linux user group can be defined fo deny access to the system. In the example we will deny access for students group from anywhere.
Specify Denied Hosts
We can specify hosts to deny access to the system. We will use same syntax like allow rule but change the rule sign with — . In the example we deny access from 192.168.200.1 to the system.
Specify Denied Network
We can specify denied network with — sign, username and the network address. In the example we will deny 10.0.0.0/24 from accessing with root user to the system.
Exception Definition
Up to now we have specified and defined the users , host names, groups and networks. We have the ability to except these. In the example we allow all users access to the system except root . We can also specify group names to except.
Deny All
The readers who worked with firewalls knows the golden rule. After specifying different access rules the best practice is defining last rule as DENY ALL . This will make system very secure. This simply imply that I only allow those connections I defined and deny all others. Put this rule to the end of the rules in access.conf file.
Можно ли разрешить или запретить доступ по SSH определенному пользователю или группе?
Это краткое руководство проведет вас через шаги, чтобы разрешить или запретить SSH-доступ определенному пользователю или группе в Linux. Оно будет полезно, если вы хотите разрешить конкретному пользователю выполнять только определенный набор команд. В этой статье мы собираемся включить или отключить доступ по SSH для пользователя или группы, внеся несколько изменений в файл конфигурации SSH по умолчанию.
В конфигурационном файле openSSH по умолчанию есть две директивы для разрешения и запрета доступа по SSH определенным пользователям или группе. Во-первых, давайте посмотрим, как разрешить или включить SSH-доступ для пользователя и группы. Обратите внимание, что все приведенные ниже команды должны запускаться от имени пользователя root или sudo.
1. Разрешить SSH-доступ пользователю или группе
Чтобы разрешить доступ по SSH для определенного пользователя, например sk, отредактируйте файл sshd_config:
$ sudo vi /etc/ssh/sshd_config
Нажмите «i», чтобы войти в режим вставки и добавить или изменить следующую строку:
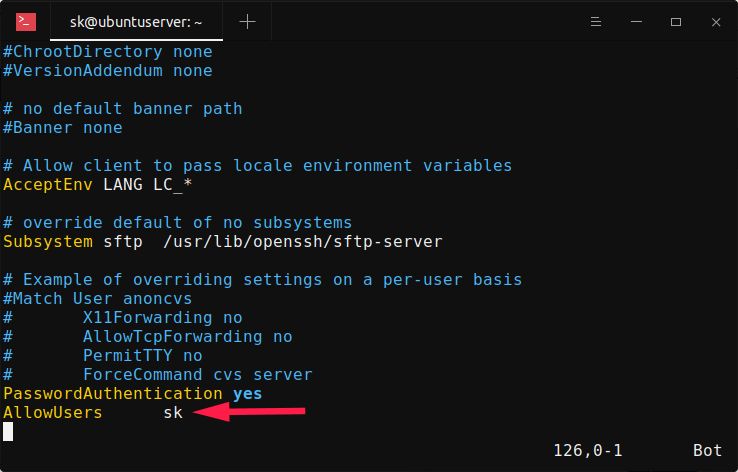
Замените «sk» своим именем пользователя. Обратите внимание на отступы между «AllowUsers» и «sk». Вы должны использовать Tab вместо пробела. Значение — добавьте слово «AllowUsers» и нажмите клавишу Tab, а затем укажите имя пользователя.
Вы также можете указать более одного пользователя, как показано ниже.
Чтобы разрешить всю группу, например, root , добавьте/отредактируйте следующую строку:
Этот параметр позволит всем членам «корневой» группы подключаться к серверу Linux по ssh.
Нажмите клавишу ESC, чтобы выйти из режима вставки, и введите : wq, чтобы сохранить и выйти из файла конфигурации SSH. Перезапустите службу SSH, чтобы изменения вступили в силу.
$ sudo systemctl restart sshd
Теперь пользователю sk и всем членам «корневой» группы разрешено подключаться к вашему Linux-серверу по ssh. Остальные пользователи (кроме sk и членов группы «root») не имеют доступа к системе через ssh.
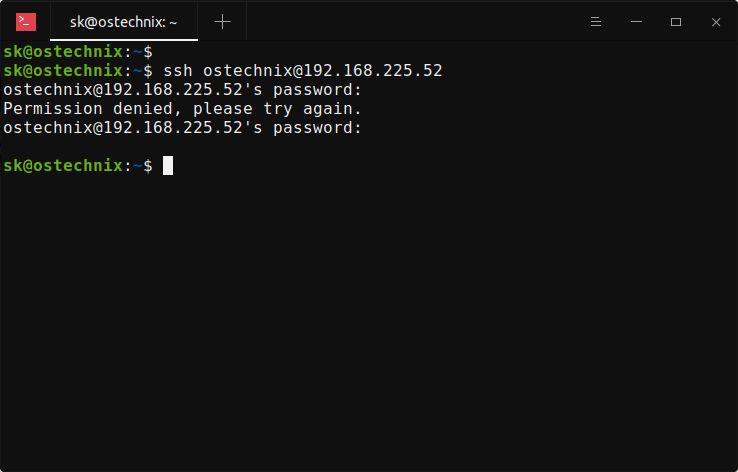
Чтобы проверить это, попробуйте подключиться к серверу Linux по ssh от имени любого из запрещенных пользователей:
Вы получите следующее сообщение об ошибке:
ostechnix@192.168.225.52's password: Permission denied, please try again.
2. Запретить доступ по SSH пользователю или группе
Чтобы отключить или запретить доступ по SSH для пользователя или группы, вам необходимо добавить/изменить следующие директивы в файле sshd_config вашего удаленного сервера.
Чтобы запретить доступ по SSH конкретному пользователю с именем «sk», отредактируйте файл sshd_config:
$ sudo vi /etc/ssh/sshd_config
Добавьте/отредактируйте следующую строку в файле sshd_config.
Убедитесь, что отступы правильные. Не используйте клавишу пробела. Нажмите клавишу Tab и добавьте имя пользователя.
Аналогичным образом, чтобы запретить доступ по SSH нескольким пользователям, укажите имена пользователей через пробел, как показано ниже.
Аналогичным образом, чтобы запретить доступ по SSH для всей группы, например root , добавьте:
Сохраните и выйдите из файла конфигурации ssh. Перезапустите службу ssh, чтобы изменения вступили в силу.
$ sudo systemctl restart sshd
Теперь попробуйте ssh на свой Linux-компьютер из заблокированной учетной записи пользователя, например sk:
Вы получите следующее сообщение:
sk@192.168.225.52's password: Permission denied, please try again. sk@192.168.225.52's password:
3. Отключить вход в систему через SSH-root
Доступ с root-доступом по ssh считается плохой практикой с точки зрения безопасности . Поэтому настоятельно рекомендуется отключить вход в систему SSH Root для защиты вашей системы.
Чтобы отключить вход в систему root ssh, отредактируйте файл sshd_config:
$ sudo vi /etc/ssh/sshd_config
Найдите следующую строку, раскомментируйте ее и установите значение no .
Перезапустите службу SSH, чтобы изменения вступили в силу немедленно:
$ sudo systemctl restart sshd
Теперь вы знаете, как предоставлять и ограничивать доступ по SSH для определенных пользователей или групп в Linux. Вы также узнали, как запретить или отключить вход root по SSH в Linux. Это одна из рекомендуемых мер безопасности, которую должен применять каждый администратор Linux при настройке сервера Linux.
Насколько публикация полезна?
Нажмите на звезду, чтобы оценить!
Средняя оценка / 5. Количество оценок:
Оценок пока нет. Поставьте оценку первым.