- Dynamic Host Configuration Protocol (DHCP)
- Installation
- Configuration
- Start and stop service
- dhcp3-server and multiple interfaces
- Установка и базовая настройка DHCP сервера на Ubuntu
- Установка и настройка
- Возможные проблемы
- Not configured to listen on any interfaces!
- Читайте также
- How to configure the Ubuntu DHCP client
- DHCP client configuration on Ubuntu
- Configure DHCP through netplan
- Configure DHCP client through Ubuntu desktop environment
- Conclusion
- About the author
- Samreena Aslam
Dynamic Host Configuration Protocol (DHCP)
The Dynamic Host Configuration Protocol (DHCP) is a network service that enables host computers to be automatically assigned settings from a server as opposed to manually configuring each network host. Computers configured to be DHCP clients have no control over the settings they receive from the DHCP server, and the configuration is transparent to the computer’s user.
note: this package was called dhcp3-server in versions prior to precise 12.04 LTS.
Installation
At a terminal prompt, enter the following command to install dhcpd:
sudo apt-get install isc-dhcp-server
You will probably need to change the default configuration by editing /etc/dhcp3/dhcpd.conf to suit your needs and particular configuration.
You also need to edit /etc/default/isc-dhcp-server to specify the interfaces dhcpd should listen to. By default it listens to eth0.
Also, you have to assign a static ip to the interface that you will use for dhcp. If you will use eth0 for providing addresses in the 192.168.1.x subnet then you should assign for instance ip 192.168.1.1 to the eth0 interface using NetworkManager. Without this step you will get an error from dhcpd when starting the service.
Configuration
The error message the installation ends with might be a little confusing, but the following steps will help you configure the service:
Most commonly, what you want to do is assign an IP address randomly. This can be done with settings as follows:
# Sample /etc/dhcpd.conf # (add your comments here) default-lease-time 600; max-lease-time 7200; option subnet-mask 255.255.255.0; option broadcast-address 192.168.1.255; option routers 192.168.1.254; option domain-name-servers 192.168.1.1, 192.168.1.2; option domain-name "mydomain.example"; subnet 192.168.1.0 netmask 255.255.255.0 range 192.168.1.10 192.168.1.100; range 192.168.1.150 192.168.1.200; >
This will result in the DHCP server giving a client an IP address from the range 192.168.1.10-192.168.1.100 or 192.168.1.150-192.168.1.200. It will lease an IP address for 600 seconds if the client doesn’t ask for a specific time frame. Otherwise the maximum (allowed) lease will be 7200 seconds. The server will also «advise» the client that it should use 255.255.255.0 as its subnet mask, 192.168.1.255 as its broadcast address, 192.168.1.254 as the router/gateway and 192.168.1.1 and 192.168.1.2 as its DNS servers.
If you need to specify a WINS server for your Windows clients, you will need to include the netbios-name-servers option, e.g.
option netbios-name-servers 192.168.1.1;
Start and stop service
sudo service isc-dhcp-server restart sudo service isc-dhcp-server start sudo service isc-dhcp-server stop
dhcp3-server and multiple interfaces
Установка и базовая настройка DHCP сервера на Ubuntu

Опубликовано: 12.03.2023
Установка и настройка
Сервер DHCP в Ubuntu может быть реализован с помощью пакета isc-dhcp-server. Его можно установить из стандартных репозиториев системы. Выполняем обновления кэша пакетов и установку:
subnet 192.168.0.0 netmask 255.255.255.0 <
range 192.168.0.100 192.168.0.200;
option domain-name-servers 192.168.0.10, 192.168.0.11;
option domain-name «dmosk.local»;
option routers 192.168.0.1;
option broadcast-address 192.168.0.255;
default-lease-time 600;
max-lease-time 7200;
>
- subnet — сеть, для которой будет работать данная группа настроек.
- range — диапазон, из которого будут браться IP-адреса.
- option domain-name-servers — через запятую перечисленные DNS-сервера.
- option domain-name — суффикс доменного имени.
- option routers — шлюз по умолчанию.
- option broadcast-address — адрес сети для широковещательных запросов.
- default-lease-time и max-lease-time — время и максимальное время в секундах, на которое клиент получит адрес, по его истечению будет выполнено продление срока.
Проверить корректность конфигурационного файла можно командой:
dhcpd -t -cf /etc/dhcp/dhcpd.conf
Разрешаем автозапуск сервиса:
systemctl enable isc-dhcp-server
systemctl restart isc-dhcp-server
Добавляем правило в firewall:
iptables -I INPUT -p udp —dport 67 -j ACCEPT
Возможные проблемы
Not configured to listen on any interfaces!
Сервис dhcp не запускается, а в логе можно увидеть ошибки, на подобие:
No subnet declaration for ens18 (192.168.1.10).
.
** Ignoring requests on ens18. If this is not what
you want, please write a subnet declaration
in your dhcpd.conf file for the network segment
to which interface ens18 is attached. **
.
Not configured to listen on any interfaces
Причина: в конфигурационном файле описана подсеть, которая не настроена ни на одном из сетевых интерфейсов сервера.
Решение: конфигурация subnet должна включать только те подсети, в которых настроен сам сервер DHCP. Посмотреть сетевые настройки можно командой:
После чего необходимо проверить настройки в конфигурационном файле сервера dhcp.
Читайте также
Другие инструкции, связанные с DHCP:
How to configure the Ubuntu DHCP client
![]()
Dynamic Host Configuration Protocol, abbreviated as DHCP, is a client-server protocol that enables a DHCP server to assign an IP address and other related configuration parameters such as default gateway and subnet mask to a DHCP client on a network.
The DHCP protocol is necessary because it prevents network or system administrators from manually configuring IP addresses for new machines added to the network or computer system that are moved from one subnet to another.
Through the ’lease’, the DHCP server allocates the IP addresses to the DHCP clients. The lease time depends on how long the client system requires the connection or DHCP configuration.
We will talk about the configuration of a DHCP client on Ubuntu Linux distribution in this article. We have assumed in this article that the DHCP server is already set up on your other machine, or you can also install it from this URL.
DHCP client configuration on Ubuntu
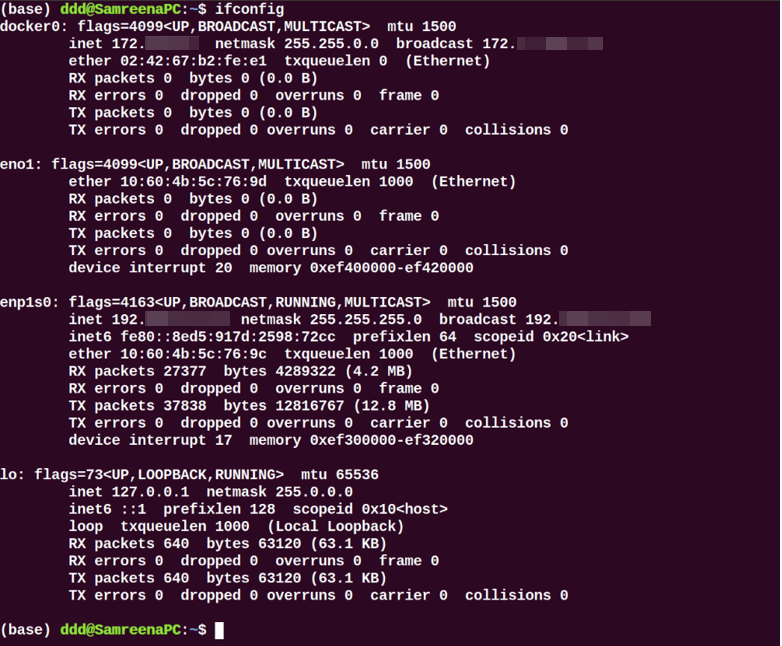
To set up the DHCP client on your Ubuntu system, first, check the network interface name by running the following command:
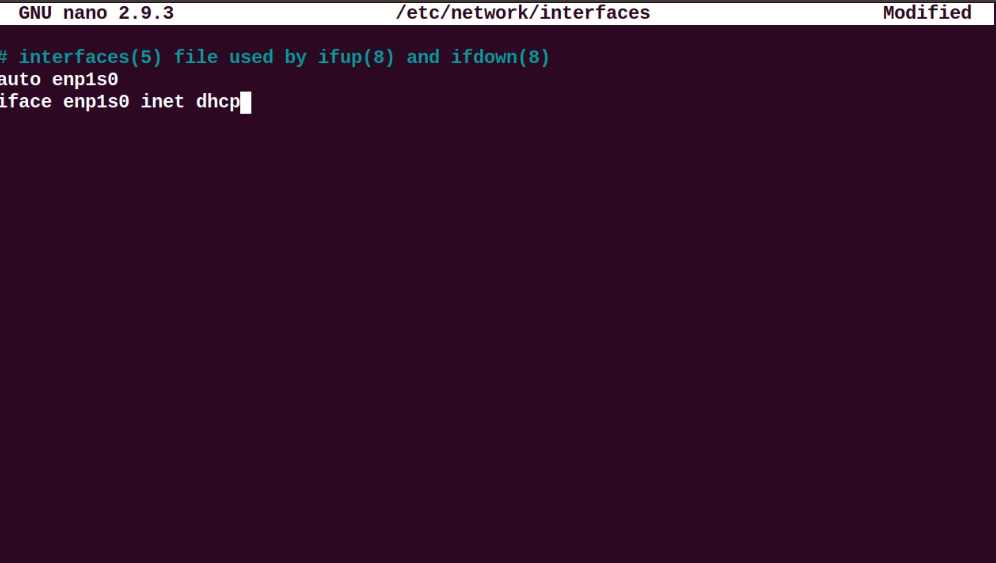
Once the network interface name is identified, you need to make some changes to the network interfaces file for DHCP client configuration. So, open the ‘/etc/network/interfaces’ file in your favorite text editor by using the following command:
Now, use the following syntax to configure the dhcp client:
Here, the network interface name is ‘enp1s0’; we have changed the above lines into the following format:
Save and close the above configuration file. Now, restart the network manager services by running the following command:

Verify the NetworkManager service running status by executing the following command:
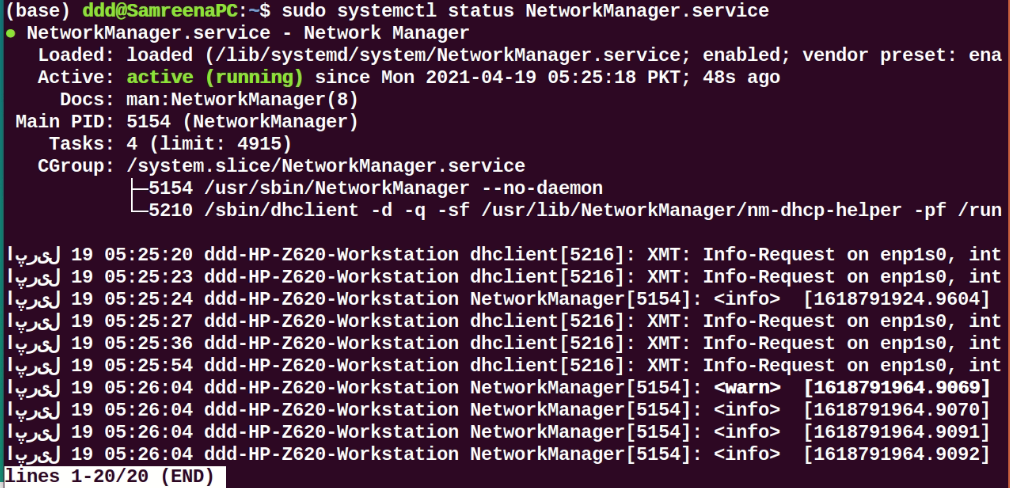
When during the booting process, this system should request network parameters from the DHCP server.
To manually execute the DHCP process, the dhclient command can be used. If the DHCP server assigns no IP to the DHCP client, then use the following command renew or release the IP address. Wait for a while; the DHCP server will automatically assign IP addresses to the client machine.
Using the ‘ifconfig’ command can view the interface name.
Configure DHCP through netplan
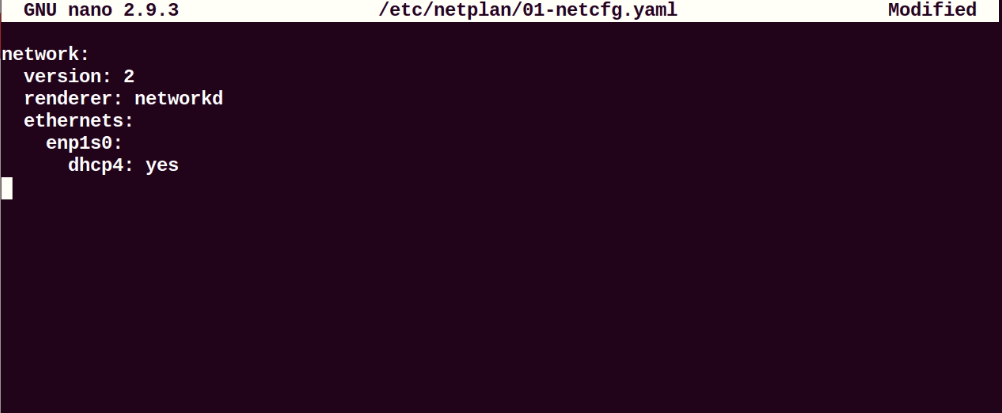
In most Ubuntu distribution, networking is controlled or managed through the netplan program. Therefore, in this situation, you need to edit the netplan configuration files. To edit the appropriate file configuration, navigate into the ‘/etc/netplan’ directory and open that file.

Add the following lines in this file:
Save the above configuration by using ‘Ctrl+O’ in this file and exit from this window by pressing ‘Ctrl+x’.
Now, run the below-mentioned command to apply changes:
Configure DHCP client through Ubuntu desktop environment
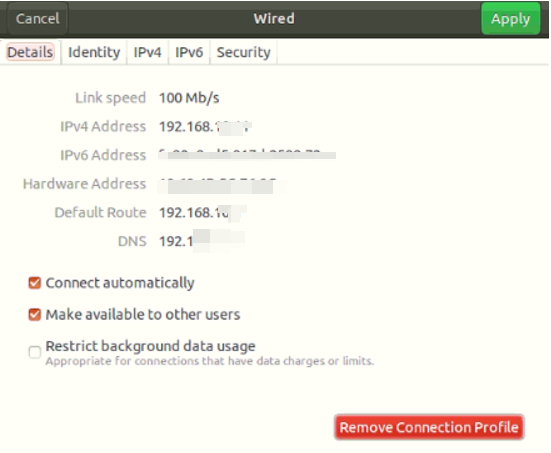
You can also use another virtual machine with Ubuntu 20.04 Desktop as a DHCP client. In Ubuntu, the default configuration method is set as DHCP. If it does not take an IP director from the DHCP server, change the IPV4 setting of your network. Click go into the ‘Setting’ and move into the network wired or wireless settings. The following window should display on your system:

Set your entire IPV4 configuration similar to the above-displayed screenshot.
Now, show the network details by clicking on the ‘Detail’ tab as follows:
Verify the configuration by running the following command:
You will see that the IP is allocated to the network interface.
You can also use the host machine on your system as a DHCP client. However, to get IP, do not reboot your host machine because, in this case, Virtualbox will be powered down, so there is no DHCP running on the system.
It is important to note that if you are using mobile devices or host machines as a DHCP client, most of the chances are that they have already been connected to this network. However, they will request the same IP to the DHCP server that was allocated before. However, if the IP does not fall in your defined range then, a request will be sent to the router.
Conclusion
We have seen in this article how to configure a DHCP client using different ways on Ubuntu distribution. All commands we have implemented on the Ubuntu 20.04 environment. DHCP client configuration is very simple. So that, in just a few minutes, you can easily set up a DHCP client on your system using the above-mentioned steps.
About the author
Samreena Aslam
Samreena Aslam holds a master’s degree in Software Engineering. Currently, she’s working as a Freelancer & Technical writer. She’s a Linux enthusiast and has written various articles on Computer programming, different Linux flavors including Ubuntu, Debian, CentOS, and Mint.