- How to Configure DHCP Server on Ubuntu 22.04 Step-by-Step
- Prerequisites
- 1 ) Update Package Index
- 2) Install DHCP Server and its dependencies
- 3) Configure DHCP Server
- 4) Configure DHCP Client
- Linux DHCP Server Configuration
- Dynamic Host Configuration Protocol (DHCP)
- Installation
- Configuration
- Start and stop service
- dhcp3-server and multiple interfaces
How to Configure DHCP Server on Ubuntu 22.04 Step-by-Step
Hello techies, in this post we will show you how to configure DHCP server on Ubuntu 22.04 LTS step-by-step.
DHCP stands for Dynamic Host Configuration Protocol, it works on client-server architecture. DHCP server assign IPv4 and IPv6 automatically to clients (computers) on the network. DHCP Server offers a lease of IP address to client, if the clients request IP address and DHCP acknowledge it then client will get IP address for the lease time. If the lease time expires and clients wants to use the same IP address, then it must request IP address to DHCP server again.
Prerequisites
- Pre-Installed Ubuntu 22.04 LTS
- Sudo User with admin rights
- Internet Connectivity or locally configured Repository
- Two Ethernet Cards (1st for access management & 2nd will used for DHCP server)
I am using two VMs for Lab setup. 1st VM is Ubuntu 22.04 which will configured as DHCP server and 2nd VM is RHEL 9, which will work as client and will get IP address from DHCP server automatically.
Ubuntu 22.04 LTS has two Lan cards (NICs)
- enp0s3 (192.168.1.204) – It will used for access management and internet connectivity
- enp0s8 (192.168.56.4)– It will be used for DHCP, we will expose the DHCP subnet on this interface.
RHEL 9 VM has one NIC enp0s3 which will request for DHCP IP address. This NIC should be mapped to DHCP subnet VLAN.
Without any further delay, let’s jump into the installation steps.
1 ) Update Package Index
Login to Ubuntu 22.04 system and run beneath apt command to update package index
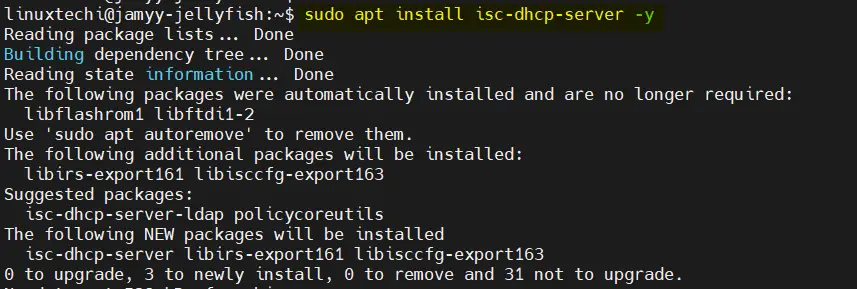
2) Install DHCP Server and its dependencies
Run following apt command to install DHCP server and its dependent packages.
$ sudo apt install isc-dhcp-server -y
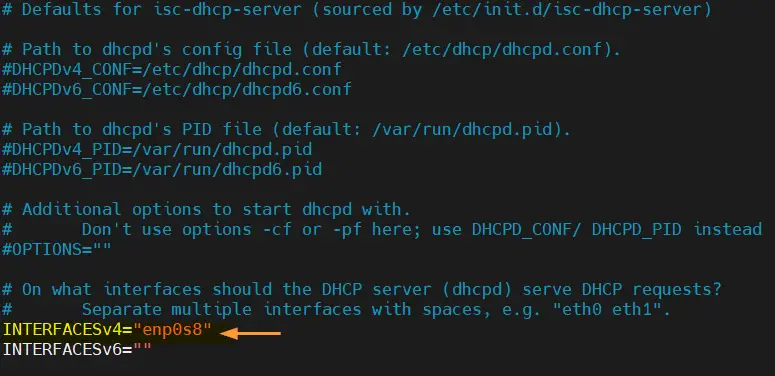
3) Configure DHCP Server
Edit /etc/default/isc-dhcp-server file and mention the interface on which DHCP would be running. In my case it is enp0s8
$ sudo vi /etc/default/isc-dhcp-server ---- INTERFACESv4="enp0s8" ----
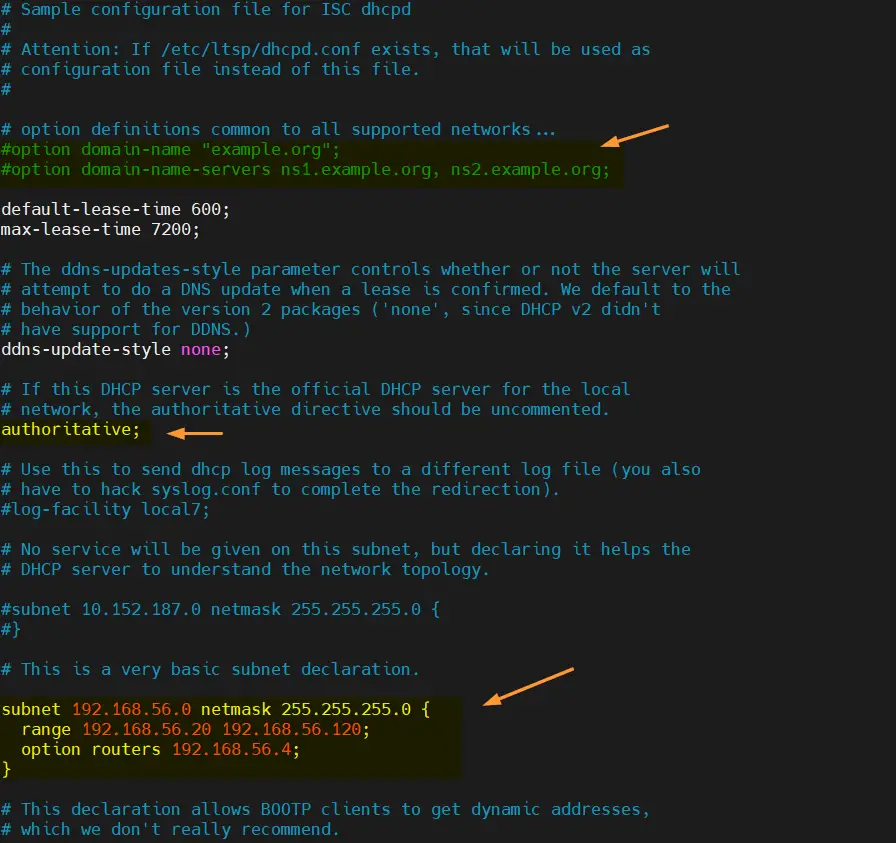
Now, edit main dhcp configuration file “ /etc/dhcp/dhcpd.conf ” and uncomment & set the following parameters,
Comment out the domain name server parameters as we are not using any DNS server,
#option domain-name "example.org"; #option domain-name-servers ns1.example.org, ns2.example.org;
Add the subnet and IP address range to be used for DHCP Server. Also specify the ip address of enp0s8 interface as routers.
subnet 192.168.56.0 netmask 255.255.255.0
Start and enable dhcp server service using following commands,
$ sudo systemctl start isc-dhcp-server $ sudo systemctl enable isc-dhcp-server
Verify dhcp server service status, run
$ sudo systemctl status isc-dhcp-server
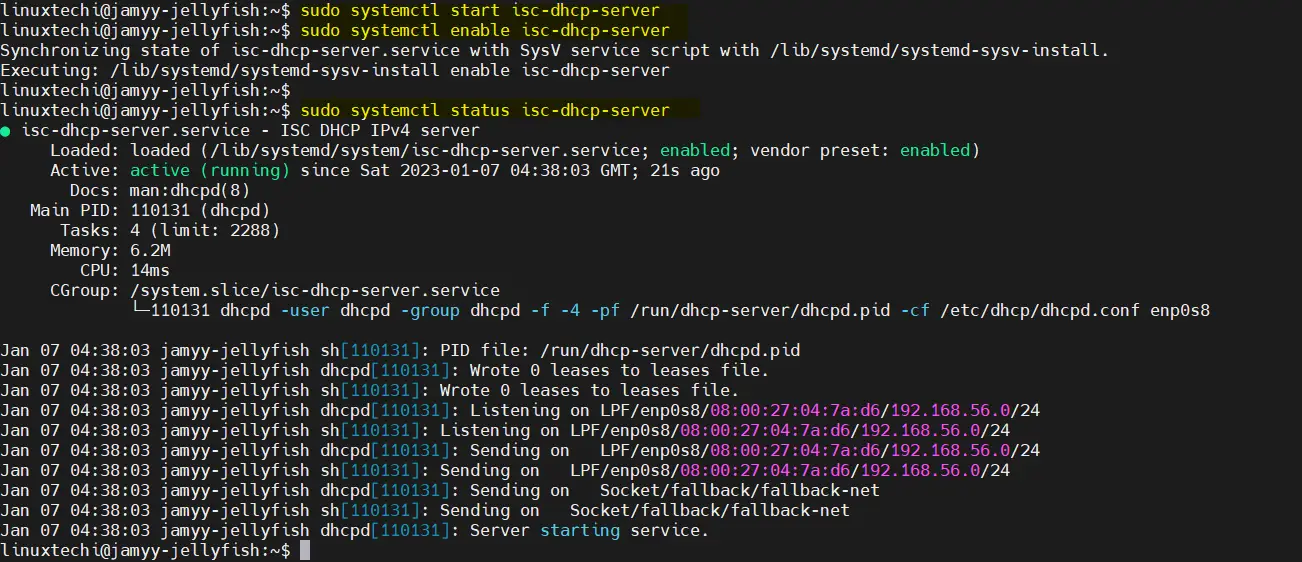
Output above confirms that DHCP server service is up and running. Now, it’s time to configure client so that it can get IP address from this DHCP server automatically.
4) Configure DHCP Client
In our case, our DHCP client is a RHEL 9 machine, So login to it and configure interface enp0s3 so that it requests for DHCP IP over network.
Edit enp0s3 interface and set IPv4 Configuration as “ Automatic ”
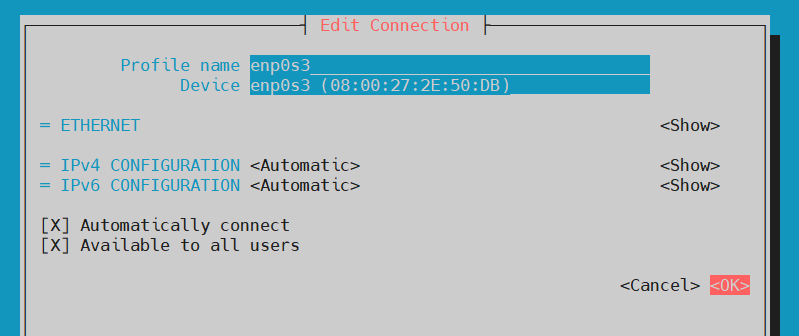
Click OK and then deactivate and activate the connection to make the changes into effect.
Verify the IP address, run below ip command

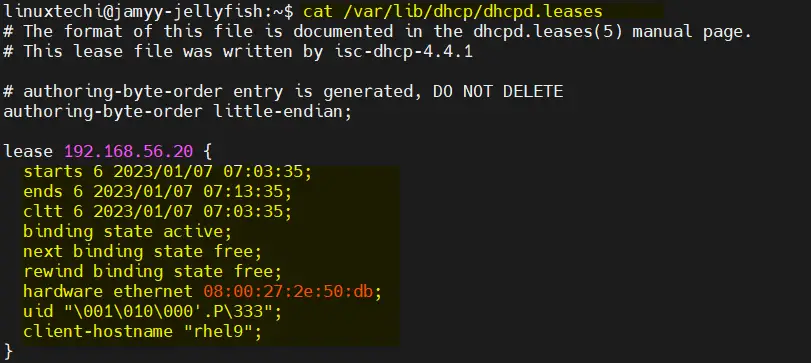
Head back to DHCP server and see the leased ip address, run following cat command
$ cat /var/lib/dhcp/dhcpd.leases
That’s all from this guide. I hope you have found it informative. Kindly do post your queries and feedback in below comments section.
Linux DHCP Server Configuration
This tutorial covers the configuration and set-up of a Linux DHCP server. It is a prerequisite that the network interface be configured. the server also be configured.
For Linux DHCP client configuration and general Linux (Red Hat, Fedora, CentOS) network configuration, see the YoLinux Networking Tutorial
Related YoLinux Tutorials:
Dynamic Host Configuration Protocol (DHCP) automatically assigns IP addresses and other network configuration information (subnetmask, broadcast address, etc) to computers on a network. A client configured for DHCP will send out a broadcast request to the DHCP server requesting an address. The DHCP server will then issue a «lease» and assign it to that client. The time period of a valid lease can be specified on the server. DHCP reduces the amount of time required to configure clients and allows one to move a computer to various networks and be configured with the appropriate IP address, gateway and subnet mask. For ISP’s it conserves the limited number of IP addresses it may use. DHCP servers may assign a «static» IP address to specified hardware. Microsoft NetBios information is often included in the network information sent by the DHCP server.
- Lease Request: Client broadcasts request to DHCP server with a source address of 0.0.0.0 and a destination address of 255.255.255.255. The request includes the MAC address which is used to direct the reply.
- IP lease offer: DHCP server replies with an IP address, subnet mask, network gateway, name of the domain, name servers, duration of the lease and the IP address of the DHCP server.
- Lease Selection: Client recieves offer and broadcasts to al DHCP servers that will accept given offer so that other DHCP server need not make an offer.
- The DHCP server then sends an ack to the client. The client is configured to use TCP/IP.
- Lease Renewal: When half of the lease time has expired, the client will issue a new request to the DHCP server.
- Red Hat/CentOS/Fedora: rpm -ivh dhcp-x.xxx.elx.i386.rpm
- Ubuntu/Debian 8: apt-get install dhcp3-server
( Later releases of Ubuntu (11.04) used the busybox release known as udhcpd and the configuration is NOT shown here)
- Red Hat/CentOS/Fedora: service dhcpd start
(or /etc/rc.d/init.d/dhcpd start for Red Hat, Fedora and CentOS Linux distributions) - Ubuntu/Debian: /etc/init.d/networking restart
- Red Hat/CentOS/Fedora: /etc/dhcpd.conf
(See /usr/share/doc/dhcp-3.X/dhcp.conf.sample)
[Potential Pitfall] : Its /etc/dhcpd.conf NOT /etc/dhcp.conf !! - Ubuntu/Debian: /etc/default/dhcp3-server
ddns-update-style interim; # Required for dhcp 3.0+ / Red Hat 8.0+ ignore client-updates; subnet 192.168.1.0 netmask 255.255.255.0 < range 192.168.1.128 192.168.1.254; # Range of IP addresses to be issued to DHCP clients option subnet-mask 255.255.255.0; # Default subnet mask to be used by DHCP clients option broadcast-address 192.168.1.255; # Default broadcastaddress to be used by DHCP clients option routers 192.168.1.1; # Default gateway to be used by DHCP clients option domain-name "your-domain.org"; option domain-name-servers 40.175.42.254, 40.175.42.253; # Default DNS to be used by DHCP clients option netbios-name-servers 192.168.1.100; # Specify a WINS server for MS/Windows clients. # (Optional. Specify if used on your network) # DHCP requests are not forwarded. Applies when there is more than one ethernet device and forwarding is configured. # option ipforwarding off; default-lease-time 21600; # Amount of time in seconds that a client may keep the IP address max-lease-time 43200; option time-offset -18000; # Eastern Standard Time # option ntp-servers 192.168.1.1; # Default NTP server to be used by DHCP clients # option netbios-name-servers 192.168.1.1; # --- Selects point-to-point node (default is hybrid). Don't change this unless you understand Netbios very well # option netbios-node-type 2; # We want the nameserver "ns2" to appear at a fixed address. # Name server with this specified MAC address will recieve this IP. host ns2 < next-server ns2.your-domain.com; hardware ethernet 00:02:c3:d0:e5:83; fixed-address 40.175.42.254; ># Laser printer obtains IP address via DHCP. This assures that the # printer with this MAC address will get this IP address every time. host laser-printer-lex1 < hardware ethernet 08:00:2b:4c:a3:82; fixed-address 192.168.1.120; >>
Test configuration file for errors with the following command: /etc/rc.d/init.d/dhcpd configtest
(Other distributions may use: /usr/sbin/dhcpd -f)
Note: The MAC addresses for the static address name server (ns2.your-domain.com), can be obtained with either of the two commands:
1: lo: mtu 65536 qdisc noqueue state UNKNOWN group default qlen 1 link/loopback 00:00:00:00:00:00 brd 00:00:00:00:00:00 inet 127.0.0.1/8 scope host lo valid_lft forever preferred_lft forever inet6 ::1/128 scope host valid_lft forever preferred_lft forever 2: eth0: mtu 1500 qdisc pfifo_fast state UP group default qlen 1000 link/ether 00:02:c3:d0:e5:83 brd ff:ff:ff:ff:ff:ff inet 192.168.42.214/24 brd 192.168.42.255 scope global dynamic eth0 valid_lft 82646sec preferred_lft 82646sec inet6 f080::477:3e0e:d5fd:803a/64 scope link valid_lft forever preferred_lft forever
eth0 Link encap:Ethernet HWaddr 00:02:C3:D0:E5:83 inet addr:192.168.42.214 Bcast:192.168.42.255 Mask:255.255.255.0 inet6 addr: fe80::202:b3ff:fef0:e484/64 Scope:Link UP BROADCAST RUNNING MULTICAST MTU:1500 Metric:1 RX packets:4070 errors:0 dropped:0 overruns:0 frame:0 TX packets:3878 errors:0 dropped:0 overruns:0 carrier:0 collisions:0 txqueuelen:1000 RX bytes:3406445 (3.2 MiB) TX bytes:439612 (429.3 KiB)
When dhcpd is running it will generate entries in the file: /var/lib/dhcp/dhcpd.leases
lease 192.168.1.128 starts 2 2004/12/01 20:07:05;
ends 3 2004/12/02 08:07:05;
hardware ethernet 00:00:e8:4a:2c:5c;
uid 01:00:00:e8:4c:5d:31;
client-hostname "Node1";
>
- ddns-update-style:
- interim: allows your DHCP server to update a DNS server whenever it hands out a lease. Allows your DNS server to know which IP addresses are associated with which computers in your network. Requires that your DNS server support DDNS (Dynamic DNS).
- none: to disable dynamic DNS updates or DNS is not supporting DDNS.
- ad-hoc: been deprecated and shouldn’t be used
LANs separated by routers: In order to have your DHCP broadcast pass through a router on the the next network, one must configure the router to allow DHCP relay. (Cisco: ip-helper address, Juniper: dhcp-relay) The local lan subnet configuration must come before the configuration directives of the remote LANs.
Look for errors in /var/log/messages
See dhcp-options man page below.
- Client: dhclient: DHCP client daemon (replaces dhcpcd)
- dhclient.conf: DHCP client configuration file (/etc/dhcp/dhcpd.conf)
- dhclient.leases: DHCP client lease database (/var/lib/dhcpd/dhcpd.leases)
- dhclient-script: DHCP client network configuration script
- dhcpd.conf: dhcpd configuration file
- dhcpd.leases: dhcpd DHCP client lease database
- dhcp-options: dhcpd Dynamic Host Configuration Protocol options
DHCP RFC's: RFC2131, RFC1541 (obsolete), RFC2132
Note: DHCP client will overwrite your /etc/resolv.conf file with new information recieved from the DHCP server.
Dynamic Host Configuration Protocol (DHCP)
The Dynamic Host Configuration Protocol (DHCP) is a network service that enables host computers to be automatically assigned settings from a server as opposed to manually configuring each network host. Computers configured to be DHCP clients have no control over the settings they receive from the DHCP server, and the configuration is transparent to the computer's user.
note: this package was called dhcp3-server in versions prior to precise 12.04 LTS.
Installation
At a terminal prompt, enter the following command to install dhcpd:
sudo apt-get install isc-dhcp-server
You will probably need to change the default configuration by editing /etc/dhcp3/dhcpd.conf to suit your needs and particular configuration.
You also need to edit /etc/default/isc-dhcp-server to specify the interfaces dhcpd should listen to. By default it listens to eth0.
Also, you have to assign a static ip to the interface that you will use for dhcp. If you will use eth0 for providing addresses in the 192.168.1.x subnet then you should assign for instance ip 192.168.1.1 to the eth0 interface using NetworkManager. Without this step you will get an error from dhcpd when starting the service.
Configuration
The error message the installation ends with might be a little confusing, but the following steps will help you configure the service:
Most commonly, what you want to do is assign an IP address randomly. This can be done with settings as follows:
# Sample /etc/dhcpd.conf # (add your comments here) default-lease-time 600; max-lease-time 7200; option subnet-mask 255.255.255.0; option broadcast-address 192.168.1.255; option routers 192.168.1.254; option domain-name-servers 192.168.1.1, 192.168.1.2; option domain-name "mydomain.example"; subnet 192.168.1.0 netmask 255.255.255.0 range 192.168.1.10 192.168.1.100; range 192.168.1.150 192.168.1.200; >
This will result in the DHCP server giving a client an IP address from the range 192.168.1.10-192.168.1.100 or 192.168.1.150-192.168.1.200. It will lease an IP address for 600 seconds if the client doesn't ask for a specific time frame. Otherwise the maximum (allowed) lease will be 7200 seconds. The server will also "advise" the client that it should use 255.255.255.0 as its subnet mask, 192.168.1.255 as its broadcast address, 192.168.1.254 as the router/gateway and 192.168.1.1 and 192.168.1.2 as its DNS servers.
If you need to specify a WINS server for your Windows clients, you will need to include the netbios-name-servers option, e.g.
option netbios-name-servers 192.168.1.1;
Start and stop service
sudo service isc-dhcp-server restart sudo service isc-dhcp-server start sudo service isc-dhcp-server stop
dhcp3-server and multiple interfaces