- Команда diff в Linux: сравниваем два файла
- Что из себя представляет команда diff в Linux?
- Синтаксис команды diff
- Примеры использования команды diff
- Синтаксис команды patch
- Примеры использования команды patch
- Итоги
- First Time Linux
- Making a simple comparison
- Making a patch
- Patching multiple files
- Applying a patch
- Linux diff – How to Compare Two Files and Apply Changes with the Patch Command
- What is the diff command in Linux?
- diff command syntax
- patch Command Syntax
- Wrapping Up
Команда diff в Linux: сравниваем два файла

Представьте, что однажды утром вы просыпаетесь и обнаруживаете, чтоб ваши продакшен-системы «лежат» из-за бага, который только предстоит найти. Один из наихудших кошмаров, верно?
Также оказывается, что для восстановления системы вам нужно сравнить код в двух версиях. Давление растет, все вокруг паникуют (и это понятно).
К счастью, в Linux есть утилита под названием diff, которая вам поможет.
Что из себя представляет команда diff в Linux?
Сравнение файлов и поиск различий между ними — широко распространенная операция. Она особенно полезна, когда нужно сравнить сложный код или конфигурационные файлы.
Сравнивать вручную долго и тяжело, к тому же велика вероятность ошибок. Поэтому Linux предоставляет вам мощную встроенную утилиту под названием diff. Ее применение позволяет сэкономить время и силы.
В Linux также есть еще одна команда, которая отлично дополняет diff, — patch. Она позволяет применить изменения из одного файла в другом. В этой статье мы рассмотрим обе команды и их применение на практике.
Синтаксис команды diff
Команда diff имеет следующий синтаксис:
Команда diff сравнивает два файла построчно. При этом первый из файлов она считает нуждающимся в редактировании и приведении к виду второго файла. Второй файл для diff — образец для сравнения.
Поэтому в выводе команды даются указания, что и как нужно изменить, чтобы первый файл стал таким же, как второй.
Указания даются при помощи специальных символов:
- c — CHANGE — изменение, которое нужно внести в указанной строке первого файла
- d — DELETE — то, что нужно удалить в первом файле
- a — ADD — то, что нужно добавить в первый файл
Давайте рассмотрим несколько примеров использования команды diff.
Примеры использования команды diff
Чтобы выяснить, являются ли файлы одинаковыми, команда diff дополняется флагом -s . В нашем примере содержимое файлов fileA и sameAsfileA совпадает.

А в следующем примере файлы имеют разный контент. Вывод команды diff говорит, что строки 11 и 14 в showList_v2.js нужно изменить, чтобы они совпадали со строками 11 и 13 в showList_v1.js.

Далее мы рассмотрим мой любимый способ использования команды diff — параллельный просмотр изменений. Для этого нужно применить флаг -y:

И последний пример — с объединенным выводом. Такой output часто используется как input для команды patch (ее мы тоже рассмотрим):

Вот еще несколько полезных флагов, которые можно применять с командой diff:
- -i — для игнорирования регистра. По умолчанию команда diff учитывает регистр.
- -w — для игнорирования пробелов в файле. По умолчанию пробелы тоже учитываются и могут считаться различием.
Синтаксис команды patch
Изменения в коде происходят постоянно. Расшаривать отредактированные файлы после внесения каждого изменения нереально. Обычно разработчики расшаривают сами изменения в коде.
Использование патчей («заплаток») — самый безопасный способ делиться только лишь изменениями.
Давайте посмотрим, как работают патчи:
Примеры использования команды patch
Предположим, у нас есть простой JavaScript-код в файле print_in_js.js, который выводит строку.

Но в функции вывода что-то сломалось, и нам нужно внести исправления. Мы отсылаем файл print_in_js.js коллеге, который может исправить код.
Наш коллега находит опечатку в строке № 3 и исправляет файл.
Когда файл исправлен и код работает корректно, наш коллега создает патч:
diff -u print_in_js.js print_in_js_Fixed.js > patched_print_js.diff
Давайте посмотрим содержимое патча:

Получив патч, мы применяем его:

И — вуаля! — наш код исправлен!
Итоги
Создавать и применять патчи при помощи команд patch и diff довольно просто.
Похожий подход применяется, когда вы пользуетесь системами контроля версий вроде Git или SVN. Знание основ (т. е. работы соответствующих команд Linux) поможет вам лучше понять работу систем контроля версий, а это важно для разработчиков.
First Time Linux
There are many tools for comparing files, many of them built in to programming environments and source control systems. Of course some tools are graphical and some just for the command line, but the aim is the same — to compare two (or three) files and show you what is different between them.
A patch takes this idea one step further, so that you can generate a small description of the changes. If you then apply that patch to the original file, the result is the file after making those changes, which is the second file.
This is a powerful way to communicate changes, because you don’t have to send the whole huge file, you just need to send the little change. It gets especially convenient if there is a large set of files to be modified, and a single patch can describe multiple changes to multiple files.
In general, a tool like diff is used to create the descriptions, and a tool like patch is used to apply the change. The changes themselves may be called either patches or diffs.
Making a simple comparison
Firstly let’s compare two versions of a simple file, using the gui tool «meld», which comes with gnome. You can do the same thing with other tools such as kdiff3.
This example uses a little text file, with some changes made to the file between versions. One line has been deleted, one modified, and one added, as you can see in the following screenshot:
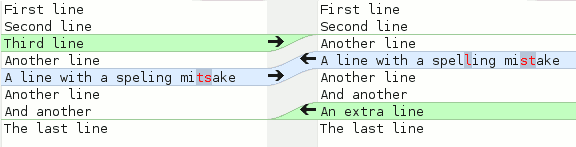
Secondly, using diff on a pair of files.
$ diff firstfile secondfile 3d2 < Third line 5c4 < A line with a speling mitsake --- >A line with a spelling mistake 7a7 > An extra line
This output is certainly not as easy to understand as the graphical output, but it contains the same information. The lines starting with «» are only in the second file (and will be added by the patch). The modified line is represented by a removal and then an addition.
Making a patch
Basically the output from that diff command shown above is the patch. It describes all the changes necessary and can be used as input to the patch command. All we need to do is save the patch by redirecting the output of the diff command into a file.
$ diff firstfile secondfile > mypatch.txt
So now we’ve got a patch file called «mypatch.txt» which has the same contents shown above. For testing this out, we can apply the patch to a copy of the file, so we can keep the original too.
$ cp firstfile dummy.txt $ patch dummy.txt mypatch.txt patching file dummy.txt
Now, dummy.txt has been patched and its contents have been replaced including all the changes. So it should be the same as «secondfile».
And that’s the basics of the patch. If someone has the «firstfile», and you’ve changed it to make «secondfile», you can just send this patch, the other person can apply the patch to their copy of the first file, and they’ll get the same file as you have.
Patching multiple files
A common use for patches is for software projects, where changes need to be made to multiple files. It would be awkward to make a patch for each file, so patches have a way of specifying which files need to be patched and how. This uses the same principle as before, but employs different options to make a diff for a complete set of files instead of just for one file.
As an example we’ll take the same files used in the rsync guide as follows:
This one will be changed on the host but not on the laptop.
See, now the main copy has been changed on the desktop.
This is the second version of the first file.
It’s now been edited, with some extra text added to it.
So now we’ve got two folders of files, and we can use the diff command as before to create a patch file. Except this time we diff the whole directories:
$ diff -uN a b > mypatch.txt
There are two new options here — » -u » makes a unified diff, which includes extra surrounding context as well (lines before and after each change). This makes the diff obviously a bit bigger, but makes it more reliable in case the file being patched isn’t exactly the same as the one which was diffed. And it helps readability too, making it more obvious where the edit is made. The second is » -N » which lets it include the content of new files in the patch, rather than just observing that there’s a new file.
Inside this new patch is a section for each file which was compared. The part for file1.txt looks like this:
diff -uN a b diff -uN a/file1.txt b/file1.txt --- a/file1.txt 2011-10-21 16:09:04.000000000 +0200 +++ b/file1.txt 2011-10-21 16:09:11.000000000 +0200 @@ -1,3 +1,3 @@ This is the main version of the first file. -It's quite simple. +It starts off quite simple, but then has some extra text added to it.
So it generates a slightly different format but with the removed (-) and added(+) lines as before. And it contains the relative file paths a/file1.txt and b/file1.txt. This is important because it is this a/file1.txt which it will look for when applying the patch.
Interesting to note is that the patch contains nothing at all about file2.txt, it was found to be identical in both folders so wasn’t even mentioned in the diff.
Applying a patch
So now imagine you’ve got your own folder of these files, and you’ve been sent this patch. Now you want to use the patch command to apply this patch to your set. It sounds straightforward, but the complication comes from the relative paths, because your directory isn’t called «a».
If you’re in your folder with all your files, you need to strip off one item from the paths in the patch file, so that «a/file1.txt» becomes «file1.txt» and then patch can find the file. This is especially important if there is a tree of directories involved, so that «a/somedir/file8.txt» becomes «somedir/file8.txt». The way this is done is using the -p parameter to patch, like this:
Of course this is just scratching the surface of the diff and patch commands, there are lots of other options including making backups, merges, and reverse patches. For more information see the man pages.
Page last updated: October 2011
Linux diff – How to Compare Two Files and Apply Changes with the Patch Command

Zaira Hira
Imagine waking up one day to find out that your production systems are down because of a bug that has yet to be traced. One of your worst nightmares right?
And you also discover that you need to compare code from two versions and the pressure is building to restore the systems. Everyone is panicking and it’s totally legit!
Luckily, there is a Linux utility called diff that has got your back.
What is the diff command in Linux?
Comparing files and finding the differences between them is a widely used operation. This is specially useful when you have to compare complex code or configuration files.
Instead of comparing manually (which has a high chance of human error), Linux gives you a built in and powerful utility called diff . It also saves time.
To compliment diff commands, Linux also provides another command to apply changes from one file to another called patch . In this article, we’ll be looking into these interesting and versatile commands to see how to use them.
diff command syntax
The syntax for diff is shared below:

In the next example, there are two files that don’t have the same contents. In the output highlighted below, the diff command shows that lines 11 and 14 in showList_v2.js should change to match lines 11 and 13 in showList_v1.js.

The next way you can use diff is my favorite, as you can see differences side by side.
Just use the -y flag like this:

The last example I am going to discuss is unified output. This output is often used as input to the patch command. We’ll see how the patch command works as well:

Below are some other useful flags you can use with diff .
- -i to ignore case. diff is case sensitive by default.
- -w to ignore whitespaces in a file. By default whitespaces are considered a difference.
patch Command Syntax
Changes happen all the time in your code, and it is unrealistic and time-consuming to share edited and fixed files for each change. Usually devs share fixes in the code with the team so they are applied instantly.
And using patches is the safest method to distribute improvements only.
Let’s see how patching works:

However, there is something wrong in the print function and we need a fixture for that. We send the file print_in_js.js to our colleague who fixes the code and sends it back.
First, our colleague is able to find a type in line #3. They correct the file.
Once file is corrected, and the code is functional, they create a patch.

Once we have the patch, we apply it as follows:

And yes – our code is fixed!
Wrapping Up
It is relatively simple and straightforward to create and apply patches using patch and diff .
A similar approach works when you’re using version control systems like Git or SVN. Learning the basics really helps you transition to and understand how version control works, which is an important aspect of software development.
Thanks for reading until the end. I would love to connect with you. You can find me here on twitter. Do share your thoughts.