- How to disable the page cache in linux kernel?
- 2 Answers 2
- Turn off write cache on all USB External Drives (Debian / Ubuntu / Linux)
- 1 Answer 1
- How to switch off caching for usb device when writing to it?
- 3 Answers 3
- What is USB Write Caching?
- Defining «Write»
- Defining «Caching»
- Defining «Write Caching»
- Write Caching in Windows
- Write Caching in Linux and Mac
- Disabling Write Caching in Mac OS
- Disabling Write Caching in Linux
- Popular Posts Like This
- Patrick Whitener
- Memorable Gifts
- Mini USB Fans
- Photographers
- From The Blog
- Keep In Touch
- Get a quote in less than 15 minutes.
How to disable the page cache in linux kernel?
how to avoid page cache in kernel,the application can directly write or read data from disk?In kernel,how to set?
It’s unclear what you’re asking. Do you want to disable page caching just for one particular application in user-space, or for all user-space processes? Do you have to do this in kernel itself, or it doesn’t matter how it will be done? Provide more details, please.
I just want to disable page caching for GlusterFS.By Fuse,I mounted the GlusterFS client(nodeA) to /mnt/glusterfs via direct-io-mode(FUSE supported).when I opened a file in GlusterFS,the file was not cached in GlusterFS client(nodeA) because of the direct-io-mode supported by FUSE,but the file was cached in GlusterFS server(nodeB).In other words,in the server(nodeB),i dont want to cache the file.So the question is,how to disable page caching for GlusterFS server(nodeB)?
Open a file,the request was sent like this,open(User-Space,nodeA)—>sys_open(Kernel,nodeA)——>fuse_open(kernel,nodeA)——->client_open(User-space,nodeA)————>server_open(User-Space,nodeB)——->sys_open(Kernel,nodeB)——->ext4_open(Kernel,nodeB).
2 Answers 2
You will need the application to call O_DIRECT. From the man page http://man7.org/linux/man-pages/man2/open.2.html
With this you are telling the kernel to not write/read from page cache while doing I/O.
O_DIRECT (since Linux 2.4.10) Try to minimize cache effects of the I/O to and from this file. In general this will degrade performance, but it is useful in special situations, such as when applications do their own caching. File I/O is done directly to/from user- space buffers. The O_DIRECT flag on its own makes an effort to transfer data synchronously, but does not give the guarantees of the O_SYNC flag that data and necessary metadata are transferred. To guarantee synchronous I/O, O_SYNC must be used in addition to O_DIRECT. See NOTES below for further discussion.
A semantically similar (but deprecated) interface for block devices is described in raw(8). Turn off write cache on all USB External Drives (Debian / Ubuntu / Linux)
How do you turn off write cache permanently for external USB drives in Linux (I’m using Ubuntu)? I’ve tried: Command line method : hdparm -W0 /dev/sdb Configuration file method (seems to be another way to do it permanently) : The next thing I found was modifying the «hdparm.conf» file located in /etc. However, that seems to require that you know ahead of time the drive letter, «sdb, sdc. » etc. How do you just blanket cover ALL drives no matter what, or specifically all USB externals? The key problem is.. I’m not sure of the order I will connect these USB external drives, therefore the drive letter will change, so I can’t just name «sdb» specifically since it might not be «sdb». Is this a situation where hdparm.conf can have an entry multiple times over even for drives letters that aren’t even connected? That way, no matter what drive is connected it will just turn the write_cache off preemptively. Or will that mess something up? Possible /etc/hdparm.conf example (will this work?):
/dev/sda < write_cache = off >/dev/sdb < write_cache = off >/dev/sdc < write_cache = off >/dev/sdd
Again, those drives may not even exist yet. Just covering as many letters of the alphabet preemptively so no matter what, the write_cache is off. I would think there’s got to be a better way than this though.. Any other ideas? Or better approaches? Thank you!
1 Answer 1
You need to use the -K option. From man hdparm
-k Get/set the "keep_settings_over_reset" flag for the drive. When this flag is set, the drive will preserve the -dmu settings over a soft reset, (as done during the error recovery sequence). This option defaults to off, to prevent drive reset loops which could be caused by combinations of -dmu settings. The -k option should therefore only be set after one has achieved confidence in correct system operation with a chosen set of configuration settings. In practice, all that is typically nec‐ essary to test a configuration (prior to using -k) is to verify that the drive can be read/written, and that no error logs (kernel messages) are generated in the process (look in /var/adm/messages on most systems). -K Set the drive´s "keep_features_over_reset" flag. Setting this enables the drive to retain the settings for -APSWXZ over a soft reset (as done during the error recovery sequence). Not all drives support this feature. How to switch off caching for usb device when writing to it?
I have problems transferring binary programs to a micro-controller prototype board when using ubuntu/kubuntu to mount the board via usb. With MacOS and Windows there are no problems. I have found the writing from Ubuntu definitely changes the written file. I suspect that the write caching is the problem. How can I disable it, or what else might be the problem.
3 Answers 3
You can try using hdparm to set the write caching feature to off at runtime. (You will probably need to run this after every boot or every time you remove and reinsert the device)
sudo hdparm -W 0 /dev/devicenamePlease ensure you know the correct device name ( sdb , sdc or so on).
You can find out the device name by running:
You can also edit /etc/fstab and add the mount options sync,dirsync however I am not very familiar with how /etc/fstab works with removable devices. I think they need a permanent mount point.
kudos to @NightwishFan for the hdparm switch to set the drive’s write-caching feature.
Note that the sync mount option decreases the speed by a magnitude (over 10 times). flush mount option ensures an effective writing with no performance cost. Also I’ve been using it with no issues for a few years on all the FAT devices (spinning or flash-memory based) I’ve used: Actually the whole set of mount options is noauto,users,noatime,flush,umask=111,dmask=000 , set manually or in /etc/fstab.
I have replaced «sync» in favor of «noatime,flush» like stated in @tuk0z answer.
This lead to the USB floppydrive behaving the same like sync, but it writes files so much faster, like the normal operationspeed you expect it to be.
Reading image files from floppy does not result in random artifacts anymore. Also reading DD floppies does not result in weird characters in filenames.
Perhaps it’s a bit unfortunate how the official documentation of «mount» put the usage in context.
What is USB Write Caching?

In this guide, we’ll start by defining write caching and exploring its potential pros and cons. We’ll then show you how to enable or disable, depending on your preference, write caching on Windows 10, Mac, and Linux operating systems.
Skip to enable or disable write caching in:
Defining «Write»
In the context of computers, writing is the process of retrieving information from a source and then transferring that info to a destination. Commonly referred to as a write command, you can think of this as the paste function from when you copy and paste some text. All storage media and files are basically writable but writing can be restricted depending on the access granted by the administrator.
Defining «Caching»
Caching, on the other hand, is storing data in a cache or a temporary storage space. Perhaps the most popular use of caching is in web browsers where the data you request from a web page is stored in a cache folder on your hard drive. The next time you return to the same web page, the browser will access the cache folder, instead of sending another request and waiting for the server to retrieve the data. This makes your browsing experience much faster.
Defining «Write Caching»
Combining these two functions forms the write caching operation.
Write caching is a process that places data into a cache in the system’s fast, volatile memory (RAM) before it is written to the destination. This process allows the user to perform other tasks while waiting for their data to finish writing with minimal effect on system performance.
This operation is particularly important in boosting the performance of external drives specifically, of USB flash drives. The tiny and innocuous storage device is likely not as fast as your internal drive, thus writing many or large files to it will often take some time.
Thanks to write caching, however, there’s no need to tap your fingers and wait. Your computer can store all these write commands in its RAM and serve each one to your flash drive as it becomes ready.
You will see the progress bar reaching 100% in a flash and the dialog box closes rather quickly. However, keep in mind, the task is not completely done. The actual writing is still running in the background but the good thing is, you can perform other tasks while the computer is transferring the cached content to your USB drive.
Although it is extremely beneficial, write caching has its downsides. The major drawbacks are the risk of data loss and data corruption. If you accidentally yank out your USB drive from the computer or in the event of a power loss while writing is still going on, there’s a large chance that the data being written will be lost or the file will be corrupted.
The principle of write caching is the same across different operating systems although the implementation can be quite different.
Write Caching in Windows
In Windows, write caching is disabled for USB drives by default, except for those using the NTFS format. The following guide will show you how to enable this feature in Windows 10 to enhance your USB drive’s performance.
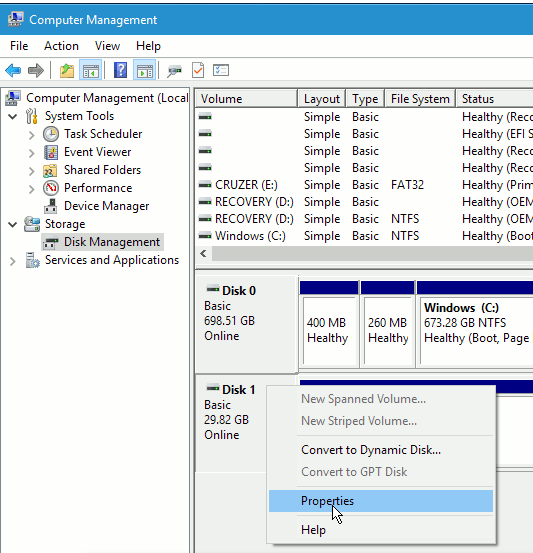
- Open File Explorer.
- Right-click on «This PC».
- Click «Manage».
- On the left pane of the Computer Management Window, click Disk Management.
- In the center, look for your USB drive. This is usually Disk 1. If you’re still not sure, check the volume of the disks. Note that the actual volume shown will not be exactly the same as your USB drive’s capacity, so look for the one that is closest to your USB drive’s capacity.
- Right-click on your USB drive and select «Properties».

- Click the «Policies» tab.
- Select «Better Performance» and click OK.
- Close the Computer Management Window, you’re good to go!
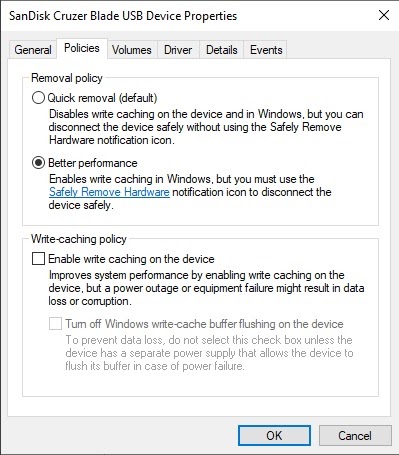
To avoid data loss, make sure to click the little «Safely Remove Hardware» icon in the taskbar before pulling out the USB drive. This would prompt the computer to finish writing the data ensuring all transferred files are complete and intact.
Write Caching in Linux and Mac
Unlike in Windows, write caching is enabled by default in Linux and Mac operating systems.
Since there is a risk of data loss or corruption, some users prefer to disable this feature. This would require running commands in the Terminal. Here are the guides on how to disable write caching in Linux and Mac.
Disabling Write Caching in Mac OS
- Open the Applications folder and click Utilities.
- Double-click «Terminal».
- In the Terminal window, run mount.
- Take note of the USB drive’s name.
- In the terminal window, type umount /dev/disk1s1, where disk1s1 is the USB drive’s name.
Disabling Write Caching in Linux
- Press CTRL+ALT+T to launch the Terminal.
- Run sudo gedit /etc/hdparm.conf
- Find write_cache and remove the # in front of it.
- Save and restart the computer.
Write caching is a great performance-enhancing feature but it has its own share of pros and cons. To stay on the safe side, always remember to safely eject your USB drive or external storage device before unplugging it.
Popular Posts Like This
Patrick Whitener
Forever Curious, I have always had an eagerness to learn and understand new topics at their core. Naturally, I feel at home in the dynamic landscapes of web development, SEO, and all things digital marketing. Outside of the office, I can usually be found deep in an online rabbit hole exploring the latest marketing trends, pop culture, or politics with a podcast playing in the background.


Memorable Gifts
Cool and unique flash drives that are the perfect gift for anyone!

Mini USB Fans
Get a pack of 4 Mini Fans for ONLY $15!
Photographers
Shop our most popular styles for photographers!
From The Blog
How To Use a USB Drive for an iPhone or iPad
5 Strategies for Successfully Branding a Small Business
Keep In Touch
Subscribe to Our Newsletter
Sign up to get our newsletter and be the first to know about our most current promotions and products.
Get a quote in less than 15 minutes.
Have a question? Call us toll free at (866) 404-4645, or e-mail sales@usbmemorydirect.com