- How to Create a Virtual HardDisk Volume Using a File in Linux
- Create a New Image to Hold Virtual Drive Volume
- Removing Virtual Drive Volume
- How to Create a Virtual Hard Disk Volume Using a File in Linux
- Step-by-Step Guide to Create a Virtual HardDisk Volume Using a File in Linux
- Step 1: Creating a New Image for Holding the Virtual Drive Volume
- Step 2: Formatting the EXT4 File
- Step 3: Creating a Mount Point
- Mounting the Created Image File at System Boot
- Step 4: Verifying the Created Virtual System
- Removing the Virtual Drive from your System
- Как создать виртуальный том жесткого диска с помощью файла в Linux?
- Создание нового образа для хранения тома виртуального диска
- Удаление тома виртуального диска
- Курсы Cisco, Linux, кибербезопасность, DevOps / DevNet, Python с трудоустройством!
How to Create a Virtual HardDisk Volume Using a File in Linux
Virtual Hard Disk (VHD) is a disk image file format which represents a virtual hard disk drive, capable of storing the complete contents of a physical hard drive. It’s a container file that acts similar to a physical hard drive. The disk image replicates an existing hard drive and includes all data and structural features.
Just like a physical hard drive, a VHD can contains a file system, and you can use it to store and run an operating system, applications, as well as store data. One of the typical uses of VHDs in VirtualBox Virtual Machines (VMs) to store operating systems and application, and data.
In this article, we will demonstrate how to create a virtual hard disk volume using a file in Linux. This guide is useful for creating VHDs for testing purposes in your IT environment. For the purpose of this guide, we will create a VHD volume of size 1GB, and format it with EXT4 file system type.
Create a New Image to Hold Virtual Drive Volume
There are number of ways you can do this, but the most easiest way is using the following dd command. In this example, we will be creating a VHD volume of size 1GB image.
$ sudo dd if=/dev/zero of=VHD.img bs=1M count=1200

- if=/dev/zero: input file to provide a character stream for initializing data storage
- of=VHD.img: image file to be created as storage volume
- bs=1M: read and write up to 1M at a time
- count=1200: copy only 1200M (1GB) input blocks
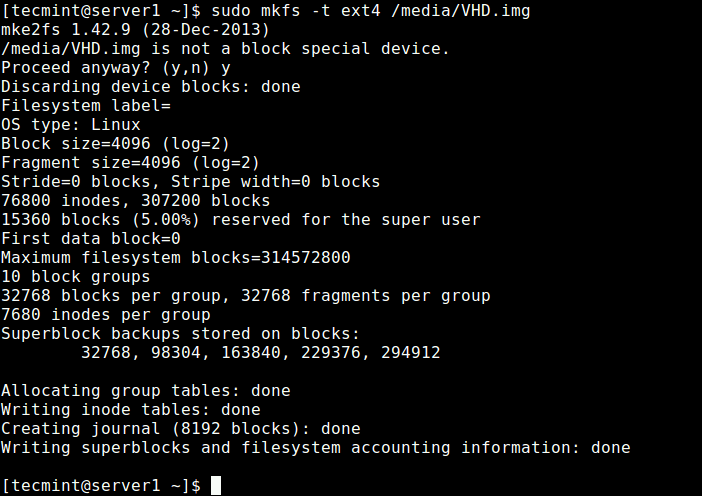
Next, we need to format the EXT4 file system type in the VHD image file with the mkfs utility. Answer y , when prompted that /media/VHD.img is not a block special device as shown in the following screenshot.
$ sudo mkfs -t ext4 /media/VHD.img
In order to access the VHD volume, we need to mount to a directory (mount point). Run these commands to create the mount point and mount the VHD volume, respectively. The -o is used to specify options for mounting, here, the option loop indicates the device node under the /dev/ directory.
$ sudo mkdir /mnt/VHD/ $ sudo mount -t auto -o loop /media/VHD.img /mnt/VHD/
Note: The VHD filesystem will only remain mounted until the next reboot, to mount it at system boot, add this entry in the /etc/fstab file.
/media/VHD.img /mnt/VHD/ ext4 defaults 0 0
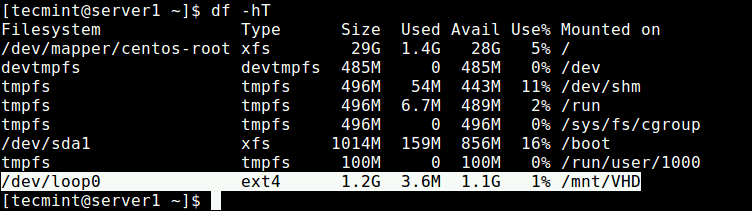
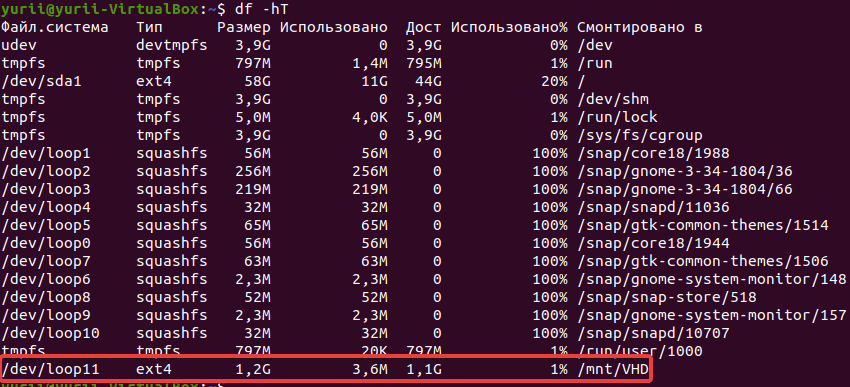
Now you can verify the newly created VHD filesystem with mount point using the following df command.
Removing Virtual Drive Volume
If you don’t need the VHD volume anymore, run the following commands to unmount the VHD filesystem, then delete the image file:
$ sudo umount /mnt/VHD/ $ sudo rm /media/VHD.img
Using the same idea, you can also create a swap area/space using a file in Linux.
That’s all! In this guide, we have demonstrated how to create a virtual hard disk volume using a file in Linux. If you have any thoughts to share or questions to ask, reach us via the comment form below.
How to Create a Virtual Hard Disk Volume Using a File in Linux

Create a virtual hard disk volume using a file in Linux and start storing the components of your system even without bringing the physical drive into the scene. Read the following tutorial and learn how you can do it in minutes.
When we talk about Virtual Hard Disk (VHD), we’re looking at an image file format to help users in many situations. However, its prime capability is storing the elements that rest within your system’s general or physical storage. It is nothing but a container in the virtual form that acts pretty similar to how a physical hard drive operates.
If you’re new to the concept of a virtual driver, wondering what’s it for is something obvious. Let me tell you, the best answer for creating a virtual hard disk volume using a file in Linux can be a lot.
Several users choose this method to add swap space to their computers without creating a new physical hard-drive partition. Since VHDs act similar to a web-page file on the Windows OS, you can seamlessly craft a virtual hard disk for building a portable virtual solution to back up your files.
In the following article, I’ll walk you through the step-by-step on creating virtual hard drives for your Linux system.
Step-by-Step Guide to Create a Virtual HardDisk Volume Using a File in Linux
With the concept of virtual disks discussed, it is the perfect time to uncover the steps you need to follow to create a VHD volume using a file in Linux.
Step 1: Creating a New Image for Holding the Virtual Drive Volume
To create a virtual hard disk volume using a file in Linux, the first thing that you’ll need to do is build an image file and employ the same to hold the virtual volume. Now, there are several ways to conclude the job. However, I’ll help you learn using the dd command to ensure you’ve got the easiest way out.
Depending on the volume you want to allocate, alter the values around the dd command. Suppose you’re after crafting a virtual hard drive that volumes to 1 GB, launch the Terminal by using the “Ctrl+Alt+T” key and invoke the following command:

• if=/dev/zero : Thus input file is meant to supply a specific character stream, especially for initializing the data storage in your Linux system.
• of=MVHD.img : It reflects the focus image file, the one that will get created as your system’s volume for storage.
• bs=1M/2M : The bs flag or the bs= option indicates the drive’s write and read speed. In this case, the value is 1M/2M.
• count=(value)1200 : 1200M (or 1 GB) input refers to the virtual hard disk volume. You can desirably choose this value as per your needs.
Step 2: Formatting the EXT4 File
Once you’re done creating the required image file for holding the virtual driver, the next thing to do is format the existing EXT4 file that sits within the created image. The concerned system contains specific files, and it is crucial to get rid of them before moving further.
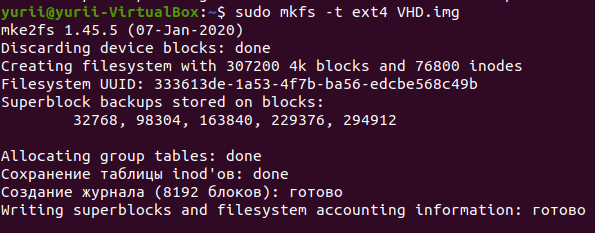
Doing this is pretty simple. Employ the mkfs command alongside the -t flag, and you’re good to go.
Run the following command:

You’ll then get prompted to verify your decision—input “ Y ” and press the “Enter key” on your keyboard.
Step 3: Creating a Mount Point
Next up is accessing the created MVHD volume. To do that, mount a directory or, in other words, build a mount point.
Invoke the mkdir and mount command inside the Terminal in the following ways:
$ sudo mount -t auto -o loop /media/MVHD.img /mnt/MVHD/

Remember, the -o flag helps specify options corresponding to the mounting scene like I’ve used loop here. If you don’t know, the loop option indicates the situation when the concerned device node is under the directory: /dev/ .
Mounting the Created Image File at System Boot
By default, the created filesystem remains mounted until you decide to reboot your system. So, in case you don’t want it to happen and rather mount the file at the very system boot, all that needs to be done is add the following entry within the file that looks something like this:
/etc/fstab. /media/MVHD.img /mnt/MVHD/ ext4 defaults
Step 4: Verifying the Created Virtual System
Verifying whether or not you’ve successfully created the virtual system is crucial. For that, invoke the df command together with the -hT flag

That’s how you create a virtual hard disk volume using a file in Linux.
Removing the Virtual Drive from your System
Don’t need the virtual drive anymore? Well, the piece of good news is that you can seamlessly get rid of it in minutes. Yes, you read that right. Removing a virtual drive takes less time than creating one.
Start by unmounting the MVHD filesystem and deleting the created image file. Launch the Terminal using the “Ctrl+Alt+T” key and then run the following commands:

With that, you know how to create a virtual hard disk volume using a file in Linux. Although the process is simple, it can be troublesome when the appropriate approach is unknown. To help you with that, I’ve presented the most user-friendly guide ever. For queries, feel free to leave a comment below.
If this guide helped you, please share it.
Husain is a staff writer at Distroid and has been writing on all things Linux and cybersecurity for over 10 years. He previously worked as a technical writer for wikiHow. In his past time, he loves taking tech apart and see what makes them tick, without necessarily putting it all back together. LinkedIn
Leave a Reply
You must be logged in to post a comment.
Как создать виртуальный том жесткого диска с помощью файла в Linux?


Сегодня поговорим о том, как создать виртуальный том жесткого диска с помощью файла в Linux. Виртуальный жесткий диск (VHD) — это формат файла образа диска, который представляет собой виртуальный жесткий диск, способный хранить все содержимое физического жесткого диска. Это файл-контейнер , который действует подобно физическому жесткому диску. Образ диска копирует существующий жесткий диск и включает в себя все данные и структурные особенности.
Как и физический жесткий диск, VHD может содержать файловую систему, и вы можете использовать её для хранения и запуска операционной системы, приложений, а также для хранения данных. Одно из типичных применений виртуальных жестких дисков в VirtualBox Virtual Machines (VM) для хранения операционных систем, приложений и данных.
В этой статье мы покажем, как создать том виртуального жесткого диска, используя файл в Linux. Эта статья полезна для создания виртуальных жестких дисков в целях тестирования в вашей ИТ-среде. В этой статье мы создадим том VHD размером 1 ГБ и отформатируем его в файловой системе EXT4.
Создание нового образа для хранения тома виртуального диска
Самый простой способ создать новый образ – использовать следующую команду dd. В этом примере мы будем создавать том VHD размером 1 ГБ.

- if=/dev/zero: входной файл для предоставления символьного потока для инициализации хранилища данных
- of=VHD.img: файл образа, который будет создан как том хранения
- bs=1 M: чтение и запись до 1M одновременно
- count=1200: копировать только 1200M (1GB) входных блоков
Далее нам нужно отформатировать тип файловой системы EXT4 в файле образа VHD с помощью утилиты mkfs. Ответьте “y“, когда на экране появится, что /media/VHD.img не является блочным специальным устройством:
Чтобы получить доступ к тому VHD, нам нужно его подключить к каталогу (точка монтирования). Выполните эти команды, чтобы создать точку монтирования и смонтировать том VHD соответственно. -O используется для указания опций для монтирования, здесь опция указывает узел устройства.
Примечание. Файловая система VHD будет оставаться подключенной только до следующей перезагрузки. Чтобы автоматически подключить её при загрузке системы, добавьте эту запись в файл /etc/fstab.
Теперь вы можете проверить вновь созданную файловую систему VHD с точкой монтирования, используя следующую команду df:

Удаление тома виртуального диска
Если вам больше не нужен том VHD, выполните следующие команды для размонтирования файловой системы VHD, а затем удалите файл образа:
Используя ту же идею, вы также можете создать файл подкачки в Linux.
Это все! В этой статье мы продемонстрировали, как создать том виртуального жесткого диска, используя файл в Linux.
Спасибо за уделенное время на прочтение статьи!
Если возникли вопросы, задавайте их в комментариях.
Подписывайтесь на обновления нашего блога и оставайтесь в курсе новостей мира инфокоммуникаций!
Курсы Cisco, Linux, кибербезопасность, DevOps / DevNet, Python с трудоустройством!
Спешите подать заявку! Группы стартуют 25 января, 26 февраля, 22 марта, 26 апреля, 24 мая, 21 июня, 26 июля, 23 августа, 20 сентября, 25 октября, 22 ноября, 20 декабря.
- Поможем стать экспертом по сетевой инженерии, кибербезопасности, программируемым сетям и системам и получить международные сертификаты Cisco, Linux LPI, Python Institute.
- Предлагаем проверенную программу с лучшими учебниками от экспертов из Cisco Networking Academy, Linux Professional Institute и Python Institute, помощь сертифицированных инструкторов и личного куратора.
- Поможем с трудоустройством и стартом карьеры в сфере IT — 100% наших выпускников трудоустраиваются.
- Проведем вечерние онлайн-лекции на нашей платформе.
- Согласуем с вами удобное время для практик.
- Если хотите индивидуальный график — обсудим и реализуем.
- Личный куратор будет на связи, чтобы ответить на вопросы, проконсультировать и мотивировать придерживаться сроков сдачи экзаменов.
- Всем, кто боится потерять мотивацию и не закончить обучение, предложим общение с профессиональным коучем.
- отредактировать или создать с нуля резюме;
- подготовиться к техническим интервью;
- подготовиться к конкурсу на понравившуюся вакансию;
- устроиться на работу в Cisco по специальной программе. Наши студенты, которые уже работают там: жмите на #НашиВCisco Вконтакте, #НашиВCisco Facebook.
Чтобы учиться на курсах Cisco, Linux LPI, кибербезопасность, DevOps / DevNet, Python, подайте заявку или получите бесплатную консультацию.