- How To Install Gdu Disk Analyzer on Ubuntu 20.04 LTS
- Install Gdu Disk Analyzer on Ubuntu 20.04 LTS Focal Fossa
- Gdu – A Pretty Fast Disk Usage Analyzer for Linux
- How to Install Gdu – Linux Disk Usage Analyzer
- How to Install and Use GDU Disk Usage Analyzer on Ubuntu
- Commands
- Installing the GDU Disk Usage Analyzer through the terminal
- Using the GDU Disk Usage Analyzer
- Uninstalling GDU
- Conclusion
How To Install Gdu Disk Analyzer on Ubuntu 20.04 LTS
In this tutorial, we will show you how to install Gdu Disk Analyzer on Ubuntu 20.04 LTS. For those of you who didn’t know, Gdu (Go Disk Usage) is very similar to Ncdu, a popular console disk usage analyzer, with one major difference: speed. Gdu makes use of parallel processing, being specially created for solid-state drives (SSD). It also works with hard disk drives (HDD), but its performance gain compared to other tools is not so great in this case.
This article assumes you have at least basic knowledge of Linux, know how to use the shell, and most importantly, you host your site on your own VPS. The installation is quite simple and assumes you are running in the root account, if not you may need to add ‘ sudo ‘ to the commands to get root privileges. I will show you the step-by-step installation of the Gdu Disk Analyzer on Ubuntu 20.04 (Focal Fossa). You can follow the same instructions for Ubuntu 18.04, 16.04, and any other Debian-based distribution like Linux Mint.
Prerequisites
- A server running one of the following operating systems: Ubuntu 20.04, 18.04, 16.04, and any other Debian-based distribution like Linux Mint.
- It’s recommended that you use a fresh OS install to prevent any potential issues.
- SSH access to the server (or just open Terminal if you’re on a desktop).
- A non-root sudo user or access to the root user . We recommend acting as a non-root sudo user , however, as you can harm your system if you’re not careful when acting as the root.
Install Gdu Disk Analyzer on Ubuntu 20.04 LTS Focal Fossa
Step 1. First, make sure that all your system packages are up-to-date by running the following apt commands in the terminal.
sudo apt update sudo apt upgrade
Step 2. Installing Gdu Disk Analyzer on Ubuntu 20.04.
Now we run the following command to download GDU from its Github repository using curl :
curl -L https://github.com/dundee/gdu/releases/latest/download/gdu_linux_amd64.tgz | tar xz
Then, make it an executable file:
After that, move the file to the /usr/bin directory:
sudo mv gdu_linux_amd64 /usr/bin/gdu
Now you can verify the installation by running the following command:
You may install GDU using Snap through it may seem like a lot of snap commands:
sudo apt install snapd sudo snap install gdu-disk-usage-analyzer snap connect gdu-disk-usage-analyzer:mount-observe :mount-observe snap connect gdu-disk-usage-analyzer:system-backup :system-backup snap alias gdu-disk-usage-analyzer.gdu gdu
Step 3. Analyze Disk Usage on Using Gdu.
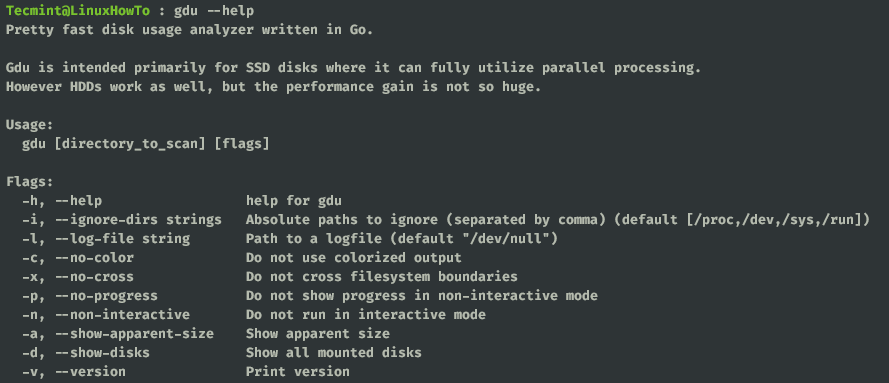
Once successfully installed, let us quickly check the usage of various options it provides, just issue the ‘help’ option as an argument:
gdu [flags] [directory_to_scan] Flags: -h, --help help for gdu -i, --ignore-dirs strings Absolute paths to ignore (separated by comma) (default [/proc,/dev,/sys,/run]) -I, --ignore-dirs-pattern strings Absolute path patterns to ignore (separated by comma) -f, --input-file string Import analysis from JSON file -l, --log-file string Path to a logfile (default "/dev/null") -m, --max-cores int Set max cores that GDU will use. 8 cores available (default 8) -c, --no-color Do not use colorized output -x, --no-cross Do not cross filesystem boundaries -H, --no-hidden Ignore hidden directories (beginning with dot) -p, --no-progress Do not show progress in non-interactive mode -n, --non-interactive Do not run in interactive mode -o, --output-file string Export all info into file as JSON -a, --show-apparent-size Show apparent size -d, --show-disks Show all mounted disks -v, --version Print version
Congratulations! You have successfully installed Gdu. Thanks for using this tutorial for installing the Gdu Disk Analyzer on Ubuntu 20.04 LTS Focal Fossa system. For additional help or useful information, we recommend you check the official Gdu website.
If you don’t have time to do all of this stuff, or if this is not your area of expertise, we offer a service to do “VPS Manage Service Offer”, starting from $10 (Paypal payment). Please contact us to get the best deal!
Gdu – A Pretty Fast Disk Usage Analyzer for Linux
In this article, we will take a look at gdu an open-source disk usage analyzer written in go. Gdu is inspired by godu, dua, ncdu, and df.
The gdu tool is created for SSD drives where parallel processing can be utilized. This tool can also work with HDD with less performance compared to SSD drives. You can also check benchmark results. There are many other similar tools and you have to play with gdu first to see if satisfy your needs.
How to Install Gdu – Linux Disk Usage Analyzer
There are few different ways to install gdu in different Linux flavors but I am going to stick with a common way that can be followed irrespective of what distribution you are running with.
Go to the gdu GitHub release page to download the archive file. The latest version is V4.9.1 and I suggest downloading the latest version.
$ curl -L https://github.com/dundee/gdu/releases/latest/download/gdu_linux_amd64.tgz | tar xz $ chmod +x gdu_linux_amd64 $ sudo mv gdu_linux_amd64 /usr/bin/gdu
Now you can verify the installation by running the following command.
$ gdu --version Version: v4.9.1 Built time: Sat Mar 27 09:47:28 PM CET 2021 Built user: dundee
A good practice before playing with any new tools is to check the help options.
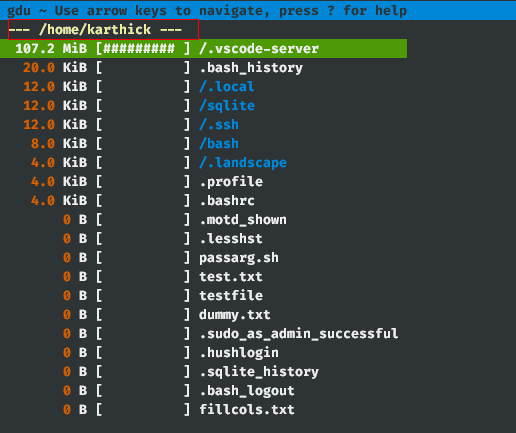
If you run the gdu command without passing any argument it will scan your current working directory. I am in my home directory now and when I run gdu, you can see from the below image my home directory is scanned.
To scan for any particular directories you have to pass the directory name as an argument.
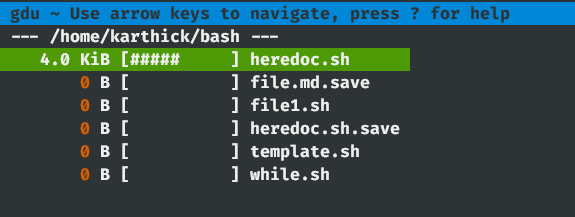
You cannot pass more than one argument.
There are few operations you can perform with the gdu command. Press ? to access help.
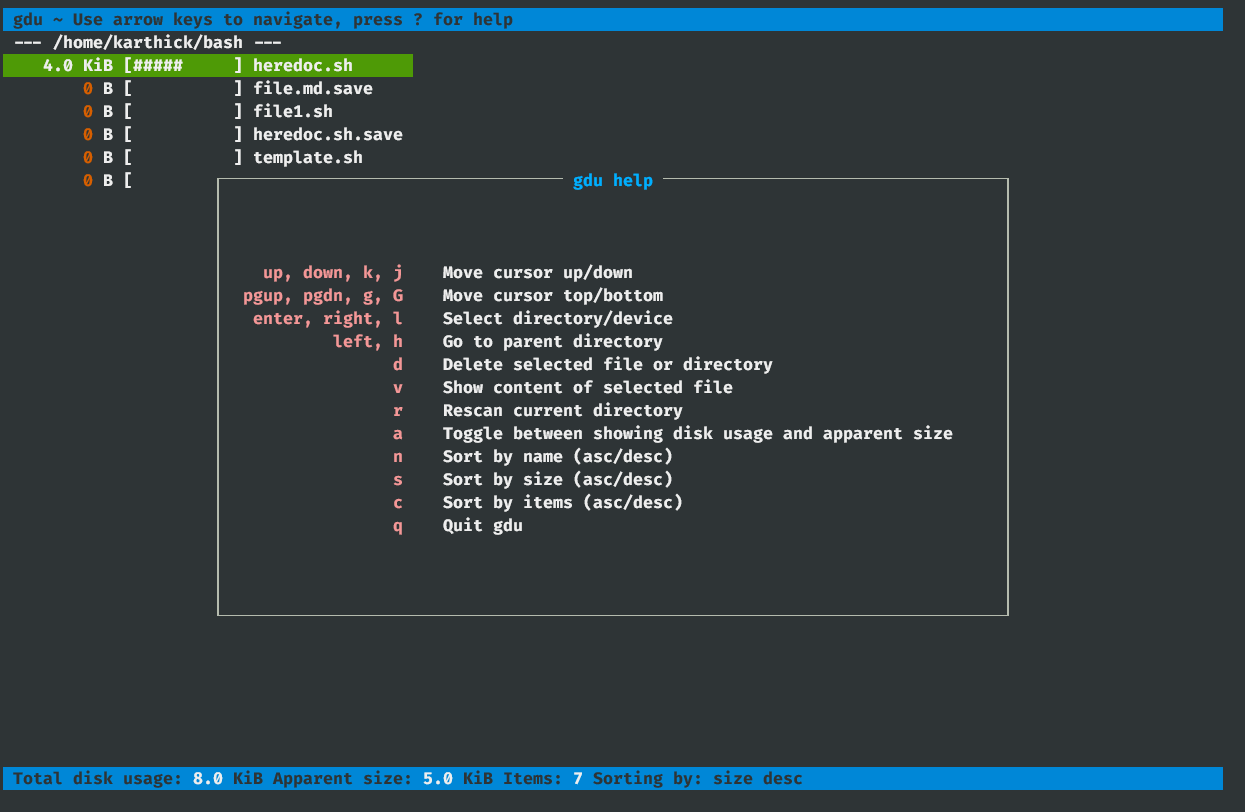
From the help you can see, there are options to sort, scan and move across directories. Access help and try exploring all the options to get comfortable.
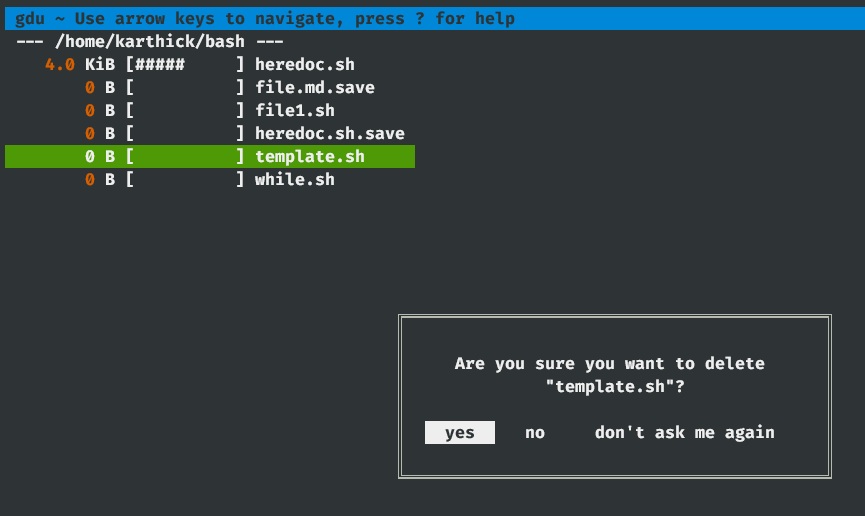
You can delete a file or directory by pressing the “d» key. It will prompt you for confirmation.
You can also view the content of any file by pressing the “v» key. To come out of the file press the escape key.

You can ignore certain directories from the output by adding directory names as an argument to the -i flag. Multiple directories can also be passed to the -i flag and each directory should be separated by commas.
$ gdu /home/karthick/ -i /home/karthick/.ssh,/home/karthick/sqlite
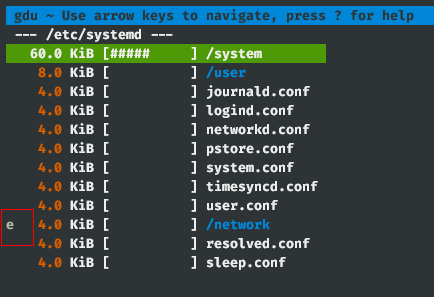
You may see special characters in the files and directories and each has a special meaning. From the below example you can see the “/network” directory is empty so the character “e” is prefixed to denote that.
[ ! ] ⇒ Error while reading directory [ . ] ⇒ Error while reading subdirectory. [ @ ] ⇒ File is socket or simlink. [ H ] ⇒ Hardlink which is already counted. [ e ] ⇒ Empty directory.
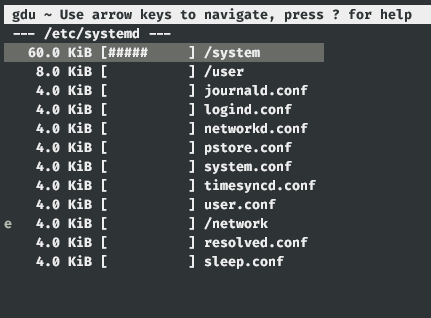
If you like black and white output, you can use “-c» flag. See the below image where the output is printed in black and white.
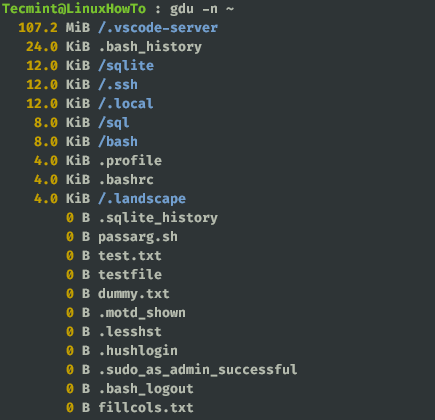
All the commands till now will launch an interactive mode to show disk stats. If you want the output in non-interactive mode use the “-n» flag.
That’s it for this article. Play with gdu and let us know how it suits your needs compared to other disk usage tools.
How to Install and Use GDU Disk Usage Analyzer on Ubuntu

With new uses for computers being discovered every day, disk usage has grown exponentially. Where 40GBs of HDD storage used to suffice for personal computing, now even terabytes of disk storage fail to do the job. All the resources and cache files have started taking up more storage space to perform more functions, and with that, it has brought forth the need for smarter disk utilization. Unlike Windows, Ubuntu 20.04 comes with multiple built-in options to help you with that. Let’s explore those in order to help you start with effective and efficient disc usage management.
Commands
Below you’ll find some of the commands to help you manage your disc usage through your terminal:
You can “df” to show the consumption for file system usage.

“du” will tell you the estimated usage by files and directories.

Typing “ls -al” will tell you about all the contents of the folder.

With “stat” you can find the status of a file/folder and the file system.

Installing the GDU Disk Usage Analyzer through the terminal
Along with many other Linux distros, Ubuntu also has a very user-friendly tool called “GDU Disk Usage Analyzer”. Written in “Golang”, the official documentation claims it to be a considerably fast tool, specifically if you have an SSD. It works pretty good with HDDs as well, but the performance isn’t nearly comparable to that when analyzing SSDs.
In order to get started with the installation, you can target the official GitHub page for a download link. You can run this to start the download:
$ wget https://github.com/dundee/gdu/releases/latest/download/gdu_linux_amd64.tgz

Once the archive has been completely downloaded, you need to extract it using the following command:
$ tar xzf gdu_linux_amd64.tgz
Executing this command will not produce any output, in order to check the results, you can use “ls -al” to see the output.

Note: the listing highlighted green is the extracted file.
Following that, you’ll be required to convert the extracted file into an executable in order to install the disk usage analyzer. You can do so through this:
$ sudo chmod +x gdu_linux_amd64
Following this execution, you’ll need to move this executable into the directory known as “/usr/bin/” through the “mv” command, like the following:
$ sudo mv gdu_linux_amd64 /usr/bin/gdu
With this move, GDU is officially installed on your Ubuntu 20.04 computer.
You can verify the install with this:

Using the GDU Disk Usage Analyzer
To start the tool, you can simply type:
Running this will update the terminal view to this:

You can either use the arrows to navigate the folders in the directory and get the stats, or you could open up GDU directly in any folder. You can specify the path like following:
Executing this will open up the tool in your desired folder.
You can use the following to know exactly how much disk space has been consumed and how much is available on all of the mounted disks:

For the apparent size of your directories, you can use:

While running the GDU Disk Analyzer, you may come across some flags before the names of your files and directories. Their meaning is as follows:
- ‘H’ means that the same file has already been counted.
- ‘@’ means that the file is a socket or a symlink.
- ‘.’ means that there was an error during the read operation for a sub-directory.
- ‘!’ means that there was an error during the read operation for a file or a directory.
- ‘e’ means that the directory is empty.
Uninstalling GDU
Unlike the installation process, uninstallation is a fairly simple process. All you have to do is remove the executable you placed in the bin directory. You can complete this uninstall by typing:
Running this will not produce any output. You can run the “gdu” command to ensure that the file has been successfully removed.
![]()
Conclusion
Keeping an eye on disk usage is a critical duty for system admins. It helps them decide whether enough space is available on the server for efficiently and effectively installing and running the required applications, creating a backup image of the system, and hence deleting the redundant files amongst many others. If you are using Ubuntu 20.04 or any other Linux-based OS for your server, now you can utilize GDU to keep an eye on the disk consumption without much hassle.