INDIAN ELITE HACKERS
How To Do DNS Spoofing In Kali Linux Using Ettercap
Now This time I am going to show you
» How to do dns spoofing in Kali Linux Using Ettercap»
Ettercap is a free and open source network
security tool for man-in-the-middle attacks
on LAN. It can be used for computer network
protocol analysis and security auditing. It
runs on various Unix-like operating systems
including Linux, Mac OS X, BSD and Solaris,
and on Microsoft Windows. It is capable of
intercepting traffic on a network segment,
capturing passwords, and conducting active
eavesdropping against a number of common
protocols.
1 — LAUNCH ETTERCAP
Open a root terminal and enter the command
ettercap -G to launch the graphical interface
of ettercap.
Once ettercap is open, select the ‘Unified
Sniffing ‘ option under the ‘Sniff ‘ menu.
Now, select your network interface and then
click ‘OK.’
WIFI = wlan0, Ethernet = eth0 | I am using wifi
so I will select wlan0 and click OK.
2 — TARGET HOSTS
Now it is time to target our hosts. To begin
this, select the » Scan for Hosts» option under
the » Hosts» menu, or just press Ctrl + S. It will
scan the hosts on your provided network
interface, and display how many were found in
the Logging box on the bottom. In my case,
4
hosts added to the hosts list.
Now, open the Hosts List by selecting Hosts
List under «Host» menu, or just press H.
Next — Select the default gateway and click
«Add to Target 1.» My default gateway is
192.168.1.1 . After that, select the host of the
VICTIM who you are going to perform the
attack on. My victim will be my Galaxy Note 3
(connected to my wifi). This works for any
device on your network. Ok, so the IP address
of my victim host is 192.168.1.14 . I will select
this host and then click «Add to Target 2.»
Ok, now select Current Targets under the
Targets menu, or just press «T» on your
keyboard. It will now show you the current
targets. If you followed the last step correctly,
your default gateway will be on one side, and
victim host on the other.
ARP POISONING
First, I am going to show you how to ARP
poison. We do this for all of the other mitm
attacks. Ok, so once you have your targets,
Simply select «Arp poisoning» off of the «Mitm»
menu. Next, select » Sniff remote connections»
and click OK.
Great, now we just need to do one more thing
to start the ARP poisoning. Select «Start
Sniffing» off of the «Sniff» menu, or you can
just use the shortcut: CTRL + W.
Now, you have ARP poisoned the victim! You
will now receive information as they log in to
sites. Example — I am going to log in to
Gmail.com on my phone and Ettercap
will show the login information in the logging
area. Now, as you see in the image below, we
have my username and password to HF :D. It
will sniff all logins.
The second Man in the Middle (Mitm) attack
I’m going to show you is DNS SPOOFING.
Here is the definition of DNS Spoofing, taken
from Wikipedia .
DNS spoofing is a computer hacking attack,
whereby data is introduced into a Domain
Name System name server’s cache database,
causing the name server to return an incorrect
IP address, diverting traffic to another
computer.
Basically, DNS spoofing is like this scenario:
Attacker does a dns spoofing attack to replace
http://twitter.com with http://192.168.1.4
(THE ATTACKERS’ TWITTER PHISHER). Having
done this, if the victim visits twitter.com, it
will show the ATTACKERS’ phisher instead of
real twitter.
Alright, so before we can dns spoof, you need
to configure a file called etter.dns . In Kali
Linux, this file is located in /usr/share/
ettercap/etter.dns. If it is not, no problem —
you can find it the file by running the
following command in terminal:
» locate etter.dns «
Alright, now we will open etter.dns in any type
of text editor. I am just going to use nano, by
entering the following commands:
cd usr/share/ettercap
nano etter.dns
Now, etter.dns will be open in nano terminal
text editor.
Take note that your etter.dns should be full of
text, mine isn’t because I have done this
before. Next, delete all of the text in this file.
You can’t do ctrl + A in terminal, so it might
be a little faster/easier to open this file in a
editor such as LeafPad, and edit it there.
Alright, now I have etter.dns open in nano
terminal text editor
Ok, so this file tells what we are going to DNS
spoof.
What we will do is enter the following:
twitter.com A 192.168.1.4
This will dns spoof twitter.com to 192.168.1.4
(which is going to be my credential harvester
for twitter).
If you wanted, you could enter multiple lines
like this:
twitter.com A 192.168.1.4
facebook.com A 74.125.225.41
myspace.com A 199.59.149.230
This would dns spoof twitter.com to
192.168.1.4 , facebook.com to
74.125.225.41 (Google), and myspace.com to
199.59.149.230 (Twitter). Or, you could just
put an asterisk which means it will spoof ALL
websites to your desired ip:
* A 192.168.1.4
I am just going to spoof Twitter for this
tutorial, so in etter.dns I am going to delete
everything and just enter twitter.com A
192.168.1.4 . Save the file. If you’re using
nano, you can save it by pressing Ctrl + X,
then Y, then press enter.
Great, now etter.dns is ready. I spoofed twitter
to 192.168.1.4 which is going to be my
credential harvester.
Ettercap — DNS Spoofing in Kali Linux
Today we gonna learn DNS spoofing in our Kali Linux system with the help of Ettercap, and How to use ettercap in Kali Linux? Before learning DNS spoofing we need a clear idea about DNS. DNS stands for Domain Name System. Domain Name System or DNS server translate a human-readable domain-name (such as google.com, nytimes.com) into a numerical IP address that is used to route communications between nodes.
As we know every system have an unique IP address, but it is very difficult to remember IP address of many website for a human. So a domain name attached with the IP address. To reduce the effort and improve the performance DNS saves translate data for a limited time which called cache.
This means if it receives another request for same translation, it can replay without needing to ask any other servers until the cache expires.
DNS spoofing is a crucial part of penetration testing. In this method attacker can divert a domain name to a incorrect IP. This results in traffic being diverted to the attacker’s computer or any other system.
With the help of DNS spoofing attacker can inject poison in victim’s address resolution protocol, and this attack is very hard to detect.
Here for this tutorial we use Ettercap to spoof DNS. Ettercap is a very popular and easy DNS spoofing tool.
How to install ettercap on kali linux? You don’t need Ettercap comes pre-installed with Kali Linux, before open it we do some configuration. Open our terminal window and edit etter.conf file in any text editor. The file is located in /etc/ettercap/etter.conf. We use leafpad and the command will be:
leafpad /etc/ettercap/etter.confThe screenshot is following:
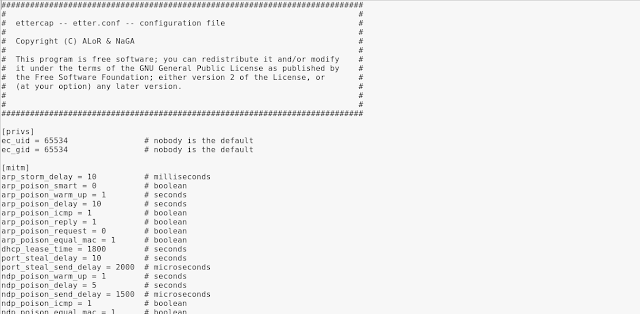
Now we scroll down for the Linux section. The screenshot is following;

Here we use IPtables, so we active two commands of IPtable section. We just need to remove those # to active the commands. See the screenshot given below:

Then we save and close it. Then we start our apache web server by following command:
Then we find our local IP by using following command:
The screenshot is following:
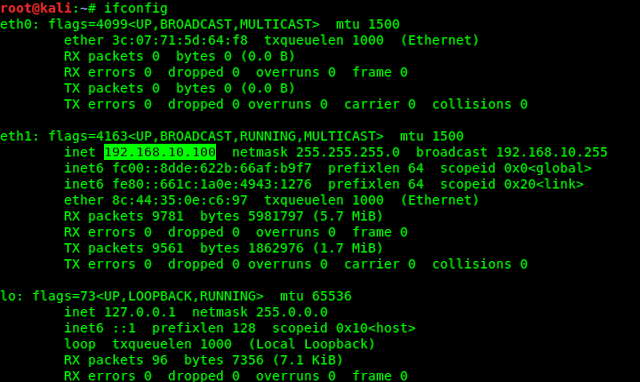
When we open our localhost, it is the homepage of apache web server. We can put anything in our localhost, like phishing page or any malicious web page. Now we change facebook.com domain with our localhost. Means if someone try to open facebook.com in our local network it will open our localhost page not the Facebook.
Now we need to configure another ettercap file called etter.dns by using following command :
leafpad /etc/ettercap/etter.dns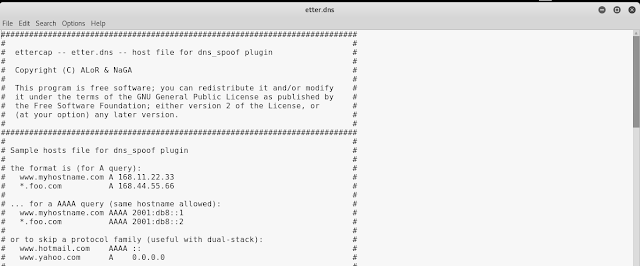
Then we scrool down and set our target. See the following screenshot:
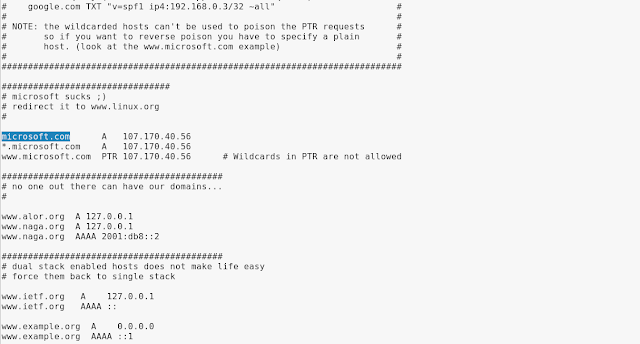
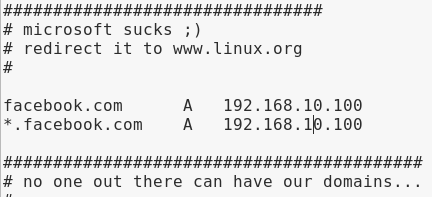
We remove the highlighted link in the screenshot, and put the link we want to redirect, in our case it is facebook.com so we put it, and we also change the next line for sub-domains.
Then we will change those IP with our local IP. Then we delete the third line. The configuration shown in following screenshot:
Then we save the file and close it.
Now we open Ettercap by using following command :
This will open ettercap’s Graphical User Interface(GUI) mode. The screenshot is following;

Then we click on Sniff and then Unified Sniffing. The screenshot is following:
Here we need to choose our network interface. Then it will start unified sniffing.
Now we choose our target. Before choosing target we need to stop unified sniffing. To do that we click on the «Start» menu and click on «Stop Sniffing«.
Then we go to Target menu and click on Current Target. We can see that we don’t have any target in the following screenshot:

We need to scan for host. So we click on Host menu and click on Scan for Hosts.
Then we can see the Host List from the Host menu. Here we may see some hosts. We need to choose our default gateway as target 1 and victim as target 2. In our case we are the victim so we added our IP in target.
Then we go to the MITM(Man In The Middle) menu, then we click on ARP Poisoning and select «Sniff remote connection«, then click on OK. Now the ARP Poisoning is set.
The next step is we need to go into the Plugins section and then go to Manage the Plugins, and we active the dns-spoof plugin by double clicking on it.
The screenshot is following:

Now we are all set. We go to the Start menu and click on the Start Sniffing.
Now we open our browser and try to open facebook.com but we will redirect ti our localhost. Here any web page we can set our localhost. If there was a phishing page then it will be very dangerous. Want to learn host malicious web pages in localhost try this tutorials: