Добавить диск linux vmware
You are using an outdated browser. Please upgrade your browser to improve your experience.
In some circumstances, you might need to give a virtual machine direct access to a physical disk or unused partition on the host computer.
A physical disk directly accesses an existing local disk or partition. You can use physical disks to run one or more guest operating systems from existing disk partitions.
Workstation Pro supports physical disks up to 2TB capacity. Booting from an operating system already set up on an existing disk or partition is not supported.
Running an operating system natively on the host computer and switching to running it inside a virtual machine is similar to pulling the hard drive out of one computer and installing it in a second computer that has a different motherboard and hardware. The steps you take depend on the guest operating system in the virtual machine. In most cases, a guest operating system that is installed on a physical disk or unused partition cannot boot outside of the virtual machine, even though the data is available to the host system. See the Dual-Boot Computers and Virtual Machines technical note on the VMware Web site for information about using an operating system that can also boot outside of a virtual machine.
After you configure a virtual machine to use one or more partitions on a physical disk, do not modify the partition tables by running fdisk or a similar utility in the guest operating system. If you use fdisk or a similar utility on the host operating system to modify the partition table of the physical disk, you must recreate the virtual machine physical disk. All files that were on the physical disk are lost when you modify the partition table.
Important: You cannot use a physical disk to share files between the host computer and a guest operating system. Making the same partition visible to both the host computer and a guest operating system can cause data corruption. Instead, use shared folder to share files between the host computer and a guest operating system.
How to Create/Add a New Virtual Disk for an Existing Linux Virtual Machine
This article helps you to create and add a new virtual disk to an existing Linux virtual machine on VMware. Here are some steps for adding a new SCSI based virtual disk on a CentOS Linux virtual machine. We are assuming that you are already familiar with Linux system administration skills and having knowledge of vCenter Server or vSphere Client. For a full description of the utilities mentioned in this article, please refer to the manuals.
Solution
To add a new virtual disk for an existing Linux virtual machine, Log in as root on your Linux virtual machine. Run this below command and make note of the sdx entries, means list of existing hard disks.
# ls /dev/sd* /dev/sda /dev/sda1 /dev/sda2
Log into the vCenter Server using the vSphere Client.

In the vSphere Client inventory, right-click the virtual machine and select Edit Settings.
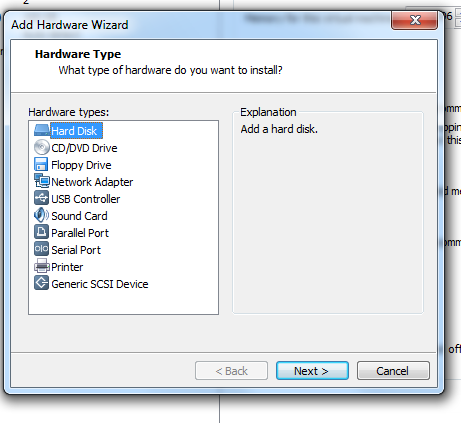
Click the Hardware tab and click Add.
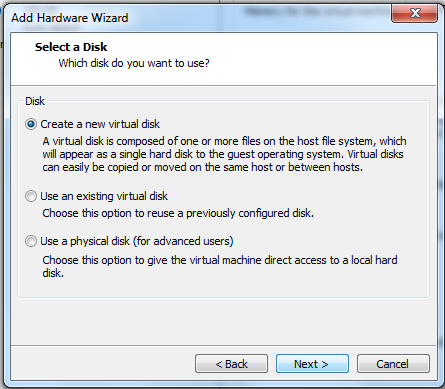
Select Hard Disk and click Next.
Complete the wizard. After adding the Hard disk to VMware/vSphere/vCenter it looks like this.

Reboot the Linux virtual machine.
Log into the Virtual machine using the root credentials and run this command.
# ls /dev/sd* /dev/sda /dev/sda1 /dev/sda2 /dev/sdb
Create an ext3 file system on the new disk using the new ‘sdb’ disk from the above list of disks
# mkfs -t ext3 /dev/sdb mke2fs 1.41.12 (17-May-2010) /dev/sdb is entire device, not just one partition! Proceed anyway? (y,n) y Filesystem label= OS type: Linux Block size=4096 (log=2) Fragment size=4096 (log=2) Stride=0 blocks, Stripe width=0 blocks 1310720 inodes, 5242880 blocks 262144 blocks (5.00%) reserved for the super user First data block=0 Maximum filesystem blocks=4294967296 160 block groups 32768 blocks per group, 32768 fragments per group 8192 inodes per group Superblock backups stored on blocks: 32768, 98304, 163840, 229376, 294912, 819200, 884736, 1605632, 2654208, 4096000 Writing inode tables: done Creating journal (32768 blocks): done Writing superblocks and filesystem accounting information: done This filesystem will be automatically checked every 38 mounts or 180 days, whichever comes first. Use tune2fs -c or -i to override.
You may see an alert that, you are performing this operation on an entire device, not a partition. That is correct, as you created a single virtual disk of the intended size. This is assuming you have specified the correct device.
Caution: Ensure that you have the selected the right device, there is no undo.
Run the fdisk command to verify the existence of the disk you created.
# fdisk -l Disk /dev/sda: 21.5 GB, 21474836480 bytes 255 heads, 63 sectors/track, 2610 cylinders Units = cylinders of 16065 * 512 = 8225280 bytes Sector size (logical/physical): 512 bytes / 512 bytes I/O size (minimum/optimal): 512 bytes / 512 bytes Disk identifier: 0x000c664e Device Boot Start End Blocks Id System /dev/sda1 * 1 64 512000 83 Linux Partition 1 does not end on cylinder boundary. /dev/sda2 64 2611 20458496 8e Linux LVM Disk /dev/sdb: 21.5 GB, 21474836480 bytes 255 heads, 63 sectors/track, 2610 cylinders Units = cylinders of 16065 * 512 = 8225280 bytes Sector size (logical/physical): 512 bytes / 512 bytes I/O size (minimum/optimal): 512 bytes / 512 bytes Disk identifier: 0x00000000 Disk /dev/mapper/VolGroup-lv_root: 18.8 GB, 18798870528 bytes 255 heads, 63 sectors/track, 2285 cylinders Units = cylinders of 16065 * 512 = 8225280 bytes Sector size (logical/physical): 512 bytes / 512 bytes I/O size (minimum/optimal): 512 bytes / 512 bytes Disk identifier: 0x00000000 Disk /dev/mapper/VolGroup-lv_swap: 2147 MB, 2147483648 bytes 255 heads, 63 sectors/track, 261 cylinders Units = cylinders of 16065 * 512 = 8225280 bytes Sector size (logical/physical): 512 bytes / 512 bytes I/O size (minimum/optimal): 512 bytes / 512 bytes Disk identifier: 0x00000000
Run this command to create a mount point for the new disk and mount that disk
# mkdir /newdisk # mount /dev/sdb /newdisk
To verify the mount run below command –
# df -h Filesystem Size Used Avail Use% Mounted on /dev/mapper/VolGroup-lv_root 18G 2.0G 15G 12% / tmpfs 491M 0 491M 0% /dev/shm /dev/sda1 477M 42M 411M 10% /boot /dev/sdb 20G 173M 19G 1% /newdisk
Now the new disk is available to you for usage. To mount the new disk or volume automatically at the boot time follow the below procedure –
Run this command to display the current /etc/fstab
# cat /etc/fstab# # /etc/fstab # Created by anaconda on Thu Dec 3 20:25:38 2015 # # Accessible filesystems, by reference, are maintained under '/dev/disk' # See man pages fstab(5), findfs(8), mount(8) and/or blkid(8) for more info # /dev/mapper/VolGroup-lv_root / ext4 defaults 1 1 UUID=e1e6c609-a94f-400f-9dc5-93faf0aab358 /boot ext4 defaults 1 2 /dev/mapper/VolGroup-lv_swap swap swap defaults 0 0 tmpfs /dev/shm tmpfs defaults 0 0 devpts /dev/pts devpts gid=5,mode=620 0 0 sysfs /sys sysfs defaults 0 0 proc /proc proc defaults 0 0
Using a text editor to edit fstab and add this line to add the disk to /etc/fstab so that it is available across reboots
/dev/sdb /newdisk ext3 defaults 1 3
After this configuration you are able to add new Virtual hard disk drives to existing Linux machines on VMware/vSphere/vCenter. This will help in the provision of a hard disk for backups or stored data to the existing Centos Linux machines.

I love programming (: That’s all I know
Добавить диск linux vmware
You are using an outdated browser. Please upgrade your browser to improve your experience.
When you map a virtual disk and its associated volume to a drive on the host system, you can connect to the virtual disk without opening a virtual machine.
After you map the virtual disk to a drive on the host system, you cannot power on any virtual machine that uses the disk until you disconnect the disk from the host system.
Important: If you mount a virtual disk that has a snapshot and then write to the disk, you can irreparably damage a snapshot or linked clone created from the virtual machine. Note that Workstation Player does not support taking snapshots or deleting them.
Mapping a virtual disk to a host system is not supported in the standalone version of Workstation Player . Virtual disk mapping is supported in the Workstation Player version included with Workstation Pro.
Prerequisites
- Power off all virtual machines that use the virtual disk.
- Verify that the virtual disk ( .vmdk ) files on the virtual disk are not compressed and do not have read-only permissions.
- Verify that the virtual disk is unencrypted. You cannot map or mount encrypted disks.
Procedure
- Select the virtual machine and select Virtual Machine > Virtual Machine Settings .
- On the Hardware tab, select Hard Disk , click Utilities , and select Map .
- On a Linux host, select the Mount in read-only mode check box in the Mount Disk dialog box.
This setting prevents you from accidentally writing data to a virtual disk that might be the parent of a snapshot or linked clone. Writing to such a disk might make the snapshot or linked clone unusable.
The drive appears on the host system. You can read from or write to files on the mapped virtual disk on the host system.