- Как изменить разрешение экрана в Linux
- How to Set A Custom Screen Resolution in Ubuntu Desktop
- Changing the Resolution or Orientation of the Screen Using Displays
- Changing the Resolution or Orientation of the Screen Using Xrandr
- Set Screen Resolution in Ubuntu
- How to Add Missing or Set Custom Display Resolution Using xrandr
Как изменить разрешение экрана в Linux

В последнее время часто приходилось сталкиваться с задачей изменения разрешения экрана в Linux. Найти её решение в интернете не сложно. Но чтобы не искать каждый раз решил оставить памятку и у себя на блоге. Дополнительно оказалось, что во многих таких решениях (по всей видимости скопированных друг у друга) демонстрируется непонимание вывода команды xrandr.
Прежде чем менять разрешение экрана нужно выяснить несколько моментов:
- какое разрешение у нас сейчас;
- какое разрешения нам нужно;
- через какой интерфейс (порт) подключен монитор.
На первый и третий вопросы отвечает команда xrandr.

Согласно статье: «xrandr — это расширение X сервера, позволяющее производить настройки режимов работы мониторов».
- наш монитор подключен к интерфейсу Virtual1 и работает с разрешением 1024х768 пикселей (соответствующая строка помечена на рисунке, так же соответствующее разрешение помечается звездочкой в списке);
- список доступных интерфейсов (Virtual1, Virtual2, Virtual3 и т.д.). Мы не будем менять интерфейс.
Теперь главный вопрос, который вызывает непонимание: что выводится в двух колонках? Понятно, что в первой — разрешение экрана, а во второй — его частота в герцах. Но что это за разрешение? Во многих интернет ответах на вопрос «как изменить разрешение экрана в Linux» пишут, что это «доступные разрешения для уcтановки». Это не совсем так. Дальнейшие описываемые действия авторов (создание режима, его добавление непонятно куда и переключение на него) являются абсолютно лишними и только вводят читателей в заблуждение. Так что же выводит xrandr?
Она выводит список доступных режимов работы. То есть, если в нашем примере выводится разрешение 1440×900, то режим для него уже существует. Его не нужно заново создавать и тем более добавлять куда-то. Для переключения на него нужно использовать всего одну команду:
xrandr --output Virtual1 --mode 1440x900
или более короткий вариант:
Команда —newmode нужна для создания нового режима, которого нет в выводе xrandr. А команда —addmode «рассказывает» о нем xrandr.
Допустим, мы хотим задать разрешение 1500×800. Его нет в выводе xrandr, поэтому нужно создать соответствующий ему режим. Но вначале нужно получить всю необходимую информацию. Это делается с помощью команды cvt. В терминале вбиваем:
Аббревиатура cvt расшифровывается как Coordinate Video Timings. Так называется стандарт (VESA-2013-3 v1.2), задающий тайминги компонентов видеосигнала. В качестве параметров утилиты cvt мы указываем желаемое разрешение. Ее вывод направляется в текстовый файл 1.txt (удобнее для последующего копирования текста). Открыв его, мы увидим следующее:
# 1504×800 59.92 Hz (CVT) hsync: 49.80 kHz; pclk: 98.00 MHz
Modeline «1504x800_60.00» 98.00 1504 1584 1736 1968 800 803 813 831 -hsync +vsync
Для создания режима нам понадобится строка после слова Modeline. Обратите внимание: cvt несколько подкорректировала наш запрос. Видимо, так оно лучше соответствует стандартам. Теперь создаем режим и добавляем его в список доступных режимов.
xrandr --newmode "1504x800_60.00" 98.00 1504 1584 1736 1968 800 803 813 831 -hsync +vsync xrandr --addmode Virtual1 1504x800_60.00
Теперь если мы вновь проверим список доступных режимов, то увидим там наш режим

Осталось только переключиться на него любым описанным ранее способом.
Иногда при добавлении нового режима возникает ошибка.

Как пишут на форумах, данная проблема появляется на закрытых драйверах nvidia. Ее решение, как правило, основывается на ручном редактировании файла настроек xorg.conf. Но об этом может быть в другой раз.
P.S. Имена интерфейсов (Virtual1, Virtual2 и т.д.) выглядят необычно потому, что ве эти эксперименты проводились на виртуальной машине. На реальной аппаратуре они обычно имеют вид: VGA1, DVI1 и др. Например, на моем стационарном компьютере с Linux на борту доступны интерфейсы: VGA-0, DVI-D-0 и HDMI-0.
P.P.S. Согласно википедии: «VESA(Video Electronics Standards Association) — ассоциация стандартизации видеоэлектроники, основанная в 1989 году компанией NEC Home Electronics и восемью другими производителями видеоадаптеров. Первоначально задачей ставилось создание стандарта SVGA(800х600 пикселей) для видеодисплеев. После этого, VESA продолжила создавать стандарты, в основном относящиеся к функционированию видео периферии в IBM-совместимых компьютерах.»
How to Set A Custom Screen Resolution in Ubuntu Desktop
Is your screen (or external monitor) resolution is low? thus making the items on your screen look larger and less clear? Or do you want to simply increase the current maximum resolution or add a custom resolution?
In this article, we will show how to add missing or set custom display resolution in Ubuntu and its derivatives such as Linux Mint. By the end of this article, you will be able to set to a higher resolution, making content on your screen appear sharper and clearer.
Changing the Resolution or Orientation of the Screen Using Displays
Normally, to change the resolution or orientation of the screen, you can use the Displays graphical user interface tool (open the Activities overview and type Displays, click to open it or System Menu then type Displays and open it).
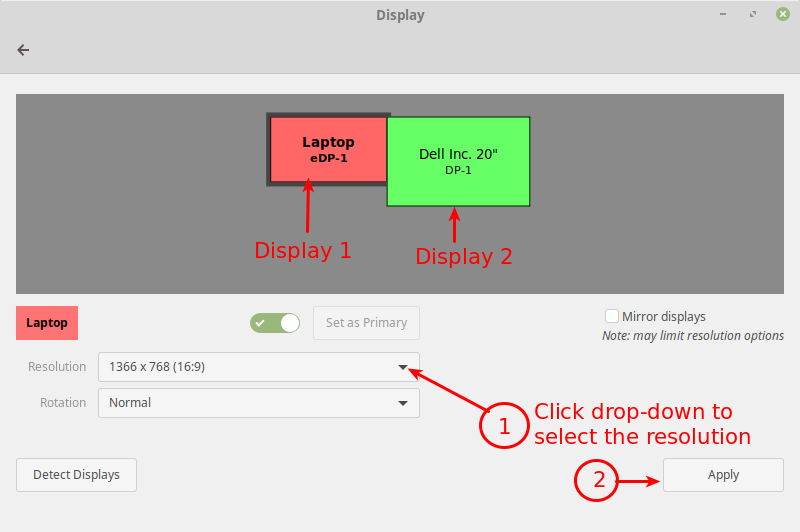
Note: In case you have multiple displays connected to your computer (as shown in the following image), if they are not mirrored, you can have different settings on each display. To change the settings for a display device, select it in the preview area.
Next, select the resolution or scale you want to use, and choose the orientation then click Apply. Then select Keep This Configuration.
Changing the Resolution or Orientation of the Screen Using Xrandr
Alternatively, you can also use the powerful xrandr tool (a command-line interface to RandR (Resize and Rotate) X Window System extension) which is used to set the size, orientation and/or reflection of the outputs for a screen.
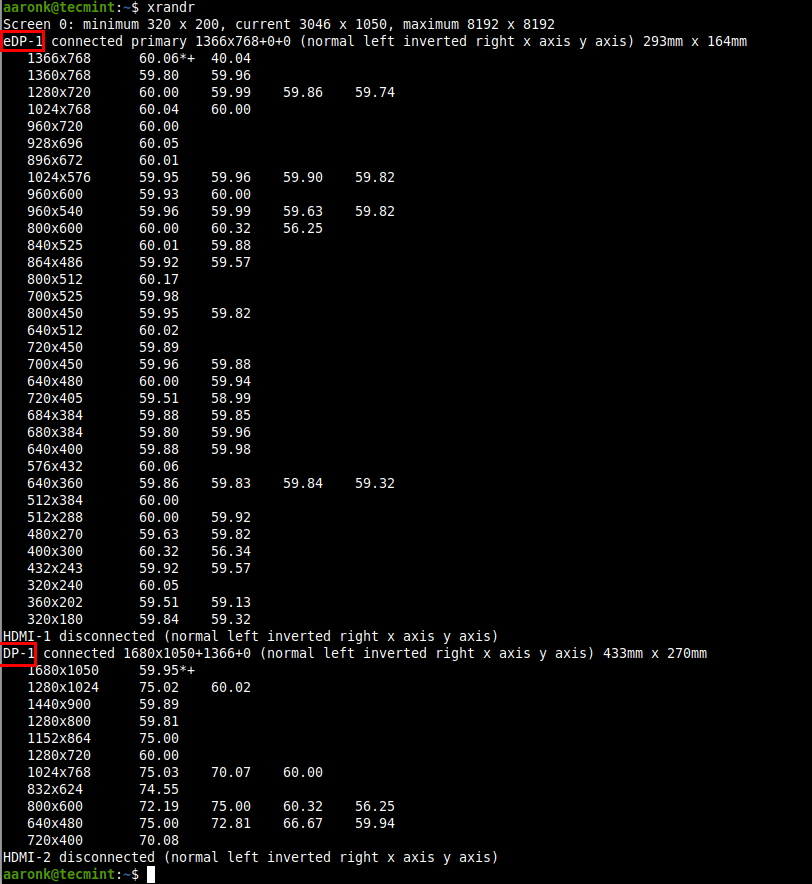
You can also use it to set the screen size or list all active monitors as shown.
$ xrandr --listactivemonitors

To show the names of different outputs available on your system and resolutions available on each, run xrandr without any arguments.
Set Screen Resolution in Ubuntu
To set the resolution for a screen for an external monitor named DP-1 to 1680×1050, use the —mode flag as shown.
$ xrandr --output DP-1 --mode 1680x1050
You can also set the refresh rate using the —rate flag as shown.
$ xrandr --output DP-1 --mode 1680x1050 --rate 75
You can also use the —left-of , —right-of , —above , —below , and —same-as options to arrange your screens either relatively to each other.
For example, I want my external monitor (DP-1) to be positioned left of the Laptop screen (eDP-1) in correspondence to the actual physical positioning:
$ xrandr --output DP-1 --left-of eDP-1
Keep in mind that any changes made using xrandr will only last until you log out or restart the system. To make xrandr changes persistently, use the xorg.conf configuration files for Xorg X server (run man xorg.conf for details on how to create a xorg.conf file) – this is the most effective method.
You can also use the ~/.xprofile file (add xrandr commands in it), however, there are some disadvantages of using this method, one is that this script is read fairly late in the startup process, thus it will not alter the resolution of the display manager (if you use one e.g lightdm).
How to Add Missing or Set Custom Display Resolution Using xrandr
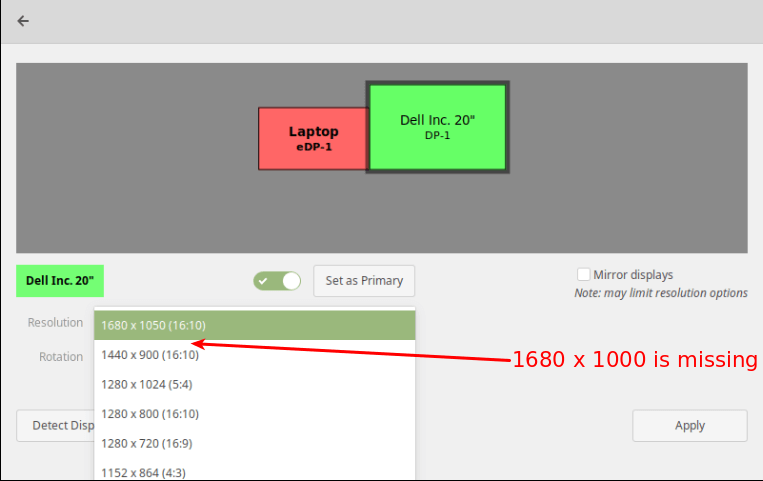
It is possible to add a missing or custom display resolution e.g 1680 x 1000 to Displays panel, for a specific display device (DP-1), as explained below.
To add a missing or custom display resolution, you need to calculate the VESA Coordinated Video Timing (CVT) modes for it. You can do this using the cvt utility as follows.
For example, if you need a horizontal and vertical resolution of 1680 x 1000, run the following command.
Next, copy the Modeline (“1680x1000_60.00″ 139.25 1680 1784 1960 2240 1000 1003 1013 1038 -hsync +vsync) from the output of the cvt command and use it to create a new mode using the xrandr as shown.
$ xrandr --newmode "1680x1000_60.00" 139.25 1680 1784 1960 2240 1000 1003 1013 1038 -hsync +vsync
Then add the new mode to the display.
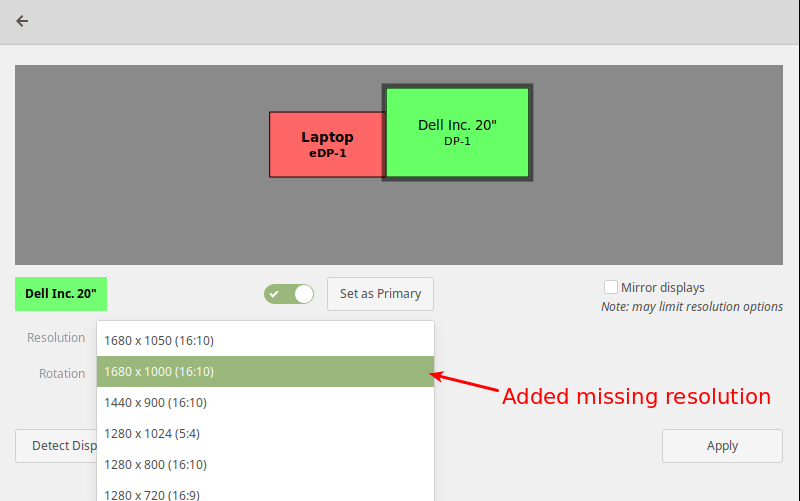
$ xrandr --addmode DP-1 "1680x1000_60.00"

Now open the Displays and check if the new resolution has been added.
The above changes are only temporary and work for the current session (they last until you log out or restart the system).
To add the resolution permanently, create a script called external_monitor_resolution.sh in the directory /etc/profile.d/.
$ sudo vim /etc/profile.d/external_monitor_resol.sh
Then add the following lines in the file:
xrandr --newmode "1680x1000_60.00" 139.25 1680 1784 1960 2240 1000 1003 1013 1038 -hsync +vsync xrandr --addmode DP-1 "1680x1000_60.00"
Save the changes and exit the file.
For more information on how xrandr works and how to use it, read its man page:
That brings us to the end of this article. If you have any thoughts to share or queries, reach us via the feedback form below.