- Running Linux Docker Containers on Windows Server 2019
- 3 Answers 3
- Getting started with Linux Containers on Windows Server 2019
- Prerequisites
- Install Docker EE
- Enable Linux Container Support
- Deploy a Linux Container
- (Optional) Install Docker Compose
- (Optional) Enable Remote Management of Docker Engine
- Как запустить Docker контейнеры на Windows Server 2019
- Как запустить Docker контейнеры на Windows Server 2019
- Шаг 1. Включите функцию контейнеров в Windows Server 2019
- Шаг 2. Установите Docker на Windows Server 2019
- Шаг 3: Запустите Docker контейнер
- Запуск контейнеров Linux на Windows Server 2019
Running Linux Docker Containers on Windows Server 2019
I am exploring docker for one of my company project. In this project I need to run the MemCached on CentOS and I prefer to run this in a docker container. I have successfully able to run this on Windows 10 machine with Docker Community Edition installed. But our project needs Windows Server 2019 in production and I want to run the container of same image (MemCached on CentOS) on windows server 2019. I googled a lot and found a link for running Linux Containers on Windows Server 2019. But as per the above link we are installing docker package in Preview version. I believe that this Preview version I should not use in Production. Is my understanding is correct or not? Also is there any other stable released way to run Linux containers on Windows Server 2019. Thanks in advance.
3 Answers 3
As per the Preview version you can remove the -RequiredVersion preview tag and then install. The process will install Docker Enterprise Edition on Server 2019 and not the CE version as the one for WIN 10. If the container you want to run is a Linux container then you may face some tough times reason being
- The containers(linux) runs on Server 2019 using LCOW way and the LCOW way is an experimental feature.
- You said that you want to run container in Production environment and I would say not to use and experimental feature for Production.
Incase you need to run the containers on a server edition of Windows ie Server 2016 or Server 2019 you can go with the Docker CE (ie the same .exe that works on Win 10). One important point to note is that on server 2016 all the docker versions are not supported. Docker 2.0.0.31259 is the supported version of Docker on Server 2016.(Latest Docker 2.1.0.3 does not work on server 2016 but it works on Server 2019
Note : I face the same issues as you face ie you want the run the containers on Server 2019. The above are my findings so far. There is no clarity from windows side about how to run docker containers. Please refer to my answer :Here for better understanding
Getting started with Linux Containers on Windows Server 2019
As some of you would have seen, I spent some time last week getting familiar with Linux Containers on Windows Server 2019, and I thought I would share what I did to get it all up and running.
Prerequisites
To get started, you’ll need to have the following in place:
- A Windows Server 2019 VM or Bare Metal host
- (VM-Only) Nested Virtualization enabled
- (VM-Only) MAC Address Spoofing enabled
- Hyper-V and Container Windows Features Enabled.
- You can install these from command line with
- Install-WindowsFeature -Name Hyper-V,Containers -IncludeAllSubFeature -IncludeManagementTools
Install Docker EE
Installing Docker involves 2 steps, installing the Package Provider that contains the latest version of Docker, and installing the Docker Package.
Installing the Package Provider is straight forward
Install-Module DockerMSFTProviderOnce that’s in place, we need to import the new module and the associated package provide
Import-Module -Name DockerMSFTProvider -Force Import-Packageprovider -Name DockerMSFTProvider -ForceWe can confirm this has worked by using Find-Package to see the new docker package is available
PS C:\> Find-Package docker ################################ # Expected Output ################################ Name Version Source Summary ---- ------- ------ ------- Docker 18.09.1 DockerDefault Contains Docker EE for use with Windows Server. Docker 1.3.2 PSGallery This module helps with development using Doc.Now all that is left is to install Docker itself
Install-Package -Name Docker -Source DockerDefaultEnable Linux Container Support
Now that we have Docker installed, we need to make some changes to the default configuration to enable support for Linux Containers.
This involves setting an Environment variable and creating a docker daemon configuration file.# Set LCOW_SUPPORTED Variable to 1 for enabled [Environment]::SetEnvironmentVariable("LCOW_SUPPORTED", "1", "Machine") # Enable Experimental Features in Dockerd daemon.conf $configfile = @" "experimental": true > "@ $configfile | Out-File -FilePath C:\ProgramData\docker\config\daemon.json -Encoding ascii -ForceBecause Linux Containers still need a Linux kernel, we need to deploy LCOW for it to run.
You should use the latest LCOW release hereInvoke-WebRequest -Uri "https://github.com/linuxkit/lcow/releases/download/v4.14.35-v0.3.9/release.zip" -UseBasicParsing -OutFile release.zip Expand-Archive release.zip -DestinationPath "$Env:ProgramFiles\Linux Containers\."And all that’s left to do now is restart the server for everything to apply.
Deploy a Linux Container
You may be wondering why I’ve got a section for actually deploying a container, as surely it will ‘just work’ now everything is setup, and that’s true, but because we now can deploy either Windows or Linux containers, we need to specify which we want.
This is done with an additional switch, —platform
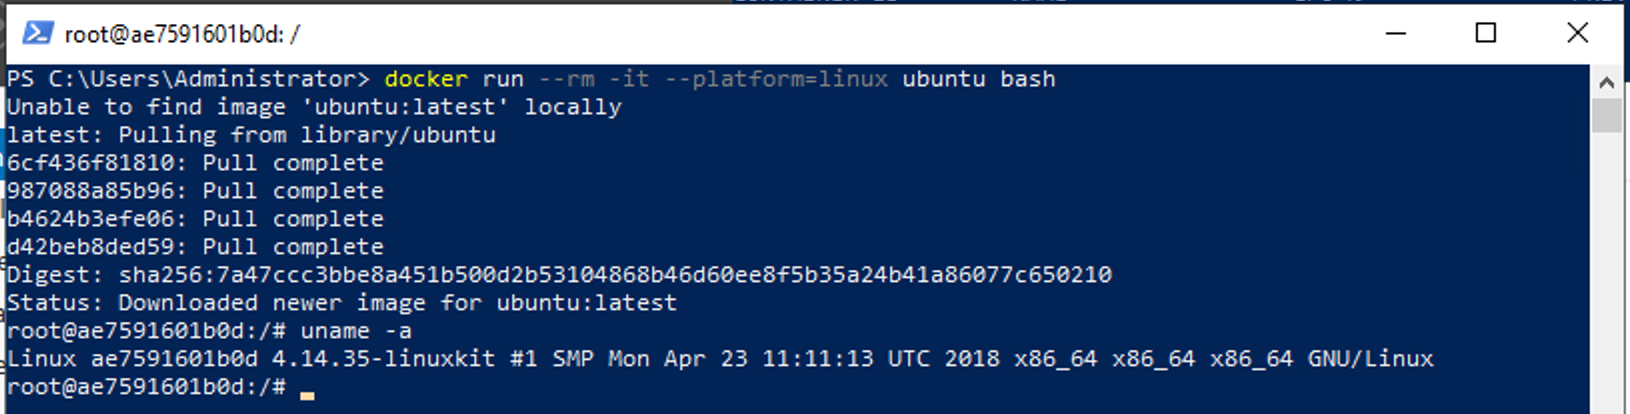
Personally I like to use ubuntu as a quick test containerdocker run --rm -it --platform=linux ubuntu bash
Now if you’re like me and planning on deploying mostly Linux Containers, you probably don’t want to specify the —platform parameter every time you start a container.
Luckily the default platform can be changes to Linux with another Environment variable.[Environment]::SetEnvironmentVariable("LCOW_API_PLATFORM_IF_OMITTED", "linux", "Machine")(Optional) Install Docker Compose
Now if you’ve been dealing with Docker on Linux for a while, you’ll probably be used to using Docker-Compose. Good news is it’s available for Windows Server as well, and is just as easy to deploy.
$dockerComposeVersion = "1.23.2" Invoke-WebRequest "https://github.com/docker/compose/releases/download/$dockerComposeVersion/docker-compose-Windows-x86_64.exe" -UseBasicParsing -OutFile $Env:ProgramFiles\docker\docker-compose.exe(Optional) Enable Remote Management of Docker Engine
To enable access to the docker engine from other machines, such as your local workstation or a portainer deployment, we need to add a hosts entry to the Dockerd daemon.json file.
In our setup, we can do this with an easy find and replace.# New host entry to add $RemoteAccess = @" "hosts": ["tcp://0.0.0.0:2375", "npipe://"], "@ # Get Existing Config $Config = Get-content C:\ProgramData\docker\config\daemon.json # Insert our host entry into the beginning of the file and write the changes back. $Config.Replace(",$RemoteAccess)|Out-File -FilePath C:\ProgramData\docker\config\daemon.json -Encoding ascii -Force # Restart the docker service to apply the changes Restart-Service DockerAs always, I hope this was helpful to someone else out there looking to experiment with the latest and greatest from Microsoft.
Ben Thomas is a highly skilled and experienced Solutions Advisor working at Datacom Systems Ltd for the past decade, where he has gained a wealth of knowledge and expertise in the field. Ben is well-respected within the industry and has been recognized for his contributions as a Microsoft MVP.
In addition to his work at Datacom Systems, Ben is passionate about learning and sharing his knowledge with others in the IT community. He is dedicated to staying up-to-date on the latest technologies and trends, and is particularly skilled in the areas of Hybrid Cloud and Private Cloud.
Как запустить Docker контейнеры на Windows Server 2019
В этом руководстве мы рассмотрим, как настроить сервер Windows 2019 для запуска контейнеров Docker.
Docker изменил правила работы с контейнерами приложений и проектированием и развертыванием микросервисов.
Docker позволяет легко создавать, отправлять и запускать образы, содержащие приложения с их зависимостями, и избегать сумасшедших проблем с зависимостями, характерных для виртуальных машин.
Docker engine – это то, что заставляет работать контейнеры.
Первоначально он был написан для Linux, но была проделана большая работа, чтобы позволить пользователям Windows и macOS запускать контейнеры Docker.
Как запустить Docker контейнеры на Windows Server 2019
Прежде чем вы сможете использовать контейнеры Windows для запуска нескольких изолированных приложений вашей системы, вам нужно включить функцию контейнеров и установить Docker на Windows Server 2019.
Шаг 1. Включите функцию контейнеров в Windows Server 2019
Первый шаг – включить функцию контейнеров Windows Server 2019. Откройте PowerShell от имени администратора.
Запустите следующие команды.
Install-Module -Name DockerMsftProvider -Repository PSGallery -Force
Это установит Docker-Microsoft PackageManagement Provider из галереи PowerShell.
Пример вывода, как показано ниже:
Шаг 2. Установите Docker на Windows Server 2019
как только функция «Контейнеры» будет включена в Windows Server 2019, установите последнюю версию Docker Engine и Client, выполнив следующую команду в сеансе PowerShell.
Install-Package -Name docker -ProviderName DockerMsftProvider
Согласитесь на установку, используя «yes», «Y» или «А», чтобы согласиться со всеми.
После завершения установки перезагрузите компьютер.
Установленную версию Docker можно проверить с помощью:
Administrator> Get-Package -Name Docker -ProviderName DockerMsftProvider Name Version Source ProviderName ---- ------- ------ ------------ docker 18.09.2 DockerDefault
Тожe самое можно выполнить командой docker —version
PS C:\Users\Administrator> docker version Client: Version: 18.09.2 API version: 1.39 Go version: go1.10.6 Git commit: 1ac774dfdd Built: unknown-buildtime OS/Arch: windows/amd64 Experimental: false error during connect: Get http://%2F%2F.%2Fpipe%2Fdocker_engine/v1.39/version: open //./pipe/docker_engine: The system cannot find the file specified. In the default daemon configuration on Windows, the docker client must be run elevated to connect. This error may also indicate that the docker daemon is not running.
Обновление можно выполнить в любое время, выполнив следующие команды в PowerShell.
Install-Package -Name Docker -ProviderName DockerMsftProvider -Update -Force Start-Service Docker
Шаг 3: Запустите Docker контейнер
После запуска службы Docker Engine загрузите предварительно созданный образец образа .NET из реестра Docker Hub:
docker pull microsoft/dotnet-samples:dotnetapp-nanoserver-1809
Затем разверните простой контейнер с приложением .Net Hello World.
docker run microsoft/dotnet-samples:dotnetapp-nanoserver-1809
Контейнер запустится, напечатает сообщение hello world и завершится.
Запуск контейнеров Linux на Windows Server 2019
Из коробки Docker в Windows запускает только контейнер Windows.
Чтобы использовать контейнеры Linux на Windows Server, вам нужно использовать Docker Enterprise Edition Preview, который включает в себя полную систему LinuxKit для запуска контейнеров Docker Linux.
Удалите ваш текущий Docker CE.
Uninstall-Package -Name docker -ProviderName DockerMSFTProvider
Включите вложенную виртуализацию, если вы используете Docker Containers с использованием виртуальной машины Linux, работающей в Hyper-V.
Get-VM WinContainerHost | Set-VMProcessor -ExposeVirtualizationExtensions $true
Затем установите текущую предварительную сборку Docker EE.
Install-Module DockerProvider Install-Package Docker -ProviderName DockerProvider -RequiredVersion preview
Включить систему LinuxKit для запуска контейнеров Linux
[Environment]::SetEnvironmentVariable("LCOW_SUPPORTED", "1", "Machine")Перезапустите Docker Service после изменения.
Вытащите образ тестового докера.
> docker run -it --rm ubuntu /bin/bash root@1440a7fef7e0:/# cat /etc/os-release NAME="Ubuntu" VERSION="18.04.1 LTS (Bionic Beaver)" ID_LIKE=debian PRETTY_NAME="Ubuntu 18.04.1 LTS" VERSION_ID="18.04" HOME_URL vglnk" href="https://www.ubuntu.com/" rel="nofollow">https://www.ubuntu.com/" SUPPORT_URL vglnk" href="https://help.ubuntu.com/" rel="nofollow">https://help.ubuntu.com/" BUG_REPORT_URL vglnk" href="https://bugs.launchpad.net/ubuntu/" rel="nofollow">https://bugs.launchpad.net/ubuntu/" PRIVACY_POLICY_URL vglnk" href="https://www.ubuntu.com/legal/terms-and-policies/privacy-policy" rel="nofollow">https://www.ubuntu.com/legal/terms-and-policies/privacy-policy" VERSION_CODENAME=bionic UBUNTU_CODENAME=bionic root@1440a7fef7e0:/# exit exit
Чтобы вернуться к работе с контейнерами Windows, выполните:
[Environment]::SetEnvironmentVariable("LCOW_SUPPORTED", "$null", "Machine")Наслаждайтесь работой контейнеров Linux и Windows на Windows Server 2019. Оставьте нам комментарий в случае каких-либо проблем.