- Mounting and mapping shares between Windows and Linux with Samba
- Great Linux resources
- Share files between Linux and Windows computers
- Access Linux from Windows
- 1. Install and configure Samba
- 2. Modify LinuxSE
- 3. Enable your user
- 4. Start Samba
- 4. Configure the firewall
- 5. Access Samba from Windows
- Access Windows from Linux
- 1. Enable file sharing
- 2. Define a shared folder
- 3. Mount the shared folder under Linux
- Summary
- Send your scans to a Linux machine over your network
- 5 open source alternatives to Dropbox
Mounting and mapping shares between Windows and Linux with Samba
Create an air of interoperability in your network with Samba. Your Windows and Linux systems can work together.

Great Linux resources
In my previous article, Interoperability: Getting started with Samba, I covered installing and configuring Samba shares on a Linux server. The real power of Samba comes when Windows clients can communicate with Linux file servers. In this article, I will cover how you can access Samba shares from both Linux and Windows clients.
Install the Samba client packages
To access Samba share from Linux clients we need to install a few Samba client packages.
On the client machine, install the samba-common and samba-client packages.
# yum install samba-client samba-common -yCheck for available shares
Let’s check if we can access our shares from the server. We can use either the hostname or ip address of the server. If you use the hostname , make sure DNS is working.
# smbclient -U user -L 192.168.1.122 Enter SAMBA\user's password: Sharename Type Comment --------- ---- ------- print$ Disk Printer Drivers myshare Disk my share IPC$ IPC IPC Service (Samba 4.9.1) user Disk Home Directories Reconnecting with SMB1 for workgroup listing. Server Comment --------- ------- Workgroup Master --------- ------- SAMBA SAMBA-SERVERCreate a directory that we can use as our mount point. I’m going to create a directory under /mnt , but you can use any directory you would like to. You may need to configure SELinux on that directory.
# mount -t cifs -o username=user //192.168.1.122/myshare /mnt/share Password for user@//192.168.1.122/myshare: ********Now that we’ve mounted our share, we can check the mounts with the following command:
Let’s make that directory mount persistently so it can withstand a reboot. Using the text editor of your choice, edit the /etc/fstab file. You can do this in multiple ways, but I’m going to demonstrate two ways to mount the Samba share at boot in /etc/fstab .
The first option provides a username and password for the Samba user in the fstab .
//192.168.1.122/myshare /mnt/share cifs username=user,password=password,_netdev 0 0The other option is to create a credential file. You can call this file anything, but I would like to call it cred . I would like to place credentials files in the home directory of the user. In our demonstration it will be /home/user/.cred .
//192.168.1.122/myshare /mnt/share cifs credentials=/home/user/.cred,_netdev 0 0The _netdev option is important since we are mounting a network device. Clients may hang during the boot process if the system encounters any difficulties with the network.
Now create that .cred file inside the user’s home directory.
Next, add the Samba user’s username and password.
username=user password=passwordFinally, mount all filesystems.
Access a share from a Windows client
I will be using Windows 10 as my client machine with a workgroup called SAMBA . We need to create a local user account on the Windows machine that matches the username and password of the Samba user account we created in my previous article. Although account creation is not necessary, this will make things simpler when accessing the share.
Like I mentioned above, this step is optional and you can skip it completely. Although there are multiple approaches to adding a new local user on a Windows machine, for the simplicity of this article I will be using PowerShell. Launch PowerShell as an administrator and issue following commands:
PS > $password = Read-Host -AsSecureString PS > New-LocalUser -Name “user” -Password $passwordNow that we have created a new local user account matching the Samba user account, we can log in to Windows with our newly created user account.
Access a share from Windows Explorer
To access the Samba share from Windows Explorer, start typing the IP address to our share in the search area. I am using the hostname of the Samba server. In my case, it is centos . You can also access the share by using the IP address of the Samba server.

You might be prompted to enter the username and password to access the share if you skipped the local user creation process. If you get prompted for credentials, enter the Samba username and password we created in the previous article.
You will need to enter the Samba share path every time you want to access the share. There is a better way to access the share by mapping a drive to Samba share in Windows.
Mapping a drive to a Samba share
To map a drive to the Samba share, open PowerShell and issue following command:
PS > NET USE M: \\centos\myshare
Accessing a Samba share on Linux and Windows is easy. With this basic setup, you will be able to access file shares from client machines in your network. With somewhat more configuration, you can deploy Samba shares in a domain environment. Samba can do more than file share. If you would like to learn more about Samba, read this article about Windows and Linux interoperability. This is a basic set up, but you can do so much more with Samba.
[ Want to test your sysadmin skills? Take a skills assessment today. ]
Share files between Linux and Windows computers

If you work with different operating systems, it’s handy to be able to share files between them. This article explains how to set up file access between Linux (Fedora 33) and Windows 10 using Samba and mount.cifs.
Samba is the Linux implementation of the SMB/CIFS protocol, allowing direct access to shared folders and printers over a network. Mount.cifs is part of the Samba suite and allows you to mount the CIFS filesystem under Linux.
Caution: These instructions are for sharing files within your private local network or in a virtualized host-only network between a Linux host machine and a virtualized Windows guest. Don’t consider this article a guideline for your corporate network, as it doesn’t implement the necessary cybersecurity considerations.
Access Linux from Windows
This section explains how to access a user’s Linux home directory from Windows File Explorer.
1. Install and configure Samba
Start on your Linux system by installing Samba:
Samba is a system daemon, and its configuration file is located in /etc/samba/smb.conf . Its default configuration should work. If not, this minimal configuration should do the job:
[global] workgroup = SAMBA server string = %h server (Samba %v) invalid users = root security = user [homes] comment = Home Directories browseable = no valid users = %S writable = yesYou can find a detailed description of the parameters in the smb.conf section of the project’s website.
2. Modify LinuxSE
If your Linux distribution is protected by SELinux (as Fedora is), you have to enable Samba to be able to access the user’s home directory:
setsebool -P samba_enable_home_dirs onCheck that the value is set by typing:
getsebool samba_enable_home_dirsYour output should look like this:
![]()
3. Enable your user
Samba uses a set of users and passwords that have permission to connect. Add your Linux user to the set by typing:
You will be prompted for a password. This is a completely new password; it is not the current password for your account. Enter the password you want to use to log in to Samba.
To get a list of allowed user types:
4. Start Samba
Because Samba is a system daemon, you can start it on Fedora with:
This starts Samba for the current session. If you want Samba to start automatically on system startup, enter:
On some systems, the Samba daemon is registered as smbd .
4. Configure the firewall
By default, Samba is blocked by your firewall. Allow Samba to access the network permanently by configuring the firewall.
You can do it on the command line with:
firewall-cmd --add-service=samba --permanentOr you do it graphically with the firewall-config tool:

5. Access Samba from Windows
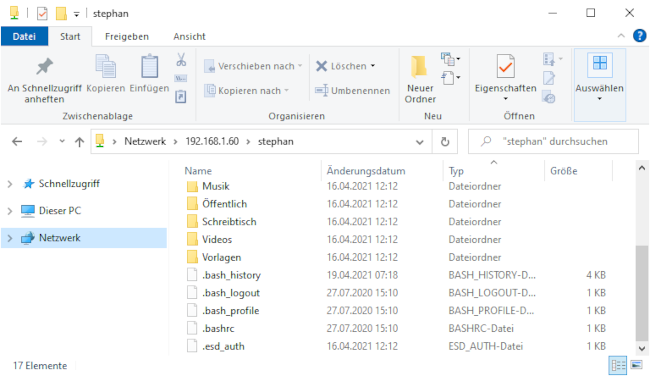
In Windows, open File Explorer. On the address line, type in two backslashes followed by your Linux machine’s address (IP address or hostname):
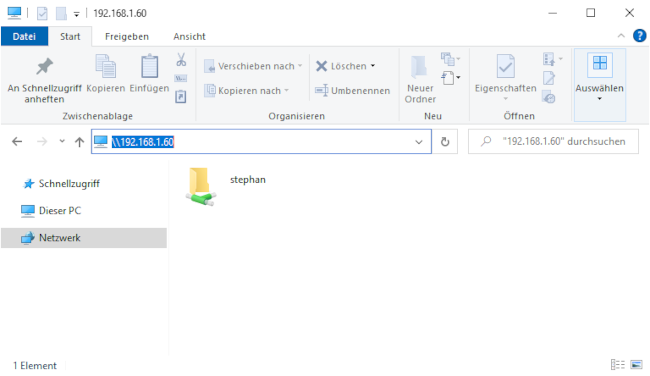
You will be prompted for your login information. Type in the username and password combination from step 3. You should now be able to access your home directory on your Linux machine:
Access Windows from Linux
The following steps explain how to access a shared Windows folder from Linux. To implement them, you need Administrator rights on your Windows user account.
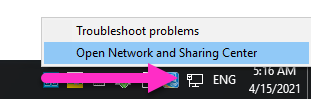
1. Enable file sharing
Open the Network and Sharing Center either by clicking on the
Windows Button > Settings > Network & Internet
or by right-clicking the little monitor icon on the bottom-right of your taskbar:
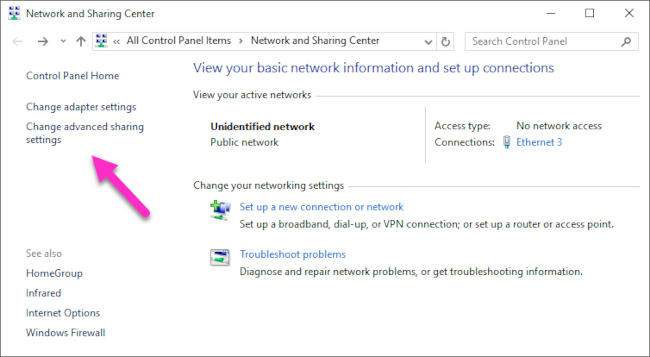
In the window that opens, find the connection you want to use and note its profile. I used Ethernet 3, which is tagged as a Public network.
Caution: Consider changing your local machine’s connection profile to Private if your PC is frequently connected to public networks.
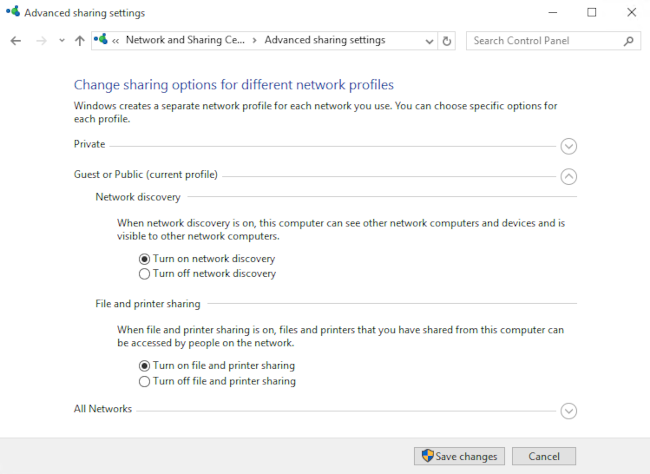
Remember your network profile and click on Change advanced sharing settings:
Select the profile that corresponds to your connection and turn on network discovery and file and printer sharing:
2. Define a shared folder
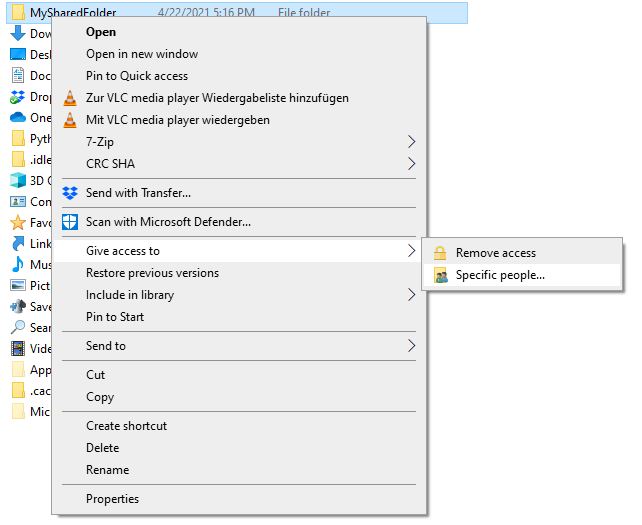
Open the context menu by right-clicking on the folder you want to share, navigate to Give access to, and select Specific people. :
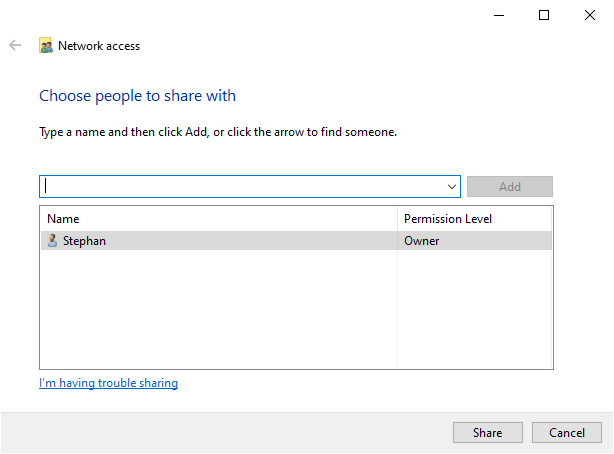
Check whether your current username is on the list. Click on Share to tag this folder as shared:
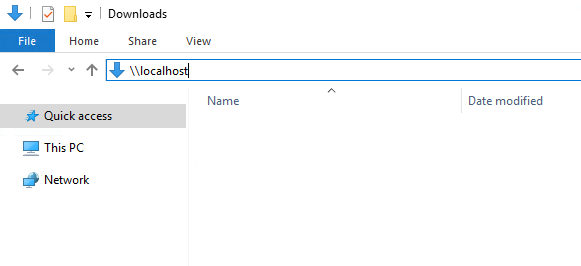
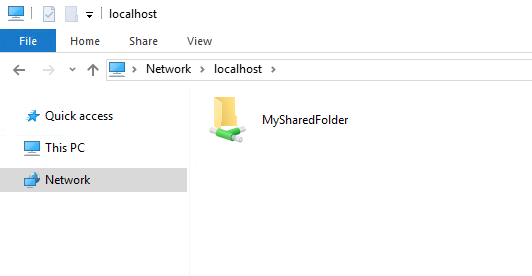
You can display a list of all shared folders by entering \\localhost in File Explorer’s address line:
3. Mount the shared folder under Linux
Go back to your Linux system, open a command shell, and create a new folder where you want to mount the Windows share:
Mounting Windows shares is done with mount.cifs, which should be installed by default. To mount your shared folder temporarily, use:
sudo mount.cifs ///MySharedFolder ~/WindowsShare/ -o user=,uid=$UID- is the Windows PC’s address info (IP or hostname)
- is the user that is allowed to access the shared folder (from step 2)
You will be prompted for your Windows password. Enter it, and you will be able to access the shared folder on Windows with your normal Linux user.
To unmount the shared folder:
You can also mount a Windows shared folder on system startup. Follow these steps to configure your system accordingly.
Summary
This shows how to establish temporary shared folder access that must be renewed after each boot. It is relatively easy to modify this configuration for permanent access. I often switch back and forth between different systems, so I consider it incredibly practical to set up direct file access.

Send your scans to a Linux machine over your network
Set up a Samba share to make a scanner easily accessible by a Linux computer over your network.

5 open source alternatives to Dropbox
Find a filesharing application that doesn’t compromise your security, freedom, or bank balance.