- Doxie go se wi fi
- Join A Local Wi-Fi Network
- Need a hand?
- Doxie go se wi fi
- Wi-Fi
- Joining Doxie’s own Wi-Fi network
- Next.
- Configuring Doxie to join your local Wi-Fi network
- More pages in this section
- Doxie go se wi fi
- Join A Local Wi-Fi Network
- First, join Doxie’s network
- Next, configure Doxie in the web interface
- Finally, confirm a successful connection
- How’d it go?
- Doxie go se wi fi
- Wi-Fi Requirements
- System Requirements
- What if my home or office Wi-Fi network doesn’t meet Doxie’s network requirements?
- Doxie go se wi fi
- Join A Local Wi-Fi Network from Mac or PC
- First, join Doxie’s network
- Next, configure Doxie in software
- Finally, confirm a successful connection
- How’d it go?
- Need a hand?
Doxie go se wi fi
- Set Up Doxie Go SE
- Scanning
- Software
- Mobile & Web App
- Wi-Fi
- Import Scans via Wi-Fi
- Join A Local Wi-Fi Network
- Wi-Fi Requirements
- Advanced Configuration
- HTTP/JSON Developer API
- Advanced Topics
- Accessories
- Get Help + Contact Support
Join A Local Wi-Fi Network
Before you start, take note of what Wi-Fi network you’re currently connected to, and make sure you know the correct Wi-Fi password. Your Wi-Fi network must meet Doxie’s system requirements to be joined.
Trouble with joining your Wi-Fi network? Check out the FAQs, contact us for help, or have us call you for personal assistance.
By default, Doxie creates its own Wi-Fi network you can join. Optionally, you can configure Doxie to join your home or office network.
When you turn on Doxie’s Wi-Fi feature, it’ll look for the last local network it joined – if it can’t find it nearby (because, perhaps, you’re out and about), it’ll create its own network so you can still access your scans.
In most cases, joining a network is easy – but Wi-Fi is deceptively complicated, so in the few cases it doesn’t work right, check out our detailed troubleshooting information. If you’re still having trouble, contact Doxie Customer Care for expert assistance.
You can configure Doxie to join your local network from your Mac, PC, or iOS device.
Once your device is on the same network as your Doxie, you can access your scans and import them using Doxie’s included apps for Mac/PC or iOS.
Need a hand?
We’re here to help! Check out the FAQs, contact us for help, or have us call you for personal assistance.
Doxie go se wi fi
- Set Up Doxie Go SE
- Scanning
- Software
- Mobile & Web App
- Wi-Fi
- Import Scans via Wi-Fi
- Join A Local Wi-Fi Network
- Wi-Fi Requirements
- Advanced Configuration
- HTTP/JSON Developer API
- Advanced Topics
- Accessories
- Get Help + Contact Support
Wi-Fi
Doxie Go SE Wi-Fi has built-in wireless networking technology, so you can sync scans wirelessly to your Mac, PC, iPhone, or iPad.
There are multiple Doxie Go SE models — only Doxie Go SE Wi-Fi has built-in Wi-Fi networking technology. Check for the Wi-Fi icon above the back button on your scanner to confirm you have a model with Wi-Fi.
To turn on Wi-Fi, tap the back button. Doxie’s light quickly blinks white as the Wi-Fi feature turns on.
Doxie’s light turns to a slow white flash when Wi-Fi is ready.
The white LED should be blinking — if it’s solid white, you’ve accidentally turned on an advanced mode. Tap the Wi-Fi button to turn it off, then tap it again to turn on Wi-Fi (don’t hold down the Wi-Fi button, just tap).
Once you’re finished downloading scans, turn off Wi-Fi by tapping the back button again. Since Wi-Fi takes up a lot of power and is only used to download scans, we highly recommend turning it off when not downloading scans.
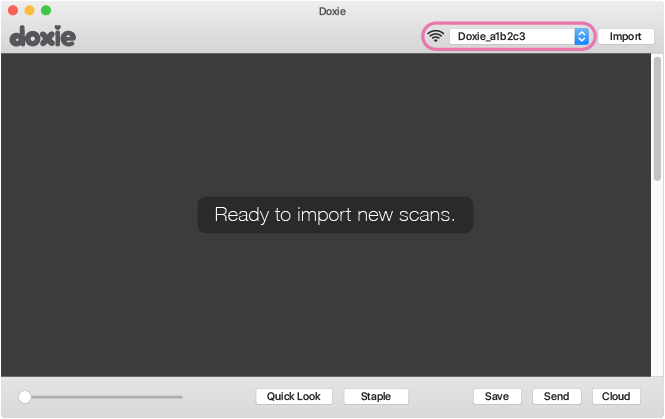
Joining Doxie’s own Wi-Fi network
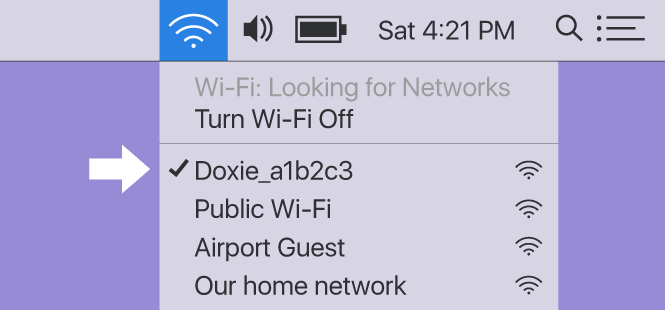
By default, Doxie creates its own Wi-Fi network you can join to access your scans called Doxie_XXXXXX (where XXXXX is a unique network ID associated with your Doxie).
Wait for the white LED to light up after turning on Wi-Fi. Then, connect your Mac, PC, or iOS device to Doxie’s network from the menu bar or in settings. Your device needs to be on the same network as Doxie to access your scans.

Next.
Once your device is on the same network as your Doxie, you can access your scans and import them using Doxie’s included apps for Mac/PC or iOS.
Configuring Doxie to join your local Wi-Fi network
You can optionally configure Doxie to join your home or office network. If you use your Doxie in frequent locations like these, it definitely makes sense to join Doxie to your network — this way, you won’t need to join Doxie’s own network in the future.
When you turn on Doxie in range of a configured network, Doxie will join that network and skip creating its own network. If, however, it doesn’t find a configured network, Doxie will assume you’re out and about and create its own network temporarily so you can access your scans on the go.
Read more about how to configure Doxie to join a local network here.
More pages in this section
Doxie go se wi fi
- Set Up Doxie Go SE
- Scanning
- Software
- Mobile & Web App
- Doxie for iOS
- Web Viewer – Linux & Chrome
- Launch Web Viewer
- Download Scans
- Advanced Options
- Wi-Fi
- Advanced Topics
- Accessories
- Get Help + Contact Support
Join A Local Wi-Fi Network
By default, Doxie creates its own Wi-Fi network you can join. Optionally, you can configure Doxie to join your home or office network via the Wi-Fi page in the web interface.
When you turn on Doxie’s Wi-Fi feature, it’ll look for the last local network it joined – if it can’t find it nearby (because, perhaps, you’re out and about), it’ll create its own network so you can still access your scans.
In most cases, joining a network is easy – but Wi-Fi is deceptively complicated, so in the few cases it doesn’t work right, check out our detailed troubleshooting information. If you’re still having trouble, contact Doxie Customer Care for expert assistance.
Before you start, take note of what Wi-Fi network you’re currently connected to, and make sure you know the correct Wi-Fi password. Your Wi-Fi network must meet Doxie’s system requirements to be joined.
First, join Doxie’s network
- Turn on Doxie. Press and hold down the power button for a moment.
- Turn on Wi-Fi. Turn on Wi-Fi by tapping the back button. Doxie’s light quickly blinks white and turns to a slow white flash when Wi-Fi is ready.
- Join Doxie’s direct network from your device. From the Wi-Fi menu, join Doxie_XXXXXX (where XXXXXX is a unique network ID associated with your Doxie).
Next, configure Doxie in the web interface
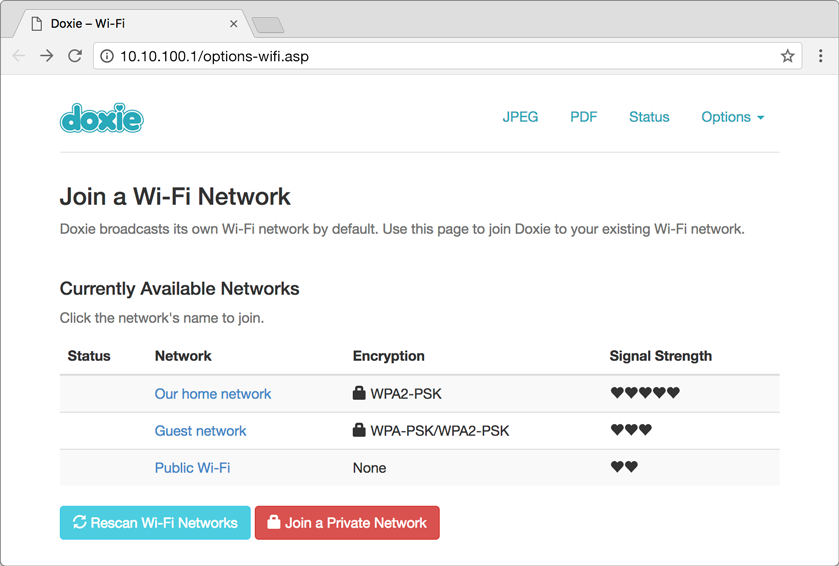
- Launch Doxie Web Viewer from your browser. Click on the Options tab, and then select Wi-Fi (Note: If you set a password on your scanner, use the username «doxie» and your password to access the interface.)
- The page shows a list of networks in range under Currently Available Networks. If you see your network and it’s a standard, non-fancy network, this will be easy – click on the network name, enter the password in the new tab, and click Connect.
Finally, confirm a successful connection
- Use your device’s Wi-Fi menu to re-join the same network you just joined Doxie to.
- Open Doxie’s web interface again to access the scanner. Note that Doxie will now be under a different IP address assigned by the local network’s DHCP server. (How do I find Doxie’s IP on my local network?)
How’d it go?
If you’re back on your network and you see Doxie on that same network, you’re done. Now, when you turn on Doxie’s Wi-Fi feature, it’ll look for your network as a priority over creating its own.
If it didn’t work out – you can’t find your network, your scanner didn’t join the network, or there’s some other issue, let’s proceed to troubleshoot.
Doxie go se wi fi
- Set Up Doxie Go SE
- Scanning
- Software
- Mobile & Web App
- Wi-Fi
- Import Scans via Wi-Fi
- Join A Local Wi-Fi Network
- Wi-Fi Requirements
- Advanced Configuration
- HTTP/JSON Developer API
- Advanced Topics
- Accessories
- Get Help + Contact Support
Wi-Fi Requirements
Doxie Go SE Wi-Fi has built-in 802.11n wireless networking capabilities – to connect, use your computer or device with built-in Wi-Fi. Doxie creates its own wireless network, and can also join compatible networks in your home or office.
System Requirements
To use Doxie’s direct network, you need a Mac, PC, iPhone, or iPad with built-in Wi-Fi capabilities that can join Doxie’s standard 802.11b/g/n wireless network.
Doxie can also join your existing home or wireless network, so you don’t have to change networks to sync scans wirelessly. Doxie supports most consumer Wi-Fi networks. In this mode, Doxie offers Dual Wi-Fi for mobile connectivity: if you turn on Doxie away from your home or office network, Doxie reverts to creating its own network so you can sync your scans.
Doxie has similar requirements to most non-computer Wi-Fi devices. To join your home or office network, the network must meet these basic requirements:
- 802.11b, 802.11g, or 802.11n 2.4GHz wireless network
- Password types: Open, WEP, WPA Personal, WPA2 Personal. Non-computer devices like Doxie can’t connect to Wi-Fi networks with special/enterprise credential requirements (username login, certificates, etc.)
- IP address allocated by DHCP or manual entry
- Doxie and your base station must be close enough to see each other without interference (suggested up to 25-30 meters away)
What if my home or office Wi-Fi network doesn’t meet Doxie’s network requirements?
Use Doxie’s direct network to sync scans. When Doxie isn’t joined to a network, it creates its own network you can connect to from any device.
Doxie go se wi fi
- Set Up Doxie Go SE
- Scanning
- Software
- Mobile & Web App
- Wi-Fi
- Import Scans via Wi-Fi
- Join A Local Wi-Fi Network
- Wi-Fi Requirements
- Advanced Configuration
- HTTP/JSON Developer API
- Advanced Topics
- Accessories
- Get Help + Contact Support
Join A Local Wi-Fi Network from Mac or PC
Before you start, take note of what Wi-Fi network you’re currently connected to, and make sure you know the correct Wi-Fi password. Your Wi-Fi network must meet Doxie’s system requirements to be joined.
Trouble with joining your Wi-Fi network? Check out the FAQs, contact us for help, or have us call you for personal assistance.
First, join Doxie’s network
- Turn on Doxie. Press and hold down the power button for a moment.
- Turn on Wi-Fi. Turn on Wi-Fi by tapping the back button. Doxie’s light quickly blinks white and turns to a slow white flash when Wi-Fi is ready.
The white LED should be blinking — if it’s solid white, you’ve accidentally turned on an advanced mode. Tap the Wi-Fi button to turn it off, then tap it again to turn on Wi-Fi (don’t hold down the Wi-Fi button, just tap).

Next, configure Doxie in software
- Launch the Doxie App.
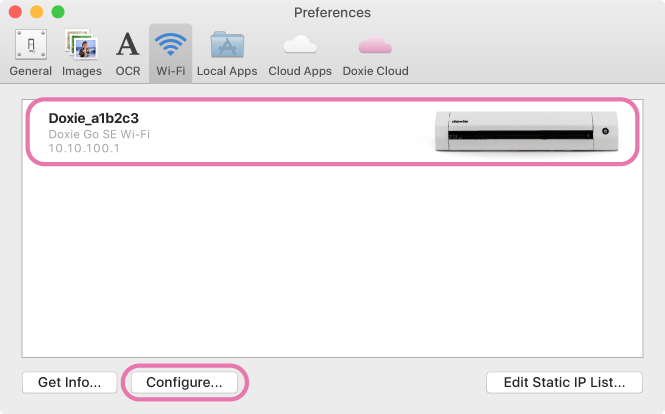
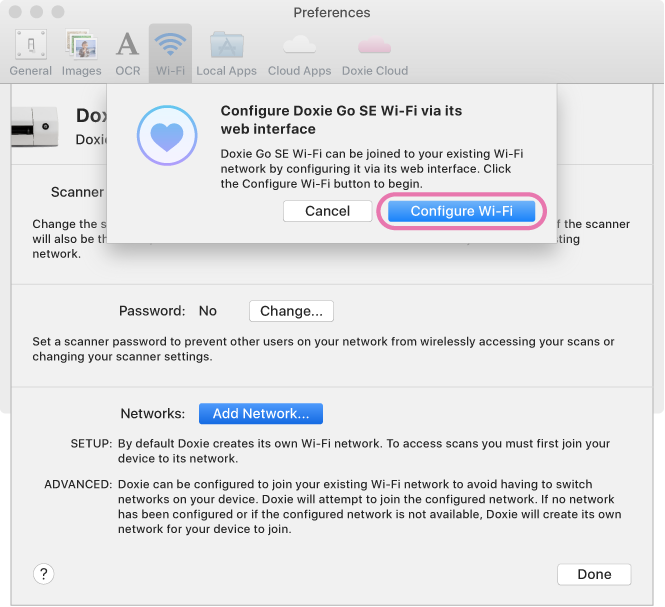
- In Preferences > Wi-Fi, select your Doxie then click the Configure button.

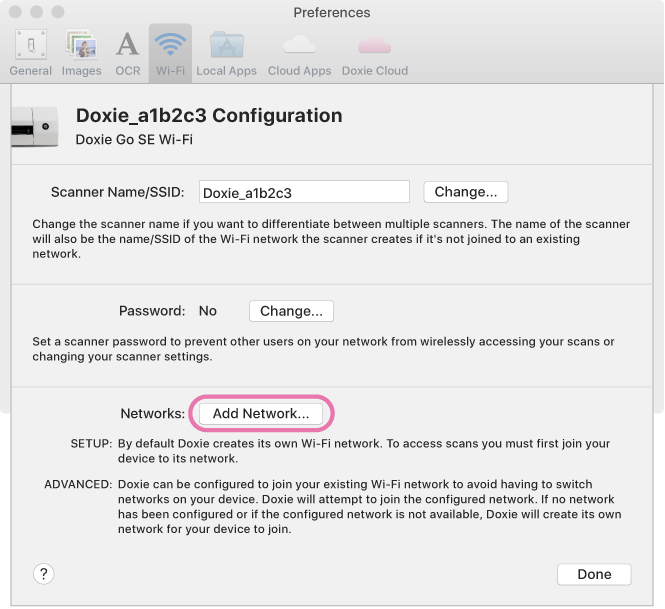
- Click Add Network.
- Click Configure Wi-Fi. A web page will launch in your browser.
(Note: If you set a password on your scanner, use the username «doxie» and your password to access the page.) - The page shows a list of networks in range under Currently Available Networks.
If you see your network and it’s a standard, non-fancy network, this will be easy – click on the network name, enter the password in the new tab, and click Connect.
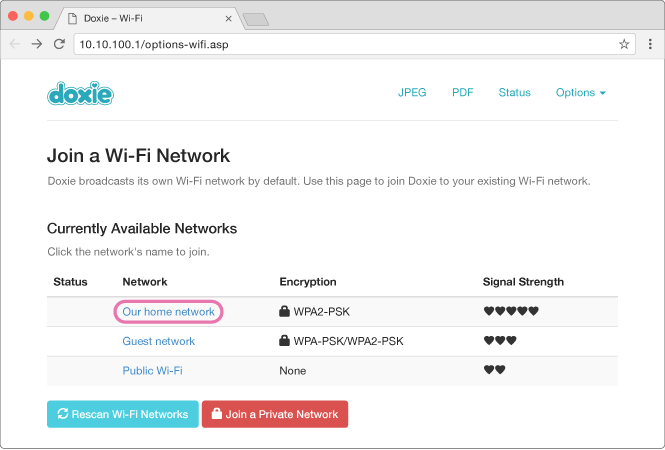
If your network is hidden and does not broadcast SSID, click on the red Join a Private Network button at the bottom and enter the SSID and password on the page instead.
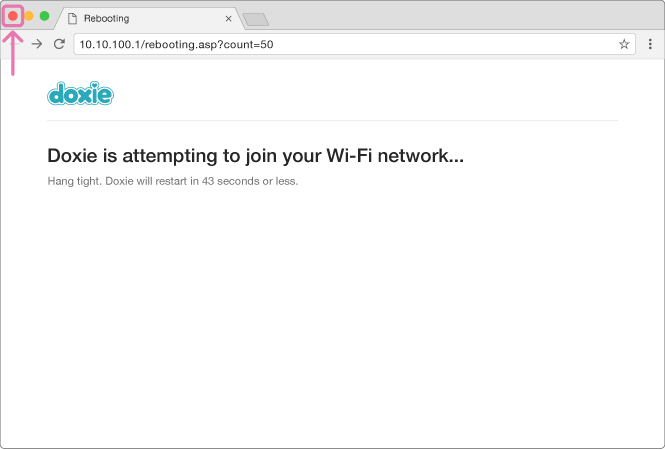
Doxie’s LED will repeat two quick flashes. When the LED returns to a slow white flash, Doxie has completed its search.
Finally, confirm a successful connection
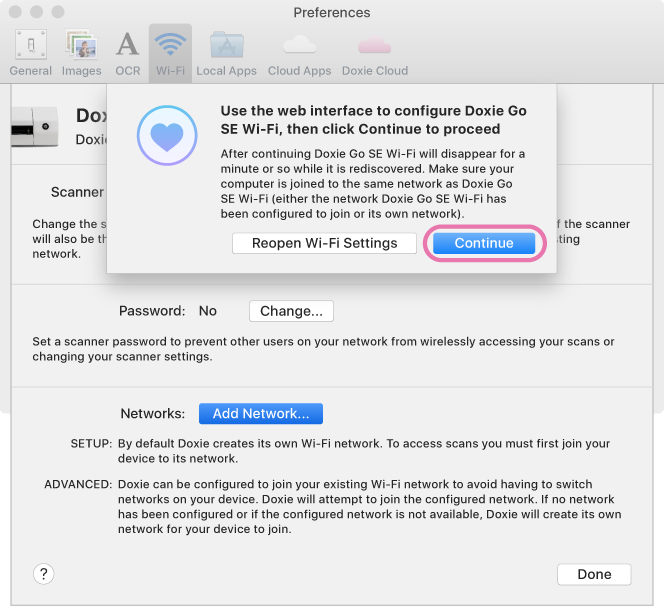
- Use your device’s Wi-Fi menu to join the same network you just joined Doxie to.
- In the Doxie App, wait up to 30 seconds for Doxie to be discovered by the software, and you’ll be ready to import.
How’d it go?
If you’re back on your network and you see Doxie on that same network, you’re done. Now, when you turn on Doxie’s Wi-Fi feature, it’ll look for your network as a priority over creating its own. Open the Doxie app on your computer or mobile device to discover your Doxie and import scans.
If it didn’t work out – you can’t find your network, your scanner didn’t join the network, or there’s some other issue, let’s proceed to troubleshoot.
Need a hand?
We’re here to help! Check out the FAQs, contact us for help, or have us call you for personal assistance.