- ¶ Introduction
- ¶ Preparation
- ¶ Follow the getting connected guide
- ¶ Familiarise yourself with Duet Web Control
- ¶ Firmware versions
- ¶ Now with RepRapFirmware 3 installed
- ¶ Check and update firmware if necessary.
- ¶ Connect your Duet to the other components in your 3D printer.
- ¶ Initial configuration
- ¶ Commissioning tests
- ¶ If you experience any problems
- ¶ Introduction
- ¶ Duets with WiFi
- ¶ Connect to WiFi host network
- ¶ Configuring Duet in WiFi Access Point mode
- ¶ Duets with Ethernet
- ¶ Wired network connection
- ¶ Wired direct connection
- ¶ Duet 3 with Single Board Computer (SBC)
- ¶ A note about mDNS local network discovery
¶ Introduction
Congratulations on your new Duet 2 WiFi or Ethernet! This page will guide you through getting connected, updating firmware, setting up initial configuration.
First, read the warnings! See Warnings, Fire safety and USB ground loops for precautions you must take.
¶ Preparation
- See the following pages for choosing components. even if you already have a printer or set of components they can help in understanding the advantages and limitation of certain components.
- Choosing stepper motors.
- Choosing a heater.
- Choosing the power supply.
- Choosing a Z probe.
- Choosing temperature sensors.
¶ Follow the getting connected guide
We suggest you get connected to your Duet before you wire it into your printer.
¶ Familiarise yourself with Duet Web Control
The Duet Web Control user interface it the best way to control your Duet. It is used to control the Duet through the remainder of the steps in this guide. A comprehensive manual is here:
¶ Firmware versions
¶ Now with RepRapFirmware 3 installed
From late 2020, Duet 2 boards ship with RepRapFirmware 3 loaded by default. Prior to this Duet 2 boards had RepRapFirmware 2 loaded and an upgrade procedure was required — see links below.
Duet 2 boards with RepRapFirmware 3 installed will have a sticker indicating this (with a QR code that links here).
CAUTION There are guides and tutorials in this documentation and in many other locations on the internet that show how to set up a particular printer or accomplish a particular task using RepRapFirmware 2. Often these will still be useful for RepRapFirmware 3; however many configuration settings may be different.
It is strongly recommended to generate the initial configuration for your machine using the RepRapFirmware config tool and the use guides to modify it if necessary.
¶ Check and update firmware if necessary.
¶ Connect your Duet to the other components in your 3D printer.
- See the specific wiki page for more detail on each part of the hardware setup that applies to your setup:
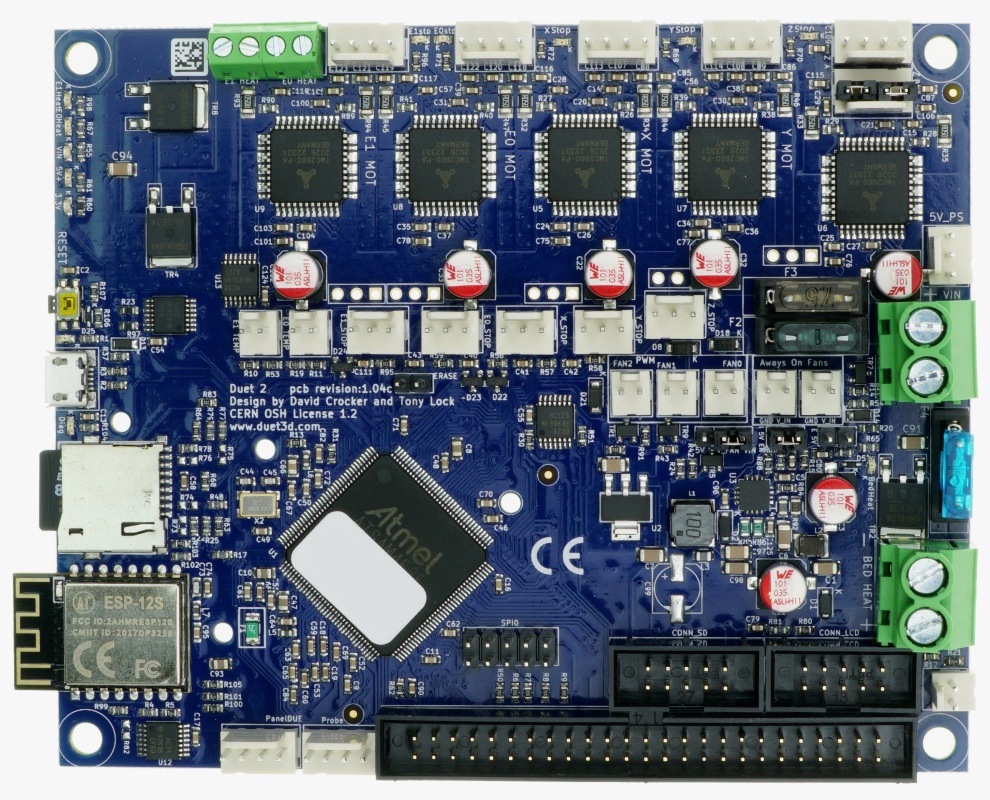
- Duet 2 WiFi/Ethernet Hardware overview
- SD card.
- Power wiring.
- Connecting stepper motors.
- Connecting endstop switches.
- Connecting thermistors or PT1000 temperature sensors.
- Connecting thermocouples.
- Connecting PT100 temperature sensors.
- Connecting a bed heater.
- Connecting and configuring a chamber heater.
- Connecting extruder heaters.
- Connecting and configuring fans.
- Connecting a Z probe.
- Connecting an LCD control panel.
- Connecting an Emergency Stop button.
- Connecting and configuring filament-out sensors.
- DueX2 and DueX5 expansion boards.
- Using external stepper motor drivers.
- Adding additional output ports.
¶ Initial configuration
Start by generating a configuration file customised for your printer and upload it to the Duet.
There are more detailed wiki pages for each printer type:
¶ Commissioning tests
More detailed specifics are found below:
¶ If you experience any problems
¶ Introduction

This document covers networking options in more detail, including setting up a Duet 2 WiFi and Duet 3 Mini 5+ WiFi in Access Point mode, and direct connections to Ethernet-enabled Duets (Duet 2 Ethernet, Duet 2 Maestro, Duet 3 with Ethernet in stand-alone mode).
¶ Duets with WiFi
¶ Connect to WiFi host network
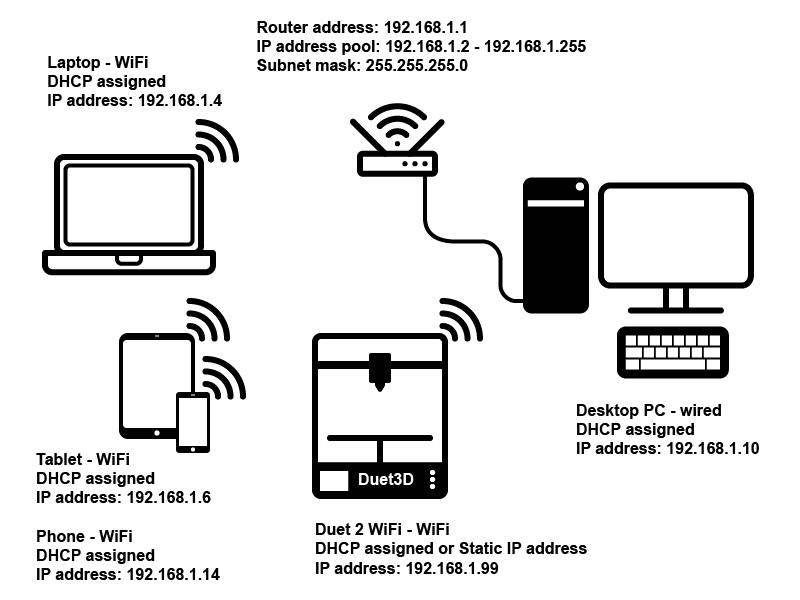
This is the standard setup, with the Duet 3 Mini 5+ WiFi (in standalone mode) or Duet 2 WiFi connecting to your network through a WiFi access point/router. This is covered in the Getting Connected guide. Briefly:
- Connect to Duet, via USB and serial terminal, or via console if already connected to network.
- Use M587 to add a WiFi host network to the remembered list of networks.
- To set a static IP address, use the ‘I’ parameter in your M587 command. If you leave this out, the Duet IP address will be set by the router, using DHCP.
- Use M552 S1 to turn on networking, and connect. You can specify the host network to connect to using the ‘P’ parameter, so long as the host network has already been stored using M587.
Note: the IP addresses in the following diagram are an example of how a network may be configured. Your network may use different IP addresses and ranges.

¶ Configuring Duet in WiFi Access Point mode
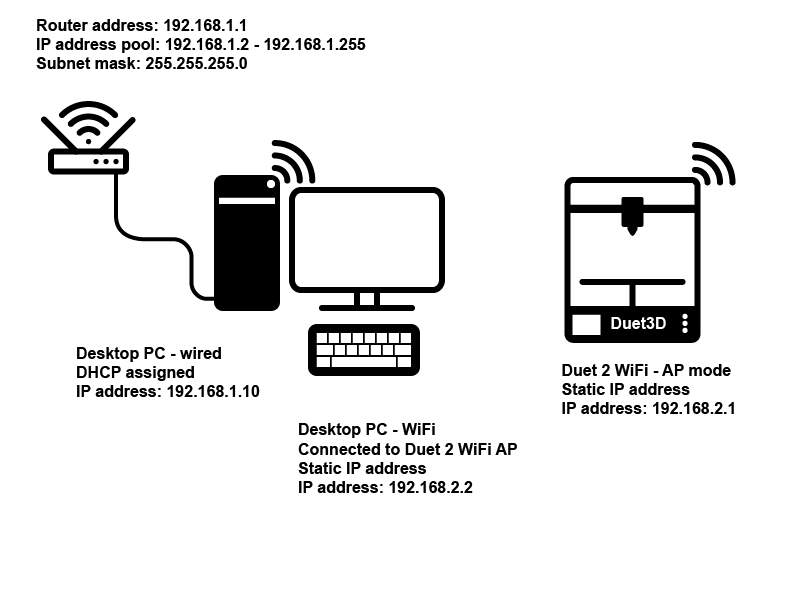
You can set up your Duet 3 Mini 5+ WiFi or Duet 2 WiFi as an access point, that your computer/tablet/phone can connect to directly. Ideally, your device should have two network connections, if you want to keep it connected to the Duet and your network/the internet, e.g. a desktop PC with wired Ethernet connection to network/internet and a WiFi connection to the Duet. Additionally, you should use an IP address range on the Duet that does not clash with your network; see illustration below.
To do this, use M589 and M552 as follows:
- Send a M589 command once from the console, via YAT/serial terminal software connected via USB, via a connected PanelDue, or via macro to set the access point name, IP address etc. These parameters will be saved within the WiFi module.
- The M589 command will fail if the WiFi module has not yet been taken out of reset. So if the WiFi module has not been started, send M552 S0 to put it in idle mode first.
- M589 does not work from within config.g at startup.
- Use M552 S2 in config.g to start the wifi module in access point mode.
- WPA2 security will be used by default.
- Look for the wireless network name you specified on your device and connect to it using the password you set.
- If you are using a PC that is connected to both your network and to the Duet, you can bridge the two network connections on your PC, to allow other devices connected to your network to connect to the Duet. This will only work when the PC is on, though.
Note: the IP addresses in the following diagram are an example of how a network may be configured. Your network may use different IP addresses and ranges.
¶ Duets with Ethernet
¶ Wired network connection
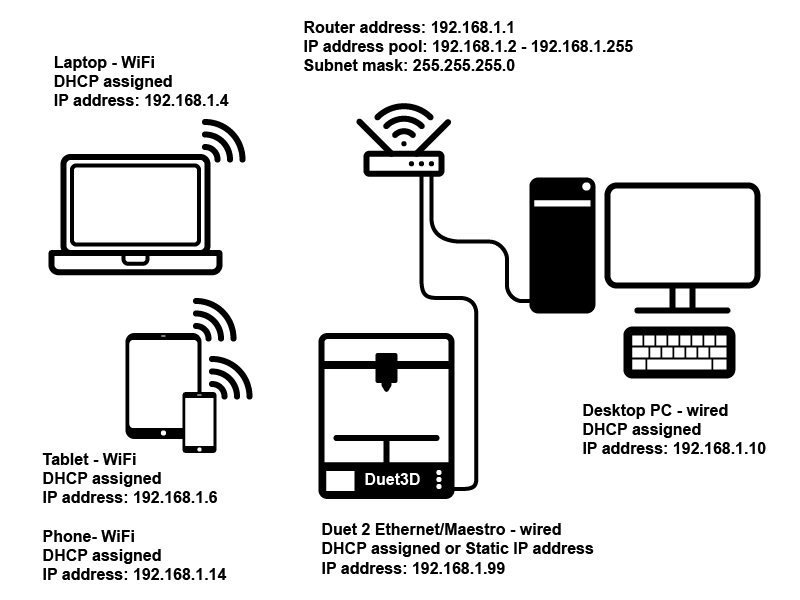
This is the standard setup for a Duet with a wired Ethernet port (Duet 3 in standalone mode, Duet 2 Ethernet and Maestro), and the set up is covered in the Getting Connected guide. The Duet is connected by a cable directly to the network router (though you could connect the Duet to a wired to wireless access point, and then connect that wirelessly to the router’s WiFi). The Duet can have its IP address set by DHCP by the router, or set a static IP address in config.g.
Note: the IP addresses in the following diagram are an example of how a network may be configured. Your network may use different IP addresses and ranges.
¶ Wired direct connection
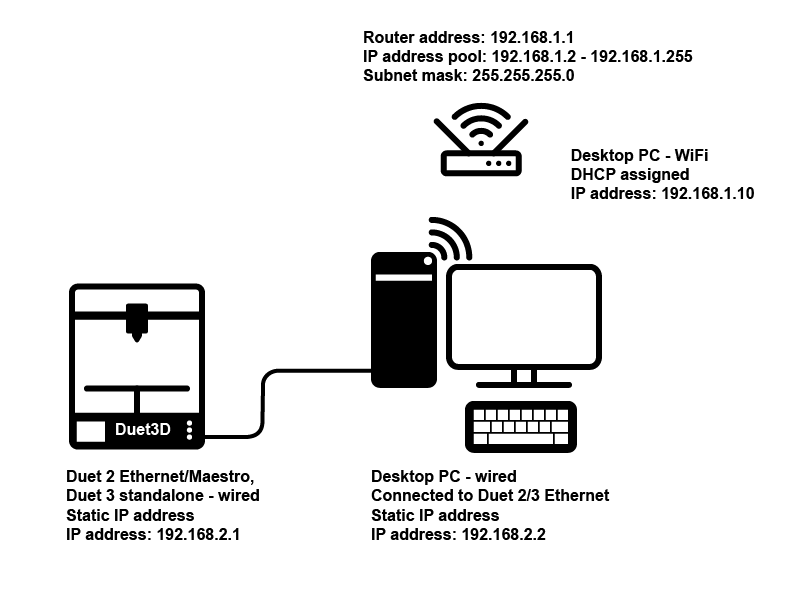
If you are unable to directly cable the Duet to your network router, you can connect it directly to a computer with a spare Ethernet port. You will need to set up the Duet and your PC in their own point-to-point sub-network, as there’s no router to do the network negotiation for them. If your PC normally connects over WiFi, you should still be able to access your network and the internet.
- On your PC, go to “Control Panel -> Network and Internet -> Network and Sharing Center -> Change Adapter Settings.”
- Click on “Change Adapter Settings.” This will reveal different connections. Select the appropriate connection. Usually, but not necessarily, the connection will be called Ethernet and have the description network cable unplugged. Right-click on the connection and select “Properties.” The local area’s connection properties window will appear.
- Under the network tab select “Internet protocol version 4 (TCP/IPv4),” then click on “Properties». Example:
- In the Properties windows you will need to set the IP address and subnet masks of your PC to settings that are DIFFERENT from your normal network settings. In the illustration below, the network uses 192.168.1.# addresses, so we’ll set up the PC/Duet subnet to use 192.168.2.# addresses:
- IP – 192.168.2.2
- Subnet Mask – 255.255.255.0
- IP – 192.168.2.1
- Subnet Mask – 255.255.255.0
Note: the IP addresses in the following diagram are an example of how a network may be configured. Your network may use different IP addresses and ranges.
¶ Duet 3 with Single Board Computer (SBC)
The connected Raspberry Pi (or similar) should already be set up for wired Ethernet access. See this guide for setting up a Duet 3 with connected SBC (Raspberry Pi or similar) on WiFi: SBC Setup for Duet 3.
If you have a display and input peripherals connected to your Raspberry Pi, you can use the same network configuration M-codes as above to configure LAN and/or WiFi. However, an index parameter ( I , e.g. M552 I0 S1 for interface #0) may be required to set up the correct network interface.
¶ A note about mDNS local network discovery
Once you have connected your Duet to your network, you will need to know its IP address to be able to connect to it. If you have set a static IP address, you can connect to this directly, and the address of the Duet will not change. However, some routers/network setups do not like this, and can remap the set IP address, or just not connect to it, forcing you to use DHCP, where the router sets the IP address for the Duet. This can make it difficult to connect, as you will need to look up the assigned IP address of your printer (either by connecting YAT/serial terminal to USB, using a network scanning app, or checking on a PanelDue if connected). To make connecting simpler, RepRapFirmware supports mDNS, also known as DNS-SD, zeroconf and Bonjour (longer article about this here).
The machine name you set in config.g can be used to allow local network discovery using mDNS. Rather than remembering the ip address of the printer to connect to, or having to find it if assigned by DHCP (mDNS works both with fixed ip address and DHCP), you can use it’s name. Using the example name above, in your browser connect to the DWC with:
mDNS is supported natively in Windows 10, most Ubuntu distributions, and Mac OS. For older versions of Windows, install Apple’s Bonjour Print Services for Windows. If you have installed Skype, Apple’s iTunes or Adobe Photoshop CS3 or later, Bonjour will already have been installed.
Use of mDNS naming also relies on the firmware on the Duet:
- Duet 2 WiFi — mDNS support in all RRF versions
- Duet 2 Ethernet, Duet 2 Maestro — mDNS support introduced with RRF v2.04RC3
The machine name is also used as the NetBIOS name, which can help to identify the Duet on a network. This is only supported on Duet 2 WiFi.
Note: Both the mDNS and NetBIOS name are limited to 15 characters. If you use a longer name, the mDNS name will be the first 15 characters, e.g. if the Duet name is «3DPrinterWithVeryLongName», you should still be able to connect to «3DPrinterWithVe.local».
If you still have trouble identifying your Duet on your network, Christian Hammacher’s FindMyDuet Android app may help. (As of June 2022, this is currently unavailable on the Google Play store, and awaiting updating.)