- Linux dump резервное копирование и восстановление
- Использование команды dump
- Создание резервных копий
- Восстановление файлов из резервных архивов
- Похожие записи:
- How to Backup Linux Filesystem Using dump Command
- How to Install Dump Utility in Linux
- Linux Dump Command Usage
- How to Backup Linux System using Dump Command
- Backup Linux Home Directory
- Backing Up Data to a Regular File
- How to Restore Linux System using Dump Command
Linux dump резервное копирование и восстановление
Для системного администратора самой трудоёмкой, скрупулёзной и ответственной работой является (что непрерывно подтверждается практикой) не установка и наладка систем, программного обеспечения и т. д., а организация и проведение процедуры резервного копирования системы. Даже небольшие организации располагают своими, пусть и небольшими, но локальными сетями, обслуживаемыми серверами. Это позволяет значительно упростить и ускорить (при грамотном подходе, конечно) рутинную работу по специфике деятельности всей организации. Потеря информации, хранящейся даже в таких сетях и даже для небольших организаций, предприятий (или даже офиса) — в большинстве случаев наносит трудно поправимый ущерб с длительным и дорогостоящим восстановлением. Чего уж говорить о гигантских компаниях или корпорациях. В подавляющем большинстве случаев потеря информации стоит гораздо дороже, чем само оборудование.
Поэтому информацию обязательно следует защищать и самым надёжным способом для этого является резервное копирование данных. В Linux-системах на базовом уровне предусмотрена специализированная утилита dump. Она была разработана специально для осуществления резервного копирования. Наряду с ней для данной задачи можно также использовать команду tar – это будет практически также эффективно, однако dump конечно же, гораздо более удобна.
Использование команды dump
Утилита dump обладает рядом особенностей, благодаря чему многие системные администраторы используют именно её для резервного копирования данных:
- возможность резервного копирования в инкрементном режиме, т. е. будет резервироваться только то, что было изменено с момента последнего копирования;
- резервирование и восстановление любых типов файлов;
- сохранение информации о владельцах файлов, режимах доступа, дат и времени их модификации;
- резервное копирование можно выполнять сразу на несколько лент (да, да, в резервном копировании часто используются магнитные ленты в качестве носителей).
Команда dump в автоматическом режиме определит, какие файлы изменились со времени прошлого резервного копирования, формирует соответствующий список и именно эти файлы направит для копирования на внешний носитель. Надо заметить, что dump способна «понимать» исходную файловую систему на довольно низком уровне — для определения файлов для резервирования используется чтение таблицы индексных дескрипторов. Вместе с тем у утилиты dump имеются и незначительные ограничения:
- файловые системы должны резервироваться индивидуально;
- резервное копирование можно проводить только для локальных файловых систем.
Кстати, утилита dump также уверенно работает с именами файлов произвольной длины, т. е. ей абсолютно не важна глубина иерархии каталогов файловой системы.
Создание резервных копий
Команда dump сканирует файл /etc/dumpdates на предмет того, как давно создавался последний архив. С помощью ключа -u можно заставить dump самостоятельно после завершения резервного копирования обновлять вышеуказанный файл, занося в него информацию о дате, имени файловой системы и уровне архива. Без использования ключа -u (если он вообще ни разу не использовался) все архивы будут иметь нулевой уровень.
Для выбора внешнего устройства для хранения резервной копии существует ключ -f, иначе будет использоваться устройство по-умолчанию, как правило, это ленточный носитель.
Итак, для создания резервной копии утилитой dump нужно дать следующую команду:
$ sudo dump -0u -f /dev/sdd1 /home
Или для варианта с ленточным носителем:
$ sudo dump -0u -f stationone:/dev/nst0 /home
Здесь с ключом -u задаётся нулевой уровень архива (0), а ключом -f – устройство /dev/sdd1 для сохранения резервной копии файловой системы /home. Удалённый носитель (во втором примере ленточный носитель nst0) задаётся в формате имя_компьютера:устройство.
Восстановление файлов из резервных архивов
Чтобы восстановить отдельные файлы из резервных копий, следует воспользоваться командой restore. Эта команда обладает большим набором опций для выполнения. Среди которых одной из самых важных является -i – этот ключ позволяет работать с восстановлением в интерактивном режиме. Также имеются опции -r – для восстановления файловой системы целиком. И -x – для автоматического восстановления заранее указанных файлов.
В интерактивном режиме (ключ -i) команда restore сначала читает состав содержимого архива, после чего даёт возможность пользователю перемещаться по этому содержимому как по дереву каталогов в файловой системе, используя команды cd, ls и pwd. Чтобы восстановить требуемые файлы, нужно сначала добавить их в список восстановления командой add. Для восстановления выбранных (добавленных в список восстановления) файлов нужно выполнить команду extract. Также можно удалять файлы из списка восстановления — командой delete. Пример:
$ sudo mkdir /var/restore
$ cd /var/restore
$ sudo ssh stationone mt -f /dev/nst0 fsf 2
$ sudo restore -i -f stationone:/dev/nst0
restore> ls
john/ michael/ lost+found/ bob/
restore> cd bob
restore> ls
resume fileone filetwo filesome
restore> add resume
restore> ls
resume* fileone filetwo filesome
restore> extract
You have not read any volumes yet.
Unless you know which volume your files are on you should
start with the last volume and work towards the first.
Specify next volume #: 1
set owner/mode for '.'? [yn] n
В приведённом примере показан наиболее общий и «суровый» случай, когда нужно восстановить архив с удалённого ленточного носителя по SSH. Здесь также используется перемотка ленты командой mt для перехода к нужному архиву — это тот случай, когда на одной ленте их несколько. В качестве параметров команде mt передаются: удаленное устройство и параметры перемотки — fsf 3, т. е. лента должна быть перемотана вперёд на 3 файла. Если архив умещается на одной ленте, то на запрос «Specify next volume #:» нужно ввести 1. Также нужно определить, должен ли текущий каталог соответствовать корневому каталогу текущей ленты и если восстанавливается не вся файловая система целиком, то можно ответить «n» — нет. Восстановление производится в текущий каталог /var/restore.
Если вы нашли ошибку, пожалуйста, выделите фрагмент текста и нажмите Ctrl+Enter.
Похожие записи:
How to Backup Linux Filesystem Using dump Command
On a Linux operating system environment, mastering how to create and restore backups is a very important skill set. It is easier for well-versed Linux user to attain their data backup goals from the terminal environment without the need for a GUI-oriented application package.
The Linux dump utility is effective in creating filesystem backups on an availed storage device. However, the filesystem supported by this backup utility disregards the likes of ReiserFS and FAT.
The dump command only supports ext4, ext3, and ext2 filesystem and incremental backups. Under incremental backup support, a Linux user can flexibly execute their backup operations on daily, weekly, or monthly time frames.
It makes it easy to decide when and how you want your backups done. You get to decide which files should be involved in the scheduled backup process. Therefore, a Linux user can only focus on backing up files with significant changes or the ones that were recently added to the targeted filesystem.
How to Install Dump Utility in Linux
If you do not have the dump utility installed on your Linux machine, you can install it by executing one of the following installation commands in regards to the Linux operating system distribution you are using.
$ sudo apt-get install dump [On Debian, Ubuntu and Mint] $ sudo yum install dump [On RHEL/CentOS/Fedora and Rocky Linux/AlmaLinux] $ sudo emerge -a sys-apps/dump [On Gentoo Linux] $ sudo pacman -S dump [On Arch Linux] $ sudo zypper install dump [On OpenSUSE]
Linux Dump Command Usage
Once you run the dump backup utility, it first examines your existing Linux filesystem files and points out the ones that are worthy of any backup effort. The dump command needs several parameters for it to execute successfully:
- The targeted dump level.
- The media to host the created filesystem backup.
- The filesystem to backup.
The dump command also accommodates optional parameters pointing to:
- Specific backup media size.
- Next tape request method.
- Times and status of filesystem dump recording.
A typical dump command string adheres to the following syntax:
$ sudo dump options arguments filesystem
The dump command options:
- 0-9 – This range signifies available dump levels. 0 caters for full filesystem backup while a higher number like 9 only prioritizes the backup of modified filesystem files.
- -B records – Highlights how many dump records should exist in a single volume.
- -b kbperdump – Highlights the number of kilobytes within a single dumb record.
- -h level – With this option, a nodump attribute is associated with your backup files.
- -f file – Points to a file or device name that will accommodate the created dump.
- -d destiny – Defines the needed tape density.
- -n – Use to alert operator group users when something like a tape change is required by the dump operation.
- -s feet: Specifies the dump tape length in feet.
- -u – Creates a record of all successful backups under the file /etc/dumpdates.
- -t date – Specifies the date and time values associated with incremental backups.
- -W – This option references the /etc/fstab and /etc/dumpdates files and highlights filesystem files that need backup.
- -w – Goes hand in hand with the W option and highlights specific/individual files that need backup.
How to Backup Linux System using Dump Command
To determine the files that need backup on your Linux system, you will run a command similar to the following:
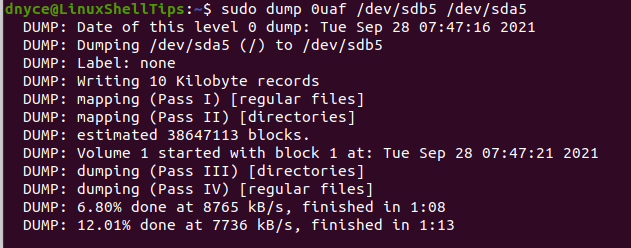
To back up the above filesystem (/dev/sda5) to an external device like /dev/sdb5 (identified by running the command sudo fdisk -l ), I would implement a dump command similar to the following:
$ sudo dump 0uaf /dev/sdb5 /dev/sda5
The dump command has the dump option 0 since it’s a first-time backup attempt.
If you need your backup compressed, you would run the above command in the following manner:
$ sudo dump 0ufz /dev/sdb5 /dev/sda5
The created backup will be compressed with the z library. The dump backup command updates the system user as it continues to execute:
Backup Linux Home Directory
To back up the files from a specific filesystem directory like your Home directory:
$ sudo dump 0ufz /dev/sdb5 /home
To back up files to a remote machine named linuxshelltips or identified by an IP address and with the tape device named /dev/sdb5, we will use the rdump command.
$ sudo rdump 0uf linuxshelltips:/dev/sdb5 /home
Backing Up Data to a Regular File
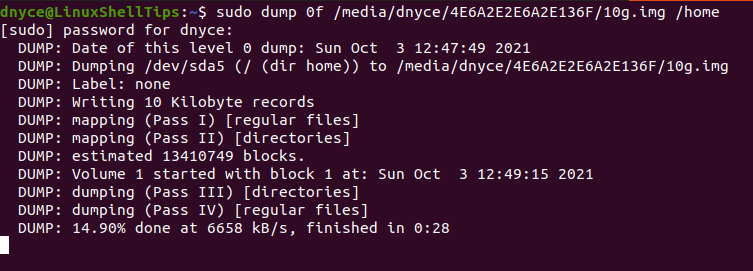
Supposing we want to back up the home directory to an existing regular file called 10g.img, we would implement the needed command in the following manner:
$ sudo dump 0f /media/dnyce/4E6A2E2E6A2E136F/10g.img /home
To create such a writable image file to hold your backup data, run the following command. Also, specify the size of this writable image file.
$ dd if=/dev/zero of=10g.img bs=1 count=0 seek=10G
Afterward, check the created backup file:
The created .img file backup can now be written to a disk device of your choice with this command:
$ sudo dd if=10g.img of=/dev/sdb5 bs=1M
How to Restore Linux System using Dump Command
To fully restore the above-created backup, we would run a command similar to the following:
The restored files will be written on the current directory path of the active Linux system user.
To restore filesystem backups from a remote machine we will use the rrestore command:
$ sudo rrestore tf linuxshelltips:/dev/sdb5
With the dump command, you can easily achieve full and incremental backups of your Linux filesystem files. The restore command reverses or does the opposite of the dump command to successfully re-instate your filesystem backups.
To learn more about these two commands and their usage, run:


