- Eclipse Installer 2023-06 R
- Try the Eclipse Installer 2023‑06 R
- 5 Steps to Install Eclipse
- 1. Download the Eclipse Installer
- 2. Start the Eclipse Installer executable
- 3. Select the package to install
- 4. Select your installation folder
- 5. Launch Eclipse
- How to Install Eclipse IDE on Linux
- Prerequisites
- Installing Eclipse on Linux
- How to Install Eclipse IDE from the Snap Store (Terminal)
- How to Install Eclipse IDE using the Eclipse Installer
- Starting Eclipse
- From the Terminal
- From the Application Finder
- From the Desktop Shortcut
- Conclusion
- Устанавливаем Eclipse на Linux
- Что такое Eclipse?
- Устанавливаем Eclipse в Ubuntu
- Подключаем Java
- Загружаем и настраиваем Eclipse
- Как установить Eclipse в Fedora и другие системы
Eclipse Installer 2023-06 R
The Eclipse Installer 2023‑06 R now includes a JRE for macOS, Windows and Linux.
Try the Eclipse Installer 2023‑06 R
The easiest way to install and update your Eclipse Development Environment.
5 Steps to Install Eclipse
We’ve recently introduced the Eclipse Installer, a new and more efficient way to install Eclipse. It is a proper installer (no zip files), with a self-extracting download that leads you through the installation process. For those who prefer not to use the Installer, the packages and zip files are still available on our package download page.
1. Download the Eclipse Installer
Eclipse is hosted on many mirrors around the world. Please select the one closest to you and start to download the Installer
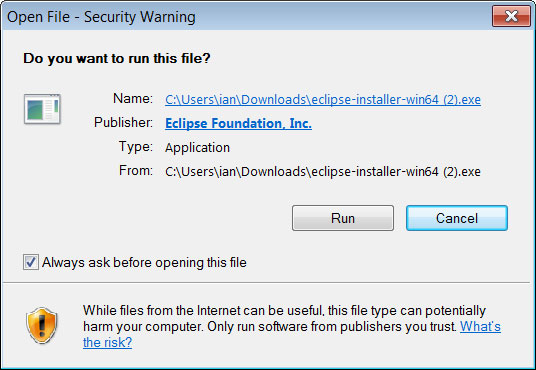
2. Start the Eclipse Installer executable
For Windows users, after the Eclipse Installer executable has finished downloading it should be available in your download directory. Start the Eclipse Installer executable. You may get a security warning to run this file. If the Eclipse Foundation is the Publisher, you are good to select Run.
For Mac and Linux users, you will still need to unzip the download to create the Installer. Start the Installer once it is available.
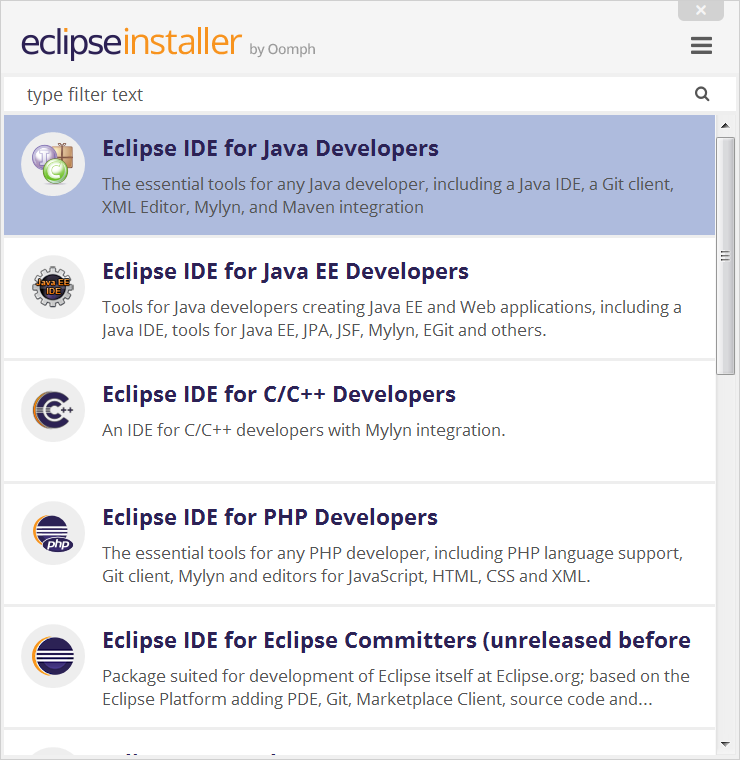
3. Select the package to install
The new Eclipse Installer shows the packages available to Eclipse users. You can search for the package you want to install or scroll through the list.
Select and click on the package you want to install.
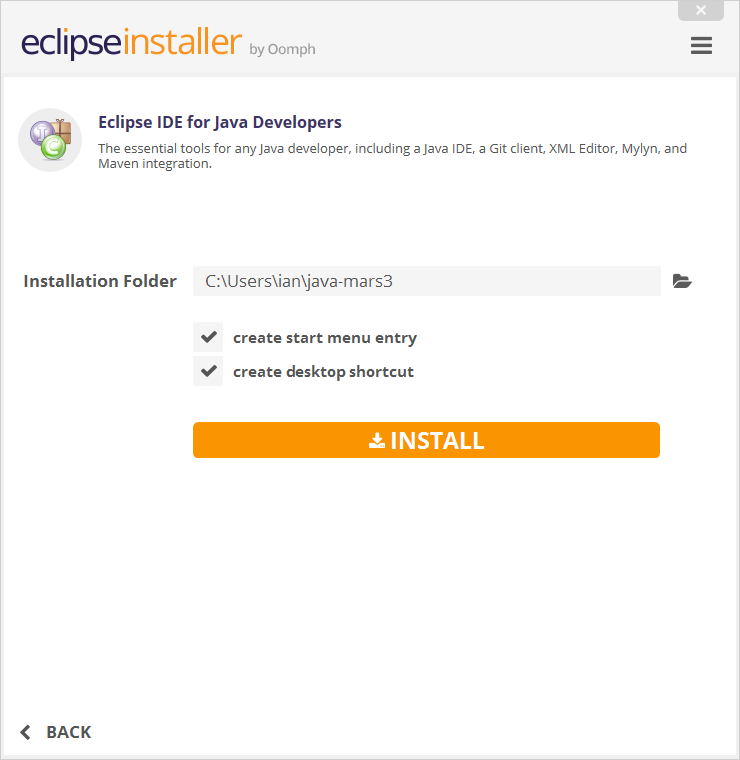
4. Select your installation folder
Specify the folder where you want Eclipse to be installed. The default folder will be in your User directory.
Select the ‘Install’ button to begin the installation.
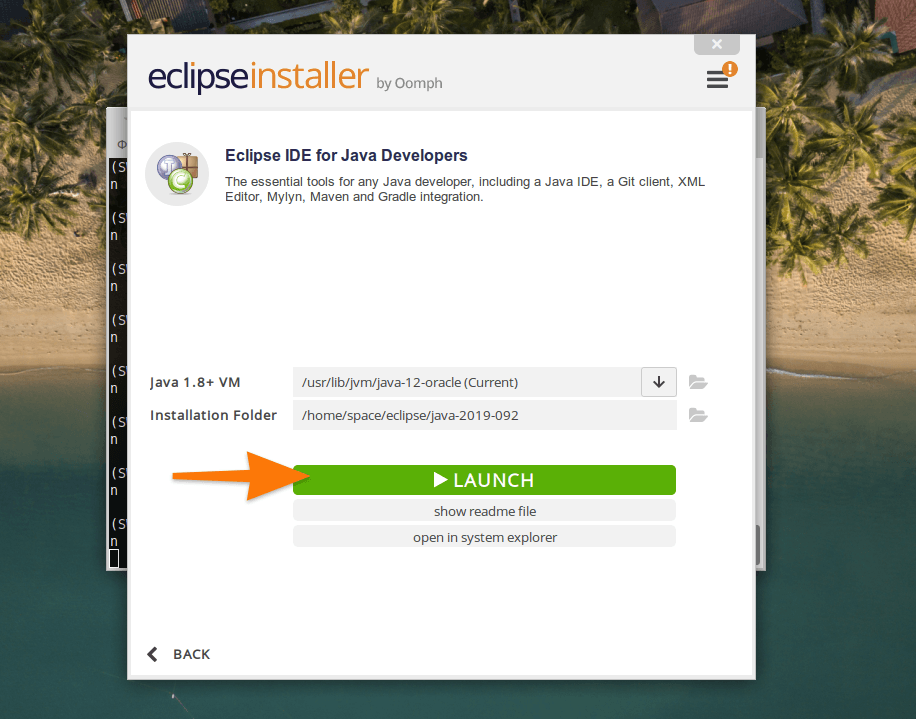
5. Launch Eclipse
Once the installation is complete you can now launch Eclipse. The Eclipse Installer has done it’s work. Happy coding.
How to Install Eclipse IDE on Linux
Eclipse is a popular Integrated Development Environment (IDE) that offers a ton of features. But installing Eclipse can be quite the challenge – especially on Linux.
This guide aims to simplify that task by providing clear and concise instructions on how to install Eclipse IDE in Ubuntu.
By the end of this guide, you should have a working installation of Eclipse that you can use to develop your applications.
Prerequisites
This hands-on tutorial requires you to have the following items so that you may follow along with the examples seamlessly.
- Your Linux computer must have Java installed. This tutorial will be using OpenJDK 11.0.15.
- You must have access to the root account or an account with sudo privileges. This guide uses a root account to execute commands.
Installing Eclipse on Linux
The Eclipse package is not available in the Ubuntu package repository as of this writing, which means you cannot install Eclipse via apt or the Software Manager. Don’t worry; there are several ways to install the Eclipse IDE.
How to Install Eclipse IDE from the Snap Store (Terminal)
Eclipse is available in the Snap Store, so you can install it with the snap command. If you’re unfamiliar with Snap, it’s a package manager for Linux that allows you to install and update applications with a single command.
Snaps are convenient to install and update. They are safe to run and isolated from the rest of your system, so they don’t put your system at risk.
While Snap is an excellent app source, the Eclipse version available in the Snap store might not be the latest one.
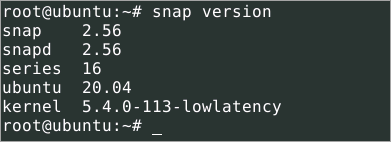
1. First, open a terminal window on your computer and run the below command to confirm that Snap is installed.
If Snap is available on your system, you will see the version information in the result.
2. If Snap is not installed, run the below command to install.

3. Create a symbolic link between /var/lib/snapd/snap and /snap. Doing so gives Snap apps access to your home directory after the installation.
ln -s /var/lib/snapd/snap /snap4. Now, update the Snap package list by running the below command.

5. Run the following command to install the latest stable version of Eclipse. This command downloads the latest stable version of Eclipse from the Snap store and installs it on your system.
snap install --classic eclipseThe output below shows that you have successfully installed Eclipse IDE from the Snap store. The version number may be different depending on when you installed it. In this example, the Eclipse version from Snap is 2019-12 at the time of writing.


6. At this point, you have successfully installed Eclipse IDE from the Snap store. To launch Eclipse, click on the Activities tab in the top left corner of your screen and search for Eclipse.
How to Install Eclipse IDE using the Eclipse Installer
If you want the latest and greatest, install the official package from the Eclipse website. The version available on the official Eclipse website is always the latest one.
Compared with the Snap installation method, installing the official package requires more steps. But don’t worry. This section will walk you through the installation process step by step.
To install Eclipse from the official Eclipse website, follow these steps.
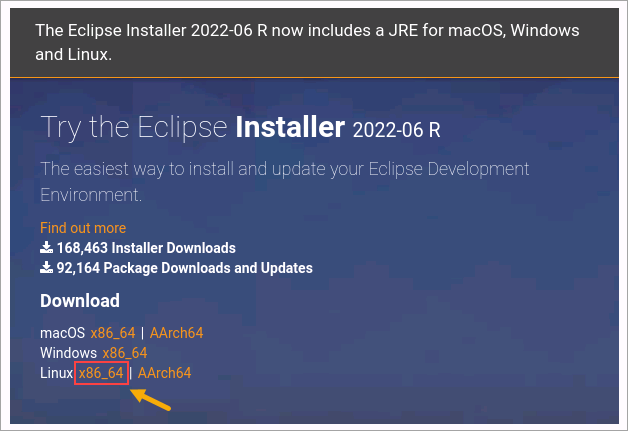
1. Open the Eclipse download website using your web browser.
2. Click the appropriate download link for Linux, as shown below. By default, the browser will download the file to your Downloads folder (~/Downloads).
3. Extract the downloaded archive file using the commands below. These commands extract the contents of the package to the /opt directory.
You can choose any location you want to extract the file. But /opt is a common directory for optional software packages, so it’s a good choice.
The -xvzf options tell tar to (x) extract the (f) file through (z) gzip and display the progress (v).
cd /opt tar -xvzf ~/Downloads/eclipse-inst-jre-linux64.tar.gz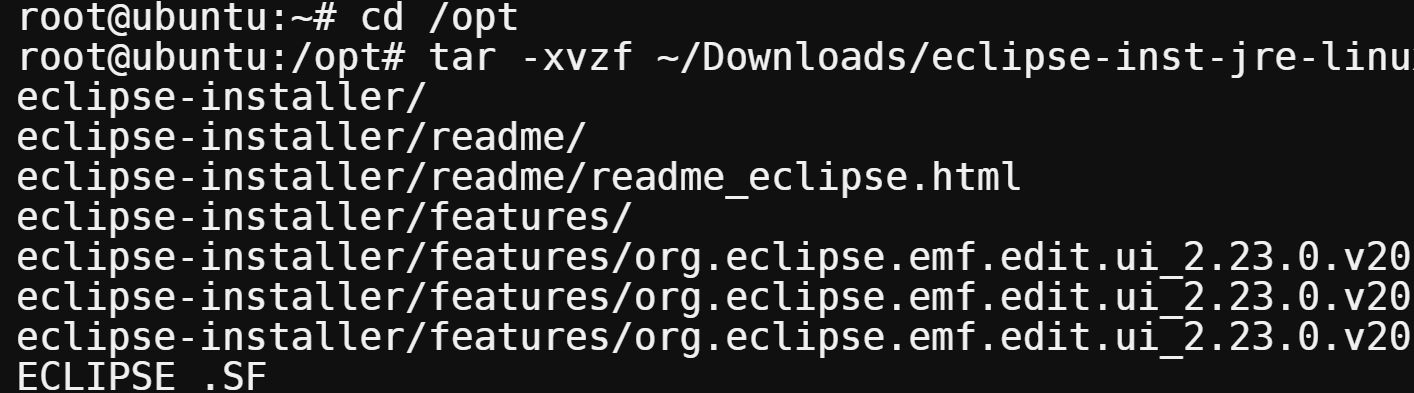
4. The installer extracts to the eclipse-installer subdirectory. To confirm the sub directory exists, run the below command.

5. Change the working directory to the eclipse-installer subdirectory.
6. Now that you are in the eclipse-installer directory, run the ./eclipse-inst file to launch the installer.
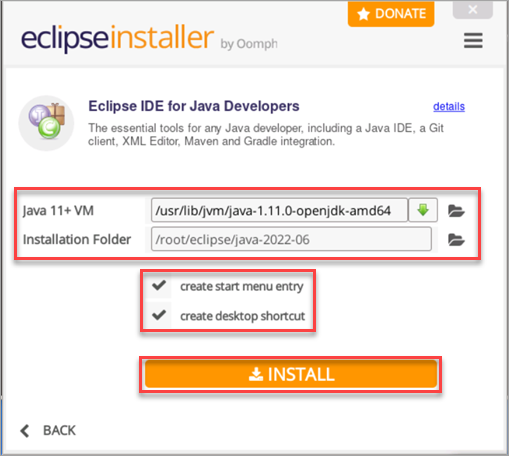
7. On the Eclipse installer window, click the Eclipse IDE type you wish to install. This example installs the Eclipse IDE for Java Developers.

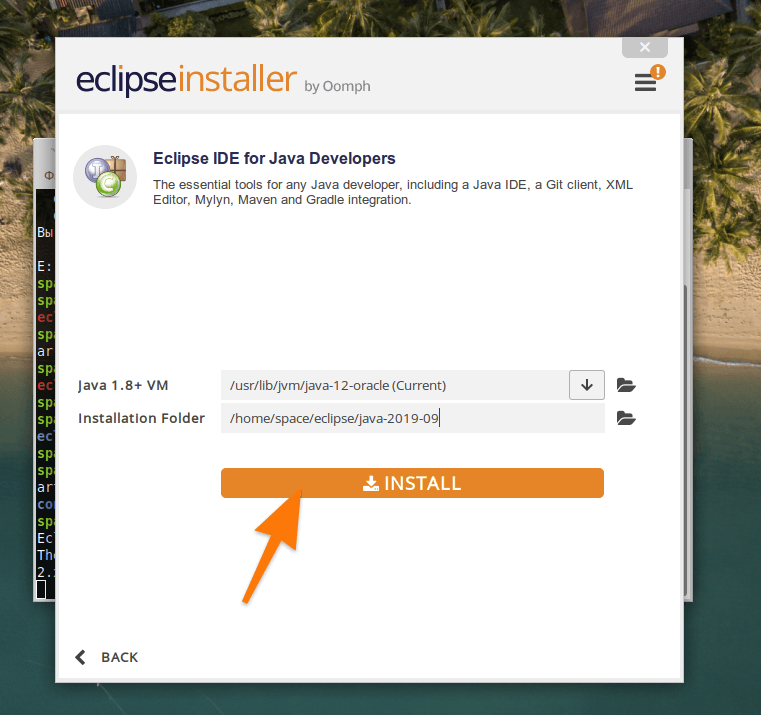
8. Select your Java version and the installation directory on the next screen. The default Java version and installation directory are acceptable in most cases.
Tick the two checkboxes to launch Eclipse using the start menu and the desktop icon. Click the Install button to start the installation process.
9. Next, click Accept Now on the Eclipse Foundation Software User Agreement page.
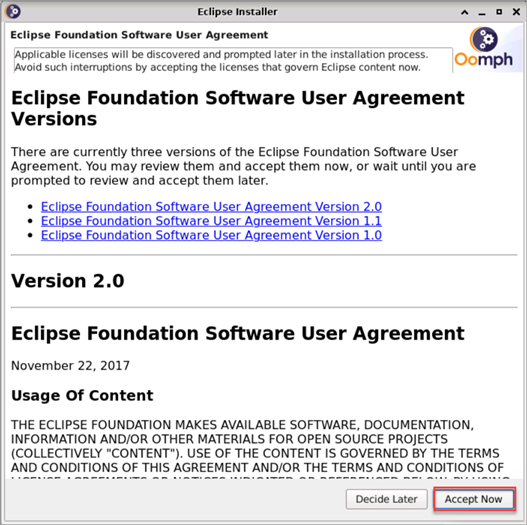
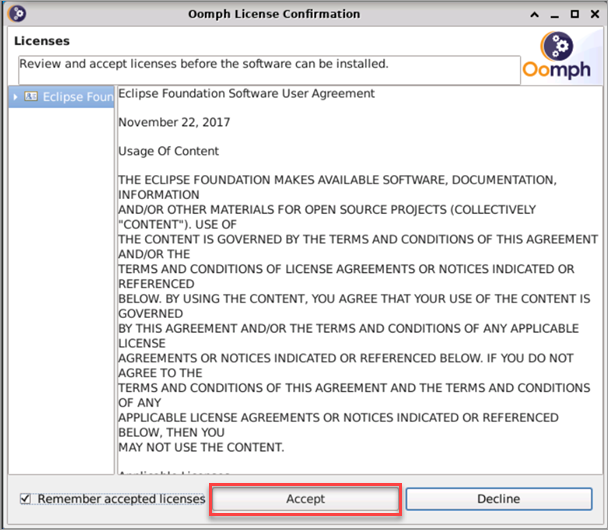
10. Review the Licenses and click Accept to proceed.
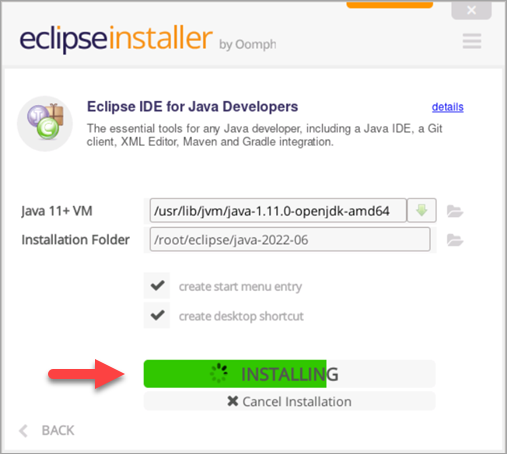
The status changes to Installing.
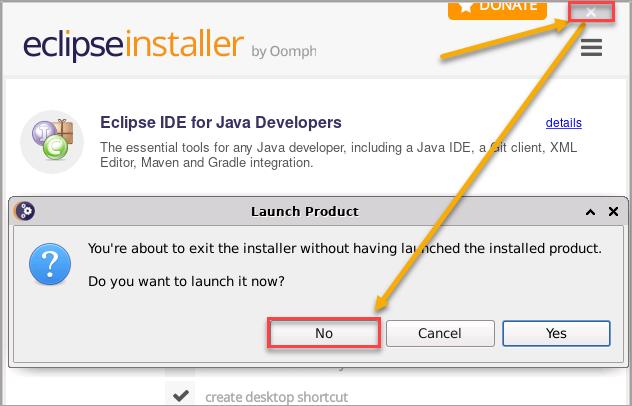
11. After the installation, click the exit button and No to exit the installer.
Starting Eclipse
You’ve completed learning how to install Eclipse IDE. Depending on which installation method you used, there are a few ways to start the Eclipse IDE.
From the Terminal
If you installed Eclipse through the Snap Store, one way to start the Eclipse IDE is by running the below command in the terminal.
Note: This method does not apply if you installed Eclipse IDE using the Eclipse installer.

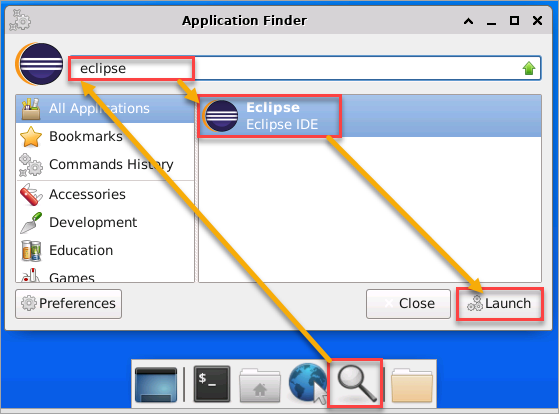
From the Application Finder
Most Linux desktop environments have a search or application finder that allows you to search for an application and launch it.
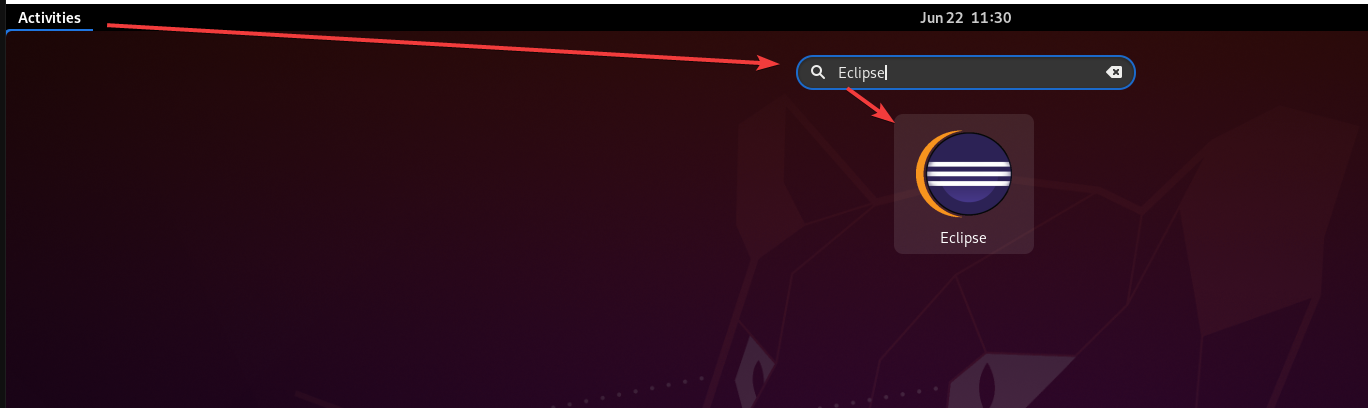
For example, in Ubuntu GNOME, click the Activities menu and type “eclipse” to search for the Eclipse IDE.

Another example on the XFCE desktop, click the Application Finder icon on the dock. Type “eclipse” in this search bar to find the Eclipse IDE app and click Launch.
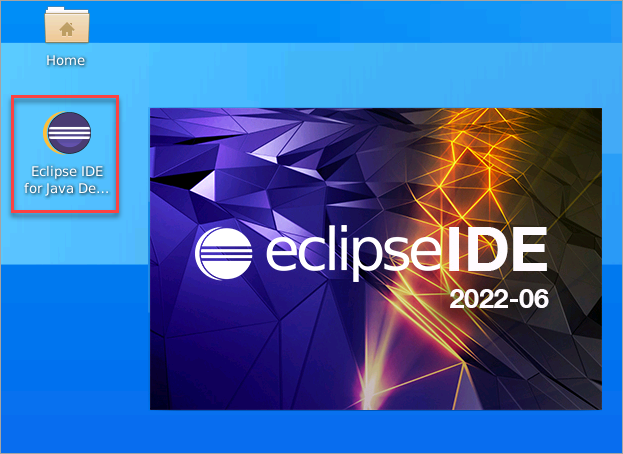
From the Desktop Shortcut
If you installed Eclipse IDE using the Eclipse installer, the installer automatically creates a desktop shortcut for you. All you need to do is double-click the icon to launch the Eclipse IDE.
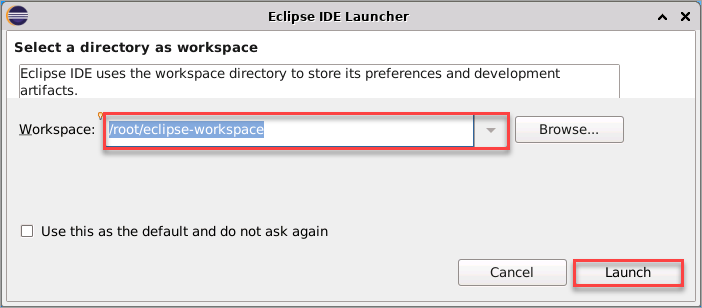
The Eclipse IDE Launcher asks you to specify the workspace directory. Choose the default location or browse to a different one as you wish. This workspace will store all your project files, including the preferences. Once you’ve selected the workspace location, click the Launch button.
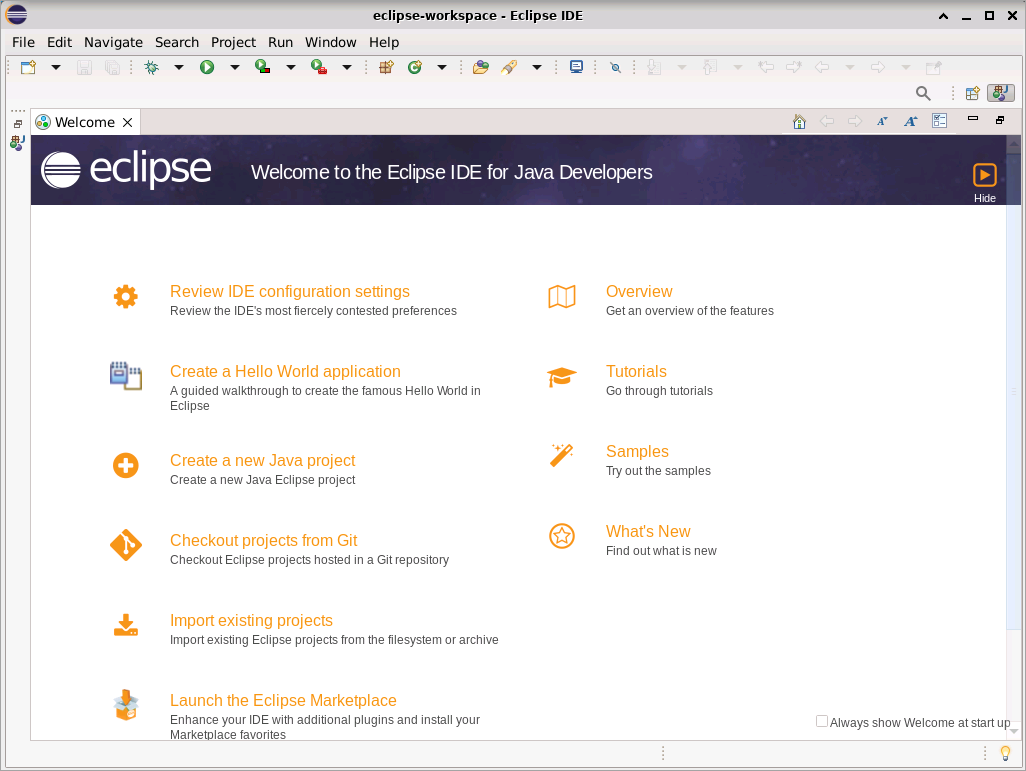
Eclipse will now launch with your selected workspace. You will see the welcome screen when Eclipse launches successfully, as shown below. You can now start using Eclipse.
Conclusion
A popular IDE for Java development, Eclipse comes packed with features to help make your life as a developer easier. In this guide, you have learned the different methods to install Eclipse on Linux and how to launch it.
Are you looking to extend the Eclipse IDE features? The Google App market is a great place to start looking for plugins to add to your Eclipse installation. With over 1000 plugins available, you will find something that will help your development workflow.
Have you used Eclipse before? What are some of your favorite features? Let us know in the comments below!
Hate ads? Want to support the writer? Get many of our tutorials packaged as an ATA Guidebook.
Устанавливаем Eclipse на Linux
Рассказываем, что такое Eclipse и как его установить в Linux.
Что такое Eclipse?
Eclipse — это целый набор приложений для разработчиков. Каждая программа из серии Eclipse — это IDE. То есть интегрированная среда разработки. Она помогает писать код на разных языках, предлагает подсказки по рефакторингу, дает возможность дополнять, корректировать, компилировать код с помощью единого инструмента.
У разработчиков Eclipse есть аналогичные решения для таких языков как: Java, C++, PHP, JavaScript, Rust и нескольких других более специфичных технологий. Есть даже отдельное программное обеспечение для тестировщиков.
Устанавливаем Eclipse в Ubuntu
Как и другие популярные кроссплатформенные IDE (например, WebStorm), Eclipse работает на базе Java. Поэтому сначала придется добавить в систему JDK, а уже потом переходить непосредственно к установке программного обеспечения для разработки.
Подключаем Java
- Сначала открываем терминал. Это можно сделать, одновременно нажав на клавиши Ctrl + Alt + T.
- Вводим туда команду sudo apt-get install openjdk–7-jdk.
- Указываем пароль администратора.
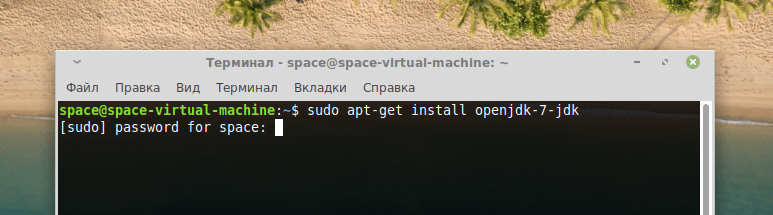
При вводе пароля нужно учитывать то, что набираемые символы никак не отображаются в интерфейсе терминала
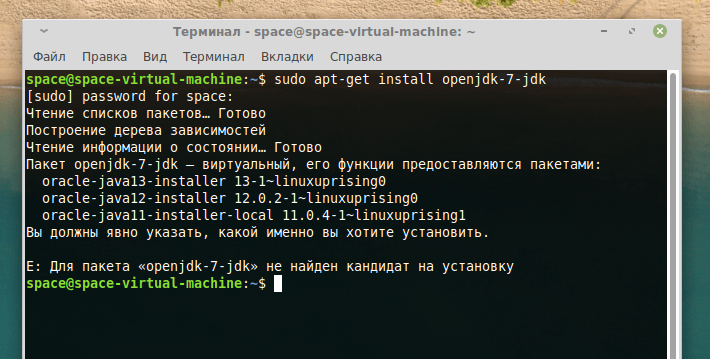
- Вероятно, система отзовется ошибкой и попросит указать другой пакет для установки. Надо будет выбрать версию Java, которая вам походит, и ввести команду sudo apt-get install подходящая версия java из списка
После выполнения этих процедур переходим непосредственно к установке Eclipse.
Загружаем и настраиваем Eclipse
- Заходим на официальный сайт разработчика.
- Ищем в верхней части страницы ссылку на загрузку Eclipse Installer для 64-битной версии Linux и кликаем по ней. Желательно в папку «Загрузки».
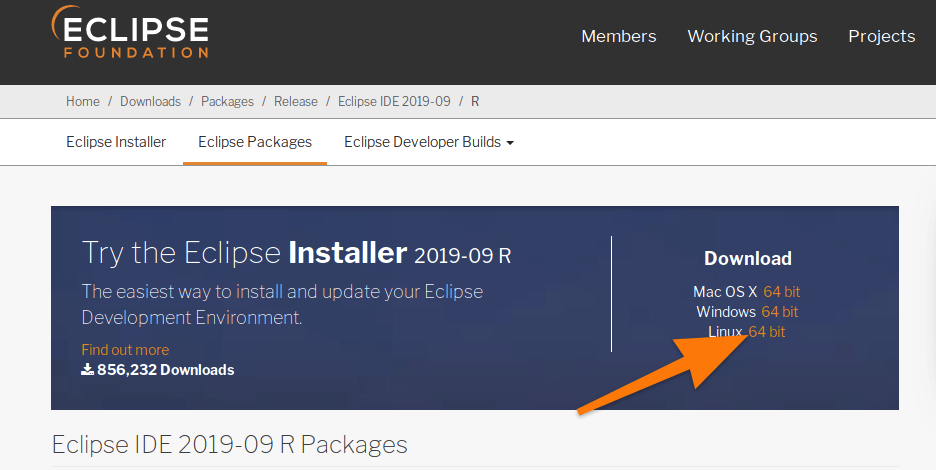
Выбираем подходящую версию установщика Eclipse
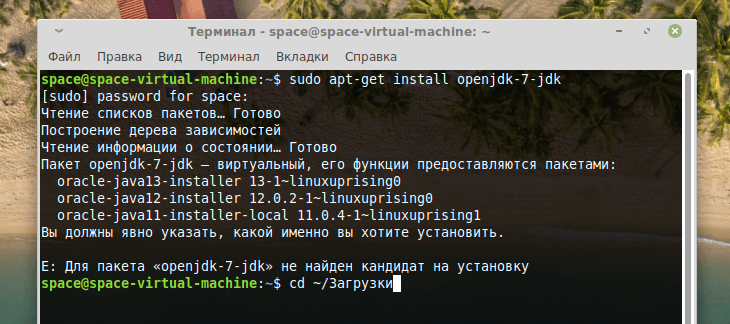
- Теперь снова открываем терминал.
- Заходим в ту папку, куда скачали Eclipse Installer. В моем случае это папка «Загрузки», и я захожу туда командой cd ~/Загрузки
Так будет проще работать с загруженным архивом
- Теперь распаковываем загруженный архив в ту же папку. Для этого введем команду tar xf название архива
- Заходим в папку, извлеченную из архива. Это можно сделать командой cd eclipse-installer
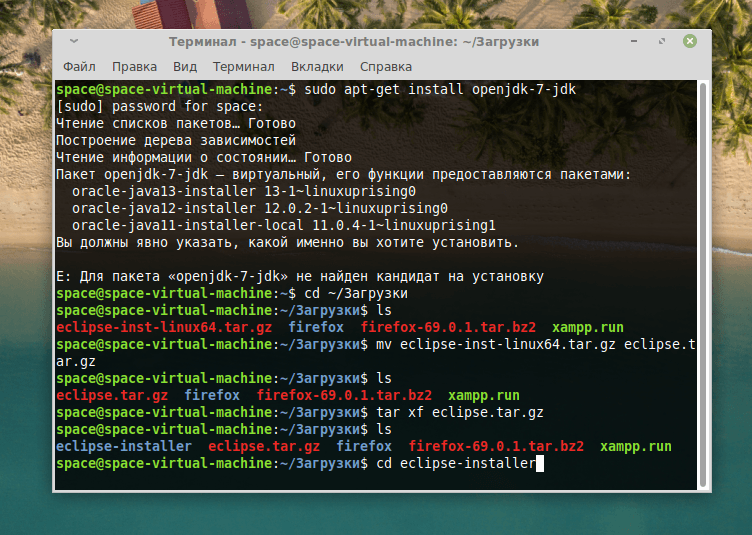
Идем в папку с распакованным установщиком
- Потом запускаем установщик, введя в терминал ./eclipse-inst
- На экране появится список IDE от Eclipse, доступных для установки. Вы можете выбрать тот язык, на котором пишете. Я же для примера покажу процесс установки Eclipse IDE for Java Developers.
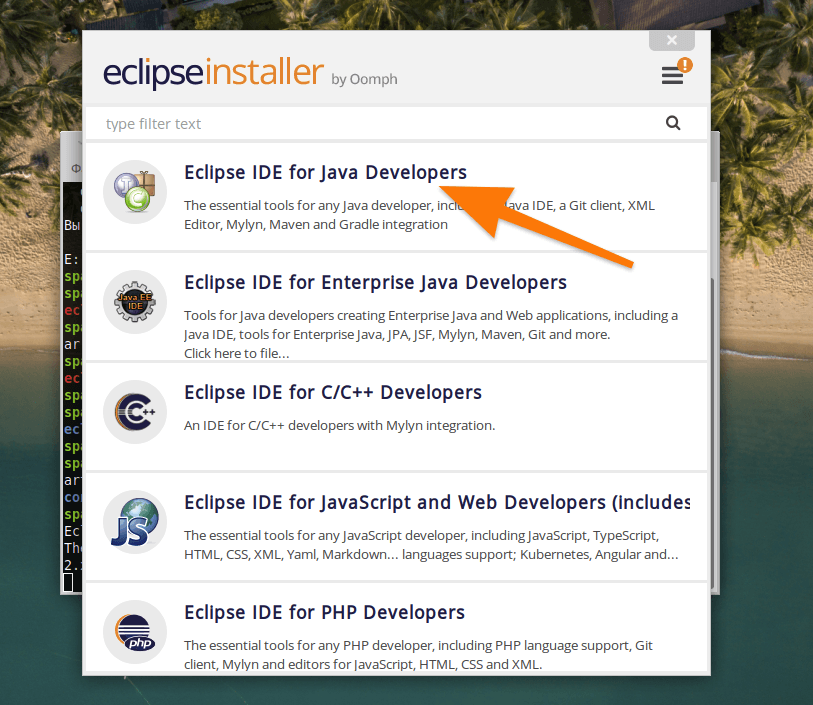
Выбираем IDE на свой вкус
- После выбора IDE появится окно с настройками. Здесь выберем версию Java и директорию, куда будет установлена программа.
- Затем нажимаем на кнопку Install.
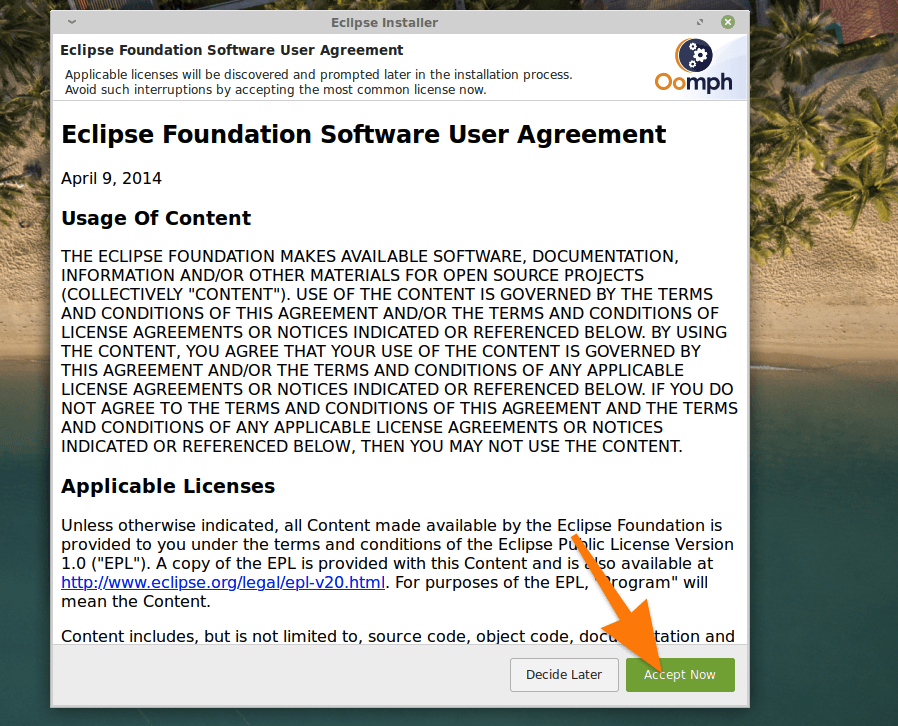
- После этого в открывшемся окне ставим галочку напротив записи Eclipse Foundation… и нажимаем на кнопку Accept selected.
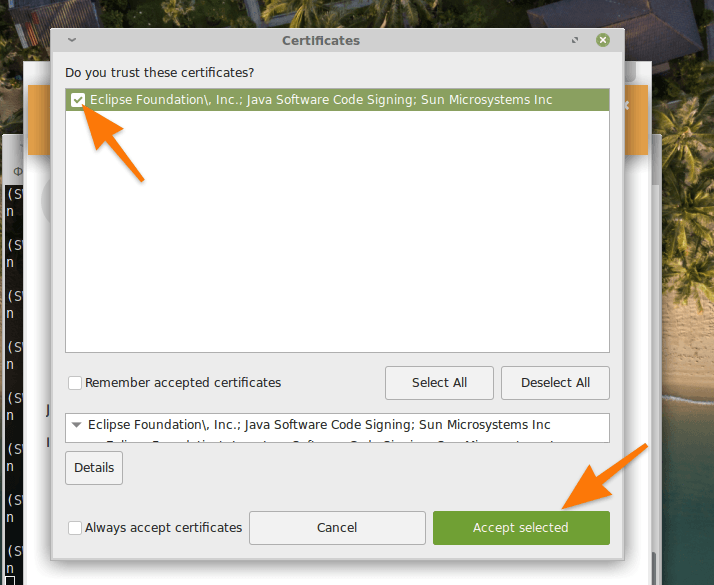
Выбираем сертификаты, без них программа работать не будет
Как установить Eclipse в Fedora и другие системы
На самом деле, процесс установки в других дистрибутивах практически не отличается. Сам установщик универсален и работает во всех вариантах Linux одинаково, так как построен на базе Java — кроссплатформенного языка программирования.
Отличие заключается как раз в установке JDK. В разных дистрибутивах используются разные менеджеры пакетов. Поэтому его и придется заменить. Например:
- sudo dnf install java–11-openjdk.x86_64 — чтобы установить Java в Fedora.
- Или sudo yum install java–11-openjdk — в CentOS.
Для каждого дистрибутива придется уточнять команду отдельно, так как менеджеры пакетов и списки доступных пакетов часто меняются.
Остальные этапы установки Eclipse не отличаются от описанных выше для Linux Mint.