- Программы для диагностического адаптера ELM327
- Оригинальные диагностические адаптеры ELM327
- Viecar ELM327 v2.2 (Wi-Fi)
- Viecar ELM327 v2.2 (new Wi-Fi)
- ELM327 v1.5 (Bluetooth 4.0) с кнопкой On/Off
- ELM327 v1.5 (Bluetooth 2.0) 2021
- ELM327 v1.5 (Bluetooth 2.0) Standart
- Vgate iCar2 (Bluetooth 3.0) ELM327
- ELM327 USB с переключателем HS+MS CAN Pro
- Адаптер ELS27 v4.1
- ELM327 v1.5 (Bluetooth 2.0) Scan Tool Pro 2022
- ELM327 v1.5 (Bluetooth 2.0) Mini
- Viecar ELM327 v1.5 (Bluetooth 4.0)
- ELM327 Forscan с переключателем HS+MS для Ford
- ELM327 v2.2 (Bluetooth 4.0)
- ELM327 v1.5 (Bluetooth 2.0) Mini 2020
- Viecar ELM327 v2.2 (Bluetooth 4.0)
- Viecar ELM327 v2.2 (Bluetooth 5.0)
- Vgate vLinker MC+ v2.2 (BLE+Bluetooth 4.0)
- Vgate vLinker FD+ v2.2 (BLE+Bluetooth 4.0)
- Vgate vLinker BM+ v2.2 (BLE+Bluetooth 4.0)
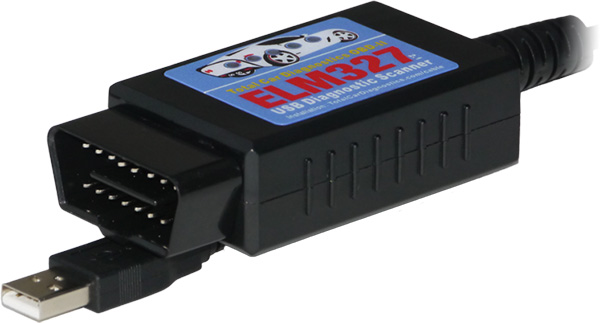
- ELM327 v1.5 (USB) Standart
- Драйвера ELM327
- Чтобы определить чип, установленный в USB ELM327 адаптере нужно
- Скачать
- Помоги нам помогать вам
- How to Install ELM327 USB, WiFi, Bluetooth on WinXP Win7 Win8 Win10?
- Guide for Installing ELM327 USB on Windows
- Guide for Installing ELM327 WiFi on Windows
- Guide for Installing ELM327 Bluetoothon Windows
- Related posts:
- Драйвер для ELM327 адаптера на чипе FTDI
- Установка драйвера для USB адаптера ELM327 на чипе FTDI
Программы для диагностического адаптера ELM327
Оригинальные диагностические адаптеры ELM327

Viecar ELM327 v2.2 (Wi-Fi)

Viecar ELM327 v2.2 (new Wi-Fi)

ELM327 v1.5 (Bluetooth 4.0) с кнопкой On/Off

ELM327 v1.5 (Bluetooth 2.0) 2021

ELM327 v1.5 (Bluetooth 2.0) Standart

Vgate iCar2 (Bluetooth 3.0) ELM327

ELM327 USB с переключателем HS+MS CAN Pro

Адаптер ELS27 v4.1

ELM327 v1.5 (Bluetooth 2.0) Scan Tool Pro 2022

ELM327 v1.5 (Bluetooth 2.0) Mini

Viecar ELM327 v1.5 (Bluetooth 4.0)

ELM327 Forscan с переключателем HS+MS для Ford

ELM327 v2.2 (Bluetooth 4.0)

ELM327 v1.5 (Bluetooth 2.0) Mini 2020

Viecar ELM327 v2.2 (Bluetooth 4.0)

Viecar ELM327 v2.2 (Bluetooth 5.0)

Vgate vLinker MC+ v2.2 (BLE+Bluetooth 4.0)

Vgate vLinker FD+ v2.2 (BLE+Bluetooth 4.0)

Vgate vLinker BM+ v2.2 (BLE+Bluetooth 4.0)

ELM327 v1.5 (USB) Standart


ИП Лифанов Андрей Анатольевич / ОГРНИП 314522932200025
© 2013–2022, ELMSCAN.RU — оборудование для автодиагностики.
г.Нижний Новгород, ул.Родионова, д.192Д, 5 этаж, офис 506
Указанная стоимость товаров и условия их приобретения действительны по состоянию на текущую дату.
Драйвера ELM327
Чтобы определить чип, установленный в USB ELM327 адаптере нужно
- Заходим в «Диспетчер устройств», находим устройство с восклицательным знаком в разделе «Контроллеры USB» или «Порты (COM и LPT)».
- Правой кнопкой мыши на устройстве с восклицательным знаком в меню выбираем пункт «Свойства». В открывшемся окне вкладка «Сведения» смотрим свойство: «ИД оборудования».

Скачать
Драйвера для адаптеров ELM327 USB на чипе FTDI: ИД оборудования: VID_0403&PID_6001
Драйвера для адаптеров ELM327 USB на чипе CP210x: ИД оборудования: VID_10C4&PID_EA60
Драйвера для адаптеров ELM327 USB на чипе PL2303: ИД оборудования: VID_067B&PID_2303
Помоги нам помогать вам
Вы можете пожертвовать небольшую сумму на поддержание работы и развитие сайта. Оплата происходит через платежную систему ЮМани от Сбербанка.
заказал елм327 юсб ставлю драйвер автоматом грузит даж не с диска а подключаюю к машине пишет нет драйвера в прге скан мастер и чо купил за 1500 р хрень с лампочками что ли и поддержка молчит
Добрый день форумчане. Я купил USB адаптер ELM. Кто-то на форуме писал что, с этим можно узнать истинный пробег авто Шевроле. Кто-нибудь выяснил? Плиз. помогите как это сделать.
Не нужно лукавить. Указывайте точную информацию. По ссылке на драйвер для адаптеров ELM327 USB на чипе PL2303: ИД оборудования: VID_067B&PID_2303 находится не собственно драйвер, а программа для его установки — Prolific DriverInstaller.
У меня ELM 327 USB V1.5a Нет нигде драйверов для него…. Где взять, кто скажет. Программа лицензия, но не работает. Драйвер остается с желтым восклицательным знаком.
How to Install ELM327 USB, WiFi, Bluetooth on WinXP Win7 Win8 Win10?
How-to: set up ELM327 USB, WiFi and Bluetooth OBD2 scanner software on Windows XP, Windows 7, Windows 8 and Windows 10 separately.
*Don’t test on all ELM327 adapters. You are at your risk.
Guide for Installing ELM327 USB on Windows
Guide for Installing ELM327 WiFi on Windows
Guide for Installing ELM327 Bluetooth on Windows
Guide for Installing ELM327 USB on Windows
(Cable should NOT be connected to your laptop yet. Only connect it when instructions say so.)
Windows XP, Vista, Win7:
If you bought genuine ELM327 cable v2.1 like image below
— then you only need to install DRIVER PACK 3. After install — go straight to Step 2 to test if it’s working.
If you bought ELM327 cable from elsewhere (clones, eBay, other manufacturers) then install all Driver Packs below, because they cover widest range of chip makers…
- DRIVER PACK 1Steps to install Driver Pack 1:
- If you have 64-bit Windows, double-click on: CP210xVCPInstaller_x64
- If you have 32-bit Windows, double-click on: CP210xVCPInstaller_x86
Go to Step 2 below to test if everything is working ok…
Windows 8, 10:
If you bought genuine ELM327 cable like this,
then you only need to install DRIVER PACK 3. Then go straight to Step 2 to test it’s working ok.

If you bought ELM327 cable from elsewhere (clones, eBay, other manufacturers) then install all Driver Packs below, because they cover widest range of chip makers…
- DRIVER PACK 1Steps to install Driver Pack 1:
- If you have 64-bit Windows, double-click on: CP210xVCPInstaller_x64
- If you have 32-bit Windows, double-click on: CP210xVCPInstaller_x86
Steps to install Driver Pack 5:
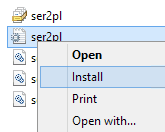
- Please FIRST move the unextracted folder to your Desktop, else below #2 step won’t show “Install” option.
- Right-click on “ser2pl” (icon has a little gear pic in it) and choose “Install”, as per below pic:

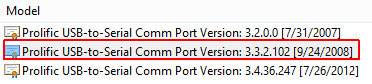
Connect ELM327 cable to your laptop. Then…Go to: Control Panel » System » Device Manager » Ports (COM & LPT) You will likely see a yellow mark next to “Prolific”, like this:
Right-click on it » Update Driver Software
- Click “Browse my computer for driver software”.
- Select “Let me pick from a list of device drivers on my computer”.
- UNcheck “Show compatible hardware“.

- Select: Prolific driver version 3.3.2.102

- Install. That’s it! The yellow triangle next to “Prolific…” should be gone.
Go to Step 2 below to test if everything is working ok…
(You can now CONNECT your ELM327 USB cable to any port on the laptop.)
Ok, we’re almost ready to start scanning your vehicle.
First, let’s ensure that everything is working fine!
Step 1: Access Device Manager
Windows Vista/7/8/10: Control Panel » System » Device Manager
Windows XP: Control Panel » System » “Hardware” tab » Device Manager
Notice any device with any one of the following names:
- FT232R USB UART
- Prolific USB-to-Serial…
- USB Serial Port
- USB2.0-Serial
- Silicon Labs CP210x USB to UART Bridge
NONE of above devices should have a yellow mark next to them.
If none of the above has a yellow mark, then congratulations! You’re ready to begin scanning your car(s).
If any one of above devices has a yellow mark, then:
- Right-click on that device » Uninstall
- Unplug cable
- Restart PC
- Download and unextract DRIVER PACK 6
- Double-click on “InstallUSB” to install
- Connect cable to laptop. Yellow mark should now be gone. Success!If yellow mark is STILL not gone after doing 1-6 above, then do this:
a) While cable is plugged in, right-click on device with the yellow mark.
b) Click on: Update Driver Software
c) Choose: Browser my computer for driver software
d) Browse to and select folder where you unextracted Driver Pack 6. Make sure “Include subfolders” is ticked ON.
e) Click on: Next
f) If you get RED warning, choose: Install this driver software anyway
g) After it installs successfully, another yellow mark may appear under “Other Device”. Eg:
Yellow Mark Other Devices Elm327
h) If g above is true, then do steps a-f for “Unknown Device”. It may also show as “COMx”.
Step 1: Install your OBD2 software Do NOT launch it yet.
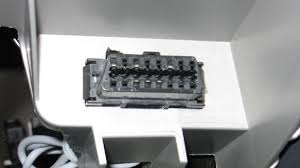
Step 2: Connect ELM327 USB to your computer and car’s OBD port (usually underneat dashboard/steering wheel).
Step 3: Place the key in the ignition and turn it forward to “ON” position. (Position where all dashboard lights are on. This is one position before engine starts.)
Step 4: Start your OBD diagnostic software. Click “Connect“, and it should auto-connect to your vehicle. That’s it!
Guide for Installing ELM327 WiFi on Windows
This guide explains how to connect ELM327 WIFI scanner to Windows.
Windows Vista, 7, 8, 10:
- Plug ELM327 WIFI Scanner into vehicle’s OBD2 port. (Port is usually found on the driver side dashboard under the steering wheel.)
- Turn ON ignition. (This is one step before engine is powered.)
- Inside Windows WIFI manager — connect to Wi-Fi signal with name similar to these examples: WIFI ELM327, WiFiOBD, OBDDevice, V-Link. NOTE: It can take up to 30 seconds for WIFI signal to show.
Password to connect to WIFI: 12345678
- Launch your OBD Software.
- Go to software Settings and configure it to look for WIFI. (It’s usually set to USB or Bluetooth).
- Configure WIFI IP Address to 192.168.0.11 (or 192.168.0.10) and Port to 35000. (Or number that sellers/manufacturers page has stated. Check their website where you bought your WIFI ELM327.)
- Software should now successfully connect to your vehicle.
- Plug ELM327 WIFI Scanner into vehicle’s OBD2 port. (Port is usually found on the driver side dashboard under the steering wheel.)
- Turn ON ignition. (This is one step before engine is powered.)
- Inside Windows WIFI manager — connect to Wi-Fi signal with name similar to these examples: WIFI ELM327, WiFiOBD, OBDDevice, V-Link. NOTE: It can take up to 30 seconds to WIFI signal to show.
Password to connect to WIFI: 12345678
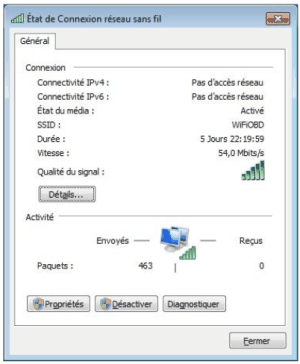
Once you’ve connected, right-click on the WIFI signal and click “Status”. The following window will appear:


Guide for Installing ELM327 Bluetooth on Windows
how to pair ELM327 Bluetooth scanner on your Windows system. (Instructions for MAC users).
STEP 1: Plug Bluetooth into Car’s OBD Port

Car’s OBD port is usually found on the driver side dashboard under the steering wheel…

STEP 2: Turn ON Car Ignition
This is one step before engine is powered.
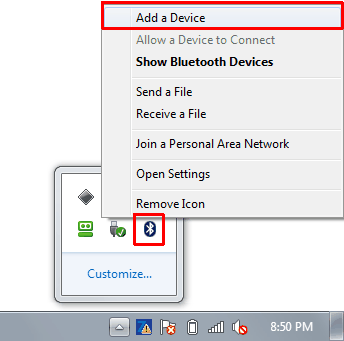
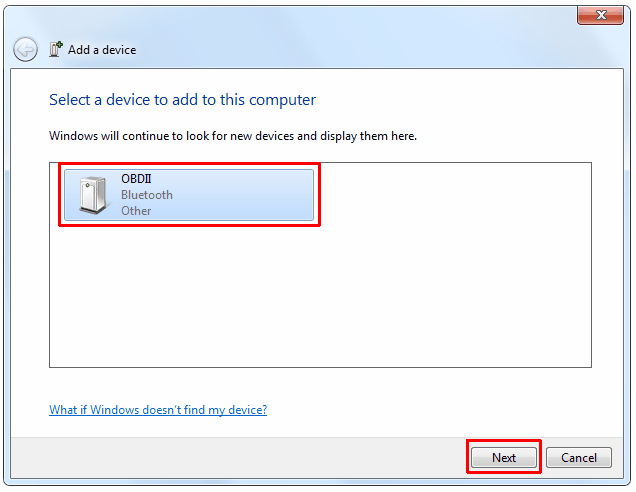
STEP 3: Add and Pair ELM327 Bluetooth to Windows
Right click on Bluetooth icon in task manager > Add a Device

Select ELM327 Bluetooth device. It’ll come under different names like: OBDII, OBD-II, VLink, Can OBDII, etc.
NOTE: It can take up to 15 seconds for Bluetooth signal to show.
SIGNAL NOT SHOWING?
- If signal does NOT show, then exit the screen. Disconnect ELM327 Bluetooth from car. Then insert it again into car’s port, and do another “Add a Device”.
- If signal STILL doesn’t show, then restart computer, and do another “Add a Device”. Repeat these suggestions in variations until signal eventually shows. Because as long as the red Power light is lit on the ELM327 Bluetooth device, it means it’s physically working, and MUST be detected.
- WORD OF CAUTION: Any attempt to detect ELM327 Bluetooth after pairing it for the FIRST time — may NOT show inside “Add a Device” anymore. In this case, it’s found inside “Show Bluetooth Devices”.

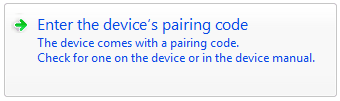
When you see list of pairing options like this:

(For Windows XP users, your option will be: Use the passkey found in the documentation)
If above doesn’t pair, then: 0000
STEP 4: Launch OBD Software and Connect to Vehicle
Click “Connect” and it should automatically detect ELM327 Bluetooth device, and connect to car’s ECU.
Related posts:
Драйвер для ELM327 адаптера на чипе FTDI
Установка драйвера для USB адаптера ELM327 на чипе FTDI
1. ОТКЛЮЧИТЕ адаптер от ноутбука или компьютера.
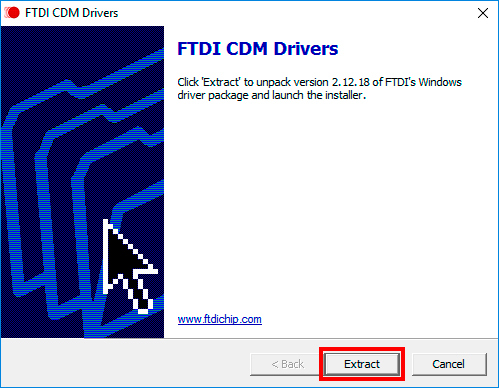
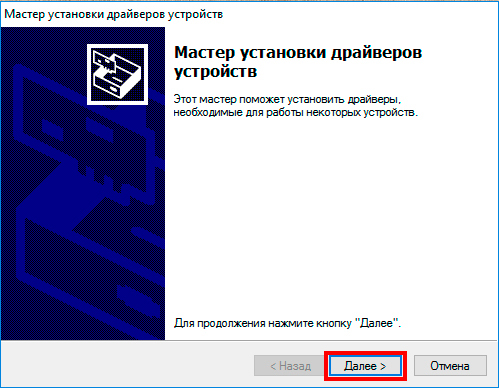
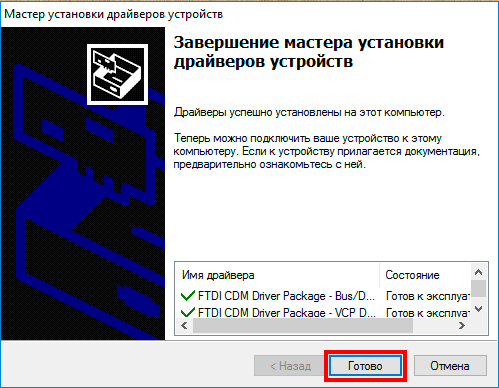
Для установки драйвера запустите файл ELM327_FTDI_Driver.exe и следуйте инструкциям ниже. После завершения установки перезагрузите компьютер.

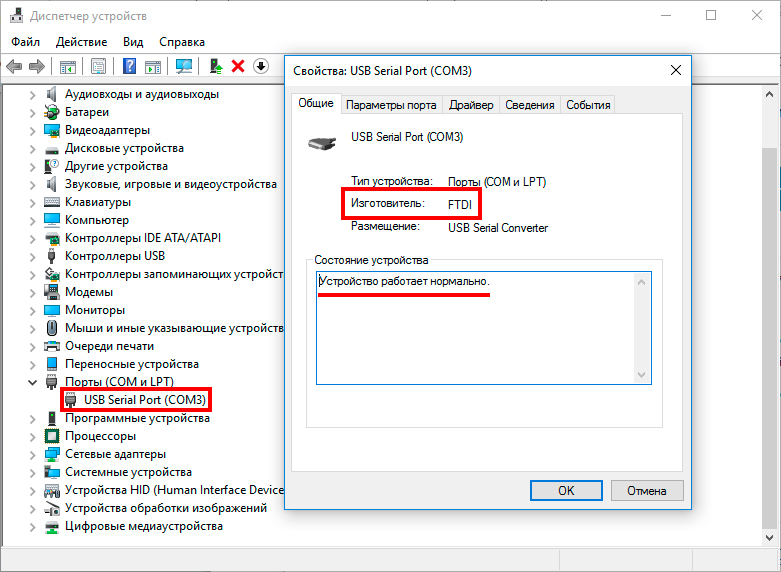
2. Для того, что бы проверить установился ли драйвер, ПОДКЛЮЧИТЕ АДАПТЕР к компьютеру и зайдите в «диспетчер устройств» Вашего компьютера (нажмите правой кнопкой на «Мой компьютер», затем «Свойства», далее «Диспетчер устройств»).
Во вкладке «Порты COM и LPT» должно появиться устройство «USB Serial Port (COM3)», причём COM3 не обязательно, цифра может быть любая – это номер порта. Если устройство появилось, и при просмотре его свойств (для просмотра свойств нажмите на USB Serial Port правой кнопкой, затем «свойства») написано: «Устройство работает нормально» значит, драйвер установлен правильно.

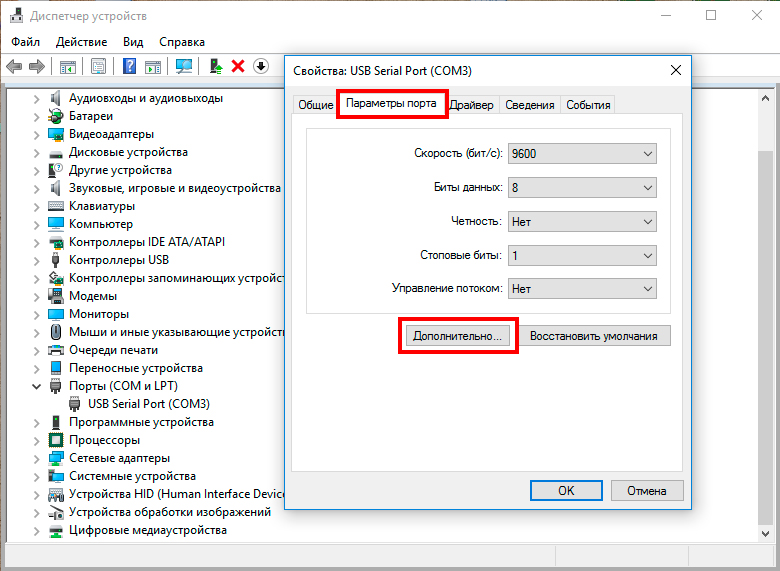
3. Если номер порта COM5 и больше, то лучше сменить его на номер от 1 до 4. Это связанно с тем, что некоторые программы диагностики поддерживают только первые 4 порта, и дальше они просто не видят, и не смогут подключиться. Большинство программ видят любой номер порта, но раз уж Вы всё равно зашли в «диспетчер устройств», то лучше сразу поменять. Это не сложно.
Для этого в этом же окне нажмите на вкладку «Параметры порта» и кнопку «Дополнительно»

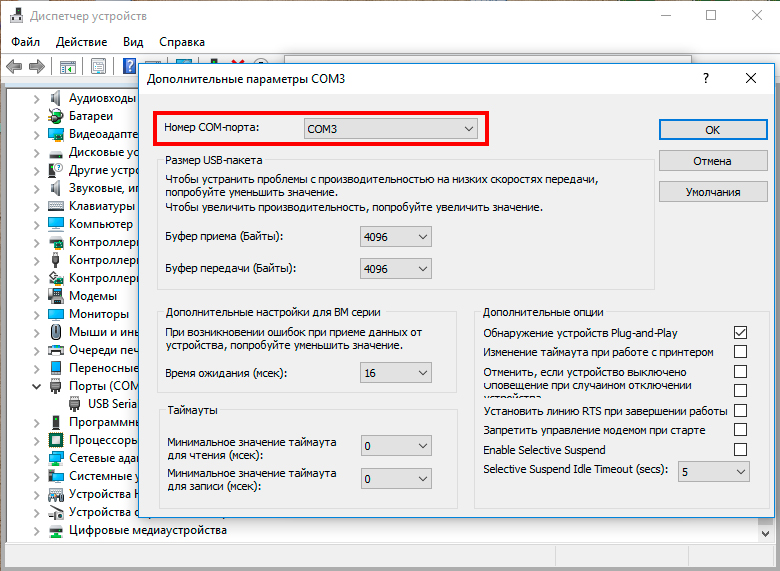
В открывшемся окне в строчке «номер COM порта» выберите любой свободный COM порт от 1 до 4. Затем нажмите кнопку OK и номер порта изменится.
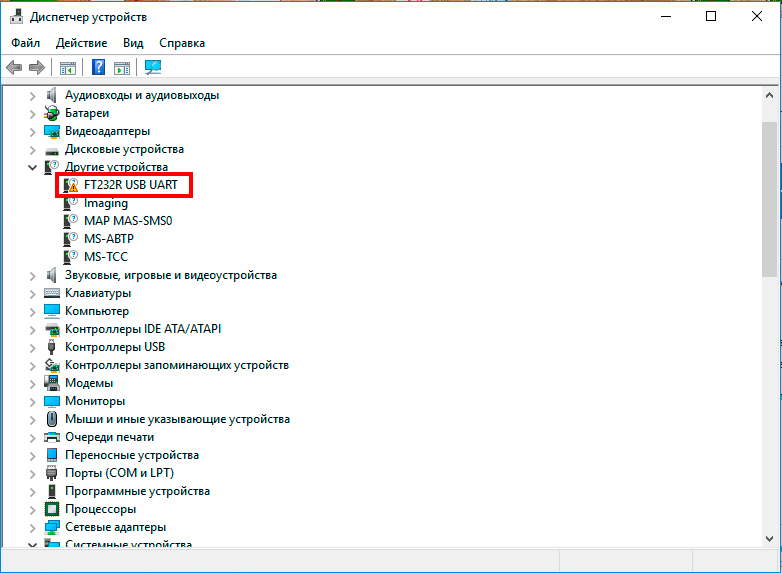
4. Если же Вы, вместо всего описанного выше, увидите неизвестное устройство, помеченное жёлтым восклицательным знаком под названием «FT232R USB UART» — это значит, что драйвер не установился или установился не корректно.

В таком случае нужно повторить установку драйвера.
Если вам сложно определиться с выбором, напишите нам на электронную почту
Если вы не нашли то, что искали, воспользуйтесь поиском по магазину
Не знаете что выбрать? Посмотрите какие адаптеры подойдут для Вашего авто.