- Boot Ubuntu 18.04 / Debian 9 Server in Rescue (Single User mode) / Emergency Mode
- Booting Ubuntu 18.04 LTS Server in Single User / Rescue Mode:
- Booting Ubuntu 18.04 LTS Server in emergency mode
- Booting Debian 9 into Rescue & Emergency Mode
- Rescue mode :
- Emergency Mode:
- Как определить, почему Linux загружается в Emergency mode
- Как определить точную причину, почему Systemd входит в emergency mode
- 1. Поиск проблем с монтированием
- 2. Поиск ошибок
- 3. Неудачный запуск fsck
- 4. Неудачный запуск любых служб
- 5. Поиск по журналу в Emergency mode и Maintenance mode
- Связанные статьи:
- How to Boot Debian 11 into Rescue / Emergency Mode
- Boot Debian 11 Into Rescue Mode
- Boot Debian 11 into Emergency Mode
- 1 thought on “How to Boot Debian 11 into Rescue / Emergency Mode”
- Leave a Comment Cancel reply
- Recent Posts
- Pages
- How to Boot into Rescue / Emergency Mode in Debian/Ubuntu & Fedora/CentOS
- Get into Recovery Mode in Debian / Ubuntu:
- Boot into Emergency Mode in Fedora / CentOS:
Boot Ubuntu 18.04 / Debian 9 Server in Rescue (Single User mode) / Emergency Mode
Booting a Linux Server into a single user mode or rescue mode is one of the important troubleshooting that a Linux admin usually follow while recovering the server from critical conditions. In Ubuntu 18.04 and Debian 9, single user mode is known as a rescue mode.
Apart from the rescue mode, Linux servers can be booted in emergency mode, the main difference between them is that, emergency mode loads a minimal environment with read only root file system file system, also it does not enable any network or other services. But rescue mode try to mount all the local file systems & try to start some important services including network.
In this article we will discuss how we can boot our Ubuntu 18.04 LTS / Debian 9 Server in rescue mode and emergency mode
Booting Ubuntu 18.04 LTS Server in Single User / Rescue Mode:
Reboot your server and go to boot loader (Grub) screen and Select “Ubuntu“, bootloader screen would look like below,
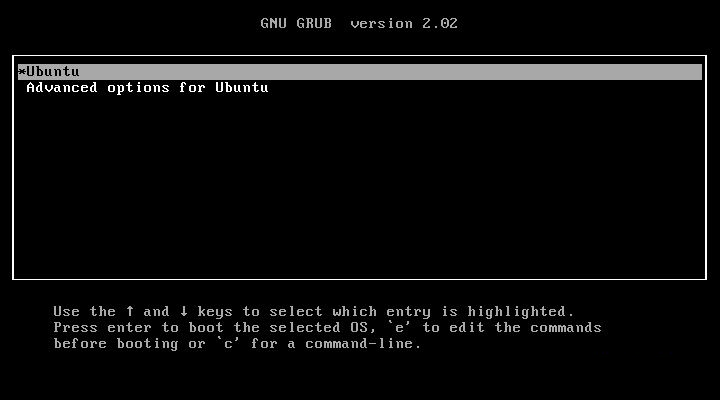
Press “e” and then go the end of line which starts with word “linux” and append “systemd.unit=rescue.target“. Remove the word “$vt_handoff ” if it exists.
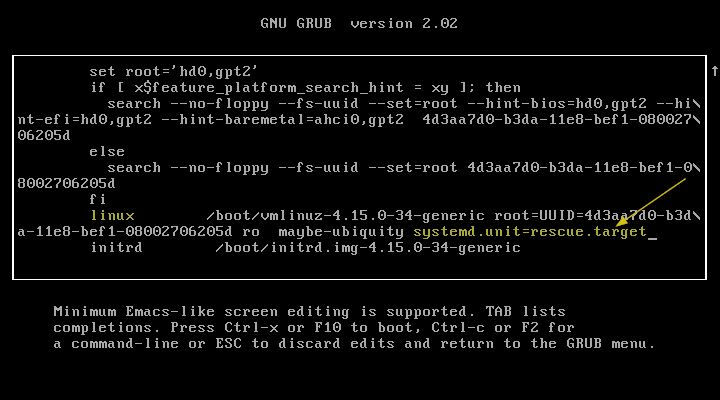
Now Press Ctrl-x or F10 to boot,

Now press enter and then you will get the shell where all file systems will be mounted in read-write mode and do the troubleshooting. Once you are done with troubleshooting, you can reboot your server using “reboot” command.
Booting Ubuntu 18.04 LTS Server in emergency mode
Reboot the server and go the boot loader screen and select “Ubuntu” and then press “e” and go to the end of line which starts with word linux, and append “systemd.unit=emergency.target”

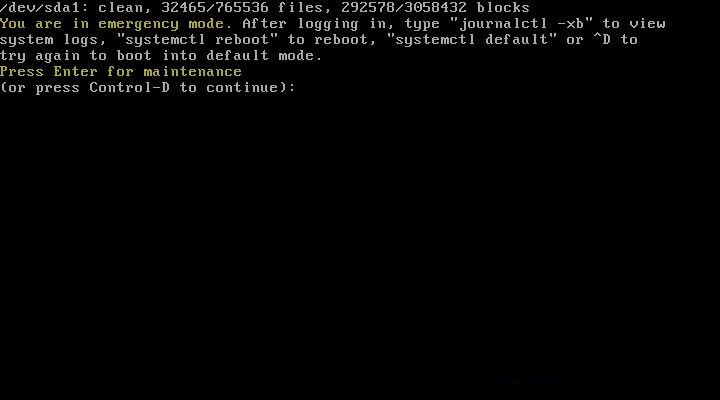
Now Press Ctlr-x or F10 to boot in emergency mode, you will get a shell and do the troubleshooting from there. As we had already discussed that in emergency mode, file systems will be mounted in read-only mode and also there will be no networking in this mode,
Use below command to mount the root file system in read-write mode,
Similarly, you can remount rest of file systems in read-write mode .
Booting Debian 9 into Rescue & Emergency Mode
Reboot your Debian 9.x server and go to grub screen and select “Debian GNU/Linux”

Press “e” and go to end of line which starts with word linux and append “systemd.unit=rescue.target” to boot the system in rescue mode and to boot in emergency mode then append “systemd.unit=emergency.target”
Rescue mode :

Now press Ctrl-x or F10 to boot in rescue mode

Press Enter to get the shell and from there you can start troubleshooting.
Emergency Mode:

Now press ctrl-x or F10 to boot your system in emergency mode

Press enter to get the shell and use “mount -o remount,rw /” command to mount the root file system in read-write mode.
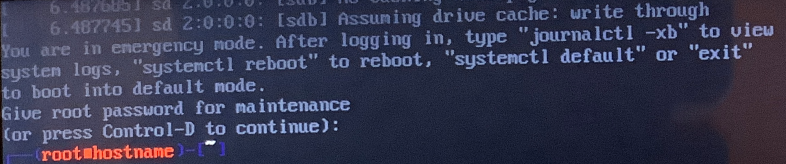
Note: In case root password is already set in Ubuntu 18.04 and Debian 9 Server then you must enter root password to get shell in rescue and emergency mode
Please share your feedback if this article is useful for you.
Как определить, почему Linux загружается в Emergency mode
Как определить точную причину, почему Systemd входит в emergency mode
Система Linux при возникновении проблем во время загрузки может переходить в оболочку emergency mode (аварийный режим).
Экран предлагает выполнить команду
для поиска причин неполадок в системе.
Также предлагается выполнить
чтобы система попыталась загрузиться в нормальном режиме.
Вы можете попробовать ввести systemctl default — иногда это действительно помогает, но иногда требуется разрешить проблему, которая стала причиной Emergency mode.
Вывод journalctl -xb довольно обширный и его изучение без фильтров не всегда даёт подсказку, почему выбрасывает в аварийную оболочку. Рассмотрим способы, которые могут помочь отыскать проблему.
1. Поиск проблем с монтированием
Причин, по которой система переходит в Emergency mode не так уж много, обычно это проблемы с монтированием дисков и разделов. Посмотрите, что вам скажут следующие команды?
systemctl status local-fs.target journalctl -xb | grep -i -E 'local-fs.target'
2. Поиск ошибок
Что необычного показывает journalctl -xb? Попробуйте поискать сообщения, связанные с монтированием и ошибками — возможно, там есть ответ.
journalctl -xb | grep -i mount journalctl -xb | grep -i -E '(error|fail|warn|\(EE\))'
3. Неудачный запуск fsck
Проверьте записи, связанные с fsck:
journalctl -xb | grep -i -E 'fsck' systemctl status systemd-fsck*
4. Неудачный запуск любых служб
Следующие команды (они идентичны) выведут список служб, которые не удалось запустить:
systemctl --state=failed systemctl --failed
5. Поиск по журналу в Emergency mode и Maintenance mode
Вы можете выполнять поиск ошибок по журналу journald без использования команд — возможно, вам это будет удобнее. Поскольку journalctl использует для многостраничного просмотра команду less, то вы можете применять все сочетания клавиш этой утилиты для ваших поисков.
Если вы полагаетесь на функцию поиска (/) и ищите что-то вроде «error», «warning» или «fail», то с помощью -i убедитесь, что выполняется поиск без учёта регистра букв.
Список команд и клавиш для поиска по journalctl (и в целом по less):
- -i (без учёта регистра)
- g (перейти к началу)
- /error (найти «error»)
- nnnn (пропустить nnnn результатов)
- g (перейти к началу)
- /fail (найти «fail»)
- nnnn (пропустить nnnn результатов)
- g (перейти к началу)
- /warn (найти «warn»)
- nnnn (пропустить nnnn результатов)
Связанные статьи:
How to Boot Debian 11 into Rescue / Emergency Mode
Booting a Linux system into rescue mode or single user mode is one of the important troubleshooting for Linux admins. Rescue mode is also known as single user mode. Generally Linux system is booted into rescue mode in order to recover forgotten root password and to repair and fix corrupted file system.
Apart from the rescue mode, Linux system can be booted into emergency mode, the main difference between them is that rescue mode loads a minimal environment with read only root file system whereas emergency mode doesn’t mount root file system.
In this guide, we will learn how to boot Debian 11 (Bullseye) into Rescue (or Single User Mode) and emergency mode.
Boot Debian 11 Into Rescue Mode
Reboot Debian 11 system and go to boot loader (Grub) screen and select “Debian GNU/Linux”.
Note: If the system is booting up using default BIOS settings, then hold down the Shift key to go boot loader screen. In case of UEFI booting, press ESC key couple of time to go to bootloader screen.
The Grub (boot loader) screen would look like below,

Press “e” and then go the end of line which starts with word “linux” and append “init=/bin/bash” .
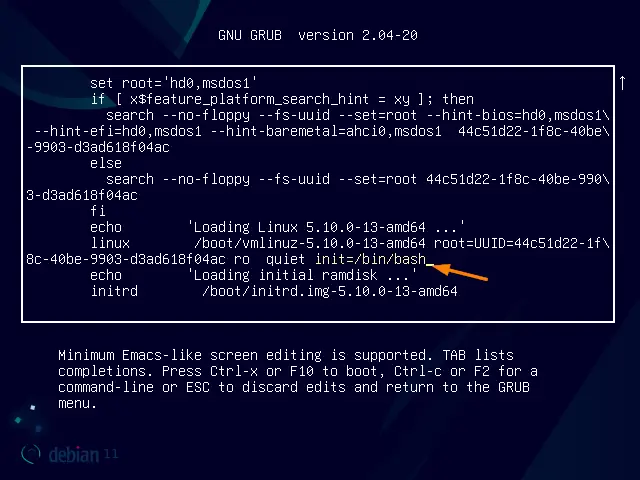
Now Press Ctrl-x or F10 to boot, we will get the following screen
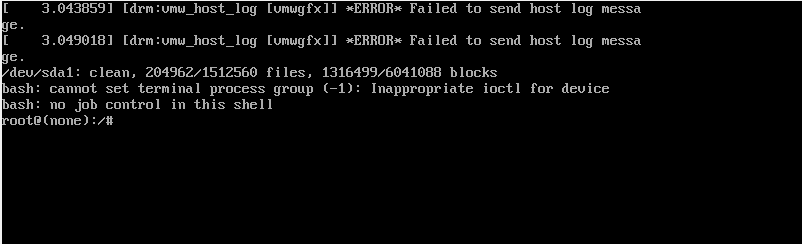
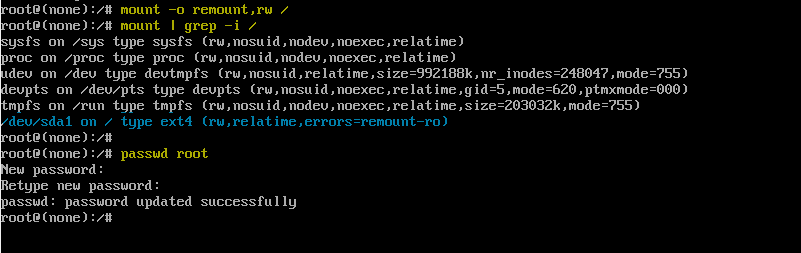
Mount the root file system in read-write mode, run
Once the file system is mounted in rw mode then we can execute admin like resetting root password.
Once you are done with all troubleshooting, reboot the system by pressing Ctrl + Alt + Del
Boot Debian 11 into Emergency Mode
Reboot your Debian 11 system and go to grub (boot loader) screen
Press “e” and go to end of line which starts with word linux and append “systemd.unit=emergency.target”.
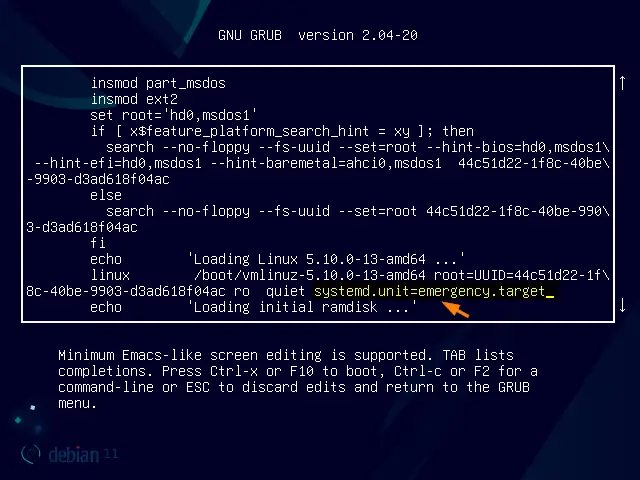
Now press Ctrl-x or F10 to boot into emergency mode.
Note: In case root password is already set in your Debian 11 system then you must enter root password to enter in emergency mode. So, in my case I have already set the root password.
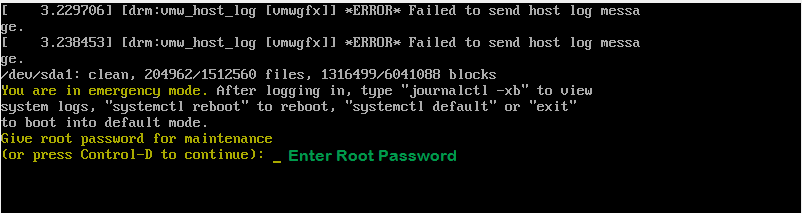
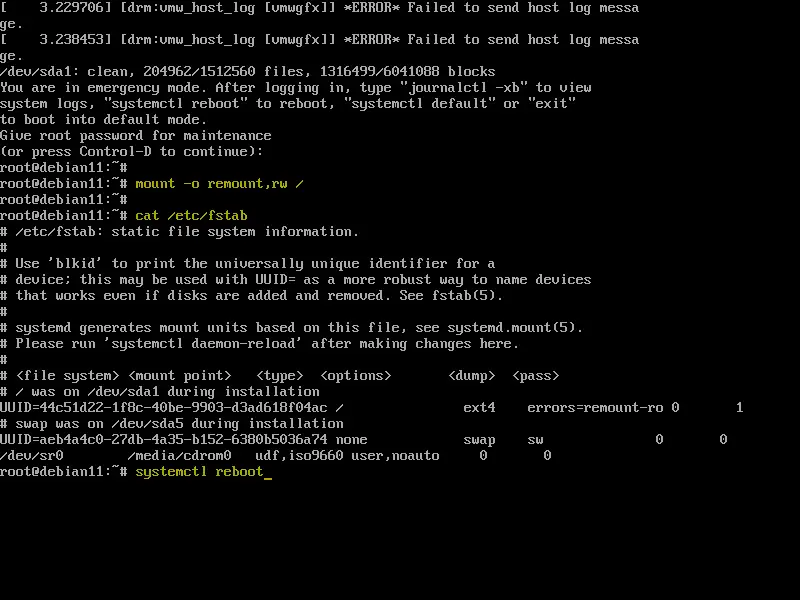
Enter root user password to get the shell and use “ mount -o remount,rw /” command to mount the root file system in read-write mode.
Perform the troubleshooting steps and type ‘ systemctl reboot ’ to reboot the system.
That’s all from this guide, I hope you have found it informative. Kindly do share your feedback and queries in below comments section.
1 thought on “How to Boot Debian 11 into Rescue / Emergency Mode”
Hi In the first section: Reboot your server and go to boot loader (Grub) screen How do we get to this GRUB screen, if the system always boots to the login screen (even with or without pressing SHIFT key)? Thanks Reply
Leave a Comment Cancel reply
Recent Posts

- How to Install PHP 8 on RHEL 8 / Rocky Linux 8 / CentOS 8
- How to Install and Use Wireshark in Ubuntu 22.04
- Top 10 Things to Do After Installing Debian 12 (Bookworm)
- How to Install Debian 12 (Bookworm) Step-by-Step
- How to Upgrade Debian 11 to Debian 12 (Bookworm) via CLI
- How to Setup Dynamic NFS Provisioning in Kubernetes Cluster
- How to Install Nagios on Rocky Linux 9 / Alma Linux 9
- How to Install Ansible AWX on Kubernetes Cluster
- How to Install Docker on Fedora 38/37 Step-by-Step
- How to Setup High Availability Apache (HTTP) Cluster on RHEL 9/8
Pages
How to Boot into Rescue / Emergency Mode in Debian/Ubuntu & Fedora/CentOS

Like safe mode in Microsoft Windows, Linux has rescue or emergency mode for troubleshooting purposes. And here’s how to get into the mode in most Linux Distributions.
After configured Linux incorrectly, broke drivers or forgot user password, system may refuse to boot/login. If system boots into login screen, you may press Ctrl+Alt+F1 ~ F6 to switch TTY command console. Or, use the recovery or emergency mode to rescue. The rescue mode is a blank and white text console without graphical interface, which provides root (super user) privilege with full access to your file system. It can rescue but also destroy your Linux!
You need root password (if enabled) to get into recovery / emergency mode in most Linux, including Debian, Fedora, CentOS, etc. Though Ubuntu is somehow less secure, since anyone can access without authentication. If root NOT enabled, it will prompt "root account is locked" and try normal boot. In this case, an USB Linux installer is required to rescue.
Get into Recovery Mode in Debian / Ubuntu:
In Debian and Ubuntu based systems, recovery mode is present in boot-menu. Start or re-start your computer and press Esc (in some machines, press and hold Shift key) key to show the Grub boot-menu.
Then choose “Advanced options for …” from menu and boot the kernel entry with (recovery mode) in the end.

In Debian it will boot into text console and ask you typing root user password to get pass, or say ‘root account is locked‘ if root is not enabled. Type the password and hit Enter, then there you are!
For Ubuntu based systems, the ‘recovery mode’ entry will boot into the following screen. Choose ‘root – Drop to root shell prompt‘ and hit Enter.

Then hit Enter again will get into rescue mode with read-only access. Before get started troubleshooting, you need enable read & write permission by remounting the file system via command:
NOTE: Some Ubuntu based systems, e.g., Zorin OS, may also require root password authentication to get access.

Boot into Emergency Mode in Fedora / CentOS:
For Fedora, CentOS and Arch Linux, there’s no recovery mode in the boot-menu. Instead, user need to edit the menu entry to boot with given parameters.
Start or re-start your computer and press Esc on keyboard to get into Grub boot-menu. When you’re there, press ‘e‘ on keyboard to edit the default entry as the bottom words indicate.

In next screen, use arrow keys to navigate to the end of the line with ‘linux’ in the beginning. It’s a long line separated into two or three via ‘\‘. At the end, input a blank space and then type ‘systemd.unit=emergency.target‘.
For choice, you may replace ‘systemd.unit=emergency.target‘ with a single ‘s‘ to do the same job, or use ‘3‘ to boot into TTY console.
For those forgot the root password, use init=/bin/bash will boot into the shell without authentication. Though mount -o rw,remount / command is required to remount the file system. 
After adding the new boot parameter, press Ctrl+X to boot the entry. It will bring you into the rescue mode, and ask for typing root password (no visual feedback) for maintenance. Once get pass the authentication, there you are!
As it indicates, run journalctl -xb to check system log and see what went wrong, or reset password via passwd USER_NAME . When everything’s done, use exit command to go normal boot or systemctl reboot to restart machine.