- How to Install KVM on Ubuntu 20.04
- Step 1: Check Virtualization Support in Ubuntu
- Step 2: Install KVM on Ubuntu 20.04 LTS
- Step 3: Creating a Virtual Machine in Ubuntu
- Create a Virtual Machine via Command Line
- Create a Virtual Machine via virt-manager
- Installation
- Use a 64 bit kernel (if possible)
- Installation of KVM
- Install Necessary Packages
- Add Users to Groups
- Verify Installation
- Optional: Install virt-manager (graphical user interface)
- Version-specific Notes
- 8.10 (Intrepid) Notes
- 11.10 (Oneric) Notes
How to Install KVM on Ubuntu 20.04
KVM, (kernel-based Virtual Machine) is a free and opensource virtualization platform for the Linux kernel. When installed on a Linux system, it becomes a Type-2 hypervisor.
In this article, we look at how you can install KVM on Ubuntu 20.04 LTS.
Step 1: Check Virtualization Support in Ubuntu
Before installing KVM on Ubuntu, we are first going to verify if the hardware supports KVM. A minimum requirement for installing KVM is the availability of CPU virtualization extensions such as AMD-V and Intel-VT.
To check whether the Ubuntu system supports virtualization, run the following command.
$ egrep -c '(vmx|svm)' /proc/cpuinfo
An outcome greater than 0 implies that virtualization is supported. From the output below, we have confirmed that our server is good to go.

To check if your system supports KVM virtualization execute the command:
If the “kvm-ok” utility is not present on your server, install it by running the apt command:
$ sudo apt install cpu-checker
Now execute the “kvm-ok” command to probe your system.

The output clearly indicates that we are on the right path and ready to proceed with the installation of KVM.
Step 2: Install KVM on Ubuntu 20.04 LTS
With the confirmation that our system can support KVM virtualization, we are going to install KVM, To install KVM, virt-manager, bridge-utils and other dependencies, run the command:
$ sudo apt install -y qemu qemu-kvm libvirt-daemon libvirt-clients bridge-utils virt-manager
A little explanation of the above packages.
- The qemu package (quick emulator) is an application that allows you to perform hardware virtualization.
- The qemu-kvm package is the main KVM package.
- The libvritd-daemon is the virtualization daemon.
- The bridge-utils package helps you create a bridge connection to allow other users to access a virtual machine other than the host system.
- The virt-manager is an application for managing virtual machines through a graphical user interface.
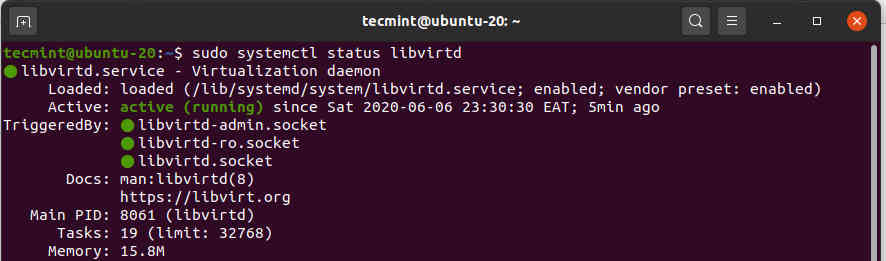
Before proceeding further, we need to confirm that the virtualization daemon – libvritd-daemon – is running. To do so, execute the command.
$ sudo systemctl status libvirtd
You can enable it to start on boot by running:
$ sudo systemctl enable --now libvirtd
To check if the KVM modules are loaded, run the command:
From the output, you can observe the presence of the kvm_intel module. This is the case for Intel processors. For AMD CPUs, you will get the kvm_intel module instead.

Step 3: Creating a Virtual Machine in Ubuntu
With KVM successfully installed, We are now going to create a virtual machine. There are 2 ways to go about this: You can create a virtual machine on the command-line or using the KVM virt-manager graphical interface.
Create a Virtual Machine via Command Line
The virt-install command-line tool is used for creating virtual machines on the terminal. A number of parameters are required when creating a virtual machine.
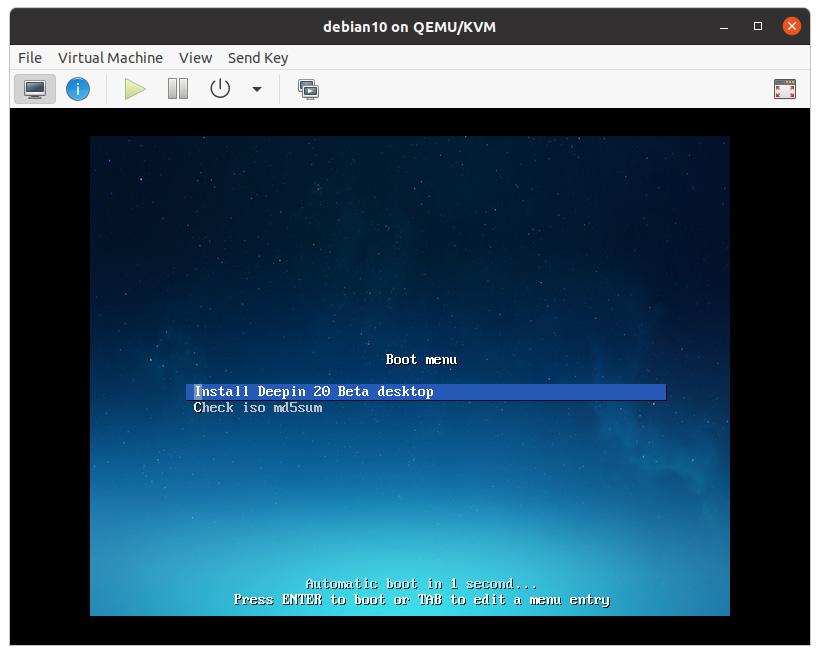
Here’s the full command I used when creating a virtual machine using a Deepin ISO image:
$ sudo virt-install --name=deepin-vm --os-variant=Debian10 --vcpu=2 --ram=2048 --graphics spice --location=/home/Downloads/deepin-20Beta-desktop-amd64.iso --network bridge:vibr0
The —name option specifies the name of the virtual machine – deepin-vm The —os-variant flag indicates the OS family or derivate of the VM. Since Deepin20 is a derivative of Debian, I have specified Debian 10 as the variant.
To get additional information about OS variants, run the command
The —vcpu option indicates the CPU cores in this case 2 cores, the —ram indicates the RAM capacity which is 2048MB. The —location flag point to the absolute path of the ISO image and the —network bridge specifies the adapter to be used by the virtual machine. Immediately after executing the command, the virtual machine will boot up and the installer will be launched ready for the installation of the virtual machine.
Create a Virtual Machine via virt-manager
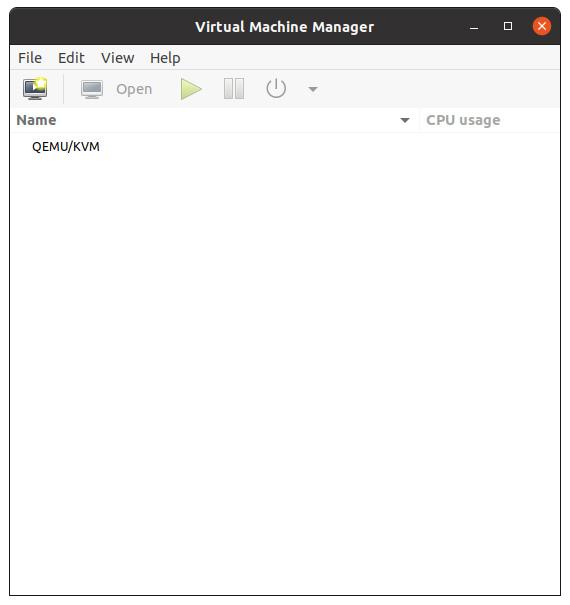
The virt-manager utility allows users to create virtual machines using a GUI. To start off, head out to the terminal and run the command.
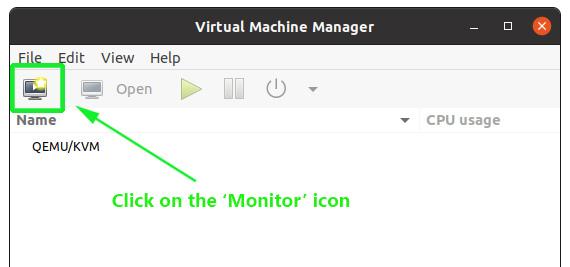
The virtual machine manager window will pop open as shown.
Now click the monitor icon to start creating a virtual machine.
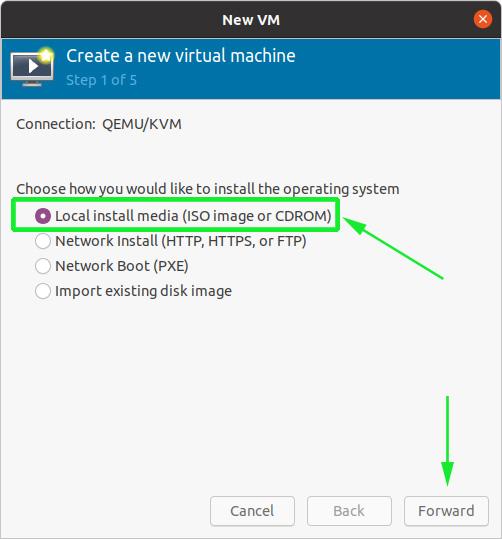
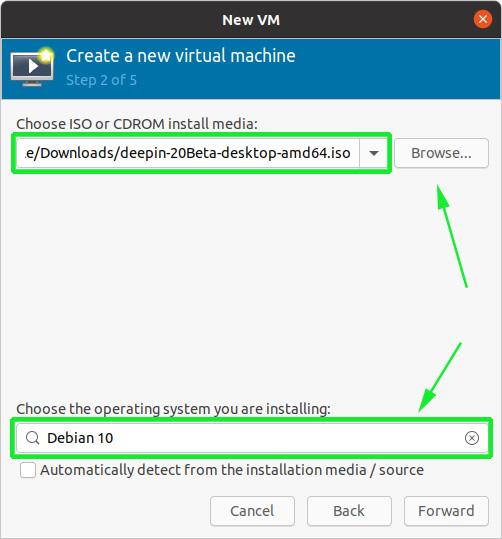
On the pop-up window, specify the location of your ISO image. In our case, the ISO image is located in the ‘Downloads’ folder in the home directory, so we’ll select the first option – Local Install Media ( ISO image or CDROM). Next, click the ‘Forward’ button to continue.
In the next step, browse to the ISO image on your system and directly below, specify the OS family that your image is based on.
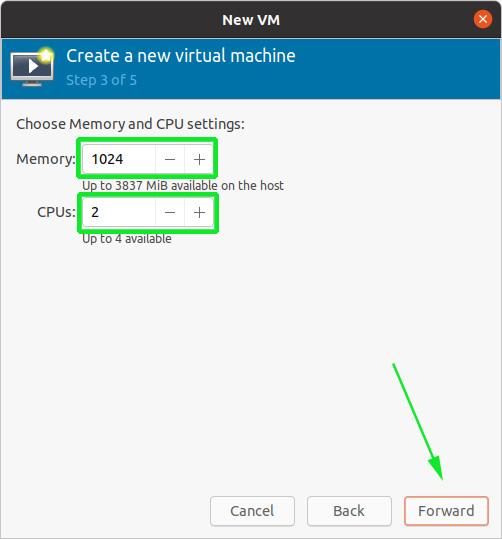
Next, select the memory capacity and the number of CPUs that your virtual machine will be allocated, and click ‘Forward’.
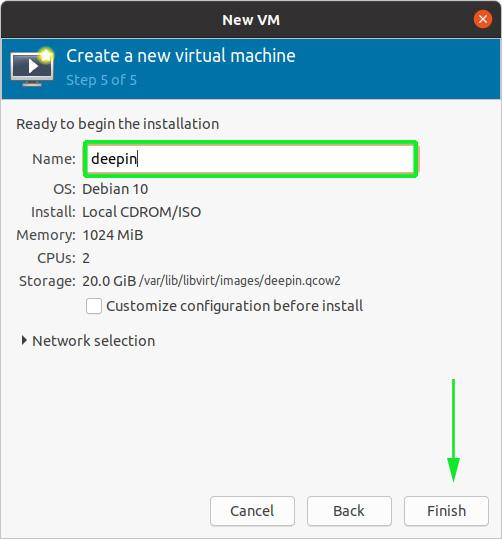
And finally, in the last step, specify a name for your virtual machine and click on the ‘Finish’ button.
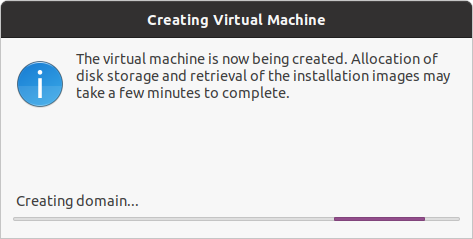
The creation of the virtual machine will take a few minutes upon which the installer of the OS you are installing will pop open.
At this point, you can proceed with the installation of the virtual machine.
And that’s how you go about installing KVM hypervisor on Ubuntu 20.04 LTS.
Installation
To run KVM, you need a processor that supports hardware virtualization. Intel and AMD both have developed extensions for their processors, deemed respectively Intel VT-x (code name Vanderpool) and AMD-V (code name Pacifica). To see if your processor supports one of these, you can review the output from this command:
egrep -c '(vmx|svm)' /proc/cpuinfo
If 0 it means that your CPU doesn’t support hardware virtualization.
If 1 or more it does — but you still need to make sure that virtualization is enabled in the BIOS.
By default, if you booted into XEN kernel it will not display svm or vmx flag using the grep command. To see if it is enabled or not from xen, enter:
cat /sys/hypervisor/properties/capabilities
You must see hvm flags in the output.
Alternatively, you may execute:
which may provide an output like this:
INFO: /dev/kvm exists KVM acceleration can be used
INFO: Your CPU does not support KVM extensions KVM acceleration can NOT be used
You can still run virtual machines, but it’ll be much slower without the KVM extensions.
NOTE: You may see a message like «KVM acceleration can/can NOT be used». This is misleading and only means if KVM is *currently* available (i.e. «turned on»), *not* if it is supported.
Use a 64 bit kernel (if possible)
- To serve more than 2GB of RAM for your VMs, you must use a 64-bit kernel (see 32bit_and_64bit). On a 32-bit kernel install, you’ll be limited to 2GB RAM at maximum for a given VM.
- Also, a 64-bit system can host both 32-bit and 64-bit guests. A 32-bit system can only host 32-bit guests.
To see if your processor is 64-bit, you can run this command:
If 0 is printed, it means that your CPU is not 64-bit.
If 1 or higher, it is. Note: lm stands for Long Mode which equates to a 64-bit CPU.
Now see if your running kernel is 64-bit, just issue the following command:
x86_64 indicates a running 64-bit kernel. If you use see i386, i486, i586 or i686, you’re running a 32-bit kernel.
Note: x86_64 is synonymous with amd64.
Installation of KVM
Install Necessary Packages
For the following setup, we will assume that you are deploying KVM on a server, and therefore do not have any X server on the machine.
You need to install a few packages first:
Cosmic (18.10) or later
$ sudo apt-get install qemu-kvm libvirt-daemon-system libvirt-clients bridge-utils
Lucid (10.04) or later
$ sudo apt-get install qemu-kvm libvirt-bin ubuntu-vm-builder bridge-utils
Karmic (9.10) or earlier
$ sudo aptitude install kvm libvirt-bin ubuntu-vm-builder bridge-utils
- libvirt-bin provides libvirtd which you need to administer qemu and kvm instances using libvirt
- qemu-kvm (kvm in Karmic and earlier) is the backend
- ubuntu-vm-builder powerful command line tool for building virtual machines
- bridge-utils provides a bridge from your network to the virtual machines
You might also want to install virt-viewer, for viewing instances.
Add Users to Groups
Karmic (9.10) and later (but not 14.04 LTS and 18.10)
You need to ensure that your username is added to the group libvirtd:
$ sudo adduser `id -un` libvirtd Adding user '' to group 'libvirtd' .
After this, you need to relogin so that your user becomes an effective member of the libvirtd group. The members of this group can run virtual machines. (You can also ‘newgrp kvm’ in a terminal, but this will affect only that terminal.)
Bionic (18.04 LTS) and higher
The group name is changed to libvirt, and you also need to be a member of ‘kvm’:
$ sudo adduser `id -un` libvirt Adding user '' to group 'libvirt' . $ sudo adduser `id -un` kvm Adding user '' to group 'kvm' .
Releases prior to Karmic (9.10)
You need to ensure that your username is added to the groups: kvm and libvirtd.
$ groups adm dialout cdrom floppy audio dip video plugdev fuse lpadmin admin sambashare kvm libvirtd
To add your to the groups:
$ sudo adduser `id -un` kvm Adding user '' to group 'kvm' . $ sudo adduser `id -un` libvirtd Adding user '' to group 'libvirtd' .
After the installation, you need to relogin so that your user becomes an effective member of kvm and libvirtd user groups. The members of this group can run virtual machines.
Verify Installation
You can test if your install has been successful with the following command:
$ virsh list --all Id Name State ---------------------------------- $
If on the other hand you get something like this:
$ virsh list --all libvir: Remote error : Permission denied error: failed to connect to the hypervisor $
Something is wrong (e.g. you did not relogin) and you probably want to fix this before you move on. The critical point here is whether or not you have write access to /var/run/libvirt/libvirt-sock.
The sock file should have permissions similar to:
$ sudo ls -la /var/run/libvirt/libvirt-sock srwxrwx--- 1 root libvirtd 0 2010-08-24 14:54 /var/run/libvirt/libvirt-sock
Also, /dev/kvm needs to be in the right group. If you see:
$ ls -l /dev/kvm crw-rw----+ 1 root root 10, 232 Jul 8 22:04 /dev/kvm
You might experience problems when creating a virtual machine. Change the device’s group to kvm/libvirtd instead:
sudo chown root:libvirtd /dev/kvm
Now you need to either relogin or restart the kernel modules:
Optional: Install virt-manager (graphical user interface)
If you are working on a desktop computer you might want to install a GUI tool to manage virtual machines.
$ sudo apt-get install virt-manager
Virtual Machine Manager will appear in Applications -> System Tools menu. First create a new connection to local QEMU instance from File -> Add Connection menu. Localhost (QEMU) or QEMU/KVM should appear in the virtual machine list. Note: there already exist Localhost (QEMU Usermode) connection but this does not work at least on Ubuntu 10.04.
Create a new virtual machine by pressing the top left Create a new virtual machine toolbar button.
Version-specific Notes
8.10 (Intrepid) Notes
- Two meta packages have been added: ubuntu-virt-server and ubuntu-virt-mgmt. Ubuntu-virt-server installs the packages needed to setup a base virtulization host (kvm, libvirt-bin and openssh-server) and ubuntu-virt-mgmt installs what you need to administer it from a management station (virt-manager, python-vm-builder and virt-viewer).
- ubuntu-vm-builder has been replaced by python-vm-builder (tutorial).
or reboot your system before being able to use it.
11.10 (Oneric) Notes
Switching to the server kernel might be helpful if there are start problems with virtual machines (i.e. Windows XP freezes approximately once every 5 starts )
KVM/Installation (последним исправлял пользователь hamishmb 2020-03-23 20:00:34)
The material on this wiki is available under a free license, see Copyright / License for details
You can contribute to this wiki, see Wiki Guide for details