- Как перевести адаптер в режим монитора WiFi на Kali Linux
- Режимы монитора WiFi-адаптера на Kali Linux
- Режим монитора WiFi-адаптера вручную на Kali Linux
- Using Monitor Mode in Kali Linux
- Uses
- 3 Ways to Use Kali Linux Monitor Mode
- 1. Enable Monitor Mode Using iw
- 2. Enable Monitor Mode Using airmon-ng
- 3. Enable Monitor Mode Using iwconfig
- Conclusion
- About the author
- Younis Said
- Cracking WPA using Fern WiFi Cracker
Как перевести адаптер в режим монитора WiFi на Kali Linux
Я уже рассказывал, как работать с TP-Link WN722N в режиме монитора. Сегодня продолжу эту тему и покажу, как перевести любой адаптер в режим монитора Wi-Fi. Мы рассмотрим два способа: ручной и с помощью Aircrack-ng.
Режимы монитора WiFi-адаптера на Kali Linux
Давайте рассмотрим режимы WiFi-адаптеров в Kali Linux:
- Управляемый (Managed): этот режим работает по умолчанию для всех беспроводных сетевых адаптеров. Режим позволяет системе, такой как Kali Linux, подключаться к точке доступа или роутеру, но не может выполнять тестирование на проникновение.
- Монитор (Monitor) позволяет этичным хакерам выполнять тестированию на проникновение путем сканирования Wi-Fi и внедрения (инжект) пакетов.
- Мастер (Master) позволяет системам на базе Linux работать в качестве точек доступа или беспроводных маршрутизаторов.
- Ad hoc позволяет системе напрямую подключаться к другой системе без необходимости использования точки доступа или беспроводного маршрутизатора.
- Ретранслятор (Repeater) позволяет главному устройству просто принимать входящий сигнал и воспроизводить его для других клиентов в сети. Ретранслятор обычно используются для расширения зоны покрытия WiFi.
- Вторичный (Secondary) позволяет хосту работать в качестве резервного устройства для главной системы или ретранслятора.
Теперь, когда мы разобрались с режимами работы адаптера, давайте взглянем на настройку, включение и отключение режима монитора на Kali Linux.
Режим монитора WiFi-адаптера вручную на Kali Linux
Итак, далее покажу, как проверить состояние интефейса, включит или отключить режим монитора Kali Linux. Я буду работать с популярным WiFi-адаптером Alfa AWUS036NHA и Kali Linux на VirtualBox.
Подключите адаптер Alfa к VirtualBox и запустите систему Kali Linux.
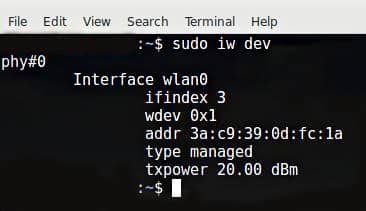
Убедитесь, что адаптер Wi-Fi обнаружен в Kali Linux:

Адаптер был обнаружен как wlan0 и в настоящее время находится в режиме Управляемый (Managed).
Отключите беспроводной интерфейс:
Переведите режим интерфейса в режим монитора:
Using Monitor Mode in Kali Linux
![]()
Wi-Fi adapters are used for connecting your device to the Internet. Most laptops, tablets, and mobile phones have a built-in Wi-Fi card. In a wireless environment, data is transferred from the device to the internet in the form of packets by sending a request for a packet to the router. The router fetches the requested packet from the internet, and once it obtains the webpage, it sends the information back to your device in the form of packets, thereby controlling all the traffic going to connected devices. Monitor Mode in Kali Linux allows you to read all the packets of data, even if they are not sent through this mode, and controls the traffic received on wireless-only networks. Monitor Mode is able to capture all these packets, which are not only directed to their device but also other to devices connected to the network. This article will provide an overiew of Monitor Mode in Kali Linux.
Uses
For an ethical hacker, Monitor Mode is used to capture all relevant data packets to check whether the router is vulnerable. It is also used to check whether the network is vulnerable to any attacks. Monitor Mode thus provides all the crucial information on every device, and can also be used for observing large volumes of network traffic.
3 Ways to Use Kali Linux Monitor Mode
If you have the wireless adapter that supports Monitor Mode, then you can easily set the wireless interface. The following sections list some of the ways that you can use Monitor Mode in Kali Linux.
1. Enable Monitor Mode Using iw
First, we will take a look at the use of the iw Wi-Fi configuration tool. It is used for configuring Wi-Fi in particular and can be more powerful than other tools. You might have already used iw for several other purposes, for example, to obtain information about your Wi-Fi network. In fact, this tool can even give you more information about different commands. The iw list gives you much more information about wireless wlan0, interface modes, HT, bit rates, scanning, etc.
The first step is to check the interface information. You can do so by entering the following:
The output will look like the following window:
To access the traffic of other people, you will have to switch this over to Monitor Mode. You can switch iw to Monitor Mode by entering the commands given below:
IFACE replaced the actual name, as shown:
The next step is to check the wireless interface one more time by entering the following command:
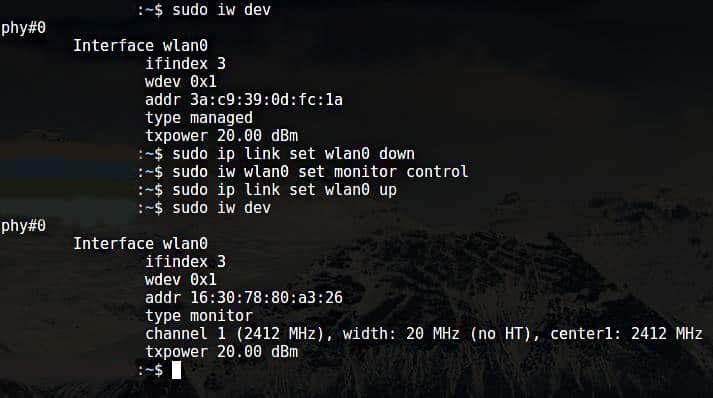
The output of the aforementioned commands can be seen in the window above.
Wondering how to get back to the Managed Mode? To do so, enter the following commands:
IFACE replaced the actual name, as shown:
2. Enable Monitor Mode Using airmon-ng
If you have already tried enabling Monitor Mode using iw and failed, then another method you can use to enable Monitor Mode is through airmon-ng.
The first step is to get information about your wireless interface. Do so by issuing the following command:
The output of the above command is as follows:

You will want to kill any process that can interfere with using the adapter in Monitor Mode. To do so, you can use a program called airmon-ng, simply entering the following commands:


Now, you should enable Monitor Mode without any interference.
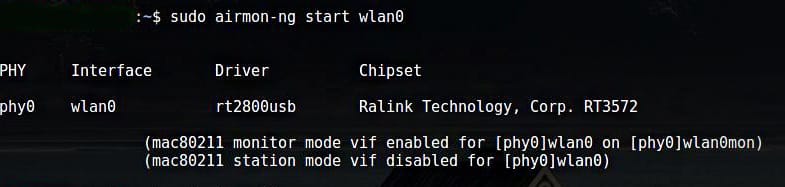
Wlan0mon has now been created.
Use the following commands to disable Monitor Mode and return to Managed Mode:
Enter the following command to restart the network manager:
3. Enable Monitor Mode Using iwconfig
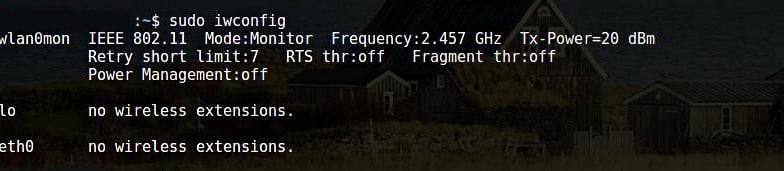
As in previous sections, check your interface name via the following command:
The next step is to enable Monitor Mode. Do so by entering the following commands:
Disable Monitor Mode
Turn off the Network Manager that Prevents Monitor Mode

Conclusion
Enabling Monitor Mode is a great method for sniffing and spying around your network and router. There are a number of ways to enable Monitor Mode. Every method does not work for every adapter. So, try out any of the methods listed above if your adapter does not behave as expected.
About the author
Younis Said
I am a freelancing software project developer, a software engineering graduate and a content writer. I love working with Linux and open-source software.
Cracking WPA using Fern WiFi Cracker
Note: For this demo I’m using a lab environment network that is not routed to the internet. I will be using the Fern WiFi Cracker open source wireless security tool included in the Kali Linux and Backtrack 5 r3 security distros. Before attempting to use Fern or any other utility in Kali or Backtrack please make sure to read the help and MAN pages for a complete description of the program options and switches. This demo is for wireless pentesting educational purposes and to emphasize the insecurities of using a weak or common dictionary word for wireless network authentication and encryption security key or passphrase.
Fern Wi-fi Cracker can crack WEP, WPA, and WPA2 secured wireless networks. Fern basically takes the command line utilities to crack these networks and puts them in a GUI. Very simple to use… scary easy! Fern also provides some extra functionality for hijacking sessions and locating a computers geolocation via its Mac address, but I have not tested with these features.
For this demo I will be using Backtrack 5 r3 running in VMware Workstation on a Win 7 host.
Originally I was using Fern in Kali and ran into some issues with my wireless adapter and with the program freezing or not opening after updating it. I have the fixes I discovered in another blog post for anyone else that may have these same problems.
Router Setup
I’m using an old Cisco/Linksys 802.11g wireless router for this demo and all the settings are defaulted except the security settings, which I set to WPA Personal with a Shared Key passphrase of “password”. The word password should never be used for a real password or passphrase and I’m using it here since I know the Fern program will quickly crack it. In real world situations a WPA/WPA2 passphrase should be completely random and not a common dictionary word. For help on creating a secure WPA/WPA2 passphrase please read my earlier blog post.

Setup the Wireless Adapter
Plug in the USB wireless adapter (I’m using the Alfa AWUS036H 802.11b/g USB wireless adapter) and open the Terminal and run iwconfig to verify the USB adapter interface.

On occasions I have had to bring the wireless adapter interface up using the following command.
Starting the Fern Program
To start Fern from the Terminal type in the following commands
#cd /pentest/wireless/fern-wifi-cracker #python execute.py
or start Fern via the GUI using the Backtrack menu
Applications/Backtrack/Exploitation Tools/Wireless Exploitation Tools/WLAN Exploitation/fern-wifi-cracker
Select the Interface and Fern enables monitor mode. If your wireless interface does not show in the list hit the Refresh button and try again.

Before starting the scan double-click on any blank area of the Fern home screen to bring up the Access Point Scan Preferences screen. You can set the channel option to scan a single channel or leave it at the default All Channels. One nice feature is to check the Enable XTerms option which will have Fern open up the Terminal windows during its usage to see what the program is doing in the background. Click OK when done.

Back on the Fern home screen click the Scan for Access points button.

Two Terminal windows will open; one showing the WEP enabled networks (no screen shot), and another showing the WPA enabled networks. The top part of the WPA Scan Terminal window shows the networks being found, and the lower part shows any connected client devices. For a WPA attack to work it requires a connected client. The most important part of the attack will kick the client off the wireless network and capture the 4-way handshake when the client device re-authenticates to the network. If the network you want to pentest has no connected client your out of luck!

On Ferns home screen the networks being detected will start populating next to the WiFi WEP or WiFi WPA buttons. (I have been seeing less and less WEP enabled networks, so that is a good thing!)

Clicking on the WiFi WEP or WiFi WPA button will bring up the Attack screen and the top pane will list the networks found. Select the AP to crack, but before clicking the Attack button to the right let’s go over a couple of settings.

I will use the Regular Attack option, but there is a WPS Attack option and I believe Fern uses the Reaver utility to launch the WPS attack. You can read more about Reaver by clicking here.
Common.txt is the wordlist that comes with the Fern program, but any wordlist you download or have created on your own can be used by hitting the Browse button and pointing Fern to the alternative wordlist file.

With the Regular Attack and the wordlist selected hit the Attack button.

Fern will start the attack and on the left side of the screen the attack steps will turn yellow as Fern works through the various steps. The most important step is capturing the 4-way handshake and Fern will open an aireplay-ng Terminal window showing the progress of deauthentication (if XTerms is checked in the preferences) of the connected client.

It may take several attempts to deauth a client and capture the 4-way handshake.

Once Fern has captured the handshake it will start the bruteforce attack. Viola! If the WPA key is in the wordlist being used it will display the found key in Red .

As I mentioned I setup a passphrase I knew would be found quickly, and from start to finish this attack took under 4 minutes!
Back on the Fern main screen is a Key Database button and it now shows one entry.

Clicking the Key Database button will display the found keys.

Using a common dictionary word for a WPA or WPA2 passphrase makes it easier to hack with utilities like Fern. The Fern utility is free to download and simple to use, and not everyone is going to use it for legit wireless pentesting purposes.
With possession of the WPA key a person can associate to network and have a gateway to the internet, or they could launch other attacks. For example, with possession of the WPA key the attack could be expanded to include decryption of the data traffic of the legitimate clients on the wireless network.
Thanks for reading and stay wireless secure!