- How to Start and Stop Monitor Mode in Linux
- What is Monitor Mode?
- List of WiFi Chipsets That Support Monitor Mode
- Three Different Ways to Enable and Disable Monitor Mode in Linux
- Use iw Command to Set Monitor Mode in Linux
- Disable Monitor Mode in Kali Linux
- Use airmon-ng Command to Set Monitor Mode in Linux
- Install Airmon-ng
- Airmon-ng Command Usage to Start and Stop Monitor Mode
- Disable Monitor Mode using airmon-ng Command
- Deprecated iwconfig Command
- Wrap up
- How to enable monitor mode in kali linux
How to Start and Stop Monitor Mode in Linux
The Wifi module comes with multiple modes and one of them is monitor mode, which you have commonly heard from security enthusiasts to sniff over a network using Wireshark.
Not only that, you can do much more when you activate monitor mode in Linux, like analyze network traffic, detect rogue access points, troubleshoot connectivity issues, and much more.
So let’s start the article by explaining to you what monitor mode is, the kind of hardware that supports monitor mode, and finally the command to start and stop promiscuous mode.
What is Monitor Mode?
Monitor Mode allows a wireless NIC card to view the contents of its connected devices on the same channel as it works.
In wireless networking, there are multiple modes that can be used to handle connections (managed mode) and monitor packets (monitor mode).
All hardware doesn’t support monitor mode, so to check whether your hardware supports monitor mode, execute the below code on your terminal screen and note down the chipset name.
$ lspci | grep Wireless # PCI Based Wi-Fi Hardware $ lsusb | grep Wireless # External Wi-fi HardwareAfter that, you can search on the internet to see whether your chipset supports monitor mode or not.
List of WiFi Chipsets That Support Monitor Mode
As I said above, monitor mode is not supported on all WiFi chipsets.
If your system hardware doesn’t support monitor mode, then you cannot use that hardware for monitoring purposes, and you will need to buy external wifi hardware that supports monitor mode.
We have listed some of the chipset that you can consider buying.
To check out more recommendations, you can refer to this link.
Three Different Ways to Enable and Disable Monitor Mode in Linux
Here you will learn three different ways to start and stop monitor mode in Linux with the following commands:
Use iw Command to Set Monitor Mode in Linux
One of the simplest and most commonly used commands to set the monitor mode is iw command.
Before the iw command, we used iwconfig command to set the monitor mode. But now it is deprecated and still, you can find iwconfig preinstalled in some Linux distributions.
If you want to know more about network commands that are deprecated in 2022, then you can refer to the List of Deprecated Linux Commands.
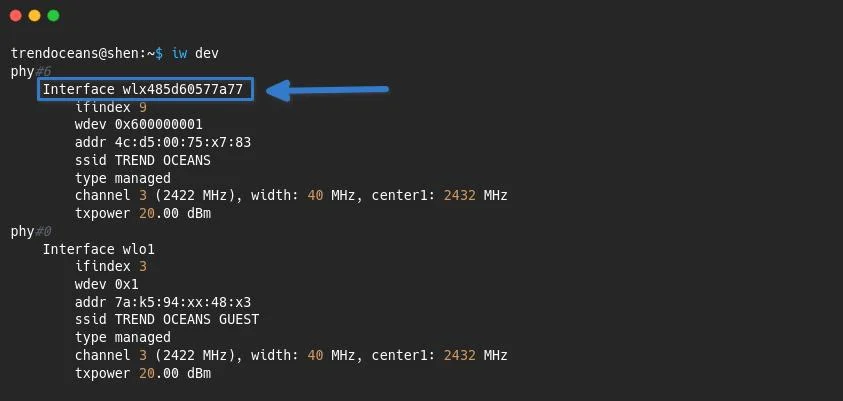
You can use the iw command to find out information about your attached Wi-Fi adapter, which is attached to your PCI or via USB, and when you invoke the below command, it will show you details like interface, ifindex, mac address, SSID, mode type, channel, and txpower.
You can display your wireless network adapter details by invoking the below command:
But before that, attach an external Wi-Fi adapter in case you’re trying this guide on your virtual machine, or else your hardware doesn’t support monitor mode.
From the list of information, you need to take note of the network interface name and mode type.
As you can see, I do have multiple Wi-Fi adapters attached to my system.
One is a Realtek RTl8723be, which doesn’t support monitor mode, and the second one is an Atheros AR9271, which is capable of monitor mode.
Once you get the network interface name, you need to execute the following commands in sequence to enable monitor mode in your Kali Linux system.
Just make sure to replace [INTERFACE] with the actual one.
$ sudo ip link set [INTERFACE] down $ sudo iw [INTERFACE] set monitor control $ sudo ip link set [INTERFACE] upIt is necessary to turn down the network interface before putting your WiFi hardware into monitor mode. Otherwise, you will not be able to change the mode of your WiFi adapter.
Now let me try it on my hardware.
$ sudo ip link set wlx485d60577a77 down $ sudo iw wlx485d60577a77 set monitor control $ sudo ip link set wlx485d60577a77 upOnce you are done with the above step, verify that the changes were made successfully.
The result of the above command:
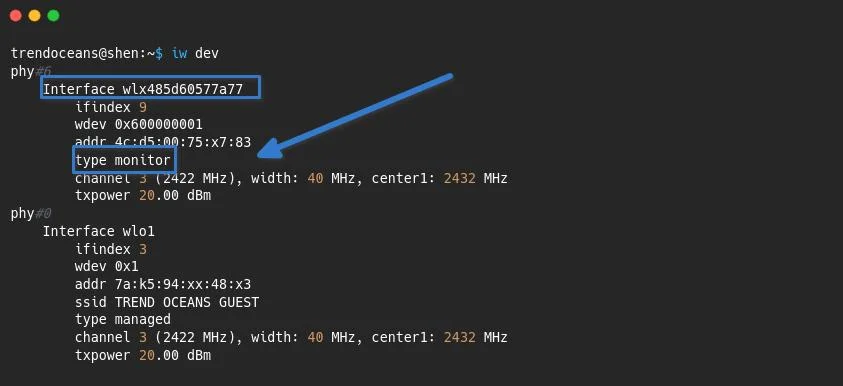
That’s all there is to setting the network adapter in monitor mode using the iw command.
Disable Monitor Mode in Kali Linux
When you are done monitoring with sniffing/network packets, you can restore your hardware mode to the default “managed” state.
To do this, you need to execute the following command:
$ sudo ip link set [INTERFACE] down $ sudo iw [INTERFACE] set type managed $ sudo ip link set [INTERFACE] upUse airmon-ng Command to Set Monitor Mode in Linux
Alternatively, you can use the airmon-ng command to set monitor mode in case the above method doesn’t work for you.
Airmon-ng is equally capable of putting wireless network adapters into monitor mode from managed mode or vice versa.
Install Airmon-ng
If you are following this guide on Ubuntu, then you will not find airmon-ng installed on your system, so to install it, run the below command:
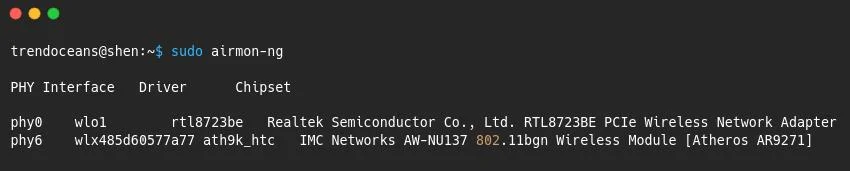
$ sudo apt install aircrack-ngWhen you execute the airmon-ng command without any arguments or parameters, it will show you the status of the attached network device, which includes PHY, Interface, Driver, and Chipset information.
Airmon-ng Command Usage to Start and Stop Monitor Mode
To find information about the wireless network adapter type, run the below code:
$ sudo airmon-ngThe output of the following command:
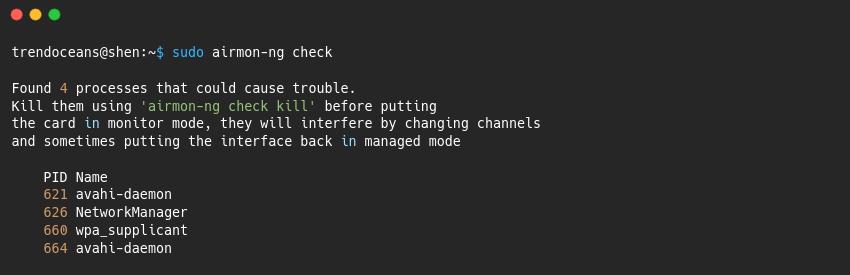
Prior to putting the wireless network adapter into monitor mode, you need to kill the application or utility to perform the next steps without any issue.
So first use the below command, which will list out the utilities that can cause problems, and once you find the utility, kill it with the second line of code.
$ sudo airmong-ng check $ sudo airmon-ng check killThe output of the following command:
After performing the above step, you need to run the below command to activate monitor mode.
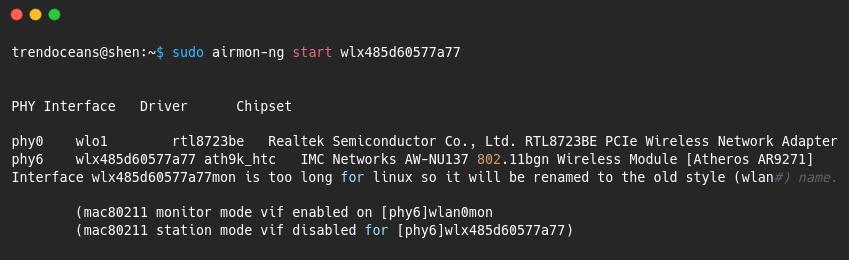
$ sudo airmon-ng start [INTERFACE]Before putting the interface into monitor mode, you should know the interface name because tab-completion will not work here, and second, after invoking the command, the internet will go down.
$ sudo airmon-ng start wlx485d60577a77From the below image, you are able to see that the monitored mode is activated on the “wlx485d60577a77” network interface, which is now changed to “wlan0mon”.
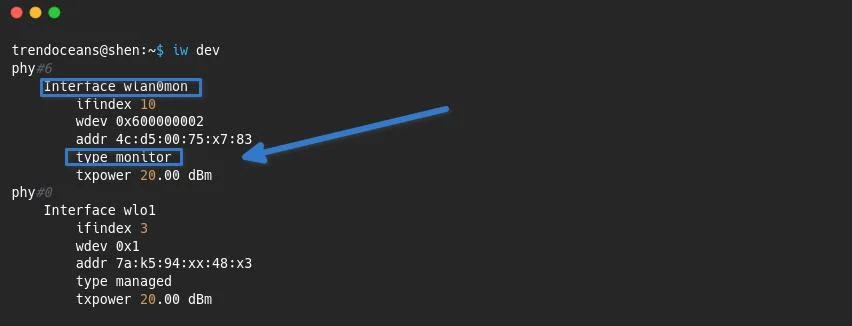
Let’s verify the changes with the iw command.
From the below output, you can say that changes have been successfully implemented on the network adapter, which is capable of monitoring mode.
As I said above, the internet will not work in monitor mode.
If you have a multiple network adapter like me, then you can use another hardware to connect with the internet and one for monitor mode.
To start the internet, execute the below code, which will activate internet connectivity.
$ sudo systemctl start NetworkManagerDisable Monitor Mode using airmon-ng Command
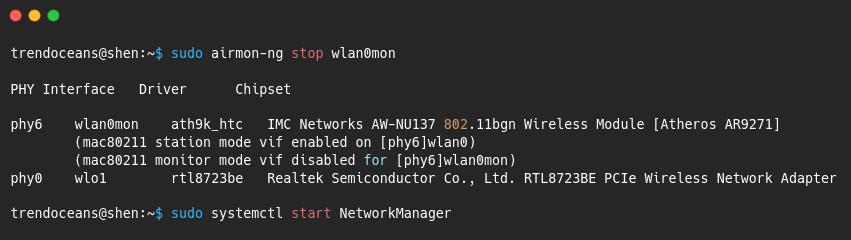
When you want to revert a wireless network adapter to managed mode, you need to execute the following line of code, which restores the connection:
$ sudo airmon-ng stop wlan0mon $ sudo systemctl start NetworkManagerThe output of the following command:
Deprecated iwconfig Command
If you still want to use the deprecated iwconfig command to start monitor mode, then you can follow the below steps, which are similar to the iw command, but I can be sure you will find iwconfig installed on your distribution.
To enable the monitor mode using the iwconfig command, type the commands in the following sequence:
$ sudo ifconfig [INTERFACE] down $ sudo iwconfig [INTERFACE] mode monitor $ sudo ifconfig [INTERFACE] upTo disable monitor mode, you can execute the following command:
$ sudo ifconfig [INTERFACE] down $ sudo iwconfig [INTERFACE] mode managed $ sudo ifconfig [INTERFACE] upWrap up
That’s all there is to enabling and disabling monitor mode in Linux.
And I hope you are able to successfully enable monitor mode on your Linux machine with the command that I shared in the following article.
If anything needs to be added or want to thank me, please pass your message in a comment box.
A man with a tech effusive who has explored some of the amazing technology stuff and is exploring more. While moving towards, I had a chance to work on Android development, Linux, AWS, and DevOps with several open-source tools.
How to enable monitor mode in kali linux
how to enable monitor mode in kali linux using the IP and iw commands Almost Any attack on WiFi begins with the transfer of the WiFi card to monitor mode (tracking mode). and here comes the question of How to put wireless adapter in monitor mode, the answer is simple.

To enable WiFi monitor mode you can use the Airmon-ng tool , A Better way is using the ip and iw commands
with “manual” way of transferring to monitor mode the interface will keep its own name so if it was wlan0 it will stay the same wlan0 that’s because Airmon-ng create a virtual interface when it start monitor mode, so to begin let’s look at the name of the wireless interface:
And translate it into monitor mode:
sudo ifconfig wlan0 down sudo iwconfig wlan0 mode monitor sudo ifconfig wlan0 up
Good method – never let me down. But, it turns out, both the ifconfig command and the iwconfig command are now considered obsolete. ifconfig is no longer installed on the system by default, and once the same will happen with iwconfig – it is only a matter of time.
In order not to sit “on the old stuff”, of course, alternatives were found.
Now we look at the interface name like this:
And put it into monitor mode like this (replace wlan0 with the name of your wireless interface):
sudo ip link set wlan0 down sudo iw wlan0 set monitor control sudo ip link set wlan0 up
now we will look at the interface name itself with a wireless extension and put it into monitor mode (if you have only one wireless interface):
t=`iw dev | grep 'Interface' | sed 's/Interface //'`;sudo ip link set $t down && sudo iw $t set monitor control && sudo ip link set $t up
If instead of changing the real interface you want to create a virtual monitor in monitor mode, then to create a wireless interface in monitor mode called mon0, you need to do this:
sudo iw phy phy0 interface add mon0 type monitor
My commands creates a virtual interface, but it does not translate into monitor mode. If you have a similar situation, then do this:
sudo ip link set mon0 down sudo iw mon0 set monitor control sudo ip link set mon0 up
To remove a virtual interface:
Under certain conditions, NetworkManager may not allow the WiFi adapter to transfer to monitor mode. Moreover, the wireless card already transferred to the monitor mode can be returned to the controlled mode. Therefore, it is recommended to disable NetworkManager when testing for the penetration of wireless networks.
In Kali Linux and BlackArch, this is done like this:
sudo systemctl stop NetworkManager
Note, after disabling NetworkManager, the Internet will stop!
Additionally, it is recommended to perform:
Keep in mind not all adapter support WiFi monitor mode for that we created a list of WiFi adapters that support monitor mode it can be found here : wifi adapter for monitor mode