- Нет звука в Ubuntu 18.04
- Что делать, если нет звука в Ubuntu?
- 1. Громкость и беззвучный режим
- 2. Перезагрузка модулей ALSA
- 3. Переустановка ALSA и PulseAudio
- 4. Диспетчер речи
- Выводы
- How To Fix No Sound in Ubuntu And Linux Mint
- Various methods to fix no audio in Ubuntu
- Fixing dummy output in sound settings
- First Alternate method to fix no sound in Ubuntu
- Second alternate method to fix no sound in Ubuntu
- Third alternate method: remove old Pulseaudio config
- Third alternate method: Try alsamixer
- Fourth alternate method to fix no audio in Ubuntu
- Fifth alternate method (specially for Lenovo Carbon X1)
Нет звука в Ubuntu 18.04
Иногда мы можем сталкиваться с такой проблемой, что в системе нет звука. В Windows, обычно, это вызывается проблемами со звуковыми драйверами и решается, чаще всего, переустановкой. В Linux же всё немного по-другому. Драйверы здесь встроены в ядро, но есть библиотеки управления звуковой подсистемой, которые иногда могут вызывать сбои и проблемы.
В этой небольшой статье мы рассмотрим несколько способов борьбы с такой проблемой, как «нет звука Ubuntu 18.04». Несмотря на то, что статья пишется для версии 18.04, она должна отлично работать, как на новых, так и на более старых версиях, а также в других дистрибутивах Linux.
Что делать, если нет звука в Ubuntu?
1. Громкость и беззвучный режим
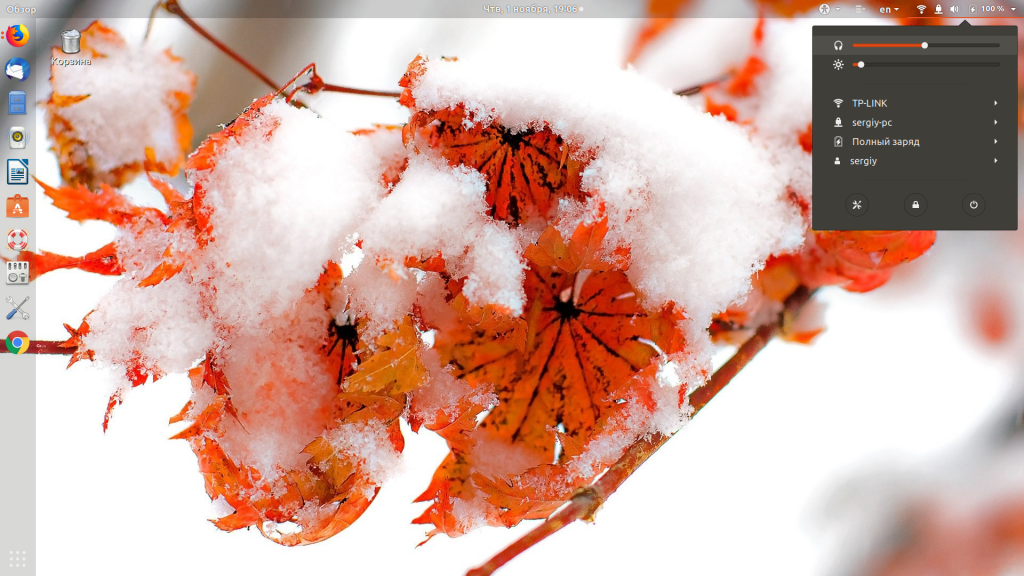
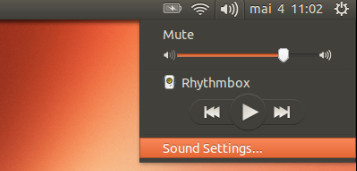
Если в вашей системе раньше был звук, а потом пропал, нужно сначала проверить уровень громкости. Конечно, это очень простая причина, но не упомянуть о ней нельзя. Значок управления громкостью находится в правом верхнем углу:
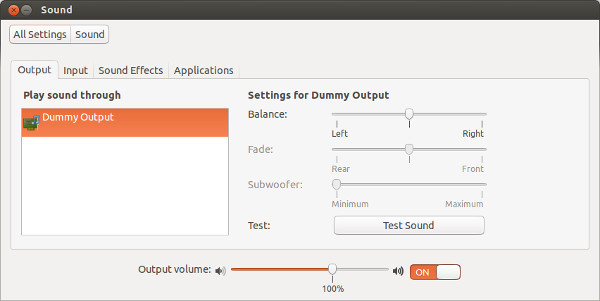
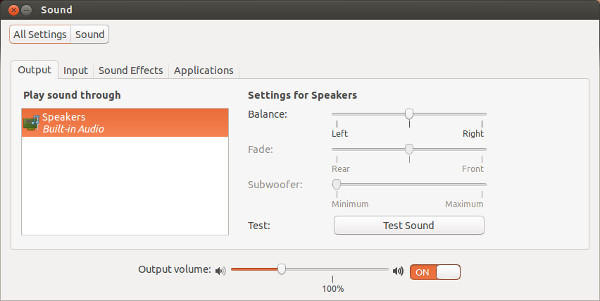
Также можно посмотреть громкость в настройках системы. Для этого откройте утилиту настроек и перейдите на вкладку звук:
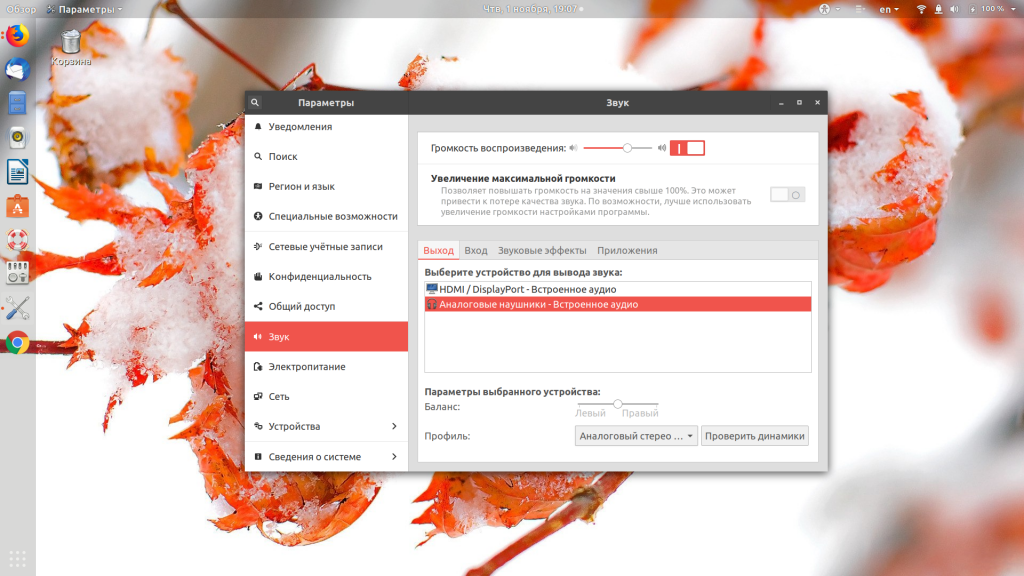
Именно здесь выполняется настройка звука Ubuntu. На этой вкладке смотрим, включён ли вообще звук, для какого устройства он включён, а также его громкость. Обратите внимание, что звук нужно передавать на колонки, а не на HDMI-выход экрана. Обычно это работает именно так. Очень часто система управления звуком ALSA не обращает внимания на настройки системы, у неё есть свой инструмент настройки громкости. Если выше перечисленные способы не помогли, можно попробовать его. Выполните в терминале:

Это инструмент командной строки, но у него есть псевдографический интерфейс, поэтому в нём будет не сложно разобраться. Здесь представлены все звуковые устройства системы и их уровень громкости. Убедитесь, что нигде нет обозначения MM, это значит, что устройство находится в беззвучном режиме, особенно обратите внимание на Master, Hearphones и PCM. Если на одном из устройств выключена громкость или установлен беззвучный режим, выберите его с помощью кнопок со стрелками вправо/влево, а затем нажмите M, чтобы включить звук. Громкость звука настраивается кнопками вверх и вниз на клавиатуре.
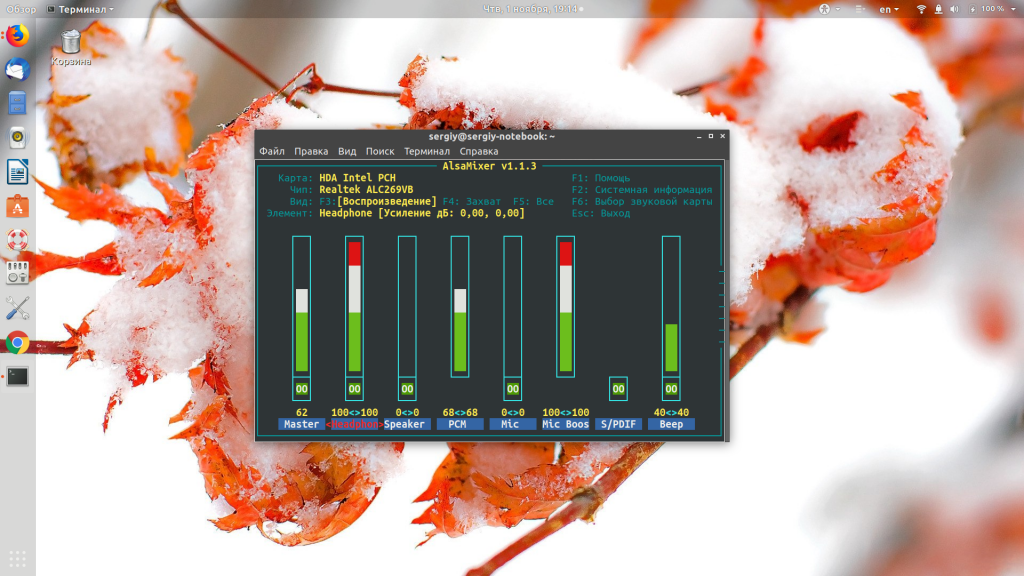
Должно быть как на скриншоте, сохранять настройки не нужно, они применяются в реальном времени. Для выхода из программы нажмите кнопку Esc. Скорее всего ваша проблема «нет звука Ubuntu» уже была решена, если же нет, есть ещё несколько вариантов.
2. Перезагрузка модулей ALSA
Если вариант с настройками звука не сработал, например, потому что в настройках вовсе нет никаких устройств, значит ваша звуковая карта не распознаётся. Эту проблему можно попытаться решить, перезапустив ALSA, для этого выполните команду:
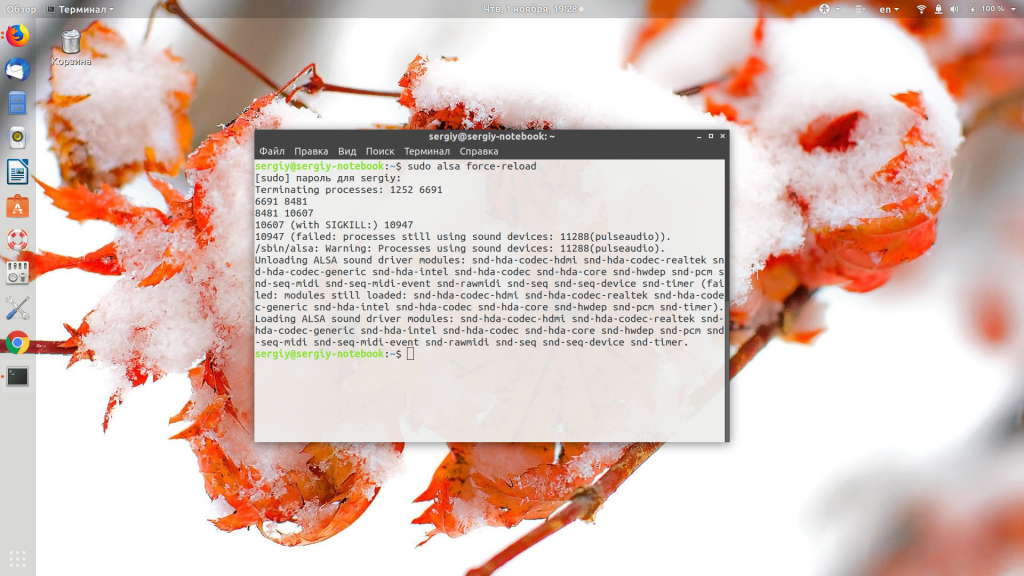
После выполнения команды нужно перезапустить компьютер, и если всё прошло хорошо, то в списке устройств в настройках появится ваше звуковое устройство.
3. Переустановка ALSA и PulseAudio
Если же и это решение не помогло, вы можете попробовать полностью переустановить ALSA и PulseAudio. Для этого выполните такие команды:
sudo apt remove —purge alsa-base pulseaudio
sudo apt install alsa-base pulseaudio
Затем снова перезапустите ALSA:
Далее, перезагрузите свой компьютер.
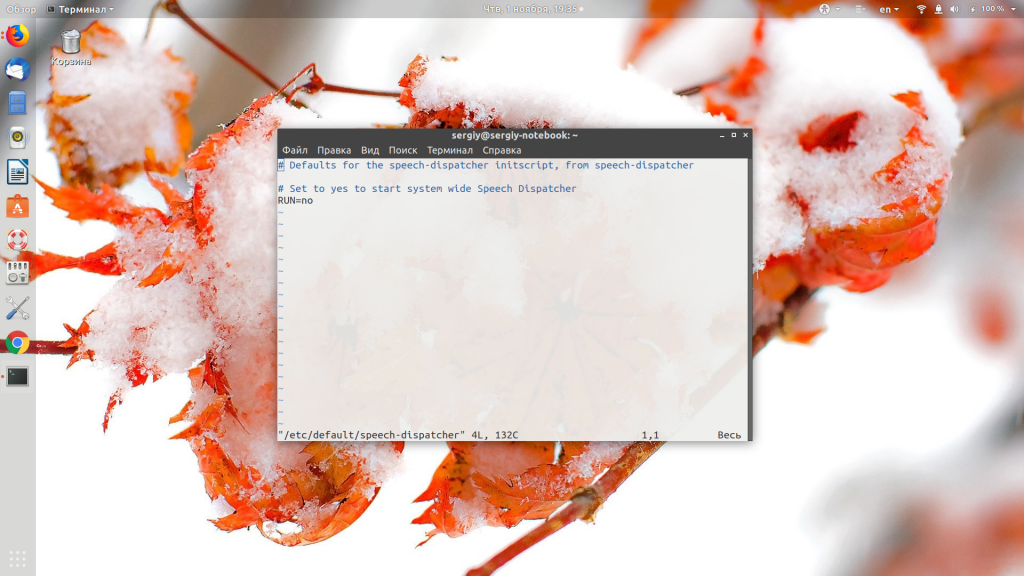
4. Диспетчер речи
Этот компонент системы должен быть отключён. Чтобы убедится, что это действительно так, откройте конфигурационный файл /etc/default/speech-dispatcher и убедитесь, что в строчке RUN находится значение no:
Выводы
Сегодня мы рассмотрели, что делать, если не работает звук Ubuntu. Как видите, есть несколько решений проблемы, и я надеюсь, что одно из них вам поможет. Также вы можете проверить свои колонки. Если они исправны, то при касании пальцем к штекеру колонок будет слышен негромкий щелчок. Во всяком случае, теперь вы знаете, что делать, если пропал звук в Ubuntu.
Обнаружили ошибку в тексте? Сообщите мне об этом. Выделите текст с ошибкой и нажмите Ctrl+Enter.
How To Fix No Sound in Ubuntu And Linux Mint
As it happens with every Ubuntu release, you install or upgrade to a newer Ubuntu version and run in to a number of problems. But then, there is always a way to overcome these big little problems.
One of the most common problems faced is no sound after installing Ubuntu. While there could be several reasons for no sound in Ubuntu, I will share the tricks that worked for me.
Let’s see in steps how I fixed and how you can fix it.
Various methods to fix no audio in Ubuntu
There could be various reasons why there is no sound in Ubuntu. The fix depends on the kind of problem you have. Before you take the steps to fix it, I suggest get some information about your system, specially about the audio related hardware.
Now check the system, machine and audio information with this command:
You should see some information like this:
[email protected]:~$ inxi -SMA System: Host: itsfoss Kernel: 5.4.0-18-generic x86_64 bits: 64 Desktop: Gnome 3.35.91 Distro: Ubuntu 20.04 LTS (Focal Fossa) Machine: Type: Laptop System: Dell product: XPS 13 9360 v: N/A serial: Mobo: Dell model: 05JK94 v: A00 serial: UEFI: Dell v: 2.13.0 date: 11/14/2019 Audio: Device-1: Intel Sunrise Point-LP HD Audio driver: snd_hda_intel Sound Server: ALSA v: k5.4.0-18-genericLook closely in the audio section of the above output. It tells that it is Intel Sunrise Point-LP HD Audio and it has the Linux driver snd_hda_intel and the sound is served with Alsa. This information maybe useful in some stages of your audio troubleshooting.
Fixing dummy output in sound settings
First step, just to verify, check if the sound is not muted. Once you verify this, go to Sound Settings:
In the Sound Settings, you’ll find that you have practically nothing here except a dummy output. Quite frustrating. It means that your sound card is not even recognized. Puff!
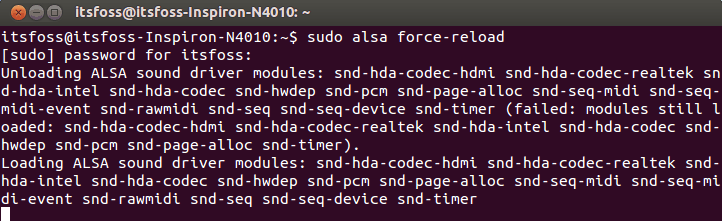
No worries. The one shot solution which fixed the sound problem for me on my Intel powered Dell Inspiron is to force reload Alsa. To do that, use the following command in terminal (Ctrl+Alt+T):
The output will be like this.
You may think that it is hanged or still in processing but it takes only couple of seconds. You can simply close it afterwards by using Ctrl+C.
Now, you need to reboot your computer. Either play some music/video files or check in the system settings to see if it worked for you.
First Alternate method to fix no sound in Ubuntu
If the above problem did not fix it for you, try reinstalling Alsa and Pulse audio in the following manner:
sudo apt-get install --reinstall alsa-base pulseaudioAnd force reload Alsa again:
Restart and check if sound is back or not.
Second alternate method to fix no sound in Ubuntu
Try starting Pulseaudio and see if it works:
Third alternate method: remove old Pulseaudio config
Go to your home directory and then go to the hidden config directory. Rename the directory named pulse here:
mv ~/.config/pulse ~/.config/old_pulseNow reboot your system. The pulse directory should be created afresh and you should have sound.
Third alternate method: Try alsamixer
Open a terminal and use the following command to open alsamixer:
You should see a screen like this:
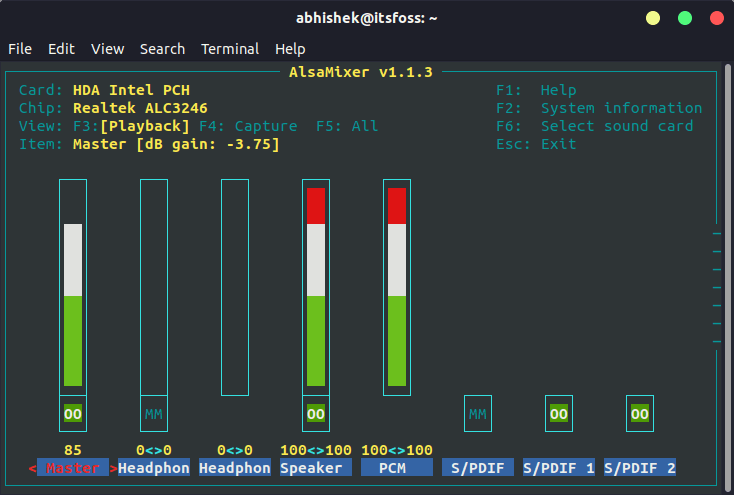
Check if the speakers or your desired audio output is muted here. MM means mute and OO means unmute. If your desired audio output (mostly it’s speakers) or the Master is muted, unmute it.
You can exit the screen using Esc key.
Note that if alsamixer command returns error, it’s probably because you have more than one sound card. In that case, you need to specify the sound card number (refer to the inxi output I mentioned in the beginning) like this:
Fourth alternate method to fix no audio in Ubuntu
Speed dispatcher is the feature that allows your system to convert text to speech. Sometimes, it conflicts with other audio settings. If you do not need this feature, you may try disabling it as it may bring your audio back.
Open the terminal and edit speech-dispatcher file by using the following command:
sudo gedit /etc/default/speech-dispatcherIn here, change RUN=yes to RUN=no . Reboot and enjoy the sound.
Fifth alternate method (specially for Lenovo Carbon X1)
A few of It’s FOSS readers mentioned that none of the above methods worked for their Lenovo Thinkpad Carbon X1 7th Gen laptop.
I looked into various places and found that this newer model has issues with Linux. While Linux kernel 5.5 and above versions has improved support for this model, it is still tricky for Ubuntu 18.04 and Mint 19 users because the kernel in use is still 5.3.
Check your Linux kernel version and if it is 5.4 or lower, try this possible workaround that is suggested by Arch Linux and Ubuntu developers.
Open the alsa configuration file (command might be different for Mint because Gedit text editor is not used in Mint):
sudo gedit /etc/modprobe.d/alsa-base.confAdd the following line to the end of this file:
options snd-hda-intel dmic_detect=0Save and close the file and reboot your system. You should have the audio back.
If it fixed your sound problem, you may want to fix brightness issue as well. Fixing the sound problem is definitely one of the must do things after installing Ubuntu.

If one of the above mentioned methods worked for you, please leave a comment below specifying the method that saved your day. Any other suggestions and feedback is also welcomed.