- How To Connect Wi-Fi On Kali Linux (GUI, Command, Hidden, …)
- Kali Linux: Wi-Fi connection during the system installation
- Wireless card not detected?
- Wi-Fi configuration during Kali Linux installation
- Connect to Wi-Fi via the desktop interface on Kali Linux
- Quick connection from the top bar
- Advanced settings
- Install a wireless driver
- Using the command line to connect to a Wi-Fi network on Kali Linux
- Как включить и отключить Wi-Fi в Kali Linux
- Включение или отключение Wi-Fi через графический интерфейс
- Включение или отключение Wi-Fi через командную строку
- Заключительные мысли
- Список установленных пакетов в Ubuntu 20.04 Focal Fossa Linux
- Программы командной строки для повседневного использования в Linux
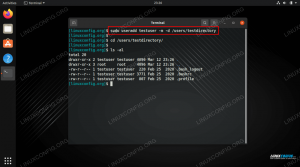
- Как создать пользователя с настраиваемым домашним каталогом в Linux
How To Connect Wi-Fi On Kali Linux (GUI, Command, Hidden, …)

Connecting to a Wi-Fi network on Kali Linux is often an important step, especially if you keep the Ethernet connection free for other purposes (or don’t have other choice). Anyway, whether you try to connect to the Wi-Fi during the installation, via the GUI or in command line, this guide will help you to get connected quickly.
Kali Linux can be connected to a Wi-Fi network by using the SSID and password from one of these interfaces: during the installation, from the desktop interface or by using command lines in a terminal.
Let’s see how to do this in each situation.
Note: I’m explaining here how to connect to your own wireless network, not how to hack another Wi-Fi network. You need the SSID and password before going further, whatever the option you choose.
Kali Linux: Wi-Fi connection during the system installation
Hide your IP address and location with a free VPN:
Try it for free now, companies are paying for you.
1500 servers in 120 countries. It’s free. Forever. No email required.
A network connection is mandatory to install Kali Linux on a computer. If you don’t use a network cable, a Wi-Fi network needs to be configured during the installation.
Wireless card not detected?
Kali Linux is based on Debian, so most wireless adapters should work with it. If you are not using something too new or exotic, your wireless card will be detected and can be used directly.
Stay tuned with the latest security news!
You’ll enjoy receiving the recent articles directly in your inbox every week!
If you aren’t lucky, you may need to install an additional driver to make it work. In this case, I would recommend completing the installation with a RJ45 cable plugged to your network, and fix the wireless connection later. It will be easier from the full interface rather than doing it during the installation.
Wi-Fi configuration during Kali Linux installation
If you don’t have any network cable connected, a Wi-Fi connection will be asked during the installation of Kali Linux. As most packages are downloaded from the Internet servers, a connection is mandatory.
Here is how to connect to a Wi-Fi network during the installation:
- Start the installation by configure your locales (localization, language, keyboard layout, etc.).
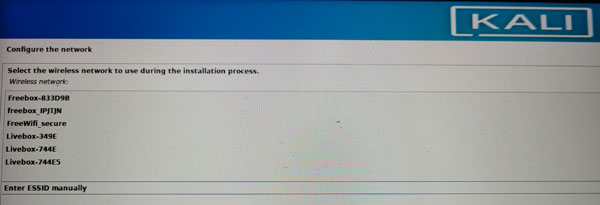
- The wizard will then detect your network configuration, and ask for a Wi-Fi network:

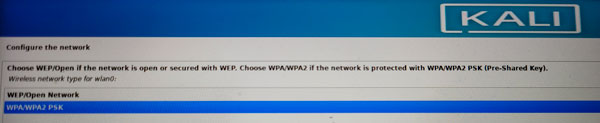
You can pick one in the list, or choose “Enter ESSID manually” if your Wi-Fi network is hidden or not displayed there. - You’ll then have the options to configure it, mostly choose the security options and type the password:
- If everything goes as expected, you’ll be connected to your Wi-Fi network, and the installer will use it to download packages and updates from the Kali Linux servers.
- Once the system installed, you’ll be automatically connected to the same network, nothing more to do after that:
Connect to Wi-Fi via the desktop interface on Kali Linux
The easiest way to connect to a Wi-Fi network on Kali Linux is to use the desktop interface after the installation. XFCE includes various tools and shortcuts to do it quickly and easily.
Quick connection from the top bar
If your wireless adapter is detected, you can quickly connect to your Wi-Fi network by clicking on the network icon in the top panel:

Kali Linux For Beginners
Learn how the good and the bad guys hack!
Learn from the pros how to use Kali Linux easily and quickly.
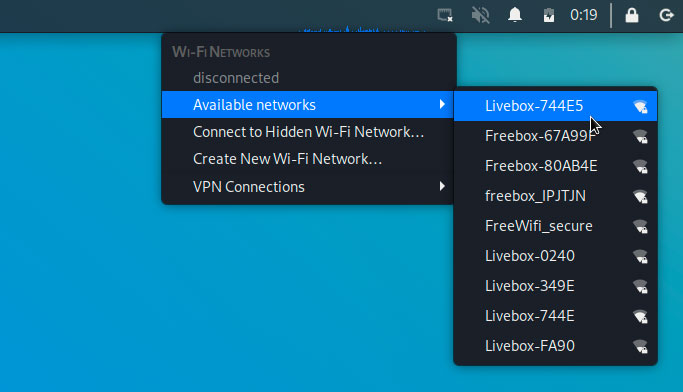
- Click on the network icon in the top-right corner.
It should be a “disconnected” network icon if you don’t have any network configured, or the “connected” alternative if you only have the RJ45 configuration done. - When you click on it, you’ll get the option to choose a network, or connect to a hidden network manually:
- Type your password, and you’ll be connected to it a few seconds later.
That’s it, in most cases it shouldn’t be that complicated.
I understand it might be new for you if you have no experience with Linux, but it’s not different from configuring it on other Linux distributions, the interface is really intuitive.
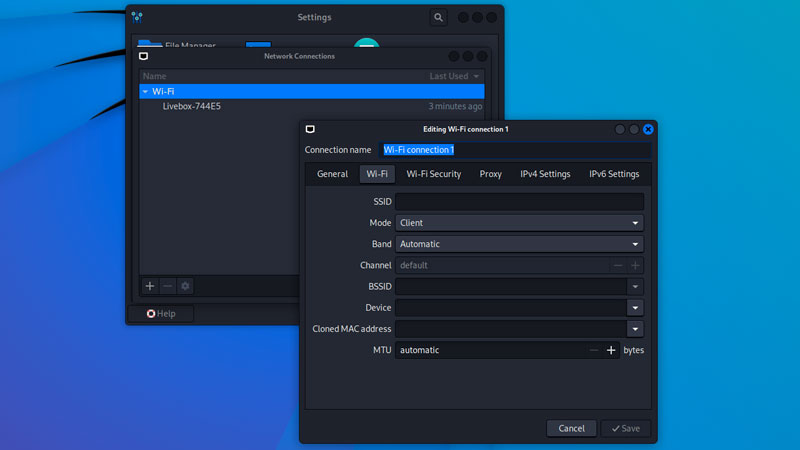
Advanced settings
If your Wi-Fi setup requires more advanced options, you can open the system settings from the main menu and go to the “Advanced Network Configuration” tool to get more options.
It looks like that:
Stay tuned with the latest security news!
You’ll enjoy receiving the recent articles directly in your inbox every week!
From there, you can either edit an existing configuration, or create a new one, with all the advanced options you might need (channel, MAC address, security, proxy, IP configuration, etc.).
For example, if there is no DHCP on your network, you will need this tool to set your IP address, gateway and DNS server.
Install a wireless driver
As explained earlier, even if Kali Linux comes with the most common wireless drivers, you may have a situation where your hardware is not detected, and you can’t connect directly to a Wi-Fi network. In this case, you’ll need to download and install the driver manually before you can use the Wi-Fi.
A few steps are involved, so I recommend watching this video to understand the idea:
Obviously, it will be slightly different depending on your Wi-Fi adapter manufacturer, but I hope it will help you to understand the procedure, so you can then do your research for your specific needs.
Using the command line to connect to a Wi-Fi network on Kali Linux
If you don’t have other options, it’s still possible to connect to a Wi-Fi network from a terminal on Kali Linux. Just expect to be a little more challenging, but it’s doable by following these steps:
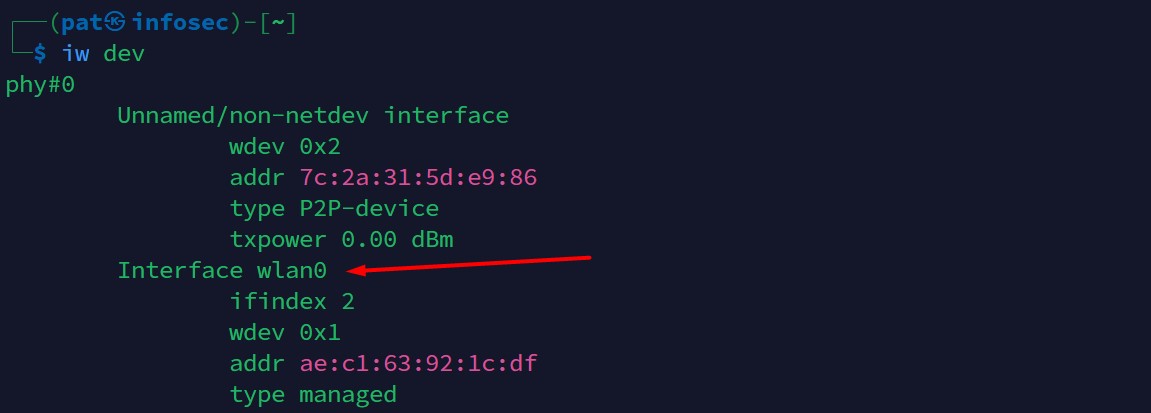
- First, make sure your Wi-Fi interface is detected, and take not of it’s name:
iw dev
You’ll get something like that:
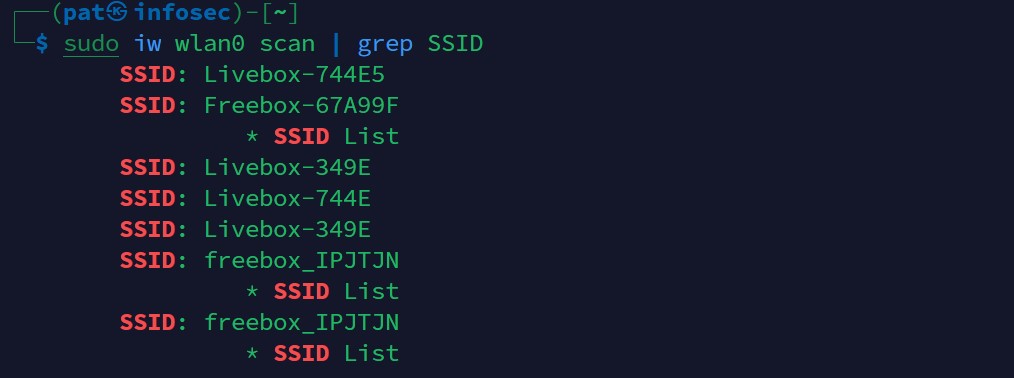
In most cases, the interface’s name will be “wlan0”. - You can then do a scan to find all the SSID available:
sudo iw wlan0 scan
You can use grep to filter the results and display only the networks names:
sudo iw wlan0 scan | grep SSID - We’ll now generate a configuration file, with the SSID we want to use and the corresponding password:
sudo su
wpa_passphrase >> /etc/wpa_supplicant.conf
Type the Wi-Fi password when asked for it, it will create the wpa_supplicant configuration file for you.
It looks like sudo doesn’t work for this command, so I used “sudo su” to switch to the administrator account.
You can then get back to the normal user with:
exit - The last step is to connect to your Wi-Fi network with wpa_supplicant:
wpa_supplicant -B -i wlan0 -c /etc/wpa_supplicant.conf
If there is any issue with your configuration, you’ll get the error directly in the terminal.
You can remove the “-B” option (run in background) to see all the details, and the next attempts. It will be held to understand and debug any misconfiguration at this point.
Hi, my name is Patrick, I’m a web developer and network administrator. I have always been interested in security, and I created this website to share my findings with you.
Как включить и отключить Wi-Fi в Kali Linux
Цель этого руководства — показать, как включать и отключать Wi-Fi на Kali Linux . Это можно сделать либо с помощью графического интерфейса, либо командная строка , и в этом руководстве мы покажем пошаговые инструкции для обоих методов.
Это будет полезно, если у вас возникли проблемы с подключением к беспроводному маршрутизатору или вы планируете что-то Сканирование и взлом Wi-Fi с помощью Aircrack-ng , Например.
В этом уроке вы узнаете:

Включение и отключение Wi-Fi в Kali Linux
| Категория | Требования, условные обозначения или используемая версия программного обеспечения |
|---|---|
| Система | Kali Linux |
| Программного обеспечения | N / A |
| Другой | Привилегированный доступ к вашей системе Linux с правами root или через судо команда. |
| Условные обозначения | # — требует данных команды linux для выполнения с привилегиями root либо непосредственно как пользователь root, либо с использованием |
Включение или отключение Wi-Fi через графический интерфейс
Эти шаги предполагают, что вы используете Xfce, среду рабочего стола по умолчанию для Kali. Если вы используете KDE , ГНОМ или какой-либо другой графический интерфейс, инструкции должны быть очень похожими.
- Чтобы включить или отключить Wi-Fi, щелкните правой кнопкой мыши значок сети в углу и выберите «Включить Wi-Fi» или «Отключить Wi-Fi».
Включите Wi-Fi через значок сети в графическом интерфейсе Xfce

Подключение к сети Wi-Fi

Введите сетевой пароль для завершения подключения

Просмотр информации о подключении
Включение или отключение Wi-Fi через командную строку
- Чтобы увидеть имя вашего адаптера WiFi, а также информацию о подключении (при условии, что вы уже подключены к сети Wi-Fi), откройте терминал и выполните команду ip a команда.

Просмотр информации об адаптере WiFi через командную строку

Отключение Wi-Fi через командную строку

Включение Wi-Fi через командную строку
Заключительные мысли
В этом руководстве мы увидели, как включать и отключать Wi-Fi через графический интерфейс и командную строку в Kali Linux. Это служит методом устранения неполадок, когда ваша система не подключается к сети Wi-Fi или у вас нет доступа в Интернет. Для получения дополнительной помощи см. Наше руководство по тестирование интернет-соединения в Linux .
Подпишитесь на новостную рассылку Linux Career Newsletter, чтобы получать последние новости, вакансии, советы по карьере и рекомендуемые руководства по настройке.
LinuxConfig ищет технических писателей, специализирующихся на технологиях GNU / Linux и FLOSS. В ваших статьях будут представлены различные руководства по настройке GNU / Linux и технологии FLOSS, используемые в сочетании с операционной системой GNU / Linux.
Ожидается, что при написании статей вы сможете идти в ногу с технологическим прогрессом в вышеупомянутой технической области. Вы будете работать самостоятельно и сможете выпускать как минимум 2 технических статьи в месяц.
Список установленных пакетов в Ubuntu 20.04 Focal Fossa Linux
Список установленных пакетов с помощью командной строкиВышеупомянутый метод предоставил вам только список основных приложений, установленных в вашей системе Ubuntu 20.04. Чтобы получить более подробный список установочных пакетов, лучше всего обра.
Программы командной строки для повседневного использования в Linux
Должен признаться, я помешан на командной строке. Всякий раз, когда у меня появляется возможность, независимо от среды рабочего стола или дистрибутива, я открываю терминал и начинаю что-то возиться. Конечно, это не значит, что все должны быть похо.
Как создать пользователя с настраиваемым домашним каталогом в Linux
Нормальный учетные записи пользователей на Linux имеют собственный домашний каталог. Это место, где обычно находятся все личные файлы учетной записи пользователя, включая их недавние загрузки, содержимое рабочего стола и т. Д.По умолчанию домашний.