- ESP32 Classic Bluetooth AT Examples
- Establish SPP connection between phone (or PC) and ESP32 in Normal Transmission mode with IO capability set to NoInputNoOutput
- Establish SPP connection between phone (or PC) and ESP32 in Passthrough mode with IO capability set to NoInputNoOutput
- Establish SPP connection between phone (or PC) and ESP32 with IO capability set to KeyboardOnly
- Establish SPP connection between two ESP32 development boards
- Establish A2DP connection and enable A2DP Sink to play music
- Использование Bluetooth в модуле ESP32
- Принципы использования классического Bluetooth и BLE в ESP32
- Подготовка Arduino IDE для работы с модулем ESP32
- Объяснение программы для модуля ESP32 для использования Bluetooth
- Bluetooth
- Examples
- Serial To Serial BT
- BT Classic Device Discovery
ESP32 Classic Bluetooth AT Examples
This document provides detailed command examples to illustrate how to utilize ESP32 Classic Bluetooth® AT Commands on ESP32.
The default firmware does not support Classic Bluetooth commands. For how to enable support for those commands, please refer to Introduction to Classic Bluetooth .
Establish SPP connection between phone (or PC) and ESP32 in Normal Transmission mode with IO capability set to NoInputNoOutput
In this example, mobile phone or PC is master and ESP32 is slave. The example shows how to establish SPP connection.
- Classic Bluetooth initialization. Command:
The symbol > indicates that AT is ready for receiving serial data and you can enter data now. When the requirement of data length determined by the parameter
- If the number of bytes inputted are more than the length (n) set by AT+BTSPPSEND , the system will reply busy p. , and send the first n bytes. And after sending the first n bytes, the system will reply OK .
- After AT outputs the > character, the special characters in the data does not need to be escaped through the escape character, and it does not need to end with a new line (CR-LF).
+BTSPPDISCONN:0,"e0:24:81:47:90:bc" OK
Establish SPP connection between phone (or PC) and ESP32 in Passthrough mode with IO capability set to NoInputNoOutput
In this example, mobile phone or PC is master and ESP32 is slave. The example shows how to establish SPP connection.
- Classic Bluetooth initialization. Command:
- After the AT enters Passthrough Mode, data received from serial port will be transmitted to the mobile phone or PC.
Important The aim of ending the packet with +++ is to exit Passthrough Mode and to accept normal AT commands. However, you can also use command AT+BTSPPSEND to go back into Passthrough Mode.
+BTSPPDISCONN:0,"e0:24:81:47:90:bc" OK
Establish SPP connection between phone (or PC) and ESP32 with IO capability set to KeyboardOnly
The process is basically the same as in the Establish SPP connection between phone (or PC) and ESP32 in Normal Transmission mode with IO capability set to NoInputNoOutput. The only difference lies in security parameters settings.
- Classic Bluetooth initialization. Command:
- The PIN code you entered may be different from those in the above command. Please use the real PIN instead.
- The address you obtained may be different from that in the above response.
+BTSPPDISCONN:0,"e0:24:81:47:90:bc" OK
Establish SPP connection between two ESP32 development boards
Below is an example of using two ESP32 development boards, one as master, the other one as slave.
In the following steps, the operations starting with Master only need to be executed at master, and the operations starting with Slave only need to be executed at slave. If the operation is not specified on which side it is executed, it needs to be executed on both the master side and the slave side.
+BTSTARTDISC:"10:f6:05:f9:bc:4f",realme V11 5G,0x2,0x3,0x2d0,-34 +BTSTARTDISC:"24:0a:c4:d6:e4:46",EXAMPLE. -27 +BTSTARTDISC:"10:f6:05:f9:bc:4f",realme V11 5G,0x2,0x3,0x2d0,-33 +BTSTARTDISC:"24:0a:c4:d6:e4:46",EXAMPLE. -25 +BTSTARTDISC:"ac:d6:18:47:0c:ae",,0x2,0x3,0x2d0,-72 +BTSTARTDISC:"24:0a:c4:d6:e4:46",EXAMPLE. -26 +BTSTARTDISC:"10:f6:05:f9:bc:4f",,0x2,0x3,0x2d0,-41 +BTSTARTDISC:"24:0a:c4:2c:a8:a2". -50 +BTSTARTDISC:"24:0a:c4:d6:e4:46",EXAMPLE. -26 +BTSTARTDISC:"10:f6:05:f9:bc:4f",realme V11 5G,0x2,0x3,0x2d0,-39 +BTSTARTDISC:"24:0a:c4:d6:e4:46",EXAMPLE. -23 +BTSTARTDISC:"10:f6:05:f9:bc:4f",realme V11 5G,0x2,0x3,0x2d0,-36 +BTSTARTDISC:"10:f6:05:f9:bc:4f",realme V11 5G,0x2,0x3,0x2d0,-41 +BTSTARTDISC:"b4:a5:ac:16:14:8c",,0x2,0x3,0x2d0,-57 +BTSTARTDISC:"24:0a:c4:2c:a8:a2" +BTSTARTDISC:"b4:a5:ac:16:14:8c" OK
AT+BTSPPCONN=0,0,"24:0a:c4:d6:e4:46"
+BTSPPCONN:0,"24:0a:c4:d6:e4:46" OK
- When entering the above command, replace the address with slave address.
- If the SPP connection is established successfully, message +BTSPPCONN:0,»30:ae:a4:80:06:8e» will be prompted on the slave.
+BTSPPDISCONN:0,"30:ae:a4:80:06:8e" OK
- Both master and slave can actively terminate the SPP connection.
- If the SPP connection is ended successfully, message +BTSPPDISCONN:0,»24:0a:c4:d6:e4:46″ will be prompted on the master.
Establish A2DP connection and enable A2DP Sink to play music
- To use A2DP Sink , you need to add the code of the I2S part by yourself. For the code to initialize the I2S part, please refer to a2dp sink example.
- The driver code of the decoder chip part also needs to be added by yourself or use an off-the-shelf development board.
Использование Bluetooth в модуле ESP32
Bluetooth модули HC-05 и HC-06 просты в использовании и находят достаточно широкое применение в радиоэлектронных проектах. Однако к их недостаткам можно отнести сравнительно большое энергопотребление и использование уже сильно устаревшей версии Bluetooth V2.0. На их фоне модули ESP32, обладающие встроенными Wi-Fi и Bluetooth, контактами для АЦП и ЦАП, поддержкой аудио устройств, спящего режима и многими другими возможностями, смотрятся весьма неплохо для конструирования различных проектов тематики интернета вещей (Internet of Things, IoT).
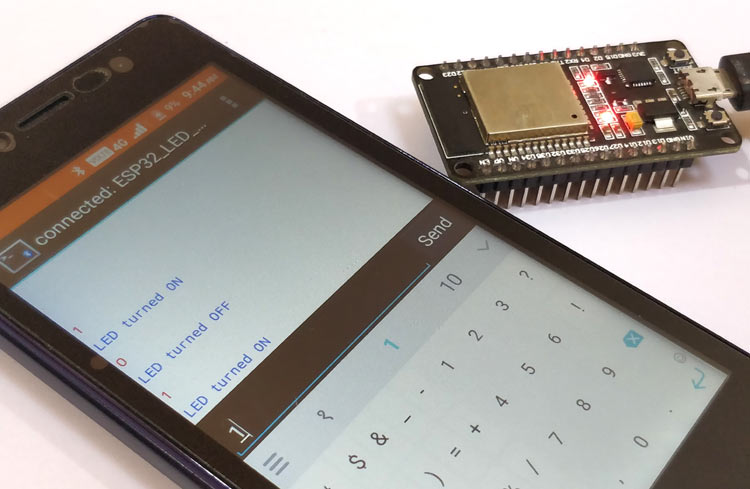
В данной статье мы рассмотрим использование классического Bluetooth в модуле ESP32 – мы будем управлять включением/выключением встроенного светодиода модуля с помощью смартфона. В дальнейших статьях на нашем сайте мы также рассмотрим использование в модуле ESP32 более «продвинутой» версии Bluetooth – технологии BLE (Bluetooth Low Energy – Bluetooth с низким энергопотреблением).
Принципы использования классического Bluetooth и BLE в ESP32
Технология BLE (Bluetooth Low Energy), как следует из ее названия, потребляет значительно меньше энергии чем классический (classic) Bluetooth. Это достигается при помощи передачи данных по требованию с заранее определенными периодическими обновлениями. Но в отличие от классического Bluetooth технология BLE не используется для передачи файлов или музыки. Наверное, вы были неоднократно удивлены тем, что когда вы подключаете к вашему смартфону какой-нибудь фитнес браслет или умные часы, то вы в своем смартфоне можете посмотреть и уровень заряда батареи подключенного устройства – этот функционал становится доступен благодаря использованию технологии BLE. Данная технология работает вместе с версией Bluetooth V4.0 и может использоваться в серверных или клиентских устройствах, что делает ее чрезвычайно удобной для применения в умных часах, фитнес браслетах и т.д.
Классический Bluetooth, в то же время, достаточно удобен для передачи файлов и других данных. Практически все BLE устройства поддерживают и функционал классического Bluetooth.

Bluetooth, который используется в модулях подобных HC-05, является версией классического Bluetooth и называется Bluetooth SSP (Serial Port Protocol – протокол последовательного порта), что означает то, что в данном случае Bluetooth использует стандартный последовательный протокол.
В данной статье мы будем использовать функционал Serial Bluetooth (последовательного) в модуле ESP32 для его соединения со смартфоном, на котором запущено приложение Bluetooth Terminal. Из данного приложения мы будем передавать команды, с помощью которых мы будем включать/выключать встроенный светодиод модуля ESP32.
Подготовка Arduino IDE для работы с модулем ESP32
Имейте ввиду что Arduino IDE по умолчанию не поддерживает модуль ESP32 – вам необходимо скачать и установить библиотеку для его использования с помощью менеджера библиотек. Более подробно про все эти процессы вы можете прочитать в статье про программирование модуля ESP32 с помощью Arduino IDE.

Объяснение программы для модуля ESP32 для использования Bluetooth
Полный код программы приведен в конце статьи, здесь же мы кратко рассмотрим его основные фрагменты. Если вы ранее работали с Bluetooth модулями HC-05 или HC-06, то в программах для данных модулей вы найдете много общего с программой, которую мы рассмотрим в данном проекте.
Основная идея нашей программы состоит в том, что соединение Serial Bluetooth в модуле ESP32 «слушает» данные, поступающие от подключенных устройств (в нашем случае смартфона). Если мы будем принимать ‘1’, то мы будем включать встроенный светодиод модуля, а если мы будем принимать ‘0’, то мы будем выключать данный светодиод.
Начнем нашу программу мы с подключения библиотеки BluetoothSerial, которая позволяет Bluetooth модулю ESP32 работать в качестве Bluetoth SSP (Bluetoth с протоколом последовательного порта).
Bluetooth
This is a work in progress project and this section is still missing. If you want to contribute, please see the Contributions Guide.
Examples
To get started with Bluetooth, you can try:
Serial To Serial BT
//This example code is in the Public Domain (or CC0 licensed, at your option.) //By Evandro Copercini - 2018 // //This example creates a bridge between Serial and Classical Bluetooth (SPP) //and also demonstrate that SerialBT have the same functionalities of a normal Serial #include "BluetoothSerial.h" //#define USE_PIN // Uncomment this to use PIN during pairing. The pin is specified on the line below const char *pin = "1234"; // Change this to more secure PIN. String device_name = "ESP32-BT-Slave"; #if !defined(CONFIG_BT_ENABLED) || !defined(CONFIG_BLUEDROID_ENABLED) #error Bluetooth is not enabled! Please run `make menuconfig` to and enable it #endif #if !defined(CONFIG_BT_SPP_ENABLED) #error Serial Bluetooth not available or not enabled. It is only available for the ESP32 chip. #endif BluetoothSerial SerialBT; void setup() Serial.begin(115200); SerialBT.begin(device_name); //Bluetooth device name Serial.printf("The device with name \"%s\" is started.\nNow you can pair it with Bluetooth!\n", device_name.c_str()); //Serial.printf("The device with name \"%s\" and MAC address %s is started.\nNow you can pair it with Bluetooth!\n", device_name.c_str(), SerialBT.getMacString()); // Use this after the MAC method is implemented #ifdef USE_PIN SerialBT.setPin(pin); Serial.println("Using PIN"); #endif > void loop() if (Serial.available()) SerialBT.write(Serial.read()); > if (SerialBT.available()) Serial.write(SerialBT.read()); > delay(20); >
BT Classic Device Discovery
#include #if !defined(CONFIG_BT_ENABLED) || !defined(CONFIG_BLUEDROID_ENABLED) #error Bluetooth is not enabled! Please run `make menuconfig` to and enable it #endif #if !defined(CONFIG_BT_SPP_ENABLED) #error Serial Bluetooth not available or not enabled. It is only available for the ESP32 chip. #endif BluetoothSerial SerialBT; #define BT_DISCOVER_TIME 10000 static bool btScanAsync = true; static bool btScanSync = true; void btAdvertisedDeviceFound(BTAdvertisedDevice* pDevice) Serial.printf("Found a device asynchronously: %s\n", pDevice->toString().c_str()); > void setup() Serial.begin(115200); SerialBT.begin("ESP32test"); //Bluetooth device name Serial.println("The device started, now you can pair it with bluetooth!"); if (btScanAsync) Serial.print("Starting discoverAsync. "); if (SerialBT.discoverAsync(btAdvertisedDeviceFound)) Serial.println("Findings will be reported in \"btAdvertisedDeviceFound\""); delay(10000); Serial.print("Stopping discoverAsync. "); SerialBT.discoverAsyncStop(); Serial.println("stopped"); > else Serial.println("Error on discoverAsync f.e. not workin after a \"connect\""); > > if (btScanSync) Serial.println("Starting discover. "); BTScanResults *pResults = SerialBT.discover(BT_DISCOVER_TIME); if (pResults) pResults->dump(&Serial); else Serial.println("Error on BT Scan, no result!"); > > void loop() delay(100); >