- Circuits4you.com
- Arduino interfacing, circuits tutorials with code and ebooks, Step by step guides for all sensor modules used for arduino. Programming tips and tricks.
- Software reset ESP8266
- Как стереть Flash память ESP8266 NodeMCU (аппаратный сброс модуля)
- Установка esptool.py
- Change WiFi Credentials of ESP8266 without uploading code again
- Learn how to change the wifi credientials of ESP8266 over the air without touching and uploading the edited code through Arduino IDE.
- Required Components
- Method 1: Code inside sketch. Storing the WiFi credentials inside EEPROM
- ESP8266 — hard resetting via rts pin.
- Your board does not support Autoreset.
- Changing the RESET Method.
- You used pins from the ESP8266 incorrectly
- Conclusion
- Johannes
Circuits4you.com
Arduino interfacing, circuits tutorials with code and ebooks, Step by step guides for all sensor modules used for arduino. Programming tips and tricks.
Software reset ESP8266
This tutorial shows hot to software reset ESP8266 in Arduino IDE. This sketch/example shows software reset using simple command ESP.restart() or ESP.reset().
Software reset for ESP8266 is required when you get trouble to connect WiFi router.
Lets see the use of software restart. This example program will show you software reset in a loop before it reaches to its max value.
ESP.reset() is a hard reset and can leave some of the registers in the old state which can lead to problems, its more or less like the reset button on the PC.
ESP.restart() tells the SDK to reboot, so its a more clean reboot.
/* * circuits4you.com * ESP8266 software reset demo * This program counts from 1 to 20 * and resets at 6 count before completing counting */ #include // the setup function runs once when you press reset or power the board void setup() < // initialize digital pin LED_BUILTIN as an output. Serial.begin(115200); pinMode(2, OUTPUT); >// the loop function runs over and over again forever void loop() < int i; for(i=0;i<20;i++) < digitalWrite(2, HIGH); // turn the LED on (HIGH is the voltage level) delay(500); // wait for a second digitalWrite(2, LOW); // turn the LED off by making the voltage LOW delay(500); // wait for a second Serial.print("count"); Serial.println(i); if(i==6) < Serial.println("Resetting ESP"); ESP.restart(); //ESP.reset(); >> > Upload above program. after uploading open serial monitor you will find below reset
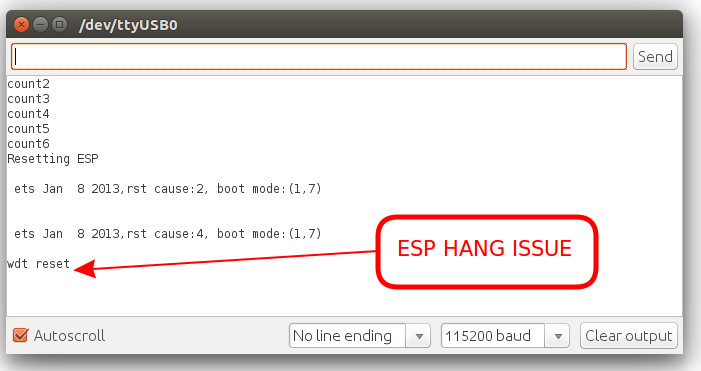
You will notice that it resets the ESP but wont start the program again. this is small but it is caused after only serial upload.
the boot mode:(1,7) problem is known and only happens at the first restart after serial flashing. if you do one manual reboot by power or RST pin all will work.

After manual reset the program will work fine as expected.
Как стереть Flash память ESP8266 NodeMCU (аппаратный сброс модуля)
В данной статье мы рассмотрим как стереть Flash память (флэш-память) модуля ESP8266 NodeMCU, то есть выполнить аппаратный сброс модуля и вернуть его к заводским настройкам. Восстановление заводских настроек модуля ESP8266 может быть полезно, если вы хотите удалить любые изменения, внесенные в прошивку или настройки конфигурации; если система часто дает сбои и вы не можете загрузить новый код; для очистки данных, которые больше не нужны, и других приложений. Стирать Flash память модуля ESP32 мы будем с помощью инструмента под названием esptool . Ранее на нашем сайте мы рассматривали аналогичную процедуру стирания Flash памяти модуля ESP32.
 Установка esptool.py

Для выполнения сброса к заводским настройкам модуля ESP8266 NodeMCU мы будем использовать программу esptool, которая представляет собой платформо-независимую утилиту с открытым исходным кодом, основанную на языке Python. Она используется для взаимодействия с ROM загрузчиком (bootloader) в чипах от компании Espressif, к которым относится и ESP32.
Чтобы установить утилиту esptool необходимо чтобы на вашем компьютере был установлен Python 3.7 или новее. Вы можете скачать свежие версии установщика Python с его официального сайта.
Когда Python 3 будет установлен на вашем компьютере, откройте окно терминала (Terminal window ) и установите самую последнюю стабильную версию программы esptool.py с помощью установщика pip:
Change WiFi Credentials of ESP8266 without uploading code again
Learn how to change the wifi credientials of ESP8266 over the air without touching and uploading the edited code through Arduino IDE.
If you are working with the ESP8266 in your project, surely you had the same problem as we faced: what to do when you change the WiFi network to which your ESP8266 is to be connected. This is the main issue faced by many IOT device creators.
Normally we enter the SSID and the password of the WiFi network directly in the programming code, but it can be inconvenient if we transfer the project we are dealing with, or if the end user who is going to use it does not know anything about programming it.

In these cases, its very hard to open the box of the esp board or if it is fixed inside any box in home automation systems and connect it to laptop or PC and need to have an access to the previous code and upload it again into the ESP8266 board which is very stubborn task.
So, in this situation we have 2 solutions which we gonna explain below in detail with code and how to implement it in your previous programs. The first method is by using the code which we provided below and the other is by using an Arduino library named ‘WiFi Manager’. So lets get started.
Required Components
Here are the required components along with Amazon buying links at best prices.
| Product Name | Quantity | ||
|---|---|---|---|
| ESP8266 NodeMCU | 1 | https://amzn.to/3tqMwkB | https://amzn.to/3sVdSjG |
| Micro USB cable | 1 | https://amzn.to/3s1a8g3 | https://amzn.to/364yInH |
Method 1: Code inside sketch. Storing the WiFi credentials inside EEPROM
In this method, we are going to use EEPROM to store the wife credentials inside it, and retrieving the stored data and connecting to that network if available. If the WiFi network is not available it ill create a WiFi hotspot to which we need to connect any device like laptop or mobile to change the WiFi credentials over web server.
To do so we need to get into setting by typing 192.168.4.1 on your device browser to access the setting page, where we can see the available networks and there signal strengths. So enter the SSID and PASSWORD of the network which you wanted to connect and click save.
![change wifi credentials esp8266]](https://www.circuitschools.com/wp-content/uploads/2020/06/change-wifi-credentials-esp8266.webp)
That it the network credentials are written into the EEPROM of the board and it will restart and search for the network which was stored in the EEPROM and connect to the network and continue executing our program.
Required Libraries:
ESP8266 — hard resetting via rts pin.
«hard resetting via rts pin. » just means, that your UART (USB-to-Serial) adapter performed an reset of your ESP. The reset is needed to boot properly. It’s not an error or something. But sometimes this essential reset, after uploading your binary can’t be executed. That can have different reasons:
Your board does not support Autoreset.
Normally, boards like the WEMOS with an integrated USB-to-Serial Adapter support the reset. If not, you may have to reset the ESP manually. Because there is already some awesome documentation about how to do this, I will just link to it:
Changing the RESET Method.
Sometimes the reset via the RTS pin would not work. In the Arduino IDE you can choose between different RESET methods. Tools -> Reset Method -> .
You used pins from the ESP8266 incorrectly
That is propably the reason why most boards won’t start after flashing. You just used the pins on your ESP8266 incorrectly. There is a really cool website that shows you the pins that you can use, and the pins to avoid.
For example you can get boot fails on different pins. Look up the pins you’re using. Maybe you pulled some pins to ground, or pulled them up at startup. That way your ESP8266 won’t boot.
Conclusion
- The message: hard resetting via rts pin. is not an error message. Just an indication whats going on
- If your ESP8266 won’t boot you may have to reset it manually. Look at this website for a good manual reset tutorial: https://tttapa.github.io/ESP8266/Chap06%20-%20Uploading.html
- Maybe you used the PINS on the ESP8266 incorrectly, double check your pins and look at this awesome website: https://espeasy.readthedocs.io/en/latest/Reference/GPIO.html#best-pins-to-use-on-esp8266
Johannes
If you press this Button it will Load Disqus-Comments. More on Disqus Privacy: Link