How to Enable /etc/rc.local with Systemd
If you are running a Linux distro that uses Systemd, then you may find that your command in /etc/rc.local file would not run at system boot time. This guide explains how to enable /etc/rc.local script to run on system startup.
Enable /etc/rc.local on Systemd
If you type the following command in terminal:
sudo systemctl status rc-local
● rc-local.service - /etc/rc.local Compatibility Loaded: loaded (/lib/systemd/system/rc-local.service; static; vendor preset: enabled) Active: failed (Result: exit-code) since Thu 2015-11-26 23:54:58 CST; 59s ago Process: 1001 ExecStart=/etc/rc.local start (code=exited, status=1/FAILURE) Nov 26 23:54:57 vivid rc.local[1001]: File "/usr/lib/python2.7/dist-packages/pkg_resources/__init__.py", line 920, in require Nov 26 23:54:57 vivid rc.local[1001]: needed = self.resolve(parse_requirements(requirements)) Nov 26 23:54:57 vivid rc.local[1001]: File "/usr/lib/python2.7/dist-packages/pkg_resources/__init__.py", line 807, in resolve Nov 26 23:54:57 vivid rc.local[1001]: raise DistributionNotFound(req) Nov 26 23:54:57 vivid rc.local[1001]: pkg_resources.DistributionNotFound: shadowsocks==2.8.2 Nov 26 23:54:58 vivid sudo[1008]: pam_unix(sudo:session): session closed for user root Nov 26 23:54:58 vivid systemd[1]: rc-local.service: control process exited, code=exited status=1 Nov 26 23:54:58 vivid systemd[1]: Failed to start /etc/rc.local Compatibility. Nov 26 23:54:58 vivid systemd[1]: Unit rc-local.service entered failed state. Nov 26 23:54:58 vivid systemd[1]: rc-local.service failed.
And if you try to enable /etc/rc.local to run on system boot with the command:
sudo systemctl enable rc-local
The unit files have no [Install] section. They are not meant to be enabled using systemctl. Possible reasons for having this kind of units are: 1) A unit may be statically enabled by being symlinked from another unit's .wants/ or .requires/ directory. 2) A unit's purpose may be to act as a helper for some other unit which has a requirement dependency on it. 3) A unit may be started when needed via activation (socket, path, timer, D-Bus, udev, scripted systemctl call, . ). The solution
As you can see from above, The unit file have no [Install] section. As such Systemd can not enable it. First we need to create a file:
sudo nano /etc/systemd/system/rc-local.service
Then add the following content to it.
[Unit] Description=/etc/rc.local Compatibility ConditionPathExists=/etc/rc.local [Service] Type=forking ExecStart=/etc/rc.local start TimeoutSec=0 StandardOutput=tty RemainAfterExit=yes SysVStartPriority=99 [Install] WantedBy=multi-user.target
Save and close the file. To save a file in Nano text editor, press Ctrl+O , then press Enter to confirm. To exit the file, Press Ctrl+X . Next, run the following command to make sure /etc/rc.local file is executable.
Note: Starting with 16.10, Ubuntu doesn’t ship with /etc/rc.local file anymore. You can create the file by executing this command.
printf '%s\n' '#!/bin/bash' 'exit 0' | sudo tee -a /etc/rc.local
Then add execute permission to /etc/rc.local file.
After that, enable the service on system boot:
sudo systemctl enable rc-local
Created symlink from /etc/systemd/system/multi-user.target.wants/rc-local.service to /etc/systemd/system/rc-local.service.
Now start the service and check its status:
sudo systemctl start rc-local.service sudo systemctl status rc-local.service
● rc-local.service - /etc/rc.local Compatibility Loaded: loaded (/etc/systemd/system/rc-local.service; enabled; vendor preset: enabled) Active: active (running) since Fri 2015-11-27 00:32:56 CST; 14min ago Process: 879 ExecStart=/etc/rc.local start (code=exited, status=0/SUCCESS) Main PID: 880 (watch) CGroup: /system.slice/rc-local.service Cron @reboot
If the above method does not work for you, or you just want some simple commands to be executed on system boot, then you can also use the @reboot feature in cron to automatically execute command on system boot. For example, I want my shadowsocks client to auto start, so I open the root user’s cron file:
And put the following line at the end of it.
@reboot /usr/bin/sslocal -c /etc/shadowsocks.json -d start
In some Linux distributions such as archlinux, the cron daemon is not enabled by default. So you have to manually enable it. To enable it on archlinux, enter the following command in the terminal.
sudo systemctl enable cronie
Shadowsocks is a socks5 proxy that can be used to bypass Internet firewalls, If you are interested, click the link below to learn how to setup your own shadowsocks server.
How to Use Systemd
Want to learn more about systemd to efficiently manage your system? Please read the following tutorial.
How to Use rc.local on Ubuntu
The systemd service rc-local.service always exists, and if rc.local resides and is executable, it is immediately pulled into multi-user.target. On systemd, synchronization with /etc/rc.local is provided by using a specific service called rc-local.service. While starting the Linux system, we can activate rc.local shell script functionality in systemd. Developers and Linux sysadmins have traditionally been using the shell script /etc/rc.local to call further scripts or commands once all services have been loaded. When Linux init switches to a multiuser runlevel, /etc/rc.local is usually called at the ending. However, in systemd, /etc/rc.local functionality is disabled by default. We may need to conduct a task on system startup while working on Linux systems, but maybe we do not want to go through the process of setting up sophisticated init scripts for the given task. Using /etc/rc.local in such instances may show to be beneficial and even essential. If the job consists of simply running a code or command which does not attempt to change the system’s networking or application service configuration, it should be evaluated for inclusion in /etc/rc.local. In this guide, we will cover the usage of rc.local along with how to enable it in the Ubuntu 20.04 Linux system.
Pre-requisites
Following are the requirements that need to be fulfilled before the implementation of this article.
- Ubuntu 20.04 system installation and configuration
- Sudo user rights
- Strong internet connection
Method to enable and use /etc/rc.local on Ubuntu
To enable /etc/rc.local on Ubuntu 20.04, you have to follow all the steps described in this guide. You have to open the shell in the Ubuntu 20.04 system by either checking in the “Application” or utilizing the “Ctrl+Alt+T” shortcut key.
Initially, you have to create a file, i.e., rc.local file, in your system with the help of the following displayed command.
As we have used the keyword “sudo” in our command, we have to provide the password of the sudo user for file creation. Now we have to verify the status of the rc.local file. To verify the status, run the below-displayed command on the terminal window of your Ubuntu 20.04 system
The output will be almost the same as displayed in the above screenshot, and if you want to enable /etc/rc.local, you have to execute the flowing listed command displayed in the screenshot.
The output might come up with the same as displayed above and has some sort of error. As you will see in the aforementioned screenshot, there is no [Install] part in the unit file. As a result, Systemd is unable to enable it. First, we must create a file by running the command below.
After executing the command, the created file will be opened automatically as shown in the attached image. Initially, there will be no content in the file. You have to insert the same content that is shown in the below image.
Save the file using “Ctrl+S” and quit it using the “Ctrl+X” shortcut key. To ensure that the /etc/rc.local file is executable, perform the following command on the terminal of Ubuntu 20.04.
There will be no output displayed after the execution. Beginning with Ubuntu 16.10, the /etc/rc.local file is no longer included. The following appended command can be used to create the file.
The output will be almost the same as shown in the above-attached screenshot. Now, we have to enable service by using the below-displayed command.
The output of the command will be alike to the one displayed above. Now the time has come to start the service with the help of the following listed command.
The command will start the service effectively. You can confirm the status by the execution of the following command.
The status is now highlighted in the image as “Active“.
Conclusion
In this guide, we have covered what the /etc/rc.local file is and how and when to utilize it. We have explained to you the method to enable it and use it in Ubuntu 20.04 Linux system. We hope you found this guide to be informative for your work.
About the author
Kalsoom Bibi
Hello, I am a freelance writer and usually write for Linux and other technology related content
Автозагрузка в Ubuntu
Рассмотрим два варианта автозагрузки программ или скриптов в Ubuntu. Через графический интерфейс и с использованием файла rc.local. В предыдущих версиях автозагрузка в Ubuntu работала именно через файл rc.local, однако в последних версиях её отключили. Мы включим данную возможность.
Автозагрузка через графический интерфейс
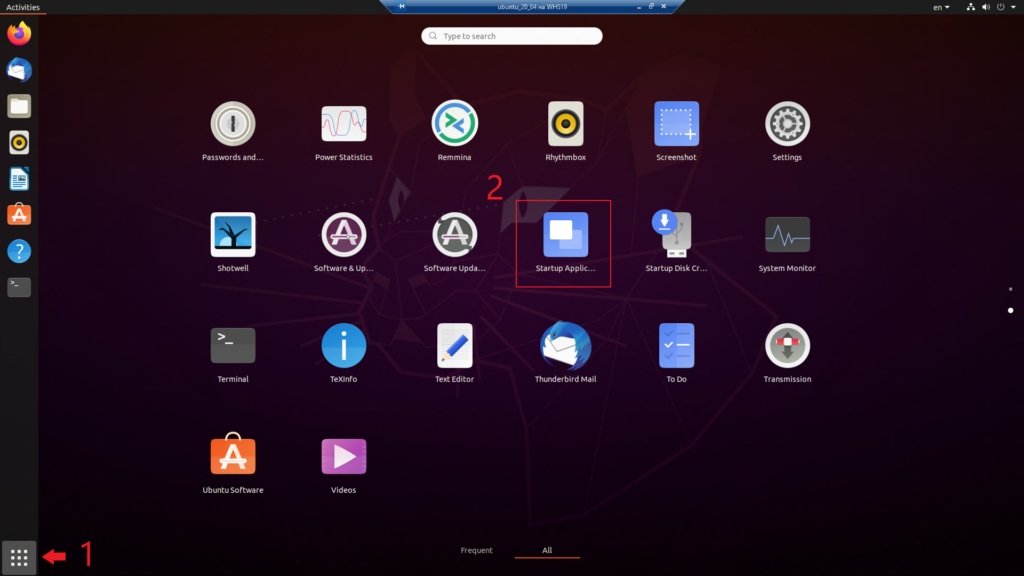
Автозагрузка через графический интерфейс настраивается в приложении Startup Application. Заходим в приложения (пункт 1) и запускаем Startup Application (пункт 2)
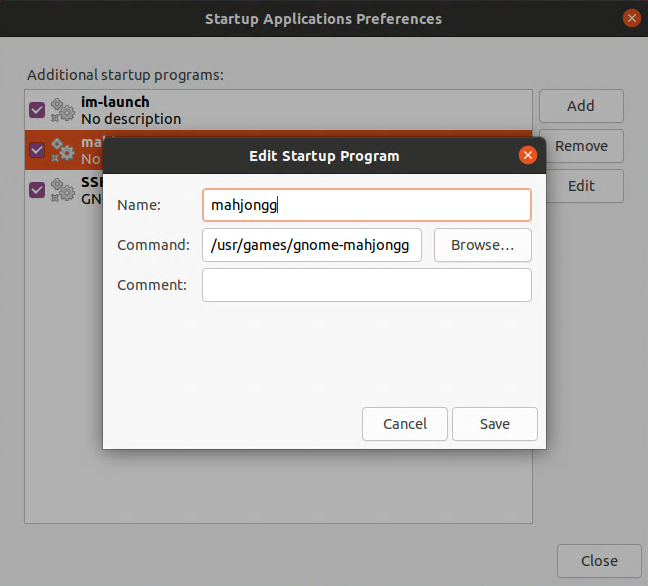
Появится окно программы, где можно добавить, удалить или изменить текущие программы запускаемые при старте системы.
Нажимаем Add для добавления программы в автозагрузку. Пишем название программы и указываем путь к ней. Для теста я добавил в автозагрузку игру mahjongg.
Нажимаем Save и перезагружаем компьютер. Игра Mahjongg должна запуститься при входе в систему.
Как включить rc.local
Добавляем в него содержимое:
#!/bin/sh -e # # rc.local # # This script is executed at the end of each multiuser runlevel. # Make sure that the script will "exit 0" on success or any other # value on error. # # In order to enable or disable this script just change the execution # bits. # # By default this script does nothing. exit 0
Включение rc.local в автозагрузку
sudo systemctl enable rc-local
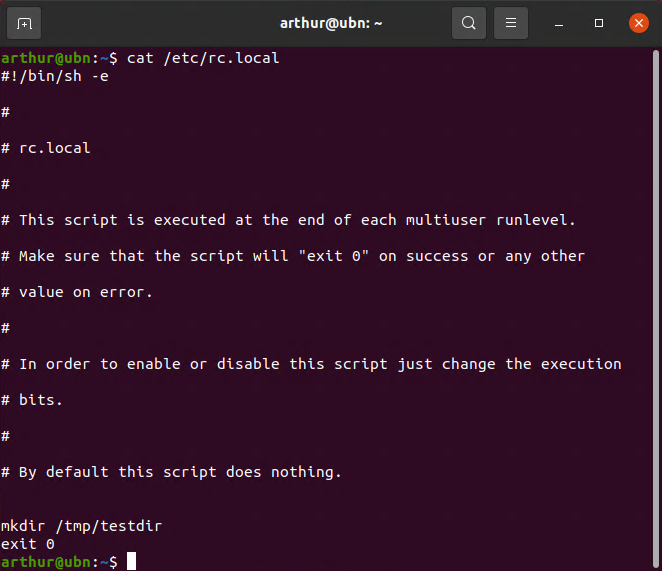
Теперь добавляем свой скрипт либо сервис до строчки exit 0 . Я для теста добавлю команду создания папки в директории tmp
Сохраняем файл и перезагружаемся. При старте системы будет создана папка testdir в /tmp/
Про автозагрузку в Ubuntu я записал видео с примерами по каждому из способов.

Конечно, с одной стороны, включение rc.local позволяет быстро настроить автозагрузку в Ubuntu, но разработчики посчитали этот инструмент устаревшим. На нашем сайте есть статья по добавлению программы или скрипта в автозагрузку с помощью systemd. Автозагрузка в Ubuntu также возможна с использованием cron, но об этом уже в другой статье.


