- Synchronizing Thunderbird Calendar and Address Book with Office365 Exchange Online using ActiveSync
- Install the plugins: TbSync and Provider for Exchange ActiveSync
- Configure TbSync to Synchronize using Provider for Exchange ActiveSync
- ActiveSync on Linux using z-push, nginx and an imap backend
- Z-Push configuration 
- nginx configuration 
- Appendix: The trouble with certificates on WP7 
- UNIXHOME.ORG.UA
- Руководство → ActiveSync под linux
Synchronizing Thunderbird Calendar and Address Book with Office365 Exchange Online using ActiveSync
Thunderbird is a nice email client available on Linux and Windows. With the Lightning plugin, Thunderbird can support calendar functions well. Exchange is a widely used email and calendar/address book service software. Office 365 provide the cloud version of Exchange named Office 365 Exchange Online. Although Exchange Online provide IMAP for synchronizing emails, it provides no methods natively supported by Thunderbird. But Thunderbird has a rick set of plugins through its plugin system to extend its functionalities and there are plugins available to support ActiveSync which is supported by Exchange Online for synchronizing Calendar and Address Books (Contacts). The plugins can extend Thunderbird to support synchronizing Calendar and Address Book (Contacts) between Thunderbird and Exchange Online. In this post, we will go through the steps to make Thunderbird synchronize with Office 365 Exchange Online.
Install the plugins: TbSync and Provider for Exchange ActiveSync
The two plugins we use here are TbSync and Provider for Exchange ActiveSync. TbSync manages cloud accounts and synchronize their contact, task and calendar information with Thunderbird and Provider for Exchange ActiveSync Add sync support for Exchange ActiveSync accounts to TbSync.
You can search and install the plugins in Thunderbird Extension management tool as follows.
Of course, if you need the Calendar functionalities in Thunderbird, you need to install Lightning too if you haven’t install it.
Configure TbSync to Synchronize using Provider for Exchange ActiveSync
After the plugins are installed, we can start to configure TbSync for synchronize with Exchange Online.
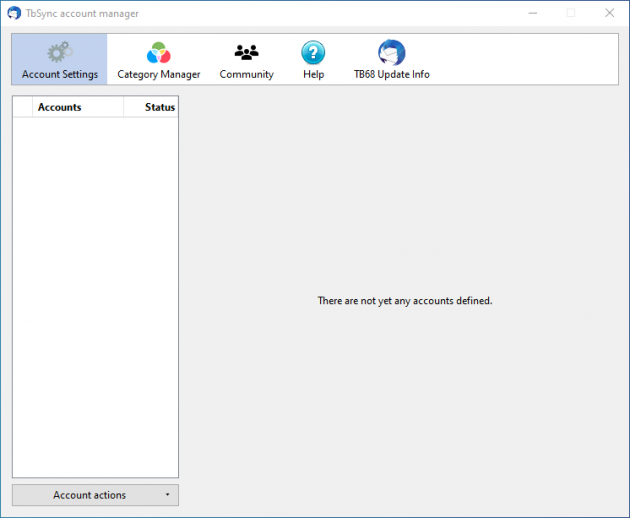
First, from the menu “Tools” -> “Add-on Preferences” -> “TbSync”, open the TbSync configuration window as follows.
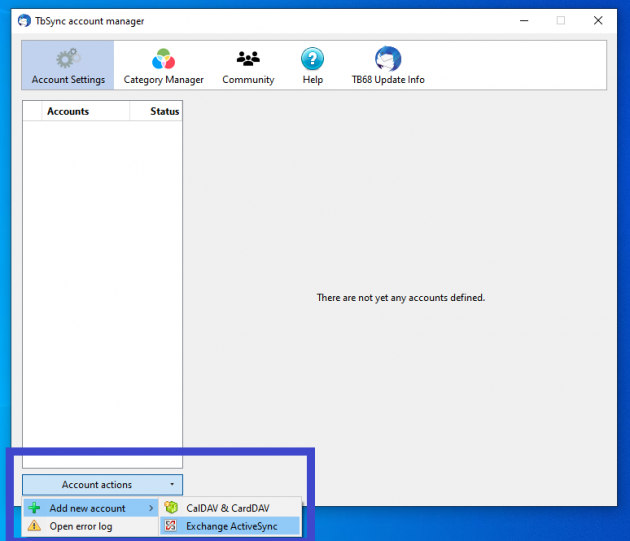
The click the “Account actions” -> “Add new account” -> “Exchange ActiveSync” as follows.
The “Adding an Exchange ActiveSync account to TbSync” dialog will show. Input the account info for your Office 365 account.
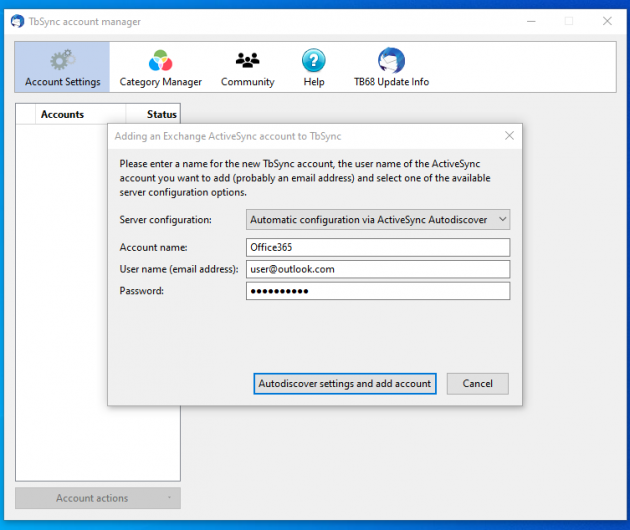
Click the “Autodiscover settings and add account” button. If everything works well, the new Exchange Online account will be added.
Last, enable the synchronization status for the account by enabling “Enable and synchronize this account” and choose the “Available resources” for the Contact/Address Book and the calendars. You may also choose to synchronize your To-do lists too.
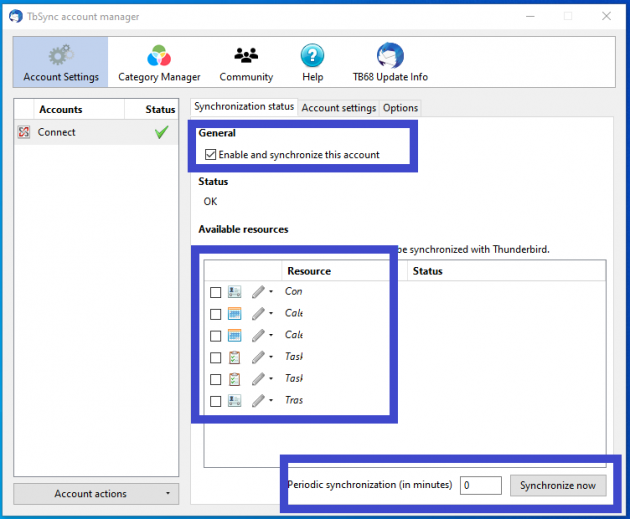
Hit the “Synchronize now” button and it will start to synchronize your calendar and contacts from the Exchange Online service. If you would like TbSync to automatically synchronize for every several minutes, input the periodic interval time in the “Periodic synchronization (in minutes)” filed.
Now your Thunderbird should be synchronizing with your Office 365 Exchange Online now. Enjoy!
ActiveSync on Linux using z-push, nginx and an imap backend
Want to extend your private IMAP server with push email functionality for your smartphone? Then Z-Push might be exactly what you need.
Z-Push is an open source ActiveSync implementation. Currently the default Z-Push packages includes four different backends.
- Zarafa (Supporting Emails, Contacts, Calendar and Task synchronization)
- Any IMAP Server (for Email synchronization only)
- maildir (Email synchronization only)
- vCard (Contact synchronization only)
Of course, it is possible to write your own backends. Some have already done that and thus created a Zimbra backend.
So how do you go about getting Z-Push installed on your server? For Debian there is a re-branded package in the repository called d-push.
Unfortunately I wasn’t able to get that working. So I went with the original z-push package available from their download page.
Although probably not advised, I tried the 2.0beta2 version. The Installation manual is also available on the same page, but following this blog post you probably won’t need it.
Z-Push configuration 
I extracted the package into /var/www/zpush/ and made sure that the www-data user has enough permissions for the folder. If the webserver is running under a different user on your machine, you’ll have to use that instead.
# cd /var/www # chown -R www-data.www-data zpush # chmod 775 zpush/state Adapt the z-push config file for your needs:
// Defines the default time zone, change e.g. to "Europe/London" if necessary define('TIMEZONE', 'Europe/Vienna'); * Default FileStateMachine settings */ define('STATE_DIR', '/var/www/zpush/state/'); * Logging settings */ define('LOGFILEDIR', '/var/log/z-push/'); define('LOGFILE', LOGFILEDIR . 'z-push.log'); define('LOGERRORFILE', LOGFILEDIR . 'z-push-error.log'); define('LOGLEVEL', LOGLEVEL_INFO); Don’t forget to create the /var/log/z-push directory and change the permissions so that the www-data user can read and write. Until you get z-push up and running you might want to change the LOGLEVEL to LOGLEVEL_DEBUG in order to get a more verbose log file.
And finally, set the BACKEND_PROVIDER:
* Backend settings */ // The data providers that we are using (see configuration below) define('BACKEND_PROVIDER', "BackendIMAP"); Depending on the backend you choose, it might be necessary to tune the backend specific settings too. In my case that wasn’t necessary for imap.
At this point z-push should be configured appropriately.
To see if everything is working so far you might invoke php in the command line:
You should see some html markup containing an access denied error message.
nginx configuration 
All that’s left is the nginx configuration which is pretty straightforward.
You can of course also use apache or lighttpd. The default manual even assumes that you’re going to use apache, so consult that for more information about how to configure apache.
server listen 443; server_name mail.example.com; ssl on; ssl_certificate /path/to/ssl.crt; ssl_certificate_key /path/to/ssl.key; root /var/www/zpush; index index.php; # not necessary, but might help #client_max_body_size 4M; #client_body_buffer_size 128k; location / try_files $uri $uri/ index.php; > location /Microsoft-Server-ActiveSync rewrite ^(.*)$ /index.php last; > location ~ .php$ include fastcgi_params; fastcgi_index index.php; fastcgi_param HTTPS on; fastcgi_param SCRIPT_FILENAME $document_root$fastcgi_script_name; # change this if necessary fastcgi_pass unix:/var/run/php-fpm.sock; > Restart nginx and try to access https://mail.example.com/Microsoft-Server-ActiveSync You should be prompted for a username and password.
At this point the server side is done. Now configure your smartphone and see if everything works. Instead of using IMAP you can now tell your smartphone to connect with an Exchange server. As Autodiscovery is not supported yet, use the advanced configuration wizard and point it to your servers hostname manually.
Appendix: The trouble with certificates on WP7 
WP7 happens to be very serious about certificates. It doesn’t trust self signed certificates and only a handful certificate authorities.
For example StartSSL isn’t trusted by default.
You can check if yours is trusted by visiting your page (the one that uses the certificate) in the Internet Explorer. If you are greeted with a warning page it isn’t trusted. If you see your page, be happy, you don’t need to continue reading this post.
In order to get WP7 to trust your certificate, you’ll need to export the whole certificate chain and install all the certificates in the chain on the phone.
- visit the https page in your browser of choice
- click the https symbol
- view certificate
- for every certificate in the Cerficiate Hierarchy view, export the certificate (choose the x.509 Certificate (DER) filetype and save the file with a .cer extension)
To get them onto your phone, setup regular IMAP on the smartphone (Luckily WP7 is more relaxed about the untrusted certificate when using IMAP) and mail yourself the certificates.
To install the certificates on the phone, all you need to do is open them and click install. Once you’ve got all of them installed, reboot the phone and see if the Exchange synchronization finally works. If not, start swearing and consult google for additional help.
UNIXHOME.ORG.UA
Руководство → ActiveSync под linux
Пошаговая настройка со сборкой из исходников уже есть, а я собрал всё это в пакеты для Gutsy за исключением пропатченного модуля ядра.
Итак для WM5 и WM6 (для WM2003 пока инструкций нет.):
Для того чтобы подключить кпк к линуксу через ActiveSync нужно.
1) Пропатчить модуль
для ядра >=2,6,21патч доступен тут
у меня ядро 2.6.22
если у вас абсолютно та же версия( узнать об этом можно по командой uname -r )
для ядра 2.6.22-14-386 пропатченный модуль доступен тут ftp://80.86.249.14/forum/synce/rndis_host.ko
для ядра 2.6.22-14-generic пропатченный модуль доступен тут ftp://80.86.249.14/forum/synce/rndis_host.ko.generic
, его нужно скопировать в /lib/modules/2.6.22-14-386/kernel/drivers/net/usb, заменив оригинальный.
И можно перейти к шагу №2
У кого отличается версия, нужно будет самому пропатчить модуль.
Для этого скачиваем пакет linux-source
sudo apt-get install linux-source
cd /usr/src sudo -s (открываем сессию рута) tar jxf linux-source-2.6.22.tar.bz2 cd /usr/src/linux-source-2.6.22/drivers/net/usb
открываем файл в любом редакторе от имени рута.
Находим строчки
dev->rx_urb_size = dev->hard_mtu + (dev->maxpacket + 1); dev->rx_urb_size &= ~(dev->maxpacket - 1);
их комментируем и вставляем новую
dev->rx_urb_size = (dev->udev->speed == USB_SPEED_FULL) ? 16384 : 8192;
//dev->rx_urb_size = dev->hard_mtu + (dev->maxpacket + 1); //dev->rx_urb_size &= ~(dev->maxpacket - 1); dev->rx_urb_size = (dev->udev->speed == USB_SPEED_FULL) ? 16384 : 8192;
ну а теперь нужно скомпилить новый модуль,
для этого скопируем конфиг от текущего установенного ядра
cd /usr/src/linux-source-2.6.22/ cp /boot/config-`uname -r` ./.config
теперь компиляция это на долго
так мы скомпилим только модули
установим только что скомпилированный модуль
cp /usr/src/linux-source-2.6.22/drivers/net/usb/rndis_host.ko /lib/modules/2.6.22-14-386/kernel/drivers/net/usb
2) Ну а теперь самое простое
Подключаем, если не подключен, мой репозиторий установкой пакета для Gutsy ftp://80.86.249.14/UBUNTU/pool/extra/k/konstantinov-denis-keyring/konstantinov-denis-keyring_2007.11.05_all.deb
затем устанавливаем пакеты librapi2-tools и odccm. odccm — это демон, который создаёт и поддерживает activesync соединение. Я добавил политику чтобы этот демон автоматически стартовал как только подключают кпк. А если кпк отключить, то демон прибъётся, так что полный plug-n-play. Одно ограничение: нельзя одновременно подключать два кпк (сам демон это не поддерживает пока).
Для того чтобы получить доступ к файловой системе кпк, нужно установить пакет libsyncevfs — это vfs плагин для наутилуса.
После его установки и подключении кпк через usb, набрав в наутилусе synce:/// вы попадёте на кпк.
Проверял работу с Mio A701, E-ten M700 и Asus P535 всё работает.
На mio и asus’e можно включать режим картридера, в этом режиме activesync не работает будьте внимательны.
Я сделал кнопку на панеле с такой командой nautilus synce:///
Примечание, впакете librapi2-tools команды имеют префикс synce-* например synce-pls это связано с конфликтом команд из пакета pimppa тут доступен плагин который показывает статус подключения кпк но больше он ни на что не годится