- How to install ExpressVPN on Ubuntu 22.04 or 20.04 LTS
- 1. Download ExpressVPN for Linux
- 2. Install ExpressVPN on Ubuntu 22.04 / 20.04
- Way to use GUI for the Installation
- Use the Command terminal to install ExpressVPN
- 3. Run the ExpressVPN command line on Ubuntu
- 4. Disconnect and Connect the VPN server
- 5. Update
- 6. Uninstallation
- Leave a Comment Cancel reply
- How To Install And Use ExpressVPN For Ubuntu 2023?
- Does ExpressVPN Work For Ubuntu In 2023?
- Why Use ExpressVPN On Ubuntu?
- How To Download ExpressVPN For Ubuntu?
- How to manually configure OpenVPN on Linux
- Jump to…
- 1. Find your ExpressVPN account credentials
- 2. Install and connect to the VPN
- Disconnect from a VPN server location
How to install ExpressVPN on Ubuntu 22.04 or 20.04 LTS
To access the internet safely and visit websites that are not allowed by your webmaster, VPN software comes in handy. It works by encrypting internet traffic and routing it through remote servers. There are dozens of VPN services available on the Internet some are free and others paid. Ofcourse the paid one will have fast servers. Out of a number of paid VPNs, ExpressVPN is one of the popular ones that is available for Linux systems as well as for Windows, macOS, browsers, smartphones, routers, and other devices.
This virtual private network (VPN) service provider offers users access to servers in more than 90 countries. It also provides features like a no-logging policy, split-tunneling, and a kill switch to protect against internet disruptions.
Steps to install ExpressVPN on Ubuntu / Debian / Linux Mint:
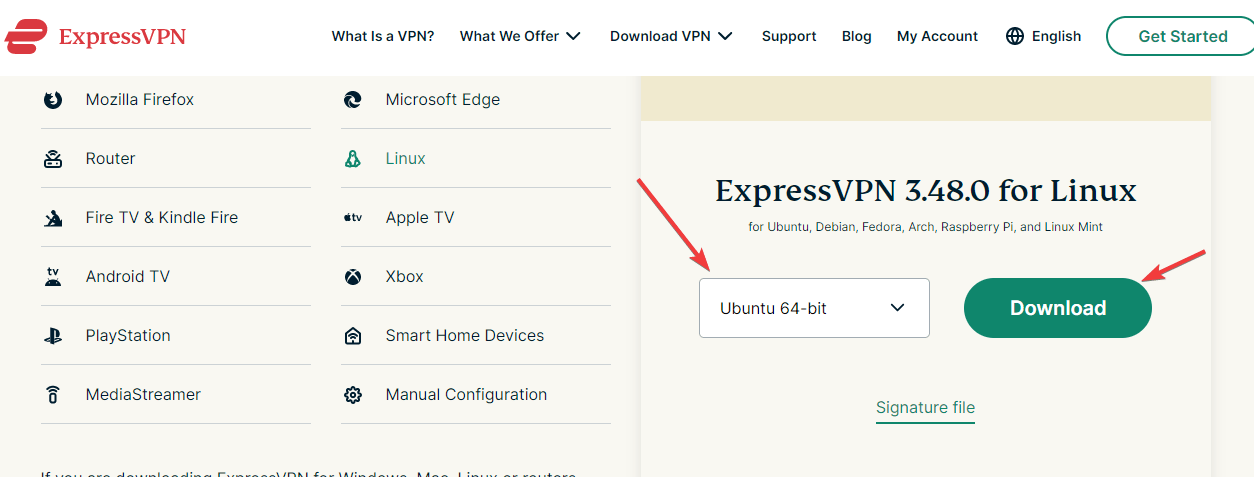
1. Download ExpressVPN for Linux
ExpressVPN is a paid software therefore not available through the Ubuntu System repository. So, we have to download the Debian package of ExpressVPN available to install on Linux systems. Here is the website download page, visit it, select Ubuntu 64-bit, and hit the Download button.
2. Install ExpressVPN on Ubuntu 22.04 / 20.04
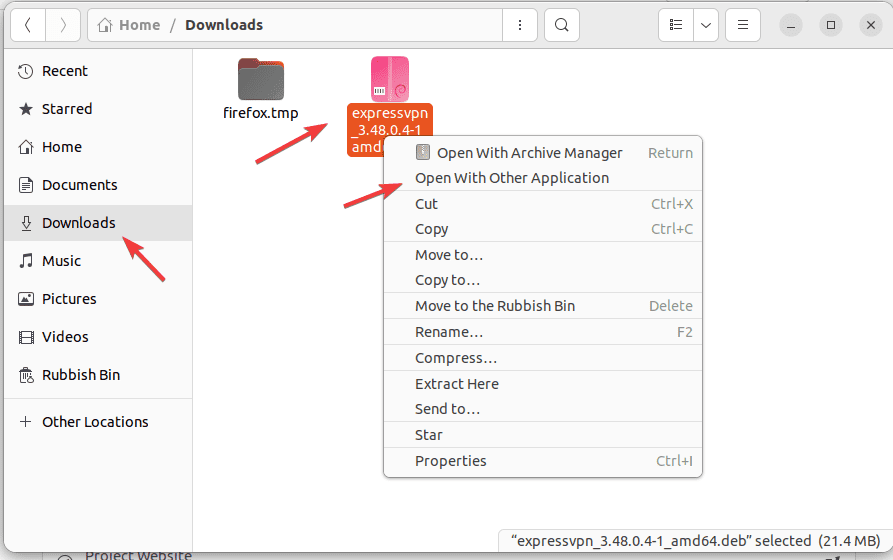
Once, using the previous step you have the ExpressVPN Debian installer on your system; open the Downloads directory because the files got from the browser go into that.
Way to use GUI for the Installation
- Open the File Manager and select the Downloads folder from the left side panel.
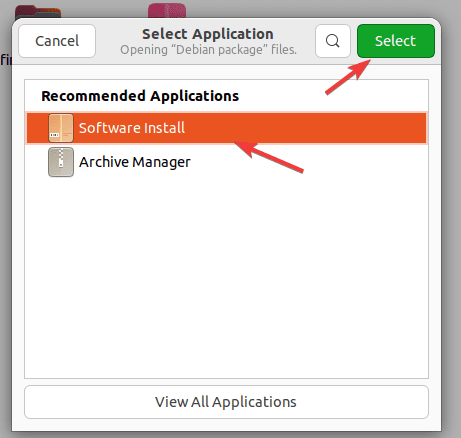
- After that, right-click on ExpressVPN.xxx.deb file and select “Open with other Applications“.
- Select “Software Install” of Ubuntu.
- Soon, the installer will open, here click the “Install” button and ExpressVPN will be installed on Ubuntu.

Use the Command terminal to install ExpressVPN
Those who want to use the Command terminal on their Ubuntu Linux, first open it using the Ctrl+Alt+T. After that switch to the downloads directory using the given command:
Check whether the downloaded ExpressVPN file is present there or not.
After, that, you can use the given command to install it.
sudo dpkg -i expressvpn_*_amd64.deb3. Run the ExpressVPN command line on Ubuntu
Finally, we have completed the installation of ExpressVPN on our respective Ubuntu versions, now run it and enter the registered license you have purchased for it.
As we know it is a command line tool for Linux, so to activate the license open your command terminal and use the following given syntax.
Paste the license key and hit the Enter key.
4. Disconnect and Connect the VPN server
To connect the remote VPN server and make your system shielded to browse the internet, you just need to run the given command in the terminal. The software will automatically choose the appropriate server to connect to:
Whereas, those who want to connect to some particular location server, can first list what are the available ones.
After that, use the listed location in the command to connect, for example:
expressvpn connect "USA - New York"Now, open your browser and start browsing the internet safely. And when your work is done, to disconnect from the VPN server, in your command terminal run:
5. Update
To install future updates for ExpressVPN, the users need to download its latest version from the official website to install again as we have shown in this tutorial.
6. Uninstallation
In case things are not going well with the software then no need to continue with it. Go to your Command terminal and run the given single command to completely uninstall EpressVPN from your Ubuntu 22.04/20.04 system.
sudo apt remove expressvpn --purge
Other Articles:
Leave a Comment Cancel reply
This site uses Akismet to reduce spam. Learn how your comment data is processed.
How To Install And Use ExpressVPN For Ubuntu 2023?

If you want to use ExpressVPN on Ubuntu but have no clue how to install and use ExpressVPN for Ubuntu then don’t worry we got your back. In this article, we will cover all the information you need to setup ExpressVPN Ubuntu.
Ubuntu is an open-source operating system on Linux and sometimes installing new software on Ubuntu can be a headache. But wait, this is definitely not the case with ExpressVPN as ExpressVPN supports 64-bit and 32-bit versions of Ubuntu. So, we will guide you on how to use Express VPN Ubuntu to protect your privacy.

Does ExpressVPN Work For Ubuntu In 2023?
Yes, ExpressVPN does Support Ubuntu. ExpressVPN is compatible with 32 Bit and 64 Bit versions of ubuntu. So you can easily download ExpressVPN for Ubuntu to protect your private data and access geo-restricted sites.
Why Use ExpressVPN On Ubuntu?
Using ExpressVPN Ubuntu provides you with more security and a better browsing experience. Installing Express VPN ubuntu 20.04 can help you protect your privacy and access the internet more securely. Not only that you can also use ExpressVPN to unblock geo-restricted sites. ExpressVPN is also an excellent choice if you planning to use VPN for Torrenting.
How To Download ExpressVPN For Ubuntu?
Here are the simple steps to setup ExpressVPN on Ubuntu in 2023. Follow these steps to get started with ExpressVPN ubuntu.

- Click on the “Get ExpressVPN for Ubuntu” button below
- You will be redirected to the official ExpressVPN site
- Choose a preferred plan ( Use ExpressVPN coupon code to get an extra discount)
- Complete the payment
you will receive an id and password on your registered email. Once you subscribed to an ExpressVPN plan the next step is to set setup ExpressVPN so that you can use it on Ubuntu. Use Clay and Buck ExpressVPN offers to access Ubuntu at the lowest cost and enjoy Ubuntu without any hassle.
How to manually configure OpenVPN on Linux

This guide will show you how to manually set up ExpressVPN on Linux using the OpenVPN protocol with ExpressVPN’s configuration files.
Not all ExpressVPN locations may be available for manually configured connections. To use the full list of VPN locations, use the app setup.
Important: The OpenVPN manual configuration does not offer the same security and privacy benefits as the ExpressVPN app. If you are located in a country with a high level of internet censorship, you are recommended to use the ExpressVPN app for a more stable VPN connection. Important: While running OpenVPN 2.6, you may encounter a warning saying “–keysize is DEPRECATED”. This is due to ExpressVPN having the keysize option in the .ovpn file. This warning message will not affect VPN functionality as OpenVPN 2.6 will simply ignore the line with no further consequence.If you want to remove this warning, open the .ovpn file with a text editor and either:
- delete the line containing keysize
or - add # in front of the keysize (#keysize 256).
Alternatively, you can ignore the warning without any negative effects.
Prefer app setup? See the instructions for setting up the ExpressVPN app for Linux.
Jump to…
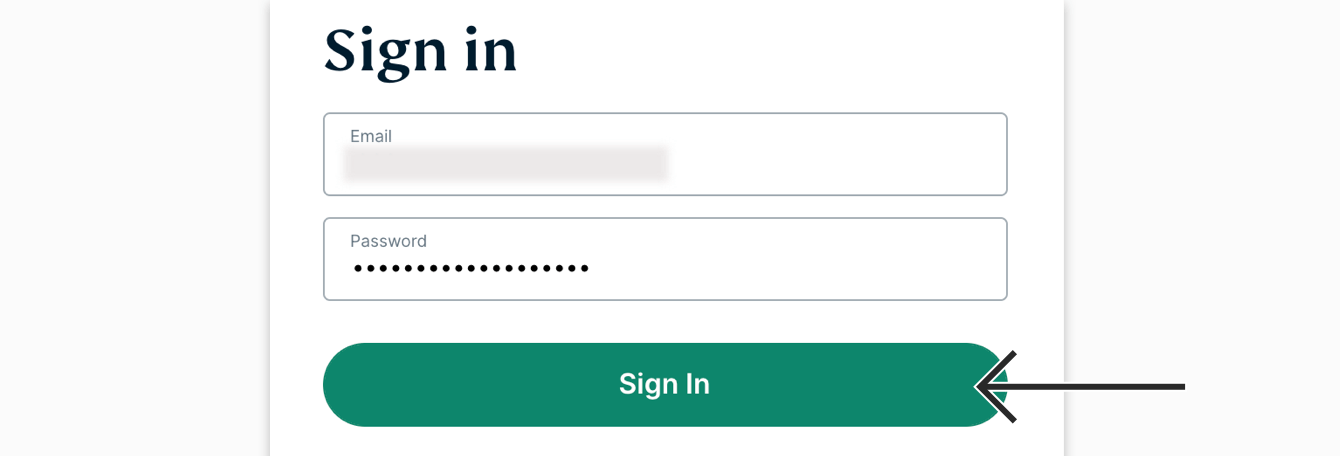
1. Find your ExpressVPN account credentials
Go to the ExpressVPN setup page. If prompted, enter your ExpressVPN credentials and click Sign In.
Enter the verification code that is sent to your email.
On the right, with OpenVPN already selected for you, you will see your username, password, and a list of OpenVPN configuration files.
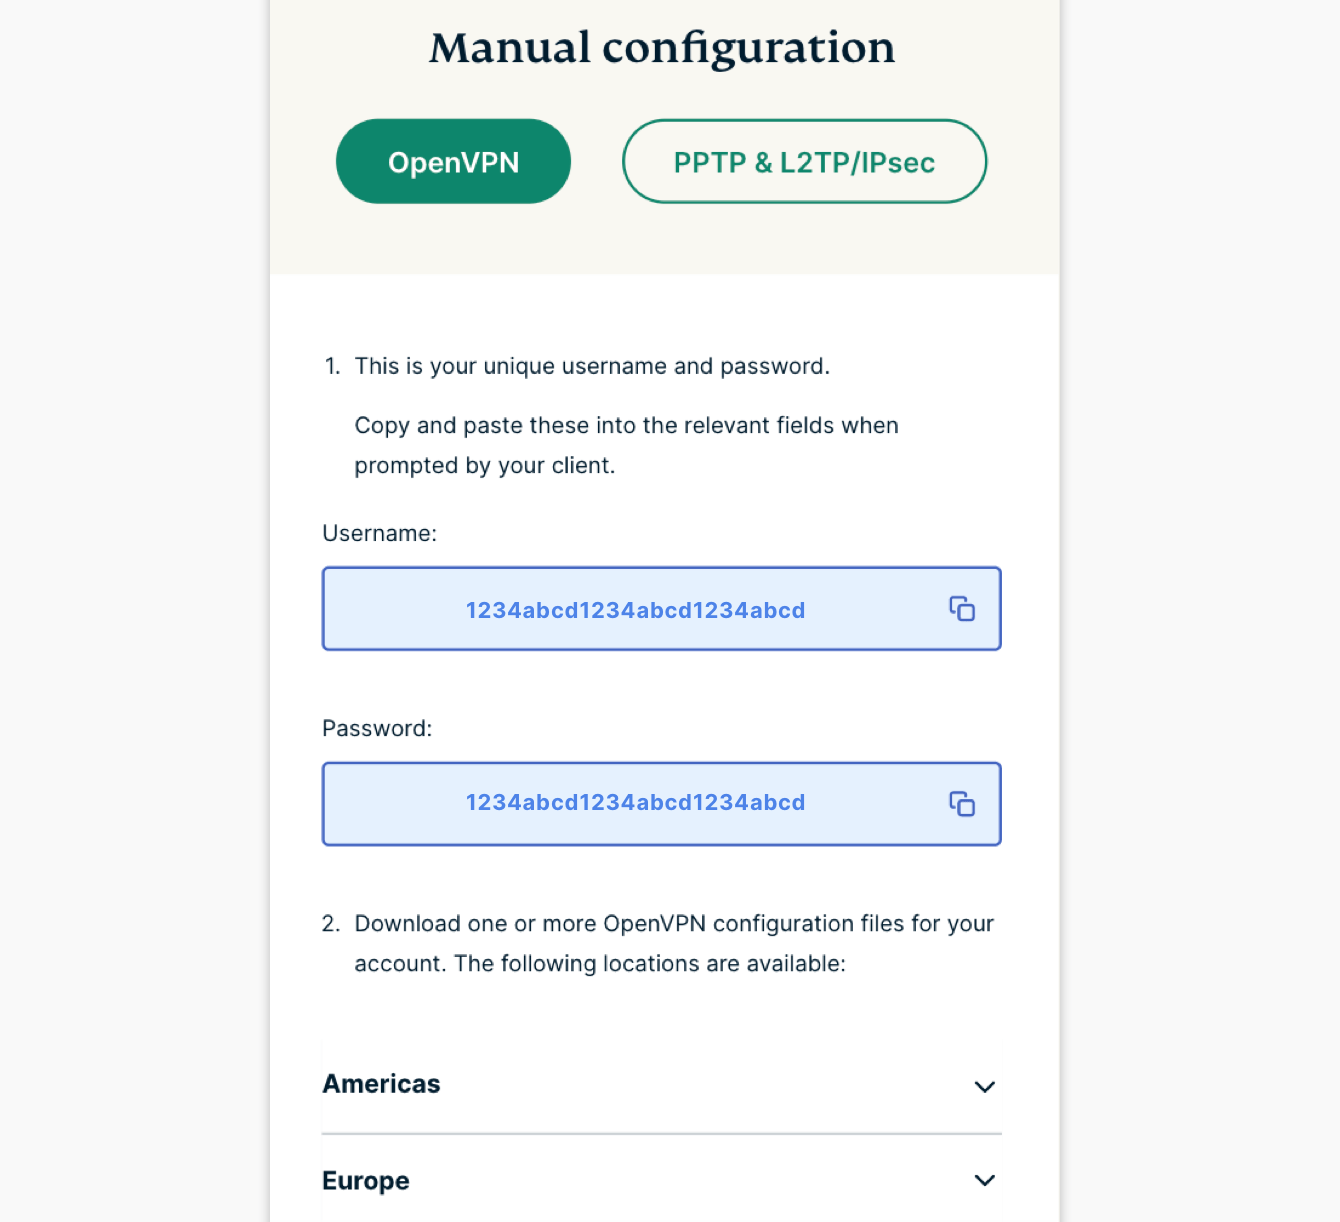
Click the location(s) you want in order to download the .ovpn file(s).
Keep this browser window open. You will need this information for the setup later.
2. Install and connect to the VPN
Refer to the corresponding section for your Linux distro below.
Note: The following steps were tested on Ubuntu 20.04 LTS (Focal Fossa).
To install the packages, enter the following in the Terminal window:
$ sudo apt install openvpn openvpn-systemd-resolved
Enter your password. Then, enter Y to continue.

To launch OpenVPN, enter the following:
$ sudo openvpn —config /[path to file]/my_expressvpn_[server location].ovpn —script-security 2 —up /etc/openvpn/update-systemd-resolved —down /etc/openvpn/update-systemd-resolved —dhcp-option ‘DOMAIN-ROUTE .’ —down-pre
Note: Replace [path to file] with the path to where the ExpressVPN configuration file was downloaded, and [server location] with the location shown in the file name.
Enter the username and password you found earlier.
After you are connected to ExpressVPN successfully, you will see the words “Initialization Sequence Completed.”

To keep the VPN connection active, keep the Terminal window running in the background.
Note: The following steps were tested on Debian 10 (Buster).
To install the packages, enter the following in the Terminal window:
$ sudo apt install openvpn resolvconf
Enter your password. Then, enter Y to continue.

To launch OpenVPN, enter the following:
$ sudo openvpn —config /[path to file]/my_expressvpn_[server location].ovpn —script-security 2 —up /etc/openvpn/update-resolv-conf —down /etc/openvpn/update-resolv-conf
Note: Replace [path to file] with the path to where the ExpressVPN configuration file was downloaded, and [server location] with the location shown in the file name.
Enter the username and password you found earlier.
After you are connected to ExpressVPN successfully, you will see the words “Initialization Sequence Completed.”

To keep the VPN connection active, keep the Terminal window running in the background.
Note: The following steps were tested on Fedora 38. These steps should also work for CentOS.
To install the packages, enter the following in the Terminal window:
To configure DNS, enter the following:
$ sudo cp /usr/share/doc/openvpn/contrib/pull-resolv-conf/client. /etc/openvpn/
$ sudo chmod +x /etc/openvpn/client.
$ sudo sed -i -e ‘s|\bresolvconf\b|ignore-&|’ /etc/openvpn/client.
To launch OpenVPN, enter the following:
$ sudo openvpn —config /[path to file]/my_expressvpn_[server location].ovpn —script-security 2 —up /etc/openvpn/client.up —down /etc/openvpn/client.down
Note: Replace [path to file] with the path to where the ExpressVPN configuration file was downloaded, and [server location] with the location shown in the file name.
Enter the username and password you found earlier.
After you are connected to ExpressVPN successfully, you will see the words “Initialization Sequence Completed.”
To keep the VPN connection active, keep the Terminal window running in the background.
Disconnect from a VPN server location
To disconnect, enter Ctrl + C in the Terminal window.