- 9 Ways To Boost Wifi Signal On Iphone And Ipad 2023
- 1. Restart your router and iPhone#
- 2. Ensure no or minimal blockage between router and iPhone#
- 3. Forget and rejoin WiFi#
- 4. Remove thick iPhone case#
- 5. Update your iPhone#
- 6. Reset All Settings#
- 7. Use custom DNS#
- 8. Contact your internet service provider#
- 9. Invest in a better router#
- Как ускорить Wi-Fi на iPhone
- Как ускорить Wi-Fi на iPhone. Способ 1
- Как ускорить Wi-Fi на iPhone. Способ 2
- Как ускорить Wi-Fi на iPhone. Способ 3
- How to set your iPhone, iPad, and Mac to prefer a faster Wi-Fi network over the slower ones
- Multiple known Wi-Fi networks (or 5 GHz and 2.4 GHz wireless bands)
- Auto-join a better Wi-Fi network over another
- iPhone and iPad
- Apple Watch
- Mac
- Wi-Fi auto-join preferences
9 Ways To Boost Wifi Signal On Iphone And Ipad 2023
We’ve put this guide featuring nine solutions and recommendations together to help you increase your WiFi speed for a better browsing experience. Take a look.
1. Restart your router and iPhone#
People often overlook restarting and jump to other fixes. Restarting your router is a common way to fix the problem quickly without much effort. So, let’s start short and simple. To restart your WiFi router, you can use the physical ‘Reset’ button on it. Alternatively, you could also power it off and on using the switch on the wall outlet (or by unplugging and plugging it back in). In the meantime, restart your iPhone as well. Note: Visit your router’s brand website or contact their customer support and see if there’s a firmware update for it.
2. Ensure no or minimal blockage between router and iPhone#
Distance and barricades significantly degrade WiFi signal strength and its ability to provide a consistent user experience. If you continuously face weak signals, consider moving closer to the router. Similarly, if there are multiple thick walls between your router and your devices, try relocating your router. Instead of having the router in one corner of the house, see if you can set it up somewhere in the middle so that the signals adequately reach every side of the house.
3. Forget and rejoin WiFi#
Before you proceed with this, make sure you know your WiFi password. If you don’t know it and can’t figure it out, skip this solution and move on to the next.
4. Remove thick iPhone case#
If you use a thick case or something similar, consider removing it in favor of a lighter option. A hefty outer protection layer may cause a bit of interference between the iPhone’s WiFi antenna and the signal. So, for best results, choose a lighter iPhone case.
5. Update your iPhone#
Besides introducing new changes, iOS updates eliminate bugs and improve the overall usability of the device. To fix issues with WiFi connectivity, give downloading and installing any pending software updates a go.
6. Reset All Settings#
This will revert all custom settings like saved WiFi networks and Bluetooth devices, VPN configurations, Home screen layout, etc. to the default state. However, personal stuff like apps, music, pictures, videos will stay unaffected. After the reset completes, open Settings → WiFi, and connect to the desired network by entering its password.
7. Use custom DNS#
Sometimes, switching to a custom DNS might help improve the WiFi signal on your iPhone. We have a separate step-by-step guide that shows you how to change the DNS on your iPhone. Look it over and see if it can’t help you out. If this solution doesn’t bring any luck, the same linked article will show you how to revert to the default DNS configuration. Note: If you’re using a VPN, please turn it off. You might immediately experience comparatively faster speeds.
8. Contact your internet service provider#
If you see extreme throttling in WiFi speed, contact your ISP and ensure there’s no pending bill or server outage. Upon payment default, some companies significantly reduce the bandwidth rather than cutting service off entirely. Once you clear any charges, your service will be restored to normal speed. Additionally, it’s also possible that there’s a temporary service outage in your area. Contacting the internet provider and explaining to them about low speeds might help.
9. Invest in a better router#
Finally, it may also be a good idea to invest in a high-end router with a better range and feature set. Try doing some research on the web to find the router best suited for your house. You could also visit a few local shops and ask their opinion on the best router for your situation. If you have floorspace to spare, you should learn more about mesh networks. A few more things you can do to improve connectivity is to change the WiFi channel or look into iPhone WiFi boosters. Signing Off… Were you successful in learning how to boost the WiFi signal on your iPhone? We hope you were. Let us know which solution worked for you in the comments. If you have any other Apple-related questions, we’re happy to hear those, too! READ NEXT:
How to Turn ON WiFi Assist on iPhone and iPad iPhone Connected to WiFi But No Internet? Here’s How to Fix it How to change WiFi network in Control Center on iPhone 


Как ускорить Wi-Fi на iPhone

Ваш домашний Wi-Fi стал работать медленнее? Или же вы хотите узнать о том, как ускорить общественные беспроводные подключения? В этой инструкции мы ответили на оба этих вопроса, рассказав о трех способах ускорения Wi-Fi на iPhone и iPad.
Как ускорить Wi-Fi на iPhone. Способ 1
Один из самых действенных способов ускорения Wi-Fi на iPhone и iPad заключается в использовании альтернативного DNS-сервера.
Шаг 1. Перейдите в меню «Настройки» → Wi-Fi.
Шаг 2. Нажмите «i» напротив активного подключения Wi-Fi.

Шаг 3. В графе DNS введите один из быстрых DNS-серверов:
Шаг 4. Выйдите из настроек подключения Wi-Fi и оцените скорость работы интернета.

Как ускорить Wi-Fi на iPhone. Способ 2
В многоквартирных домах работают сотни одинаково настроенных сетей Wi-Fi. Все они вещают на одном и том же канале, который, разумеется, сильно перегружается. Смена канала в настройках роутера с установленного по умолчанию на любой другой может значительно увеличить скорость вашего беспроводного подключения.

Обращаем внимание на то, что у различных моделей роутеров меню настроек отличаются друг от друга. Однако в большинстве случаев возможность смены канала Wi-Fi доступна в расширенных настройках подключения.
Как ускорить Wi-Fi на iPhone. Способ 3
И об общественных беспроводных сетях. Благодаря функции «Помощь Wi-Fi» подключение к интернету на вашем iPhone и iPad не будет нарушаться даже при слабом сигнале Wi-Fi. Если при работе в Сети, например, в браузере Safari, уровень сигнала Wi-Fi ухудшится до такой степени, что загрузка страницы окажется невозможной, «Помощь Wi-Fi» тут же, в полностью автоматическом режиме, начнет передачу данных по сотовой сети. Таким образом, настоящего обрыва соединения с интернетом не случится.
Активируется функция «Помощь Wi-Fi» в меню «Настройки» → «Сотовая связь». Переключатель «Помощь Wi-Fi» расположен в самом низу страницы. Функция поддерживается на всех мобильных устройствах Apple под управлением iOS 9 и более новых версий, кроме iPhone 4s, iPad 2, iPad 3 и iPad mini.

Важно отметить, что большого расхода трафика мобильного подключения из-за использования функции «Помощь Wi-Fi» произойти не может. «Помощь Wi-Fi» не запускается при фоновой загрузке содержимого и не поддерживает особенно «прожорливые» приложения, например, программы для передачи аудио и видео.
- Как отключить рекламу в играх на iPhone и iPad
- Как снимать видео на iPhone с выключенным экраном
- Все о совместном использовании iPhone и iPad
How to set your iPhone, iPad, and Mac to prefer a faster Wi-Fi network over the slower ones
Is your iPhone, iPad, or Mac constantly connecting to a known Wi-Fi network that you don’t want it to connect to? Sure, you can easily forget that network and put an end to this. But what if you wish your device to remember the Wi-Fi network (so you don’t have to enter its password again) but just doesn’t automatically connect to it?
In this tutorial, we will learn how to set your iPhone, iPad, Apple Watch, or Mac to prefer one Wi-Fi network (the faster, better one) over another (the slower one).
Multiple known Wi-Fi networks (or 5 GHz and 2.4 GHz wireless bands)
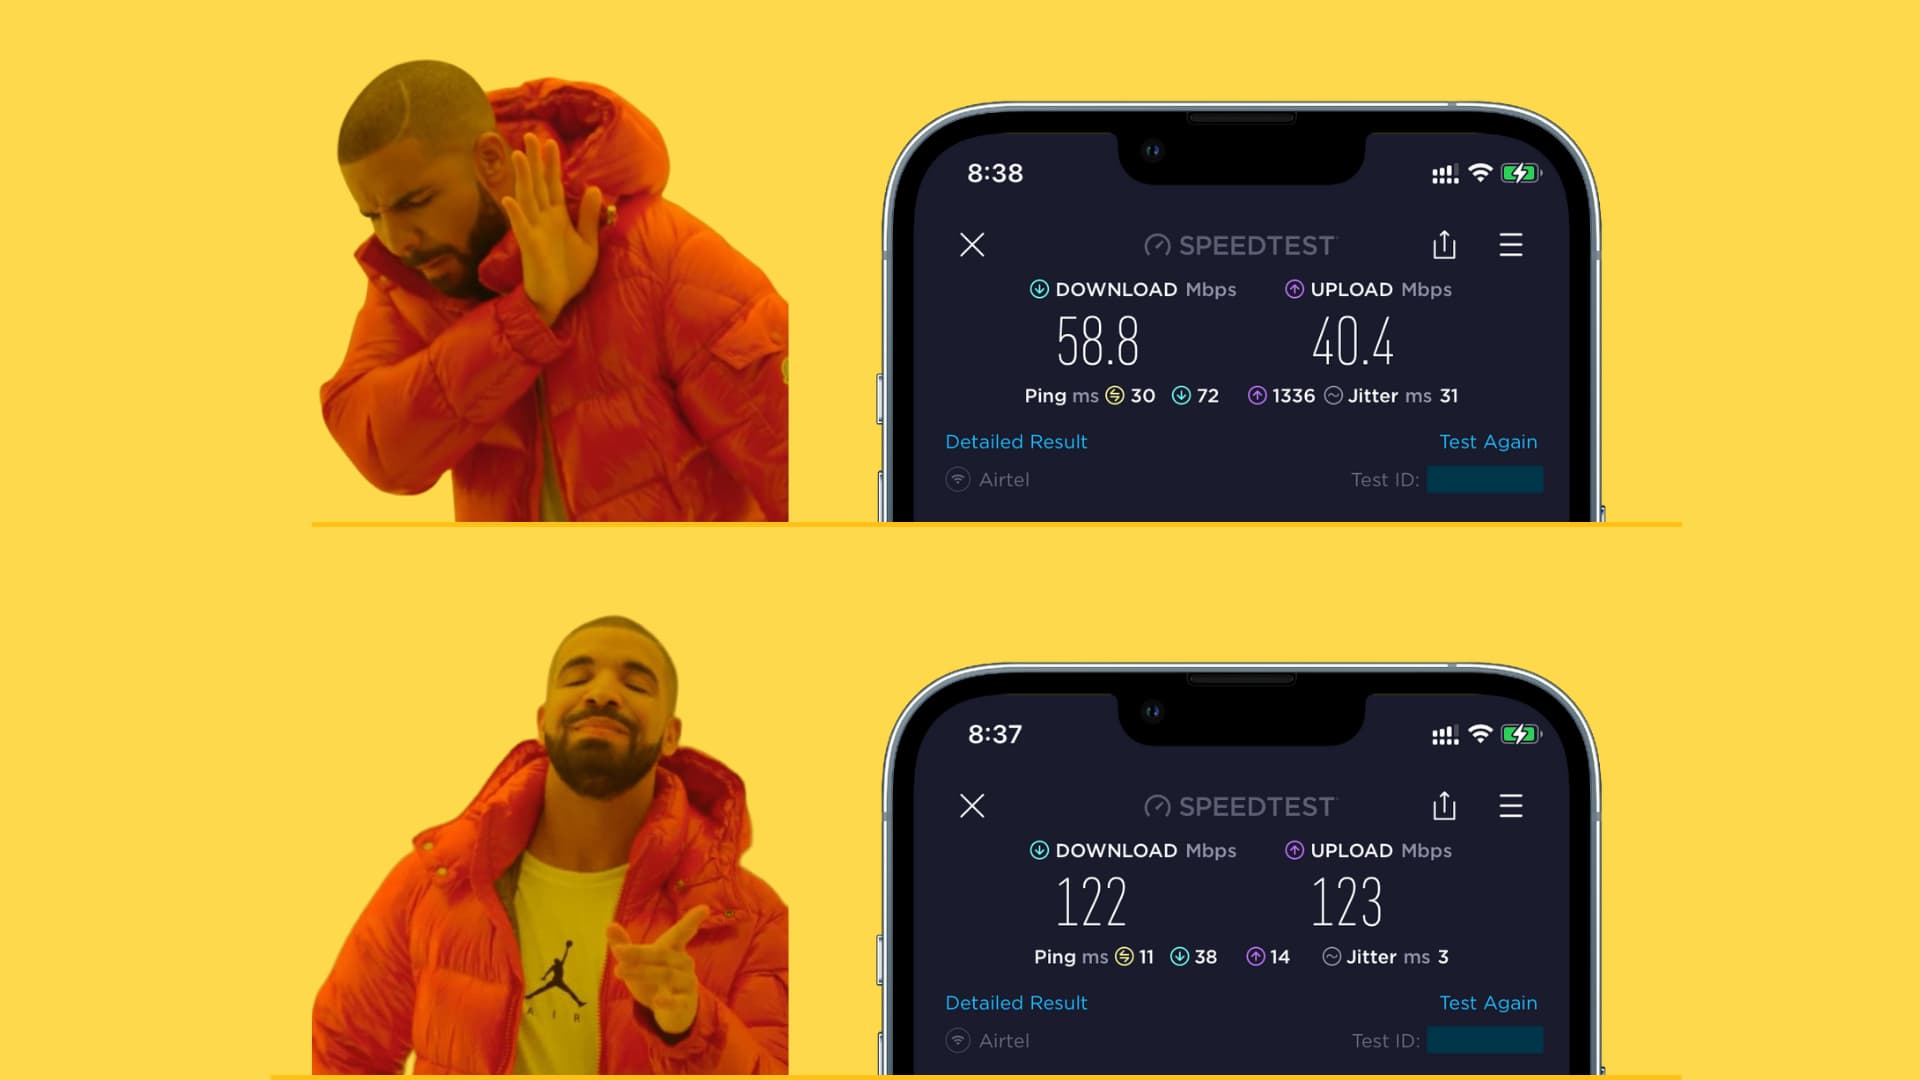
Recently, I got a new internet connection and a dual-band router that offers both 2.4 GHz and 5 GHz Wi-Fi. As a result, when I go to my iPhone or Mac’s Wi-Fi settings, I see two Wi-Fi networks – Ankur T (2.4 GHz) and Ankur T_5G (5 GHz).
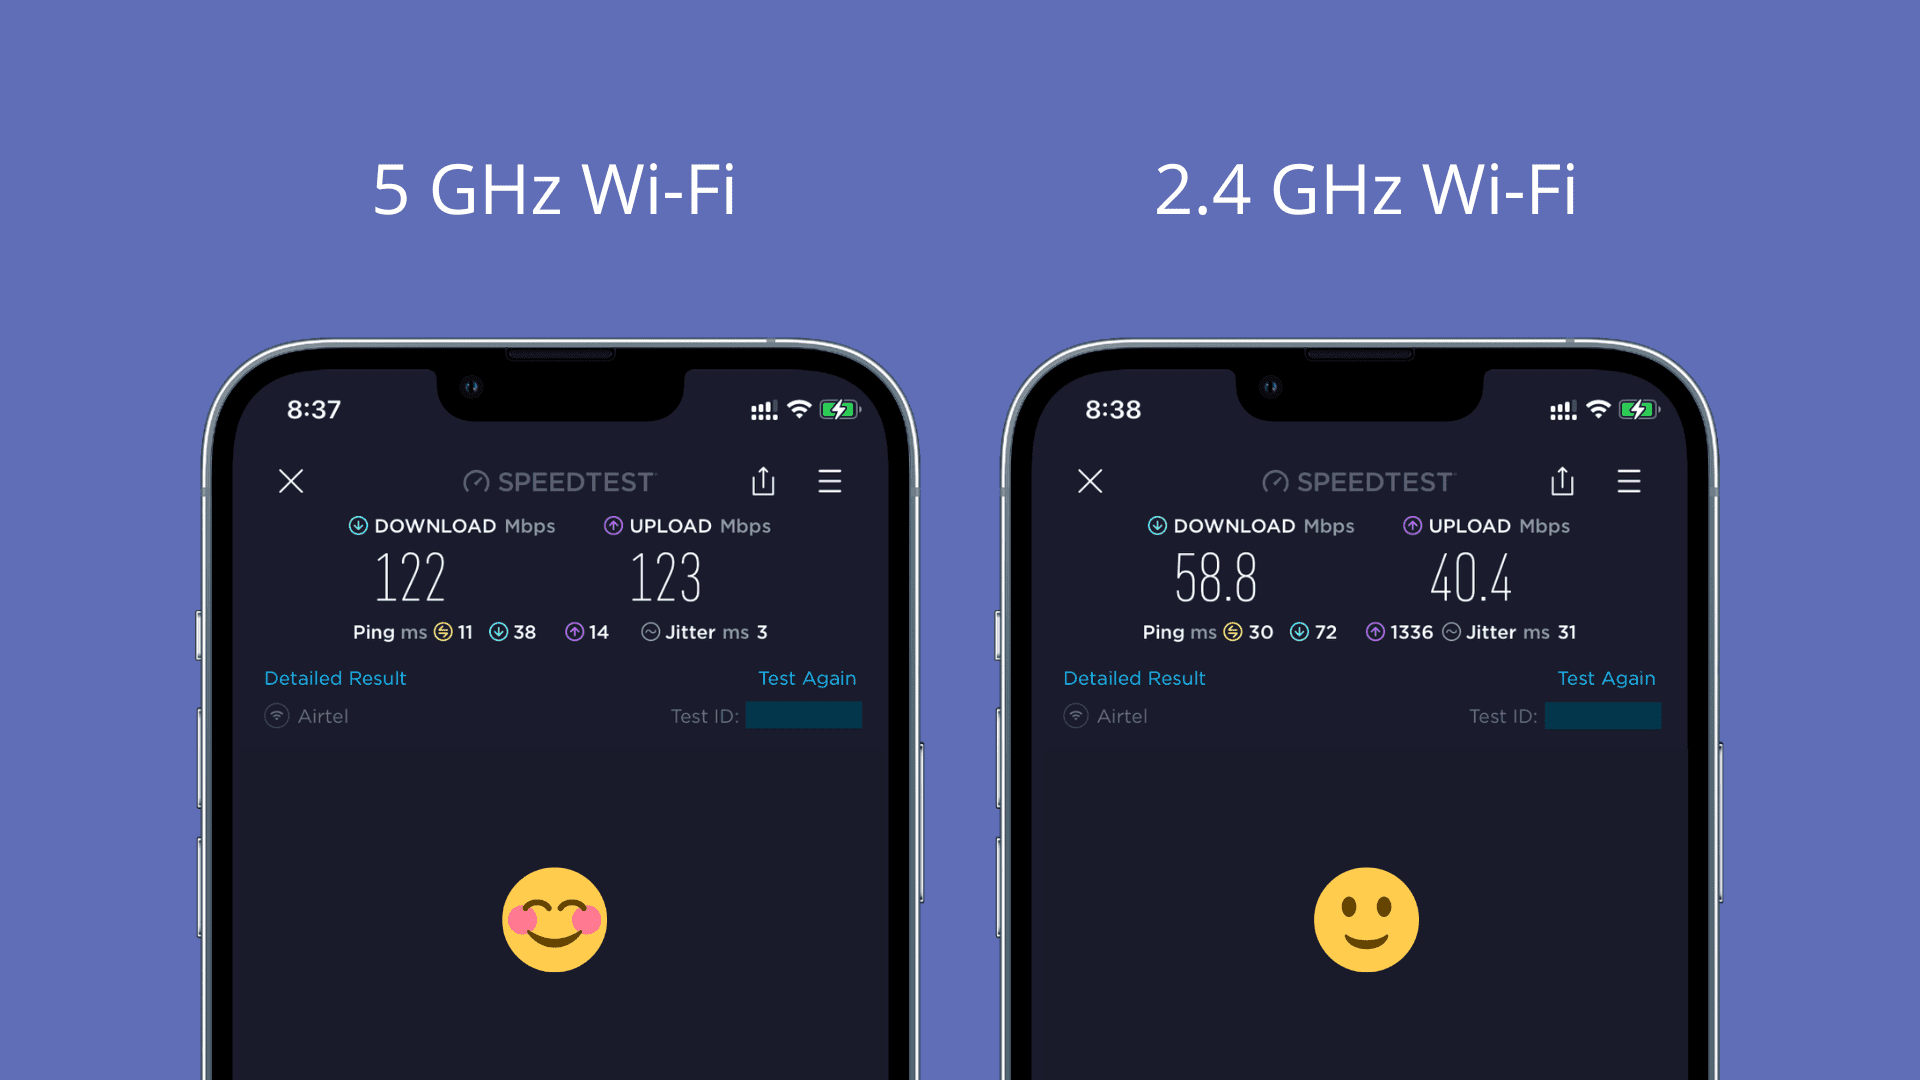
2.4 GHz Wi-Fi uses longer waves which offers an extended range and better transmission. Thus it will efficiently work even if there are multiple walls and obstructions between the device and the router. However, this band offers slower speeds. Plus, almost all Wi-Fi devices, like smart accessories, appliances, garage doors, etc., support this band, due to which it’s congested and can drop connections.
5 GHz Wi-Fi uses shorter waves that have difficulty transmitting through walls, etc., and offers a smaller range. But, as far as speeds go, it’s far superior to the 2.4 GHz Wi-Fi. Plus, not all devices support the 5 GHz band, so it’s less congested and doesn’t drop connections.
In my home, the download and upload speeds offered by the 5 GHz Wi-Fi are at least two times faster than the 2.4 GHz one (image below). Plus, since it’s a small apartment, I don’t have to worry about range and thus want my iPhone and Mac to always connect only to the 5 GHz band and ignore the other.
Earlier, whenever I would come home from outside, the router restarted due to a power outage, or I restarted my devices, they would prefer the 2.4 GHz Wi-Fi and automatically connect to it. The experience was kind of annoying to manually switch to the 5 GHz Wi-Fi every time.
Similarly, in my previous office, there were five Wi-Fi networks. My Mac would always auto-join the slowest one, and I would have to manually connect to the better network every morning. Small inconvenience, but no one likes doing this daily!
Thankfully, the steps below solved this issue forever!
Auto-join a better Wi-Fi network over another
iPhone and iPad
Follow these steps to set your iPhone to prefer a better Wi-Fi network and automatically connect to it rather than connecting to a slower network:
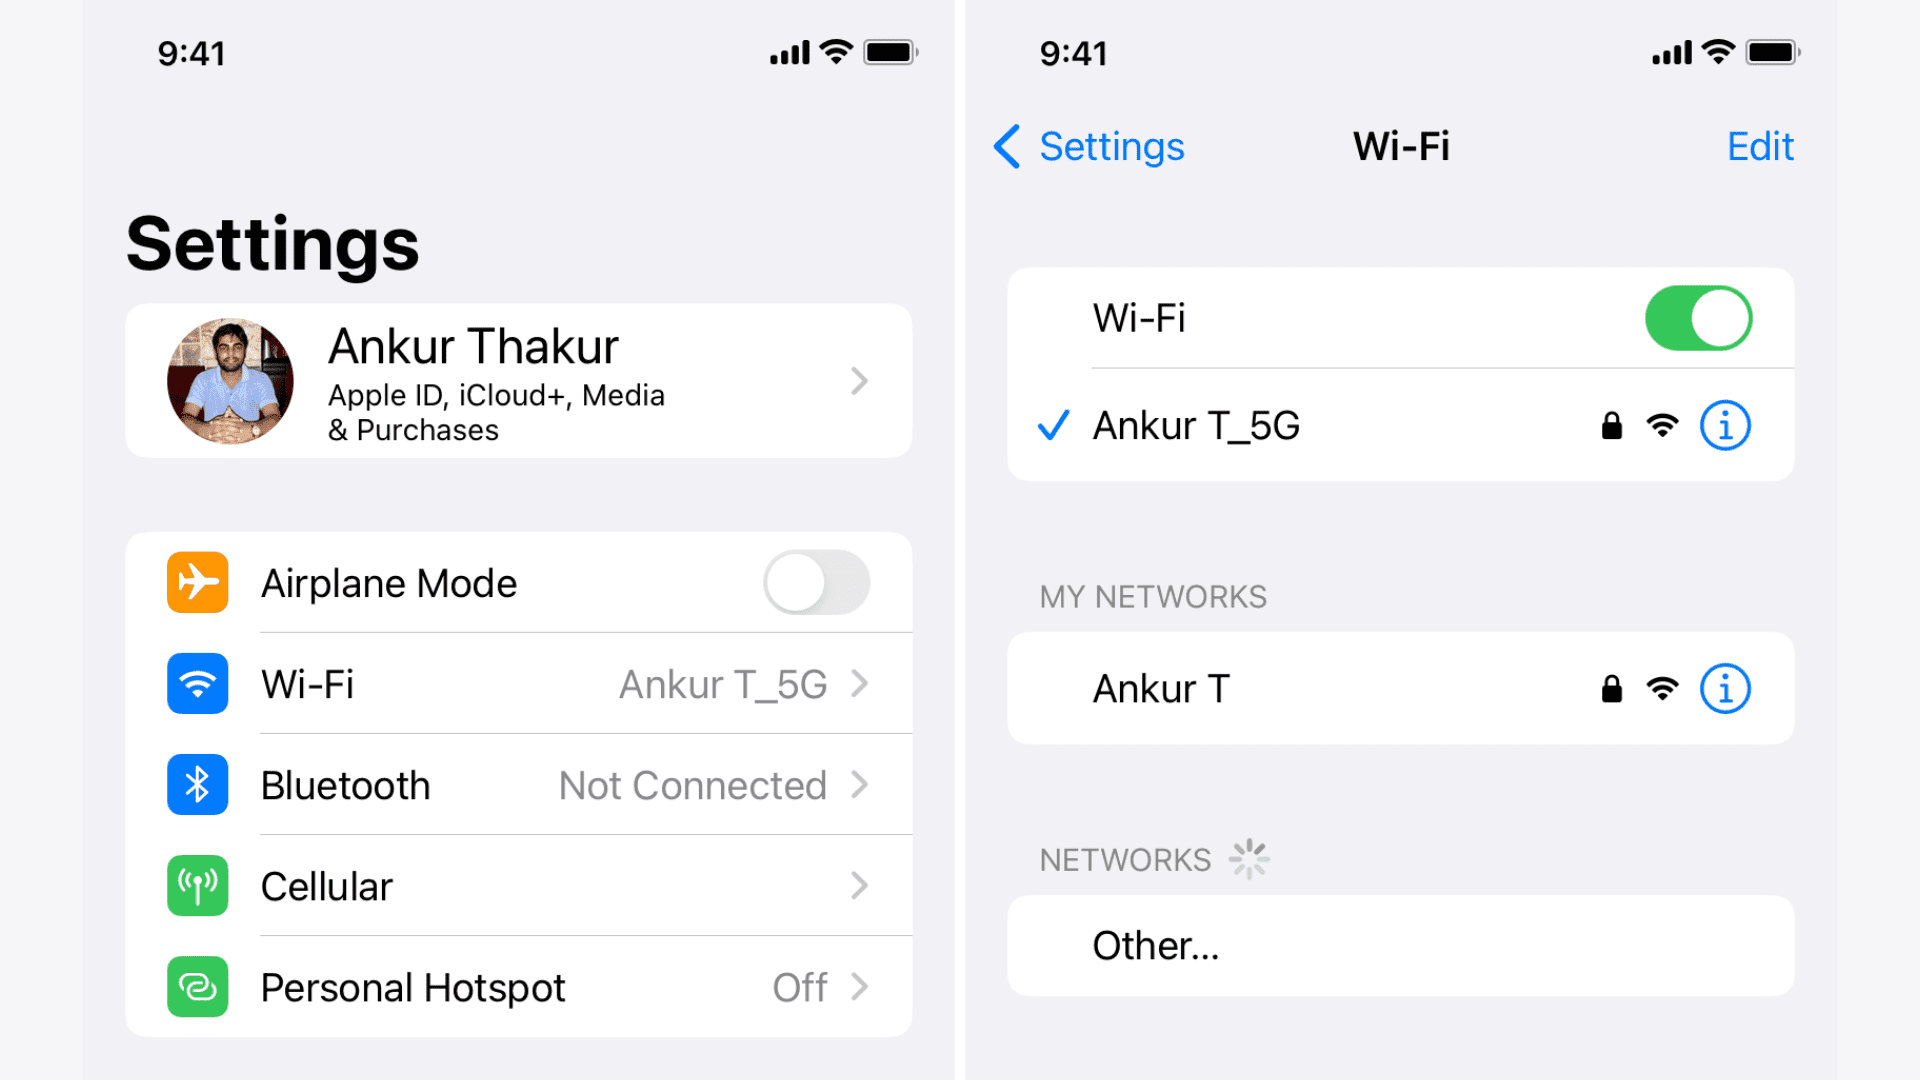
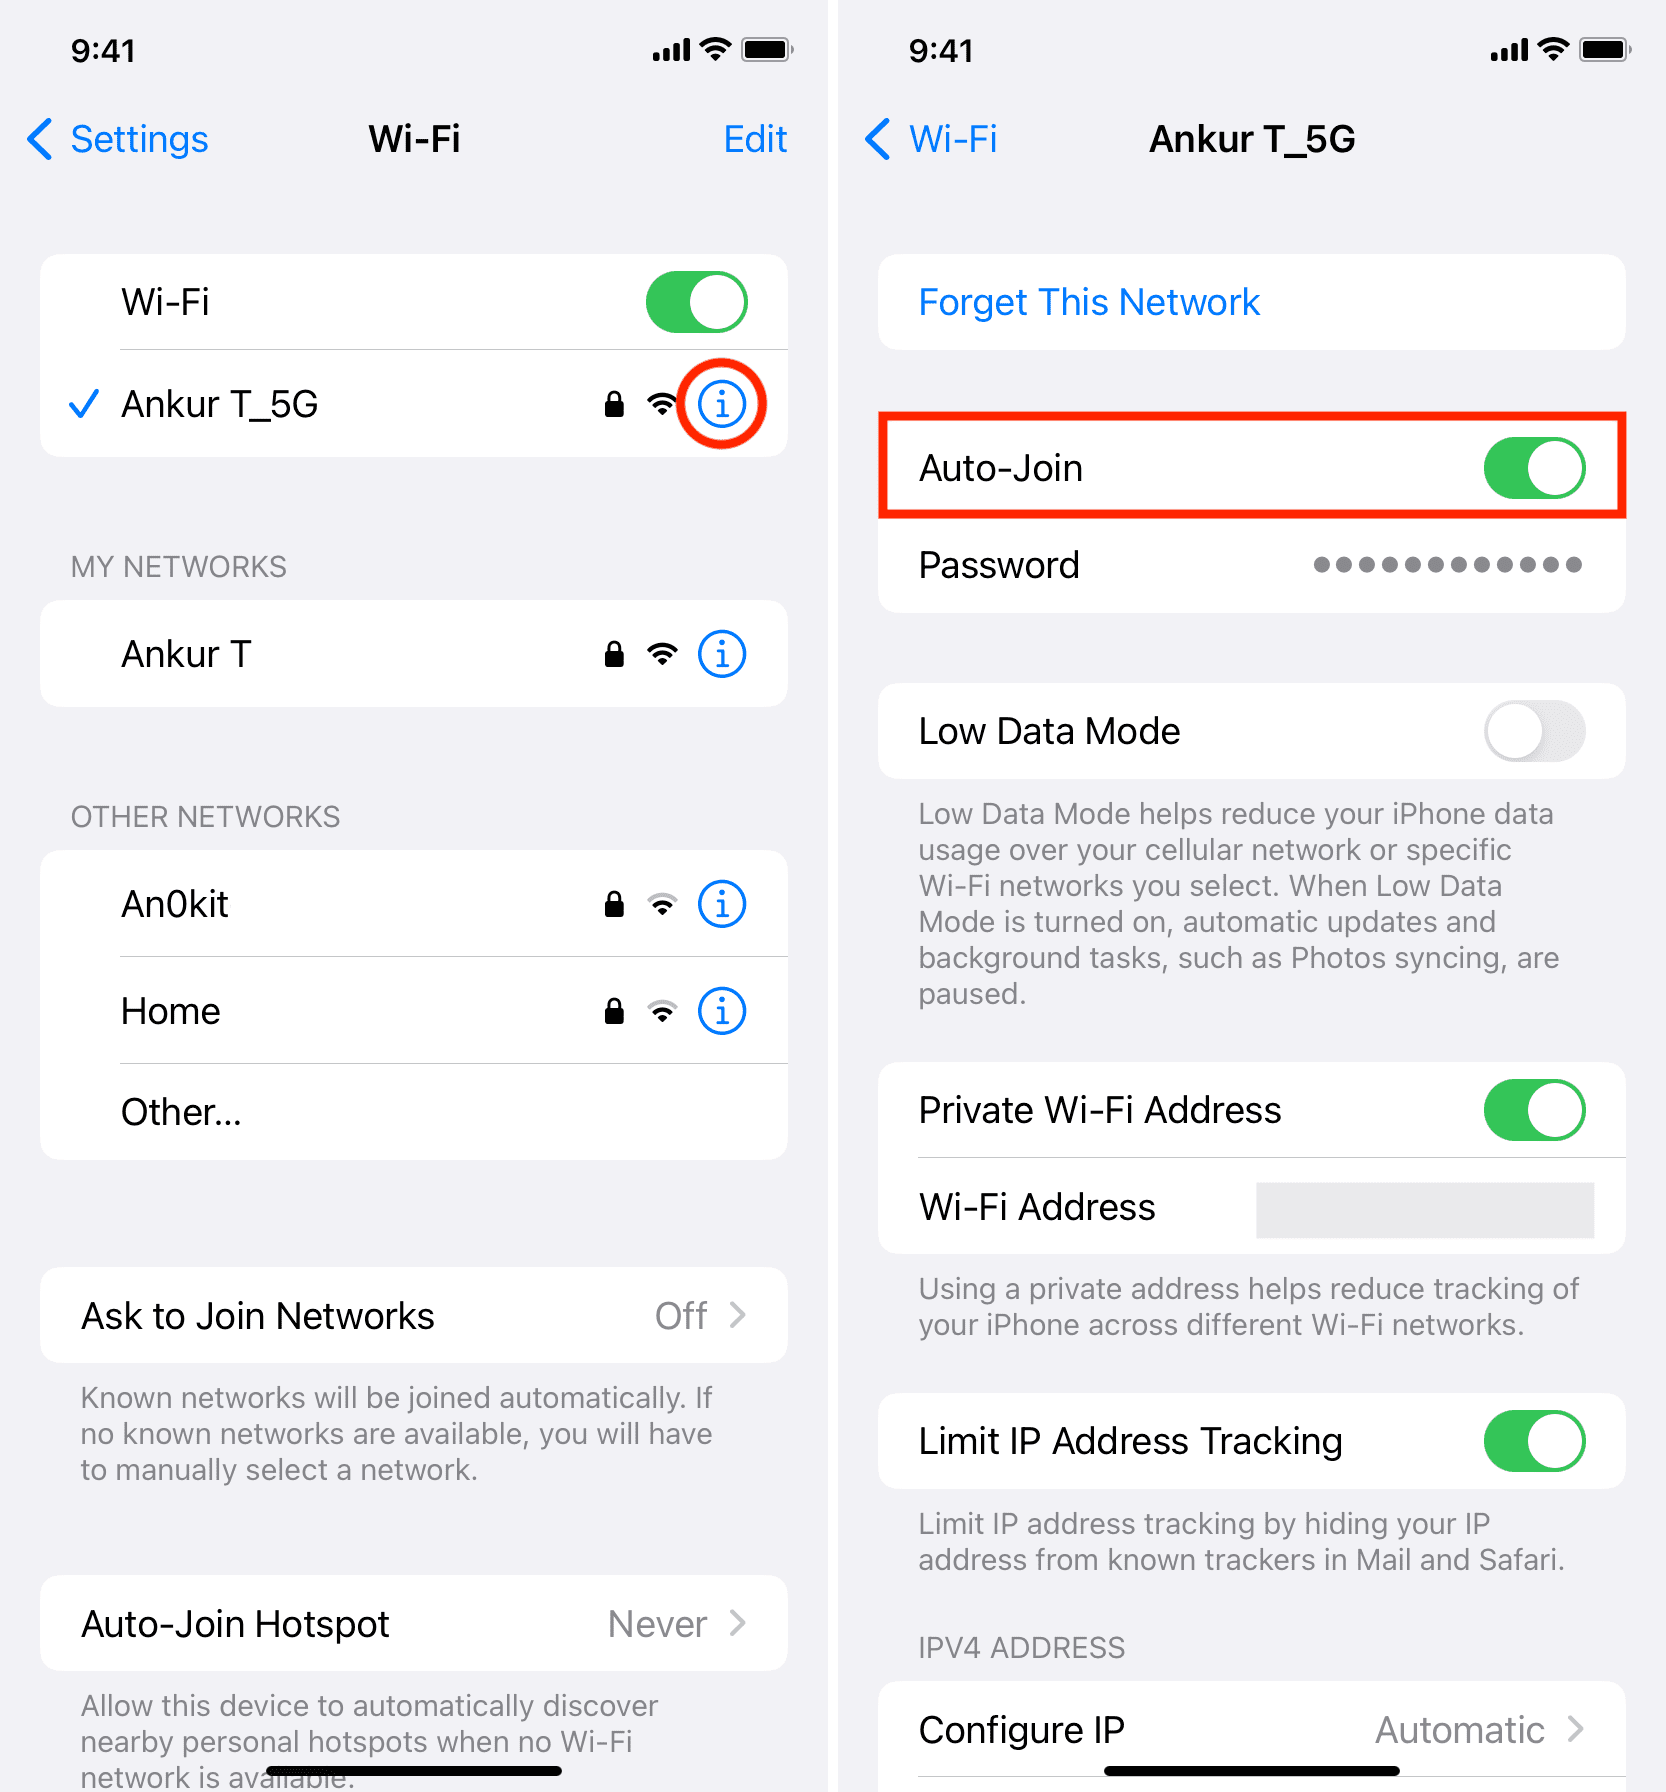
1) Open Settings and tap Wi-Fi.
2) Tap the info button (i) next to the slower Wi-Fi network.
3) Turn off Auto-Join.
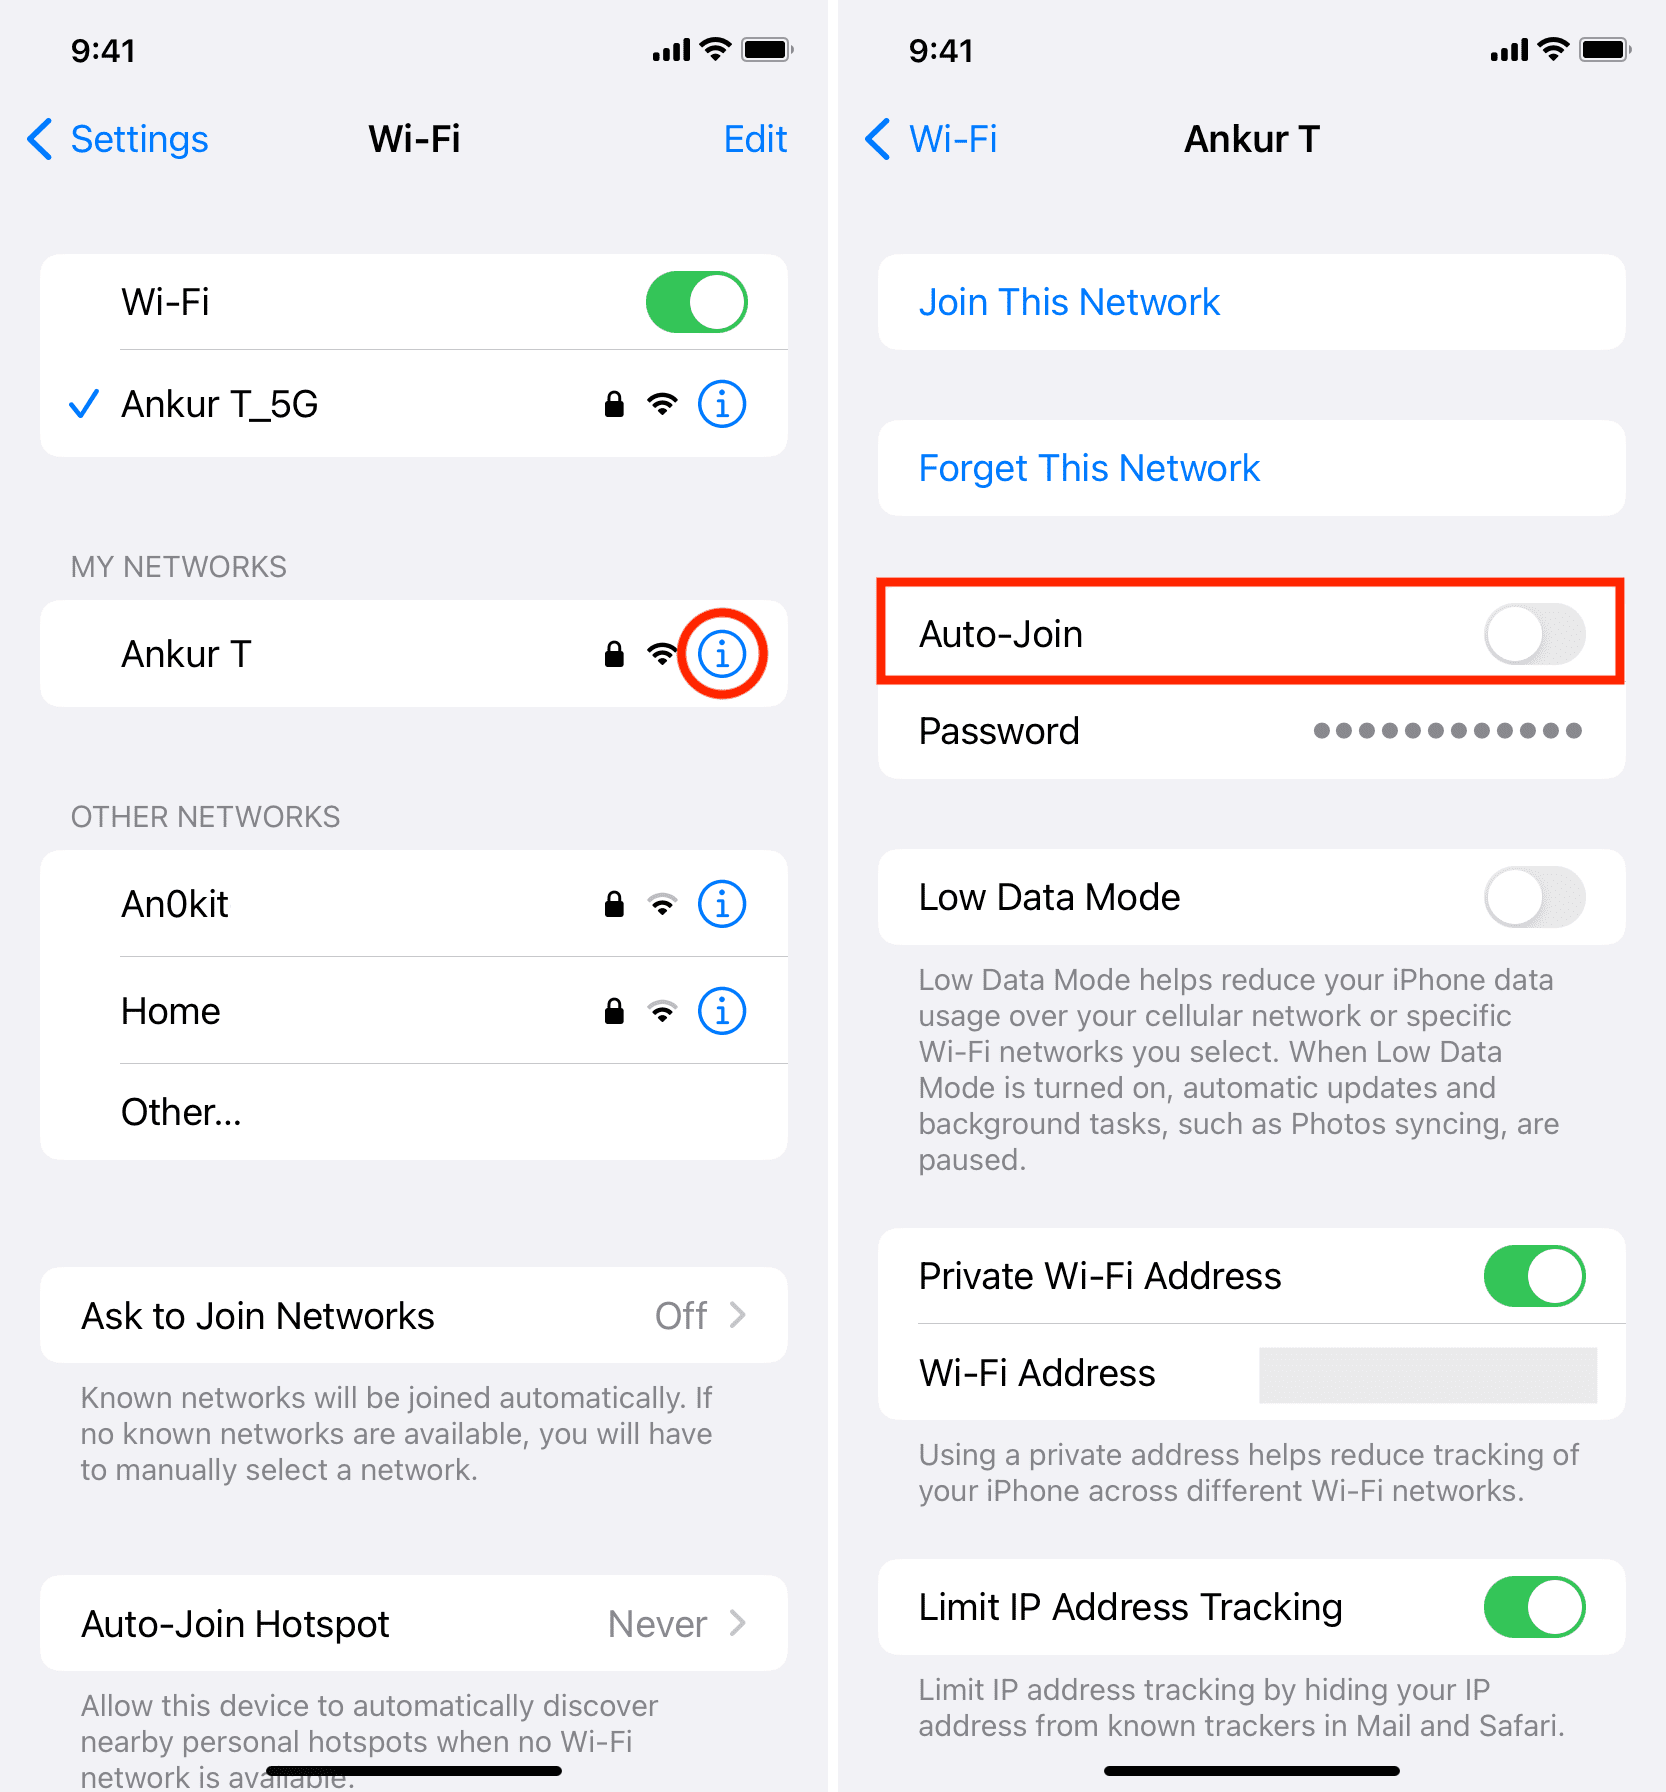
4) Go back to the previous screen and choose the info button next to the faster Wi-Fi network.
5) Make sure Auto-Join is enabled for this.
From now on, when you enter this area with both known Wi-Fi networks, your iPhone will always automatically join the better Wi-Fi. Goodbye, slow speeds and connection drops!
Anytime that better Wi-Fi is unavailable, you can simply tap the other Wi-Fi network name in Wi-Fi Settings or the Control Center (after pressing the Wi-Fi icon) to join it. You don’t have to type the Wi-Fi password.
Apple Watch
Apple Watch Series 6, Series 7, and later can connect to both 2.4 GHz or 5 GHz Wi-Fi networks. However, Apple Watch Series 5 and earlier, and Apple Watch SE can only connect to 2.4 GHz Wi-Fi.
This is how you can set your Apple Watch to prefer joining one Wi-Fi network over another:
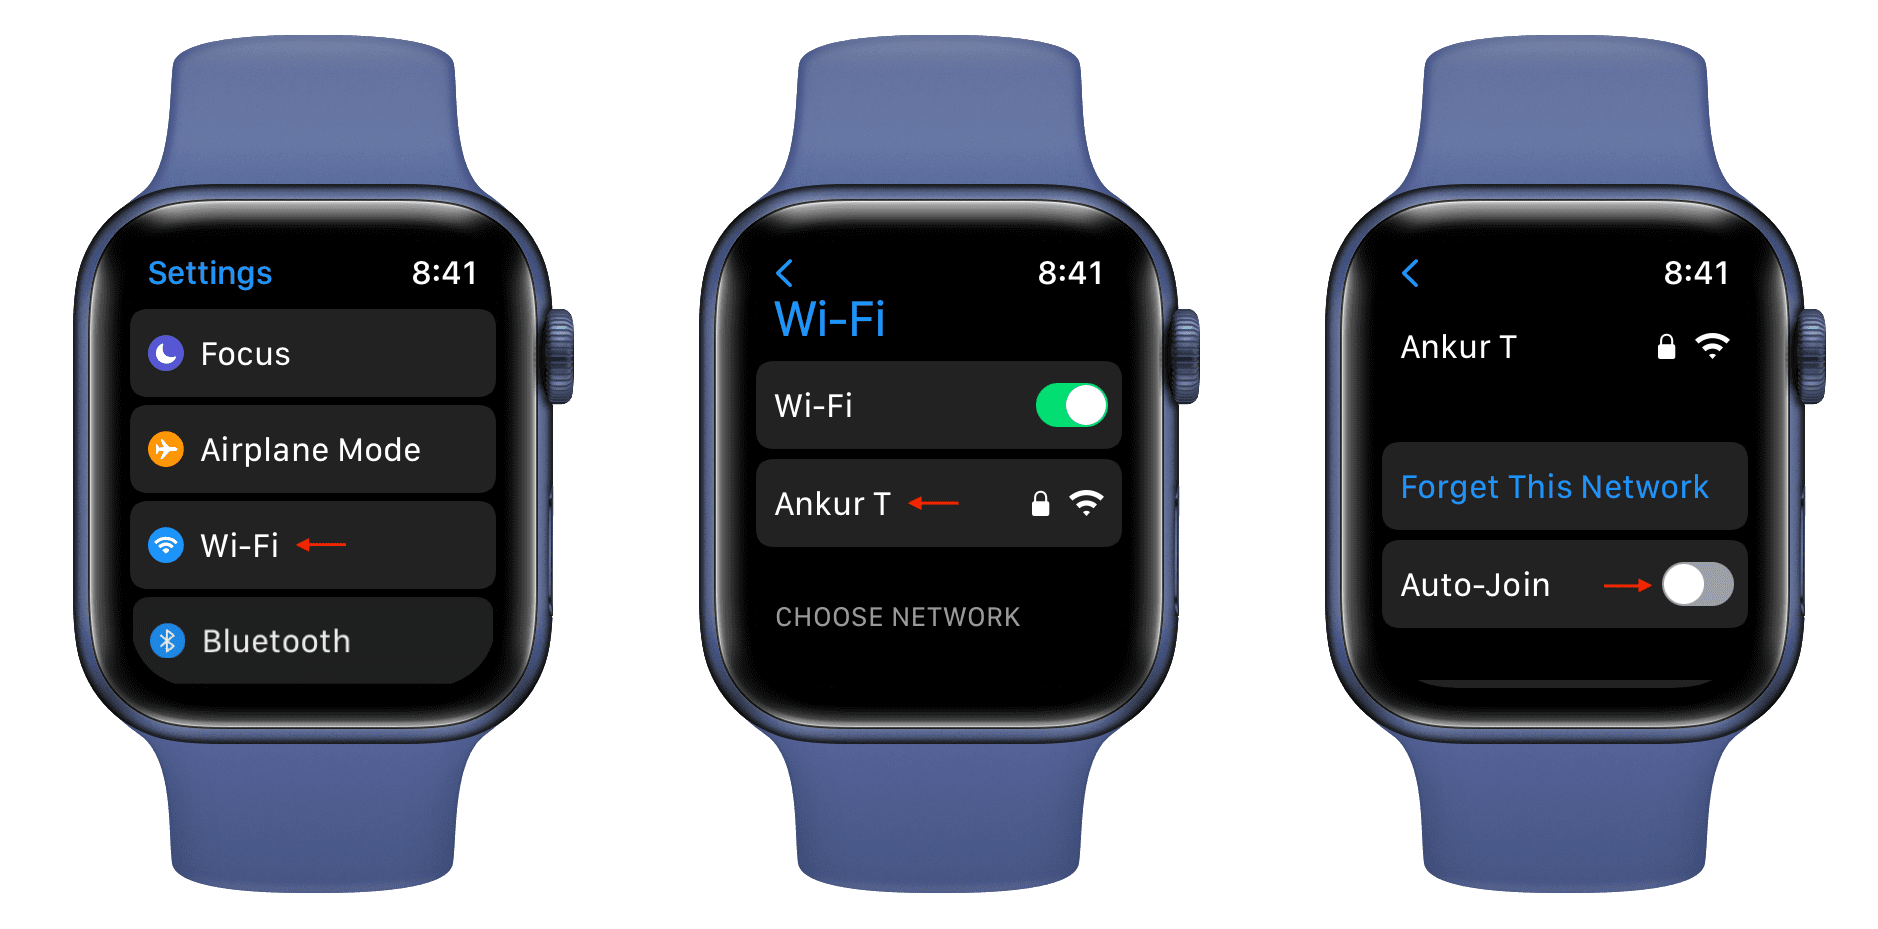
1) Press the Digital Crown and tap Settings.
2) Select Wi-Fi.
3) Choose a Wi-Fi name you don’t want your watch to join automatically and turn off Auto-Join from the next screen.
4) Now, go back and tap the preferred Wi-Fi name and ensure its Auto-Join switch is enabled.
From now on, your Apple Watch will automatically connect to the Wi-Fi network you choose in step 4 and ignore joining the other poorer Wi-Fi.
Mac
Here’s how to set your Mac to prefer and auto-connect to a faster Wi-Fi network than another slower option:
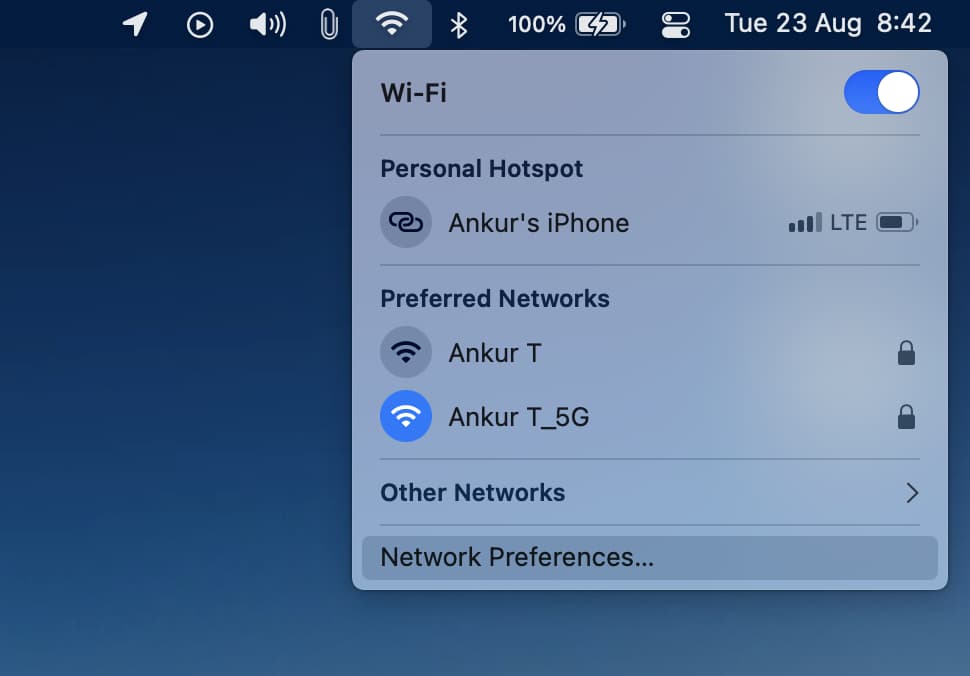
1) Click the Wi-Fi icon in the menu bar and choose Network Preferences.
2) Click Advanced.
3) Uncheck the Auto-Join box next to the inferior Wi-Fi network.
4) Make sure the Auto-Join box next to the superior Wi-Fi network is checked.
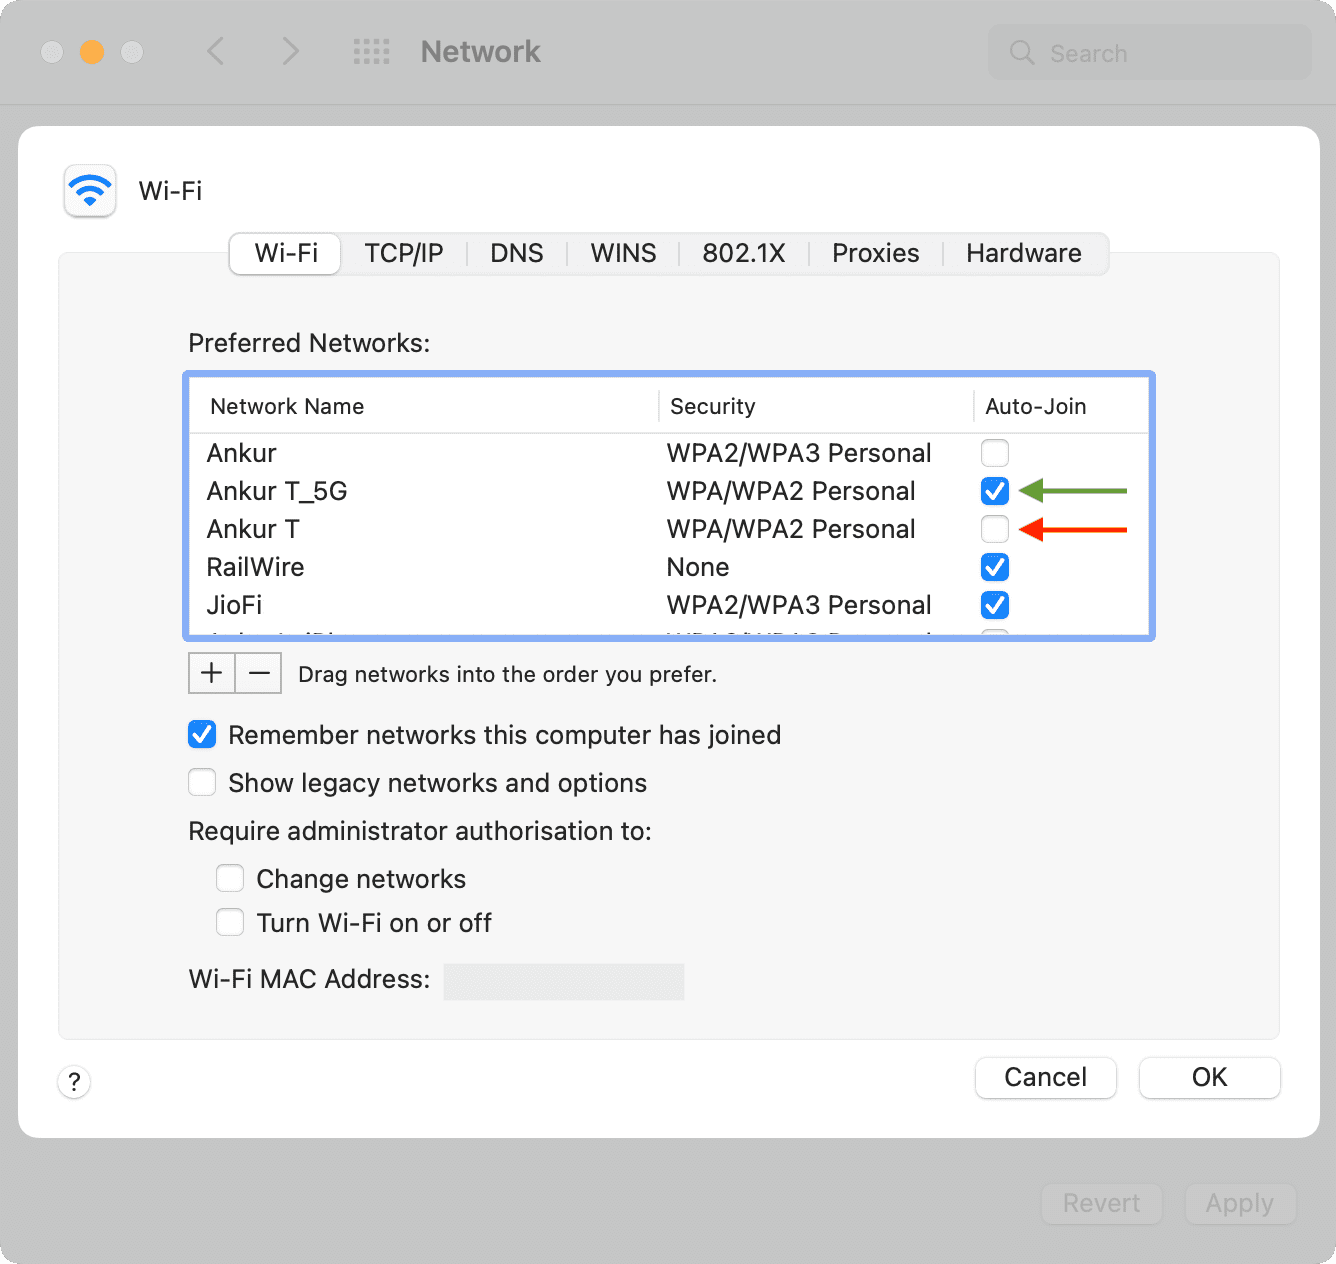
Tip: On this screen, you can drag the Wi-Fi network you want to give the highest priority to the top of the list. After this, your Mac will give preference to the Wi-Fi network that’s on the top of the list and try to join that. In case it can’t join that network, it will move on to prefer the second available Wi-Fi network and so on.
5) Click Ok.
6) Click Apply.
That’s it. From now on, when you enter this area with both known Wi-Fi networks or power on your Mac, your computer will automatically join the better network. No more hassle of manually connecting to a faster network every time!
Wi-Fi auto-join preferences
This is how you can set your iPhone, iPad, Apple Watch, or Mac to prefer one network over the other.
Besides speed, there are other instances where you might have to prefer a network over other. For example, you can control your smart bulb from your iPhone when both are on the same Wi-Fi network. If you have multiple Wi-Fi networks, you can use the above steps to ensure your iPhone always connects to the network that your smart appliances are connected to.
In this tutorial, I demonstrated using two Wi-Fi networks. But if your house, school, dorm, office, coffee place, or another frequently visited area has several networks, follow the same steps to prefer one over the rest. Just keep auto-join enabled for the best, fastest Wi-Fi, and turn off auto-join for the rest.
I should remind you once again that turning off auto-join for a known Wi-Fi doesn’t remove its Wi-Fi password. Your device still remembers the network, and you can manually connect to it in the future without entering the password.
Check out next: