- Linux raid autodetect (fd) or Linux RAID (ee)
- 2 Answers 2
- How to Set Up Software RAID 1 on an Existing Linux Distribution
- What is RAID?
- Hardware RAID vs Software RAID
- Basic Steps to Create Software RAID 1 on Linux
- Step 1: Format Hard Drive
- Step 2: Install mdadm
- Step 3: Create RAID 1 Logical Drive
- Step 4: Create File System on the RAID 1 Logical Drive
- Step 5: Test
- How to Remove the RAID
- Wrapping Up
Linux raid autodetect (fd) or Linux RAID (ee)
Ubuntu 20.04 up to date. I’m trying to setup a raid with 8TB disks and I’m following this guide using fdisk https://www.linuxbabe.com/linux-server/linux-software-raid-1-setup I can’t change partition type to fd. When I type fd and press enter the response is «Partition type unchanged» I listed all types and there is «Linux RAID» but not «Linux raid autodetect» and «Linux RAID» is «type ee» I chose Linux RAID and when I check with gparted the raid flag is checked. Am I good to go? Why can’t I choose fd? What is the difference between fd and ee? Disk size?
Please add exactly what commands you ran to your question. You said you followed that guide exactly but that guide allows for different choices depending on if you used MBR or GPT label. Also, modern Linux doesn’t use the partition type at all when assembling mdadm arrays so it doesn’t really matter, beyond not confusing yourself or other software.
2 Answers 2
sudo fdisk /dev/sd# Follow these instructions.
Type n to create a new partition. Type p to select primary partition. Type 1 to create /dev/sd#1. Press Enter to choose the default first sector Press Enter to choose the default last sector. This partition will span across the entire drive. Typing p will print information about the newly created partition. By default the partition type is Linux. We need to change the partition type, so type t. Enter fd to set partition type to Linux raid autodetect. Type p again to check the partition type. Type w to apply the above changes.
As it’s currently written, your answer is unclear. Please edit to add additional details that will help others understand how this addresses the question asked. You can find more information on how to write good answers in the help center.
How to Set Up Software RAID 1 on an Existing Linux Distribution
In this tutorial, we’ll be talking about RAID, specifically we will set up software RAID 1 on a running Linux distribution.
What is RAID?
RAID stands for Redundant Array of Inexpensive Disks. RAID allows you to turn multiple physical hard drives into a single logical hard drive. There are many RAID levels such as RAID 0, RAID 1, RAID 5, RAID 10 etc.
Here we will discuss about RAID 1 which is also known as disk mirroring. RAID 1 creates identical copies of data. If you have two hard drives in RAID 1, then data will be written to both drives. The two hard drives have the same data.
The nice part about RAID 1 is that if one of your hard drive fails, your computer or server would still be up and running because you have a complete, intact copy of the data on the other hard drive. You can pull the failed hard drive out while the computer is running, insert a new hard drive and it will automatically rebuilds the mirror.
The downside of RAID 1 is that you don’t get any extra disk space. If your two hard drives are both 1TB, then the total usable volume is 1TB instead of 2TB.
Hardware RAID vs Software RAID
To set up RAID, you can either use a hard drive controller, or use a piece of software to create it. A hard drive controller is a PCIe card that you put into a computer. Then you connect your hard drives to this card. When you boot up the computer, you are going to see an option that allows you to configure the RAID. You can install an operating system on top of hardware RAID which can increase uptime.
Software RAID requires you already installed an operating system. It’s good for storing data.
Basic Steps to Create Software RAID 1 on Linux
- First you need to have a Linux distribution installed on your hard drive. In this tutorial we will name it /dev/sda .
- Then you are going to grab two hard drives which will be named /dev/sdb and /dev/sdc in this post. These two hard drives can be of different sizes. Remember to back up your existing data before formating your hard drives.
- Next, we will create special file systems on /dev/sdb and /dev/sdc .
- And finally create the RAID 1 array using the mdadm utility.
Step 1: Format Hard Drive
Insert two hard drives into your Linux computer, then open up a terminal window. Run the following command to check the device name.

You can see mine is /dev/sdb and /dev/sdc .
Then run the following 2 commands to make new MBR partition table on the two hard drives. (Note: this is going to wipe out all existing partitions and data from these two hard drives. Make sure your data is backed up.)
sudo parted /dev/sdb mklabel msdos sudo parted /dev/sdc mklabel msdos
You can create GPT partition table by replacing msdos with gpt , but for the sake of compatibility, this tutorial will create MBR partition table.
Next, use the fdisk command to create a new partition on each drive and format them as a Linux raid autodetect file system. First do this on /dev/sdb .
Follow these instructions.
- Type n to create a new partition.
- Type p to select primary partition.
- Type 1 to create /dev/sdb1.
- Press Enter to choose the default first sector
- Press Enter to choose the default last sector. This partition will span across the entire drive.
- Typing p will print information about the newly created partition. By default the partition type is Linux.
- We need to change the partition type, so type t.
- Enter fd to set partition type to Linux raid autodetect .
- Type p again to check the partition type.
- Type w to apply the above changes.
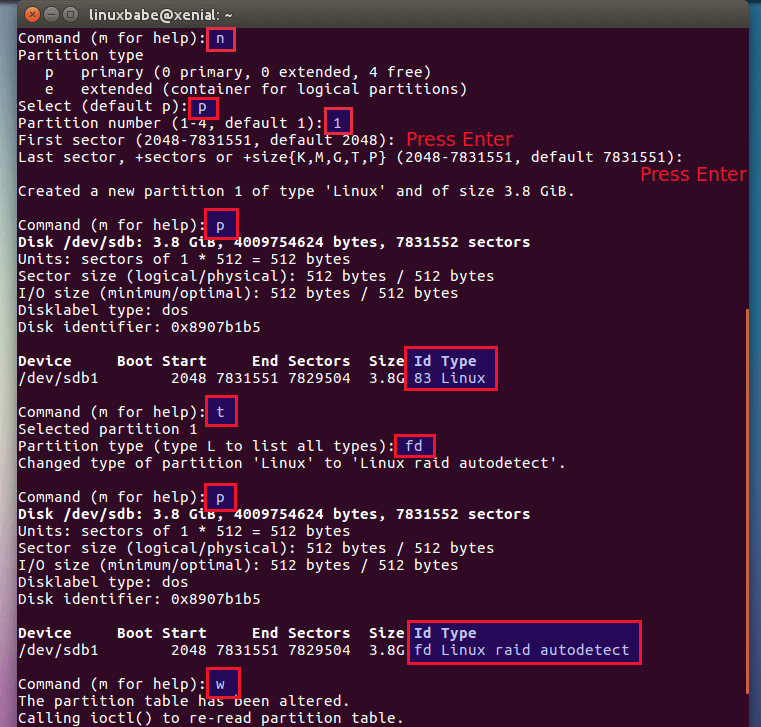
Follow the same instruction to create a Linux raid autodetect partition on /dev/sdc .
Now we have two raid devices /dev/sdb1 and /dev/sdc1 .
Step 2: Install mdadm
mdadm is used for managing MD (multiple devices) devices, also known as Linux software RAID.
Debian/Ubuntu: sudo apt install mdadm CentOS/Redhat: sudo yum install mdadm SUSE: sudo zypper install mdadm Arch Linux sudo pacman -S mdadm
Let’s examine the two devices.
sudo mdadm --examine /dev/sdb /dev/sdc
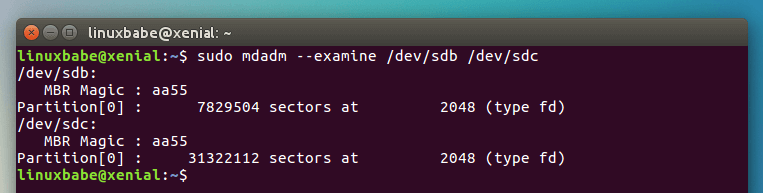
You can see that both are the type fd (Linux raid autodetect). At this stage, there’s no RAID setup on /dev/sdb1 and /dev/sdc1 which can be inferred with this command.
sudo mdadm --examine /dev/sdb1 /dev/sdc1

Step 3: Create RAID 1 Logical Drive
Execute the following command to create RAID 1. The logical drive will be named /dev/md0 .
sudo mdadm --create /dev/md0 --level=mirror --raid-devices=2 /dev/sdb1 /dev/sdc1
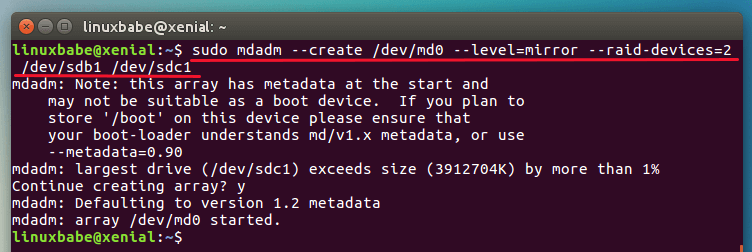
Note: If you see this message: “Device or resource busy”, then you may need to reboot the OS.

You can see that md0 is active and is a RAID 1 setup. To get more detailed information about /dev/md0 , we can use the below commands:
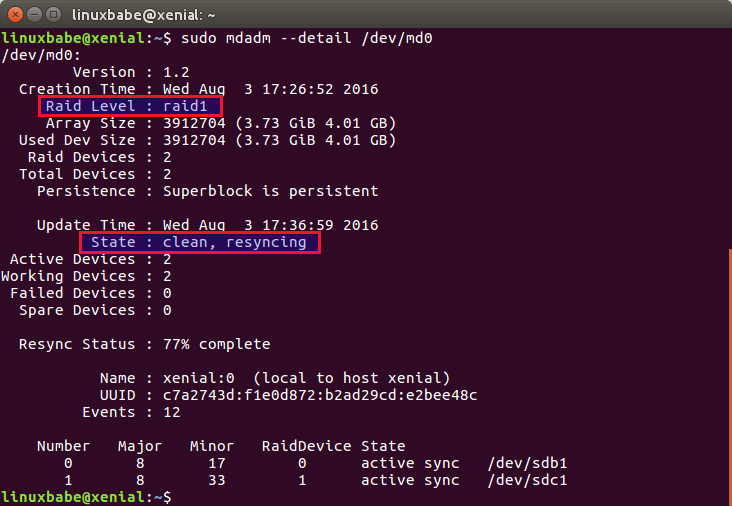
To obtain detailed information about each raid device, run this command:
sudo mdadm --examine /dev/sdb1 /dev/sdc1

Step 4: Create File System on the RAID 1 Logical Drive
Let’s format it to ext4 file system.
Then create a mount point /mnt/raid1 and mount the RAID 1 drive.
sudo mkdir /mnt/raid1 sudo mount /dev/md0 /mnt/raid1
You can use this command to check how much disk space you have.

Step 5: Test
Now let’s go to /mnt/raid1 and create a text file.
cd /mnt/raid1 sudo nano raid1.txt
Save and close the file. Next, remove one of your drives from your computer and check the status RAID 1 device again.
sudo mdadm --examine /dev/sdb1 /dev/sdc1
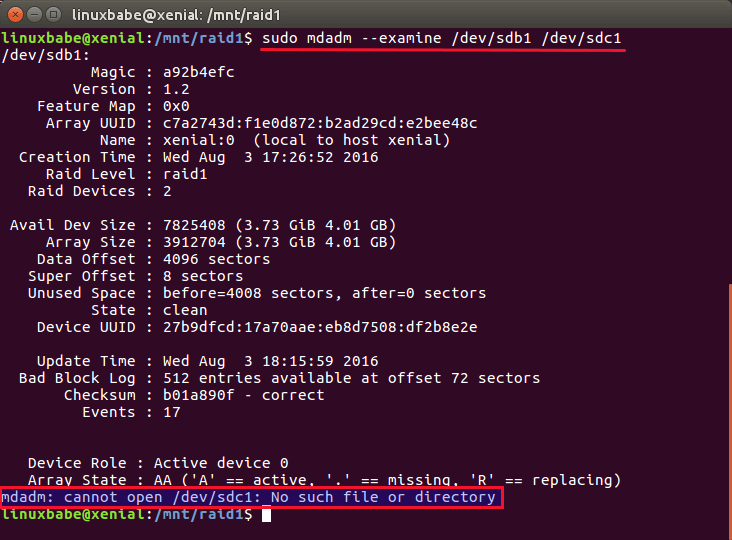
You can see that /dev/sdc1 is not available. If we check /dev/md0 , we can see that one RAID device is removed.
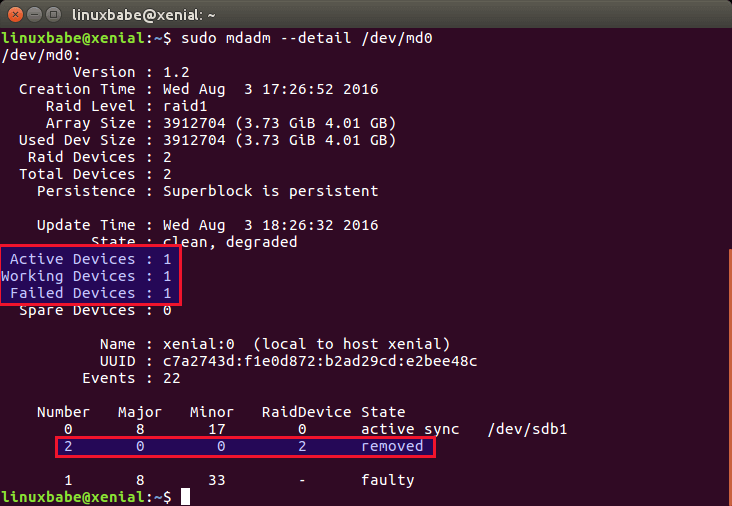
However, the text file is still there.

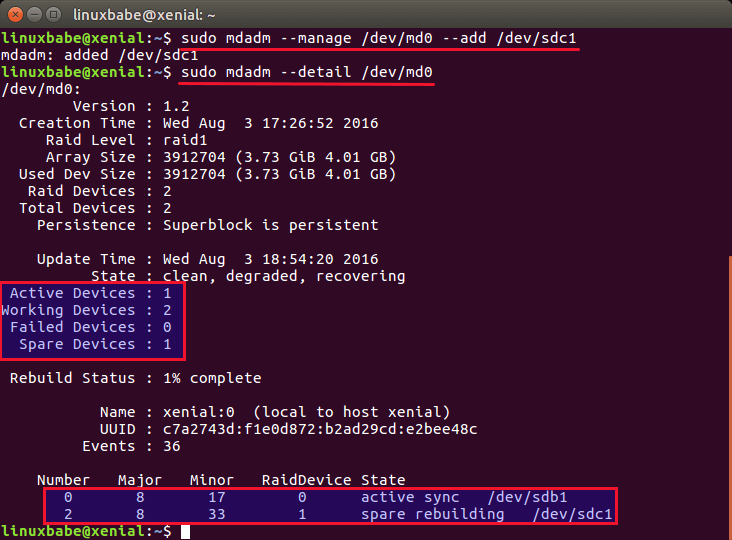
To add the failed drive (in this case /dev/sdc1 ) back to the RAID, run the following command.
sudo mdadm --manage /dev/md0 --add /dev/sdc1
Then check the details again:
We can see that the RAID is rebuilding data on /dev/sdc1 . And you can check the rebuild progress (Rebuild Status).
Remember that if you use disk backup software such as Clonezilla, you need to restore data to the RAID logical drive, not the physical drive.
It’s very important to save our RAID1 configuration with the below command.
sudo mdadm --detail --scan --verbose | sudo tee -a /etc/mdadm/mdadm.conf
ARRAY /dev/md/0 level=raid1 num-devices=2 metadata=1.2 spares=1 name=xenial:0 UUID=c7a2743d:f1e0d872:b2ad29cd:e2bee48c devices=/dev/sdb1,/dev/sdc1
On some Linux distribution such as CentOS, the config file for mdadm is /etc/mdadm.conf . You should run the following command to generate a new initramfs image after running the above command.
To automatically mount the RAID 1 logical drive on boot time, add an entry in /etc/fstab file like below.
/dev/md0 /mnt/raid1 ext4 defaults 0 0
You may want to use the x-gvfs-show option, will let you see your RAID1 in the sidebar of your file manager.
/dev/md0 /mnt/raid1 ext4 defaults,x-gvfs-show 0 0
How to Remove the RAID
If you don’t want to use the RAID anymore, run the following command to remove the RAID.
Then edit the mdadm.conf file and comment out the RAID definition.
#ARRAY /dev/md0 level=raid1 num-devices=2 metadata=1.2 spares=1 name=bionic:0 UUID=76c80bd0:6b1fe526:90807435:99030af9 # devices=/dev/sda1,/dev/sdb1
Also, edit /etc/fstab file and comment out the line that enables auto-mount of the RAID device.
Wrapping Up
I hope this tutorial helped you create software RAID 1 on Linux. As always, if you found this post useful, subscribe to our free newsletter or follow us on Google+, Twitter or like our Facebook page.