- Finding and installing Linux applications
- Sources of software packages
- Fedora Repository
- What comes with default?
- Optional repos
- Installation Procedures
- GNOME
- How to use Software
- 1. Explore applications by categories
- 2. Search applications by name
- 3. Check the software metadata
- 4. Installation
- 5. Updates
- 6. Manage repositories
- KDE
- How to use Discover
- 1. Explore applications with Kickoff
- 2. Explore applications by categories
- 3. Search applications by name
- 4. Check the software metadata
- 5. Installation
- 6. Updates
- 7. Manage repositories
- More information
- Installing software from source on Fedora
- Before you start
- How to install from source
- Download the application archive to your computer
- Extract the files from the archive
- Carefully read any instructions that came with your download
- Follow the instructions to configure, build, compile, and install the application
- See also
Finding and installing Linux applications
If you are looking for software to run on Fedora Linux, you will discover Fedora-packaged software, EPEL (Extra Packages for Enterprise Linux) and Flatpak apps. Here is an overview of software repositories and installation.
Sources of software packages
Fedora Repository
The Fedora repository is available for all Fedora releases and backed by the following characteristics.
- Free and Open Source software packaged in Fedora Linux meets license approval criteria. (Link to: https://docs.fedoraproject.org/en-US/legal/license-approval/)
- Fedora Quality Assurance continually improves the quality of Fedora releases and updates. (Link to: https://docs.fedoraproject.org/en-US/qa-docs/)
What comes with default?
Optional repos
Installation Procedures
The Fedora Linux ships with a graphical software manager to browse, test, install apps and update the installation. This article caters for users who prefer the use of graphical interface to command line interface. The process diverges depending on desktop environment.
GNOME
In GNOME desktop environment, GNOME Software helps you explore, install and update applications and system extensions.
How to use Software
To launch Software, press the Super key (next to left Alt key), type software, and press Enter key.
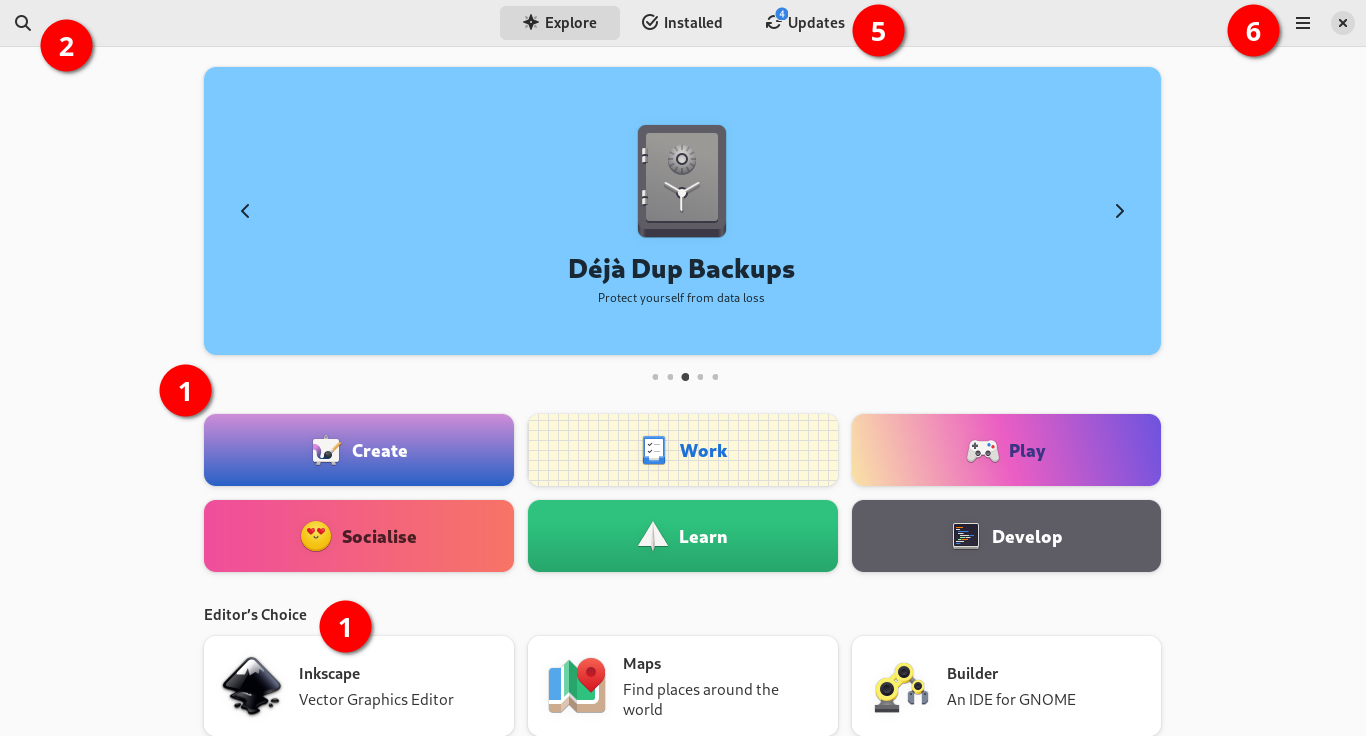
Step through the numbered list and the number annotated on the image of GNOME Software.
1. Explore applications by categories
All the featured apps will be shown on banner in the middle.
Browse apps as categorized below and click a category that is of your interest.
2. Search applications by name
If you know the name of apps to install, click the magnifying glass on the top left corner and type in the name of apps and press Enter key. GNOME Software will suggest a set of applications that match your search.
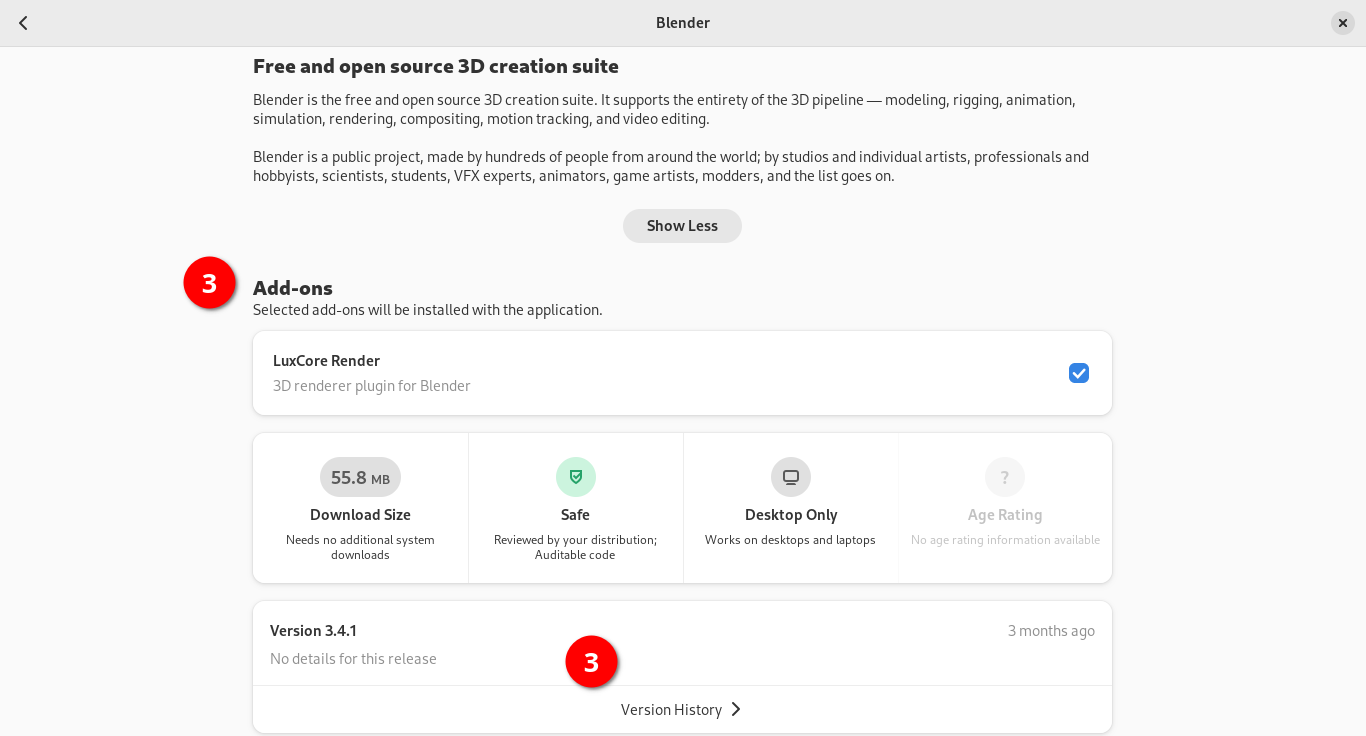
3. Check the software metadata
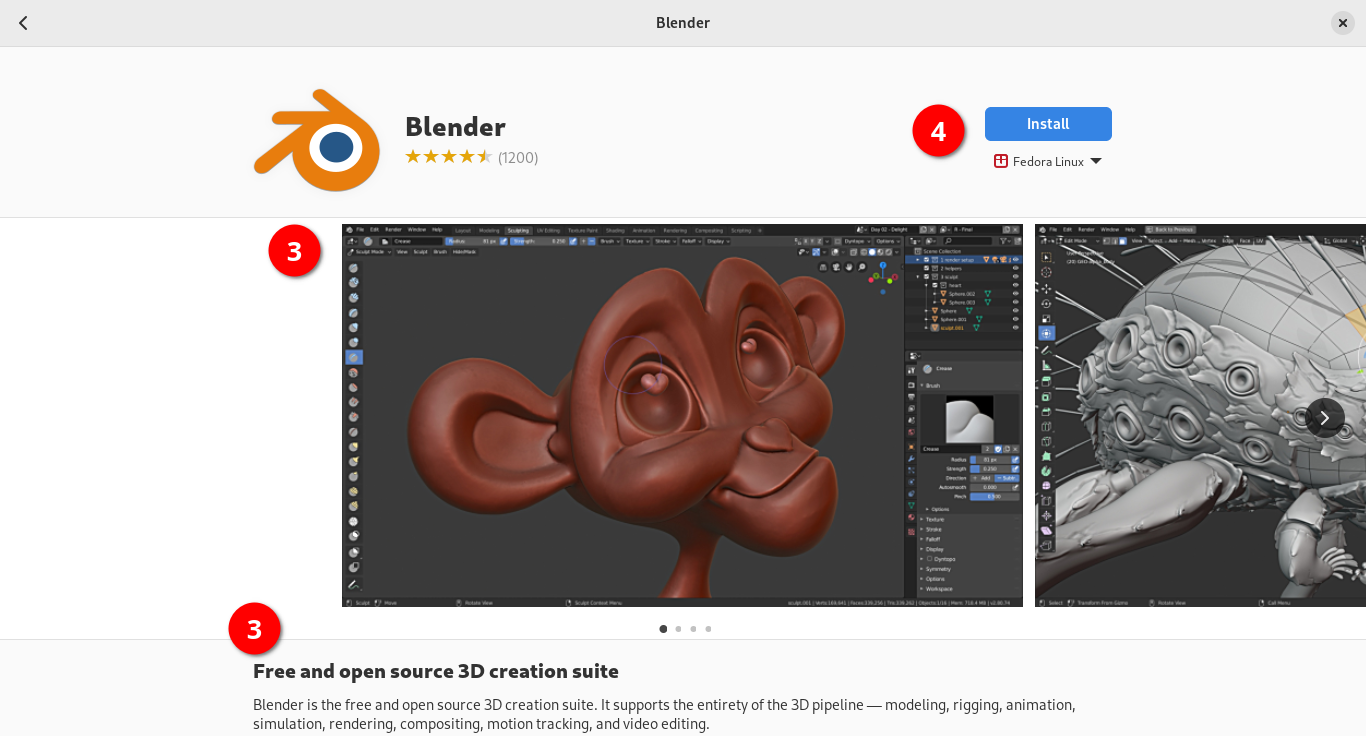
Once you click an app icon, Software presents screenshot of apps and overview.
Scroll down to examine version history, reviews and license details.
If an app has optional add-ons to install together with the app, they will be displayed as Add-ons before the software metadata section.
4. Installation
If you have checked the software metadata, scroll up to find and click the blue Install button on top right corner of software you selected.
Source (repository) is labelled as Fedora Linux (RPM) or Fedora Flatpak under the blue ‘Install’ or ‘Open’ button.
5. Updates
To check system and app updates, go to updates tab and load updates. If there are updates available, the blue download button will appear.
Click download and wait for the blue Restart & Update button. System updates require restart.
If you prefer automatic notification when there are updates available, enable automatic Updates in the hamburger menu on the top right corner.
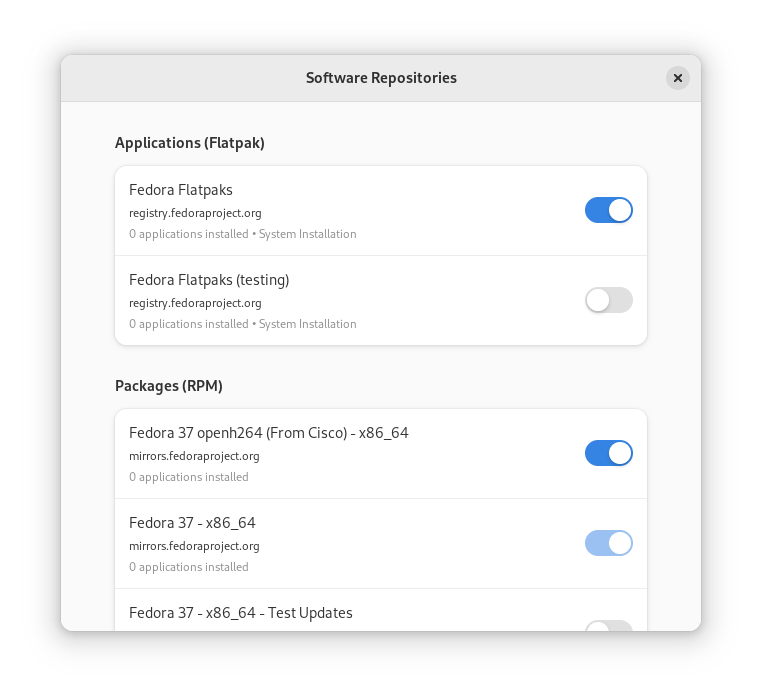
6. Manage repositories
To enable or disable repositories, go to the hamburger menu on the top right corner and select Software Repositories. From there, you can toggle Fedora Flatpaks to explore more apps.
KDE
In KDE Plasma desktop, Discover helps you explore, install and update applications and system extensions.
How to use Discover
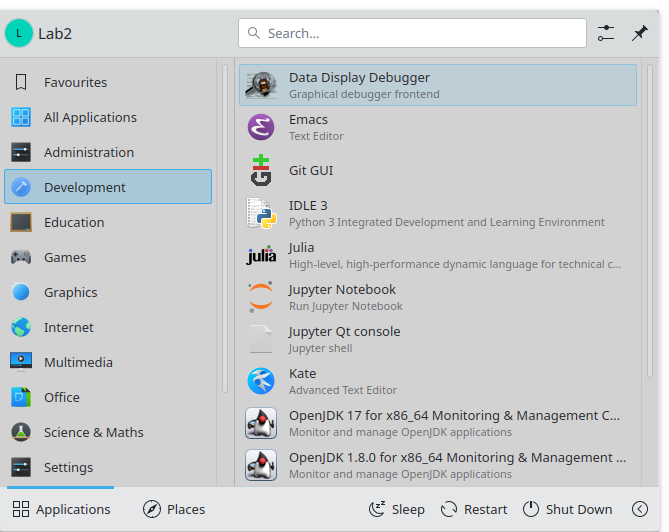
Before launching Discover, Kickoff Application Launcher (Kickoff in short) assists you to use the integrated search function.
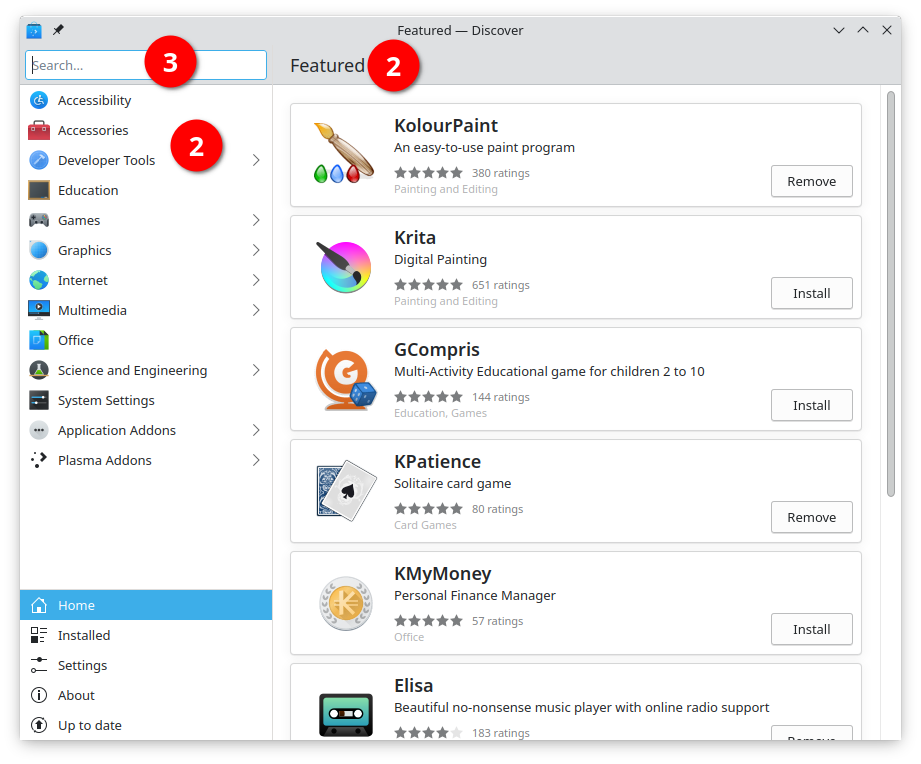
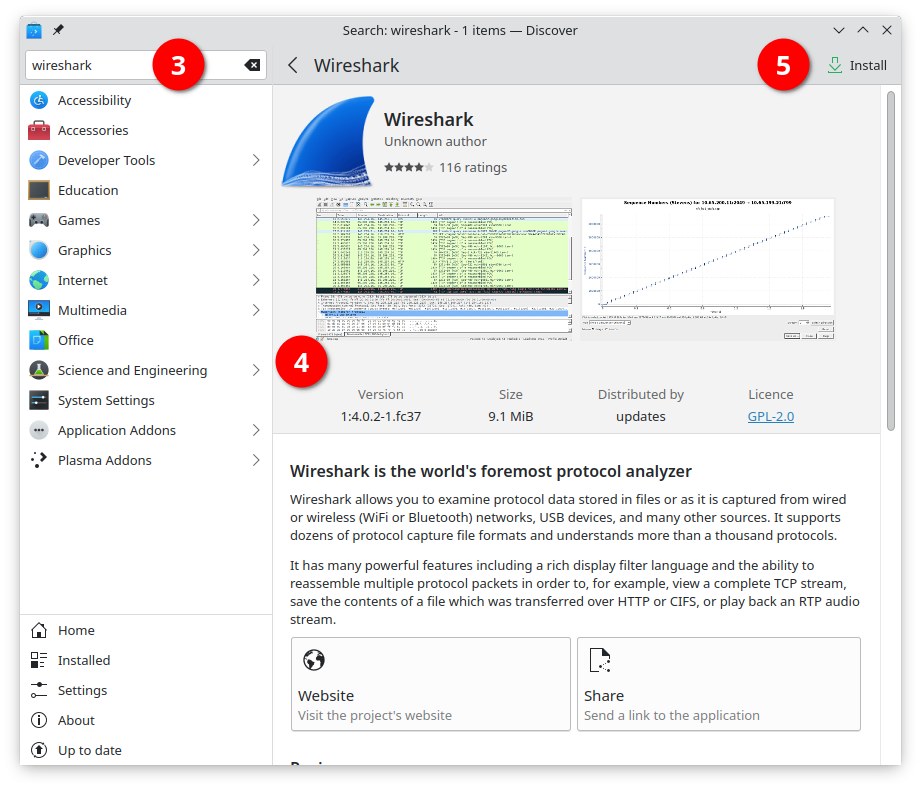
Step through the numbered list and the number annotated on the image of KDE Plasma desktop and Discover.
1. Explore applications with Kickoff
To launch Kickoff, in the default configuration, press the Super key (next to left Alt key). Hover your mouse over installed apps as caterogized on the left pane. All the available apps will be shown on the right pane.
If you look for an application that has not been installed yet, Kickoff will suggest a set of applications that match your search.
Get . Click the app to navigate to Discover, enabling you to installation.
2. Explore applications by categories
To launch Discover directly, press the Super key (next to left Alt key), type discover, and press Enter key.
Hover your mouse over available apps as caterogized on the left pane. Click a category that is of your interest. All the featured apps will be shown on the right pane.
3. Search applications by name
If you know the name of apps to install, type in the name of apps in the search window on the top left corner and press Enter key. Discover will suggest a set of applications that match your search.
4. Check the software metadata
Once you click an app icon, Discover presents screenshot of apps and overview, software metadata such as software version, reviews and license details.
5. Installation
If you have checked the software metadata, click the Install button on top right corner of software you selected.
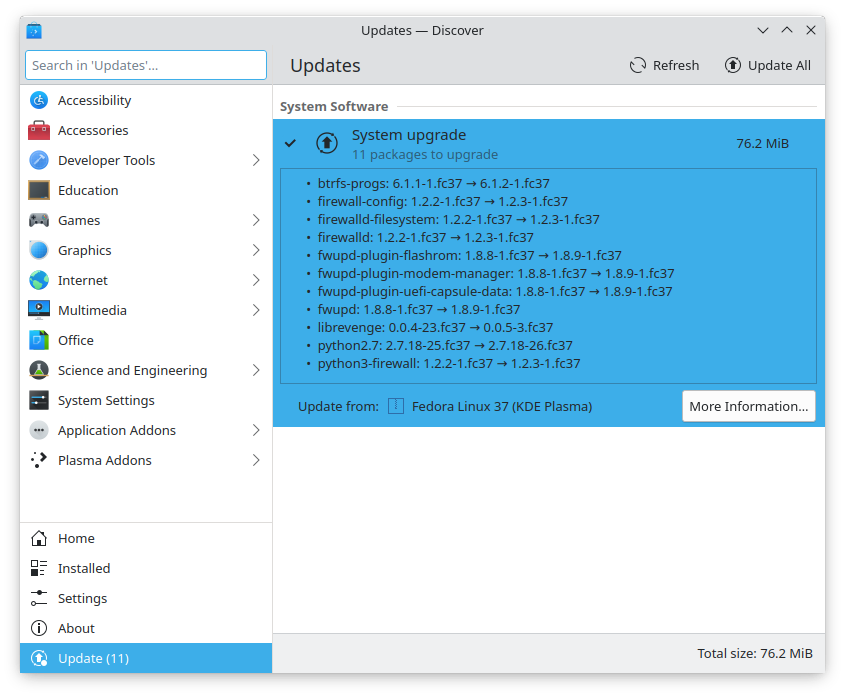
6. Updates
Update notification will appear on status bar when updates become available. Click the notification to open Discover. Press “Update All” button on the top right corner. System updates require restart.
7. Manage repositories
To enable repositories, go to Settings in Discover. In case Flathub is required to explore more apps, click the Add Flathub button.
More information
For latest improvements on functionality and look of graphical software manager, please check the upstream documentation on the link below.
To explore and install command-line apps, refer to the DNF Command Reference: https://dnf.readthedocs.io/en/latest/command_ref.html
To explore and install language libraries, packages, and development toolchain, refer to the Fedora Developer Portal: https://developer.fedoraproject.org/tech.html
All Fedora Documentation content available under CC BY-SA 4.0 or, when specifically noted, under another accepted free and open content license.
Last build: 2023-07-13 20:50:18 UTC | Last content update: 2023-03-04
Installing software from source on Fedora
Most of the software you will install on your Fedora system will either come from a desktop application manager tool such as the GNOME Software tool or from a command line package manager such as dnf. These tools make it easy to install, update, and if needed remove applications on your system.
However, there might be times where you will need to install an application from source, meaning to take the application source code and compile it into a working application.
This can be because of the fact that:
- No pre-compiled binary or application package is available.
- You have specific dependency requirements that are not available in the pre-compiled package.
- The available pre-compiled application is out of date and you need a specific version.
In these cases you will need to install the software from the command line, using the source files provided by the application developers or maintainers.
Before you start
To install an application from source, you will need to have:
- A way to extract the source file archive. This is usually an application such as tar or gzip .
- A build tool and a compiler, such as make .
These tools are generally installed by default on a modern Fedora system. You can verify that they are available by typing in make , tar , and gzip from the command line. You will see instructions on how to use the application if it is available. If the application is not available you will get an error along with instructions on how to install.
How to install from source
To install from source, you will need to do the following:
- Download the application archive file to your computer. The default location is the Downloads folder, but you might be able to choose a location during the download process.
- Extract the files from the downloaded archive. The command you use will depend on the application package.
- Carefully read any instructions that came with your download. These instructions might also be available on the website you downloaded the file from. These instructions will tell you what you need to do to install the application.
- Follow the commands given in the README (or other installation instructions) to configure, build, compile, and install the application.
Download the application archive to your computer
The default download location is your Downloads folder. From the command line the location is /home/username/Downloads (note the capital D in Downloads).
Extract the files from the archive
Most applications require many files or even directories, packaged together into an archive. The most common archives are «tarballs,» with the files packaged by using the tar (tape archive) command. These will have a .tar file extension.
In some cases the files will use a variation of the Zip archive format, such as .zip or .gz . Depending on the size of the download the application developer might use both tar and gzip together, so that the file will have a .tar.gz extension.
To extract files from a .tar archive:
-xf means to extract the files from the tar archive.
To extract files from a tar.gz archive:
-zxf means to unzip the archive, and extract the files from the tar archive.
To extract files from a .gz archive:
-d means to decompress the archive, which extracts the files.
You can also use gunzip , which is an alias for gzip -d .
To extract files from a .zip archive:
Use the man command to learn more about tar , gzip , and unzip : man tar , man gzip , or man unzip . You can also find their man pages online: Linux man pages. Search for the command you want to look up.
The See also section has links to the official documentation for these commands.
Carefully read any instructions that came with your download
When you extract the archive it will leave you with a directory with the same or similar name. You can now change into that directory to find the installation instructions that tell you how to configure and build the application.
The extracted folder for the application will have a README or some other file that gives instructions on how to install, configure, and manage the application. The README file will have detailed directions on things such as:
- Choosing an alternate directory for installation.
- Setting configuration options for the build.
- What compile time options to use for different configurations.
| If no instructions exist on how to configure or build the application, you will need to reach out to the application developers for help. You might also find instructions online from someone else who had a similar issue. |
Follow the instructions to configure, build, compile, and install the application
After you understand what options are available, you can install the application. In general you will need to:
- Configure the application by using the configure command.
- Build and compile the application by using make .
- Install the application by using make install . The make install command will need to run using sudo so it can write to system directories and local directories.
Here is an example of the entire process, from extracting the files from a .tar.gz archive to building the application:
$ tar -zxf archive.tar.gz $ cd archive/ $ ./configure $ make $ sudo make installYour application is now installed. The README file or the application website will have more information about how to use the application.
| If you get any errors during the configure and build process, carefully read the error messages and follow the instructions on how to resolve them. There can be dependency issues for some applications, meaning that to install application C, you need to have applications A and B installed. Resolving dependency issues can be challenging and you might need to look for help online to help solve the problem. |
