- How to Compare Two Files in Linux
- How to Use “diff” Command in Linux to Compare Files:
- How to Get Output in One Line Using the “diff” Command:
- How to Check the Difference of Files in Context Mode Using the “diff” Command:
- How to Check the Difference of Files in Unified Mode Using the “diff” Command:
- How to Ignore Case Sensitivity While Using the “diff” Command:
- How to Use Vim Editor to Compare Two Files:
- How to Compare Two Files Using “colordiff”:
- Conclusion:
- About the author
- Sam U
- Команда diff в Linux: сравниваем два файла
- Что из себя представляет команда diff в Linux?
- Синтаксис команды diff
- Примеры использования команды diff
- Синтаксис команды patch
- Примеры использования команды patch
- Итоги
How to Compare Two Files in Linux
![]()
If you want to compare two files and decipher the difference, a command called “diff” is used. This guide is focused on providing you the usage of the “diff” command with various options to get the difference between two files.
So, how does the “diff” command actually function? The “diff” command compares the two files and outputs a list of differences between both files. More precisely, it yields a list of modifications that require to be made in the first file to match the second file. The “diff” command is also used by the programmers to get the difference between two source code files to develop patches.
Before diving into the examples, note that the order of the files is very important. Because the “diff” command gives output based on the order of the files.
How to Use “diff” Command in Linux to Compare Files:
The syntax of the “diff” command is mentioned below:
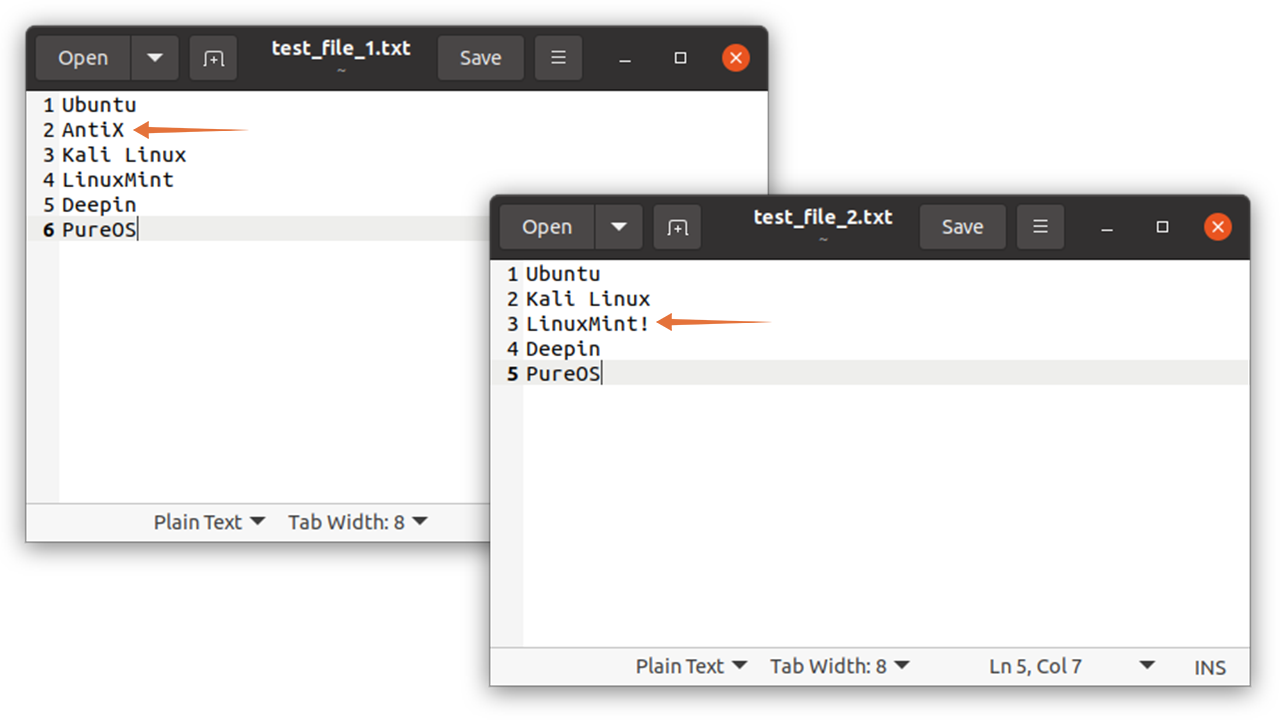
First, create two files. I am creating text files by the name of “test_file_1.txt” and “test_file_2.txt”. These files contain content with a slight difference:
Now use the following command to get the difference:
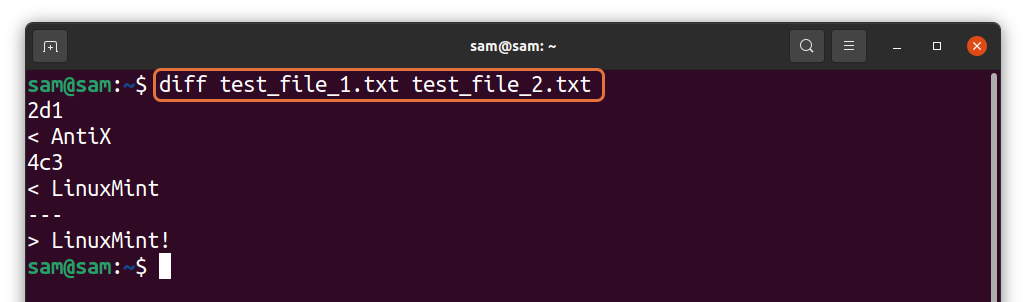
The standard output displayed the lines that match according to the order of the files mentioned in the command. So, let’s decode the output:
The comparison of the files is labeled, and each label has a number on either side. The format is as follows:
[Line number of file 1][Label(a,c,d)][Line number of file 2]
- a – Add: Add content in the first file to synch with the second file.
- c – Change: Indicates that a modification needed in the content of first file to match the second file.
- d – Delete: Remove content from the first file to match with the second.
“2d1” indicates to delete line number 2 of the first file to match the second file from line number 1.
Similarly, “4c3” means making a change in the fourth line of the first file to match line number 3 of the second file as both lines are slightly different.
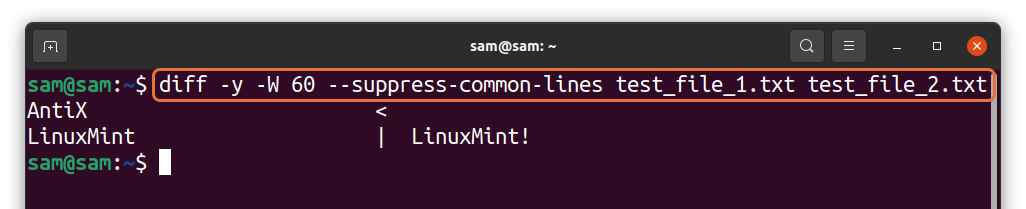
There is another method to view the difference, use the “diff” command with the “-y” option:

In the above output, the content of “test_file_1.txt” is displayed on the left side, while the content of “text_file_2.txt” is displayed on the right side. The difference is indicated by the symbols:
The “-W” indicates the width between the content of two files. To get separately and view the difference, use the following:
How to Get Output in One Line Using the “diff” Command:
If the labeled method is hard for you to decode, then there is a simpler approach. Using the “-q” option with the “diff” command gives you output in one line. Well, without any additional information, though:

If the files differ, then the above command will give an output. If the files are identical, then there will be no output. To demonstrate it, I am creating a copy of “test_file_1.txt” using:

A new file will be created by the name of “test_file_3.txt” containing the same content that “test_file_1.txt” has. Now, use:

Since both the files have similar content, therefore, there would be no output.
How to Check the Difference of Files in Context Mode Using the “diff” Command:
To get the comparison in context mode, the “-c” option will be used with the “diff” command:
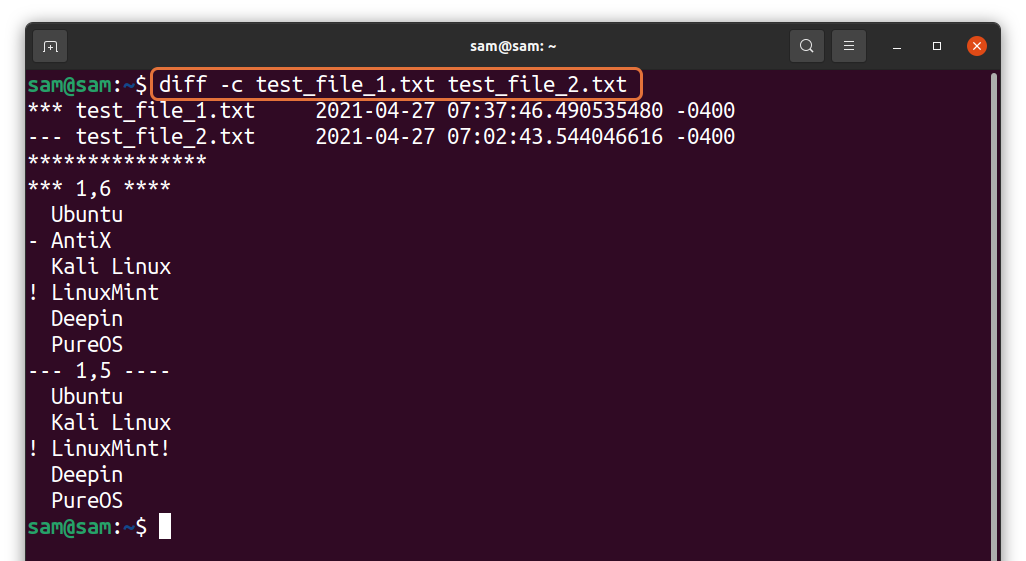
To maintain the difference, the first file is indicated by “***” along with the date and time of the creation, while the second file is indicated by “—”.
The next line signifies a range of lines considered during comparison. For the first file, it is “***1,6****” and for the second file, it is “—1,5—-”:
The difference is indicated by the symbols:
- + : Line is not present in the first file. Insert it in the first file or remove it from the second file to match both files.
- – : The line exists in the first file but not in the second file. Try to insert it in the second file or remove it from the first to match both files.
- ! : Line needs modification in order to match.
How to Check the Difference of Files in Unified Mode Using the “diff” Command:
The unified mode is quite similar to the context mode but without redundant information. The flag we use is “-u”:

In the output, the first file is indicated by “—” and the second by “+++”. The second line shows the number of lines considered for comparison in both files, then the content to be deleted, added, or modified with the symbols with them. There will be no symbol with similar lines in both files.
How to Ignore Case Sensitivity While Using the “diff” Command:
If you want to compare the files while ignoring the case sensitivity, then use the “-i” flag:
For demonstration, I have made the “D” of “Deepin” in the first file small:
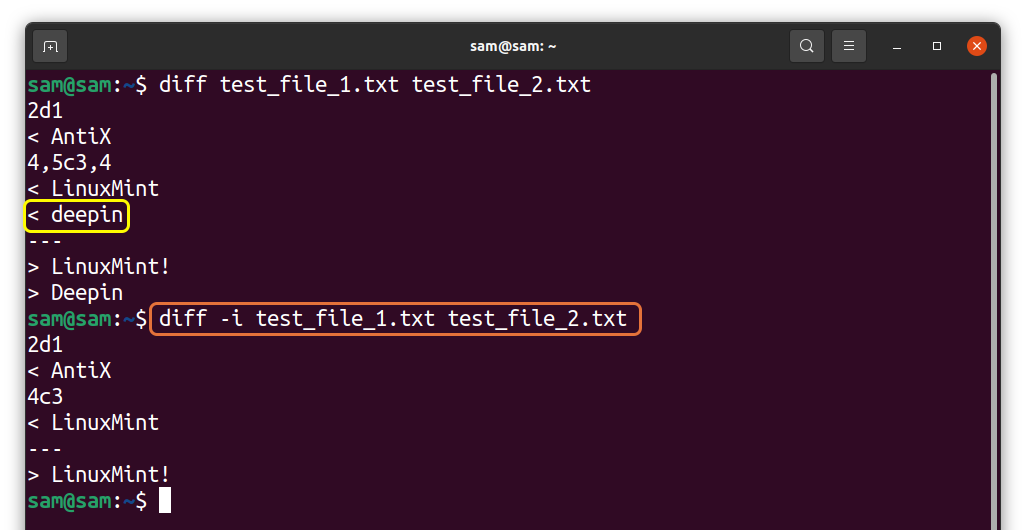
As seen in the first command, the difference is indicated; while using “-i” that difference has been removed.
Some other useful options of the “diff” command are listed below:
| Option | Description |
|---|---|
| -a | This option treats all the files as text files |
| -B | It ignores modification where lines are all blank |
| -E | This option ignores tab expansion |
| -I | It ignores the changes where all lines match |
| -s | Gives output when two files are identical |
| -w | It ignores all white space |
| -Z | It ignores white space at line end |
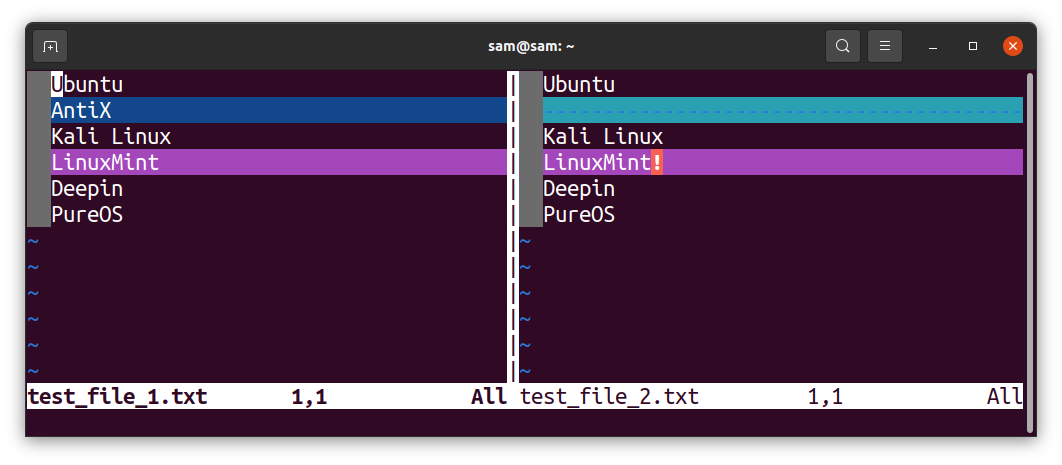
How to Use Vim Editor to Compare Two Files:
Another method to compare two files is using the “vimdiff” command. For that, you need to have vim installed:

Now, to compare two files use:

Both files will be opened side by side. The portion that does not match will be highlighted:
How to Compare Two Files Using “colordiff”:
Another approach is a sort of extension of the “diff” command. You can make the comparison more identifiable by adding colors to it. To install use:
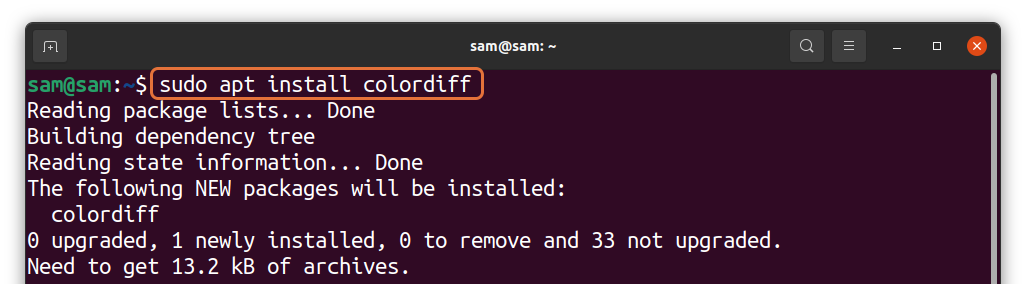

You can replace “diff” with “colordiff” to get the standard output of the “diff” command in colored format.
Conclusion:
To compare files in Linux and even in macOS, a utility used is called the “diff”. The “diff” utility compares two files and gives information about the differences between the two files. The developers primarily use the “diff” command to create patch files.
In this guide, we thoroughly discussed the “diff” command and how to use it to compare two files with different options. We also learned how to use “colordiff” to make the file differences more recognizable. But if you find terminal-based utility hard to use, there are some GUI-based tools as well, such as Kompare, DiffMerge, Meld — Diff Tool and Diffuse — GUI Giff Tool.
About the author
Sam U
I am a professional graphics designer with over 6 years of experience. Currently doing research in virtual reality, augmented reality and mixed reality.
I hardly watch movies but love to read tech related books and articles.
Команда diff в Linux: сравниваем два файла

Представьте, что однажды утром вы просыпаетесь и обнаруживаете, чтоб ваши продакшен-системы «лежат» из-за бага, который только предстоит найти. Один из наихудших кошмаров, верно?
Также оказывается, что для восстановления системы вам нужно сравнить код в двух версиях. Давление растет, все вокруг паникуют (и это понятно).
К счастью, в Linux есть утилита под названием diff, которая вам поможет.
Что из себя представляет команда diff в Linux?
Сравнение файлов и поиск различий между ними — широко распространенная операция. Она особенно полезна, когда нужно сравнить сложный код или конфигурационные файлы.
Сравнивать вручную долго и тяжело, к тому же велика вероятность ошибок. Поэтому Linux предоставляет вам мощную встроенную утилиту под названием diff. Ее применение позволяет сэкономить время и силы.
В Linux также есть еще одна команда, которая отлично дополняет diff, — patch. Она позволяет применить изменения из одного файла в другом. В этой статье мы рассмотрим обе команды и их применение на практике.
Синтаксис команды diff
Команда diff имеет следующий синтаксис:
Команда diff сравнивает два файла построчно. При этом первый из файлов она считает нуждающимся в редактировании и приведении к виду второго файла. Второй файл для diff — образец для сравнения.
Поэтому в выводе команды даются указания, что и как нужно изменить, чтобы первый файл стал таким же, как второй.
Указания даются при помощи специальных символов:
- c — CHANGE — изменение, которое нужно внести в указанной строке первого файла
- d — DELETE — то, что нужно удалить в первом файле
- a — ADD — то, что нужно добавить в первый файл
Давайте рассмотрим несколько примеров использования команды diff.
Примеры использования команды diff
Чтобы выяснить, являются ли файлы одинаковыми, команда diff дополняется флагом -s . В нашем примере содержимое файлов fileA и sameAsfileA совпадает.

А в следующем примере файлы имеют разный контент. Вывод команды diff говорит, что строки 11 и 14 в showList_v2.js нужно изменить, чтобы они совпадали со строками 11 и 13 в showList_v1.js.

Далее мы рассмотрим мой любимый способ использования команды diff — параллельный просмотр изменений. Для этого нужно применить флаг -y:

И последний пример — с объединенным выводом. Такой output часто используется как input для команды patch (ее мы тоже рассмотрим):

Вот еще несколько полезных флагов, которые можно применять с командой diff:
- -i — для игнорирования регистра. По умолчанию команда diff учитывает регистр.
- -w — для игнорирования пробелов в файле. По умолчанию пробелы тоже учитываются и могут считаться различием.
Синтаксис команды patch
Изменения в коде происходят постоянно. Расшаривать отредактированные файлы после внесения каждого изменения нереально. Обычно разработчики расшаривают сами изменения в коде.
Использование патчей («заплаток») — самый безопасный способ делиться только лишь изменениями.
Давайте посмотрим, как работают патчи:
Примеры использования команды patch
Предположим, у нас есть простой JavaScript-код в файле print_in_js.js, который выводит строку.

Но в функции вывода что-то сломалось, и нам нужно внести исправления. Мы отсылаем файл print_in_js.js коллеге, который может исправить код.
Наш коллега находит опечатку в строке № 3 и исправляет файл.
Когда файл исправлен и код работает корректно, наш коллега создает патч:
diff -u print_in_js.js print_in_js_Fixed.js > patched_print_js.diff
Давайте посмотрим содержимое патча:

Получив патч, мы применяем его:

И — вуаля! — наш код исправлен!
Итоги
Создавать и применять патчи при помощи команд patch и diff довольно просто.
Похожий подход применяется, когда вы пользуетесь системами контроля версий вроде Git или SVN. Знание основ (т. е. работы соответствующих команд Linux) поможет вам лучше понять работу систем контроля версий, а это важно для разработчиков.