- How to install ExpressVPN on Ubuntu 22.04 or 20.04 LTS
- 1. Download ExpressVPN for Linux
- 2. Install ExpressVPN on Ubuntu 22.04 / 20.04
- Way to use GUI for the Installation
- Use the Command terminal to install ExpressVPN
- 3. Run the ExpressVPN command line on Ubuntu
- 4. Disconnect and Connect the VPN server
- 5. Update
- 6. Uninstallation
- Leave a Comment Cancel reply
- How to set up ExpressVPN OpenVPN using Ubuntu Network Manager
- Jump to…
- 1. Find your ExpressVPN account credentials
- 2. Set up the VPN
- 3. Connect to a VPN server location
- Disconnect from a VPN server location
How to install ExpressVPN on Ubuntu 22.04 or 20.04 LTS
To access the internet safely and visit websites that are not allowed by your webmaster, VPN software comes in handy. It works by encrypting internet traffic and routing it through remote servers. There are dozens of VPN services available on the Internet some are free and others paid. Ofcourse the paid one will have fast servers. Out of a number of paid VPNs, ExpressVPN is one of the popular ones that is available for Linux systems as well as for Windows, macOS, browsers, smartphones, routers, and other devices.
This virtual private network (VPN) service provider offers users access to servers in more than 90 countries. It also provides features like a no-logging policy, split-tunneling, and a kill switch to protect against internet disruptions.
Steps to install ExpressVPN on Ubuntu / Debian / Linux Mint:
1. Download ExpressVPN for Linux
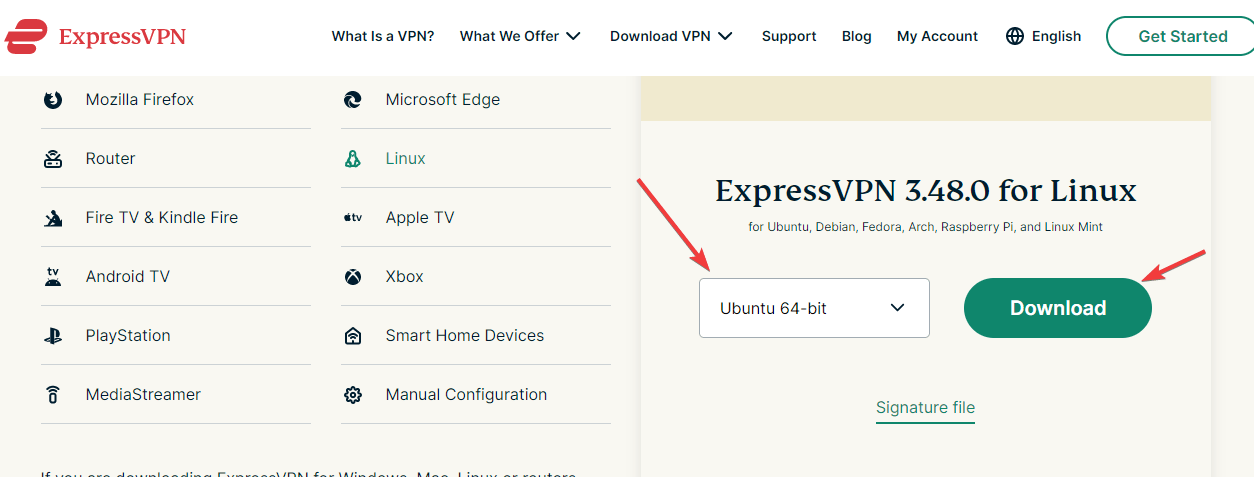
ExpressVPN is a paid software therefore not available through the Ubuntu System repository. So, we have to download the Debian package of ExpressVPN available to install on Linux systems. Here is the website download page, visit it, select Ubuntu 64-bit, and hit the Download button.
2. Install ExpressVPN on Ubuntu 22.04 / 20.04
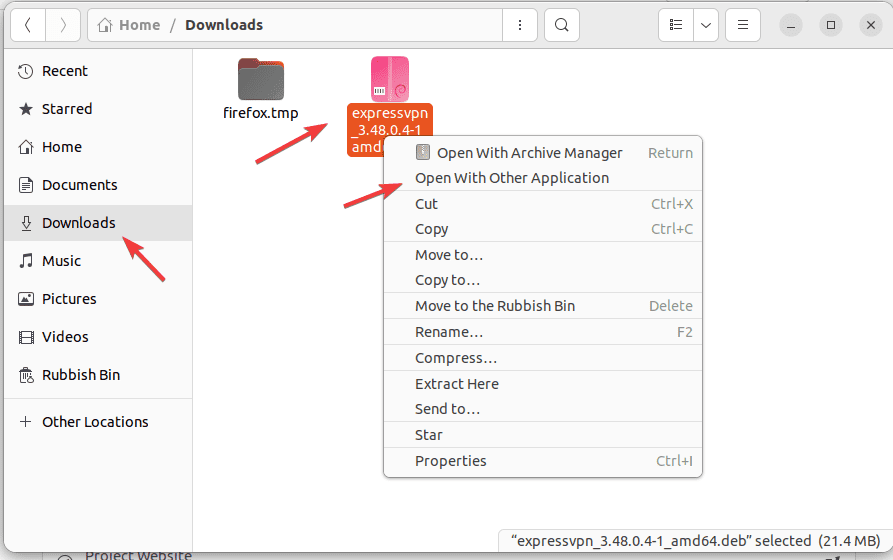
Once, using the previous step you have the ExpressVPN Debian installer on your system; open the Downloads directory because the files got from the browser go into that.
Way to use GUI for the Installation
- Open the File Manager and select the Downloads folder from the left side panel.
- After that, right-click on ExpressVPN.xxx.deb file and select “Open with other Applications“.
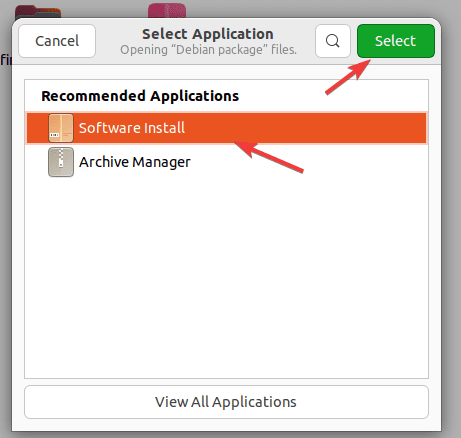
- Select “Software Install” of Ubuntu.
- Soon, the installer will open, here click the “Install” button and ExpressVPN will be installed on Ubuntu.

Use the Command terminal to install ExpressVPN
Those who want to use the Command terminal on their Ubuntu Linux, first open it using the Ctrl+Alt+T. After that switch to the downloads directory using the given command:
Check whether the downloaded ExpressVPN file is present there or not.
After, that, you can use the given command to install it.
sudo dpkg -i expressvpn_*_amd64.deb3. Run the ExpressVPN command line on Ubuntu
Finally, we have completed the installation of ExpressVPN on our respective Ubuntu versions, now run it and enter the registered license you have purchased for it.
As we know it is a command line tool for Linux, so to activate the license open your command terminal and use the following given syntax.
Paste the license key and hit the Enter key.
4. Disconnect and Connect the VPN server
To connect the remote VPN server and make your system shielded to browse the internet, you just need to run the given command in the terminal. The software will automatically choose the appropriate server to connect to:
Whereas, those who want to connect to some particular location server, can first list what are the available ones.
After that, use the listed location in the command to connect, for example:
expressvpn connect "USA - New York"Now, open your browser and start browsing the internet safely. And when your work is done, to disconnect from the VPN server, in your command terminal run:
5. Update
To install future updates for ExpressVPN, the users need to download its latest version from the official website to install again as we have shown in this tutorial.
6. Uninstallation
In case things are not going well with the software then no need to continue with it. Go to your Command terminal and run the given single command to completely uninstall EpressVPN from your Ubuntu 22.04/20.04 system.
sudo apt remove expressvpn --purge
Other Articles:
Leave a Comment Cancel reply
This site uses Akismet to reduce spam. Learn how your comment data is processed.
How to set up ExpressVPN OpenVPN using Ubuntu Network Manager

This tutorial will show you how to manually set up ExpressVPN on Linux via Ubuntu Network Manager.
Not all ExpressVPN locations may be available for manually configured connections. To use the full list of VPN locations, use the app setup.
Important: The OpenVPN manual configuration does not offer the same security and privacy benefits as the ExpressVPN app. If you are located in a country with a high level of internet censorship, you are recommended to use the ExpressVPN app for a more stable VPN connection. Important: While running OpenVPN 2.6, you may encounter a warning saying “–keysize is DEPRECATED”. This is due to ExpressVPN having the keysize option in the .ovpn file. This warning message will not affect VPN functionality as OpenVPN 2.6 will simply ignore the line with no further consequence.
If you want to remove this warning, open the .ovpn file with a text editor and either:
- delete the line containing keysize
or - add # in front of the keysize (#keysize 256).
Alternatively, you can ignore the warning without any negative effects.
Prefer app setup? See the instructions for setting up the ExpressVPN app for Linux or setup for other Linux distributions.
Jump to…
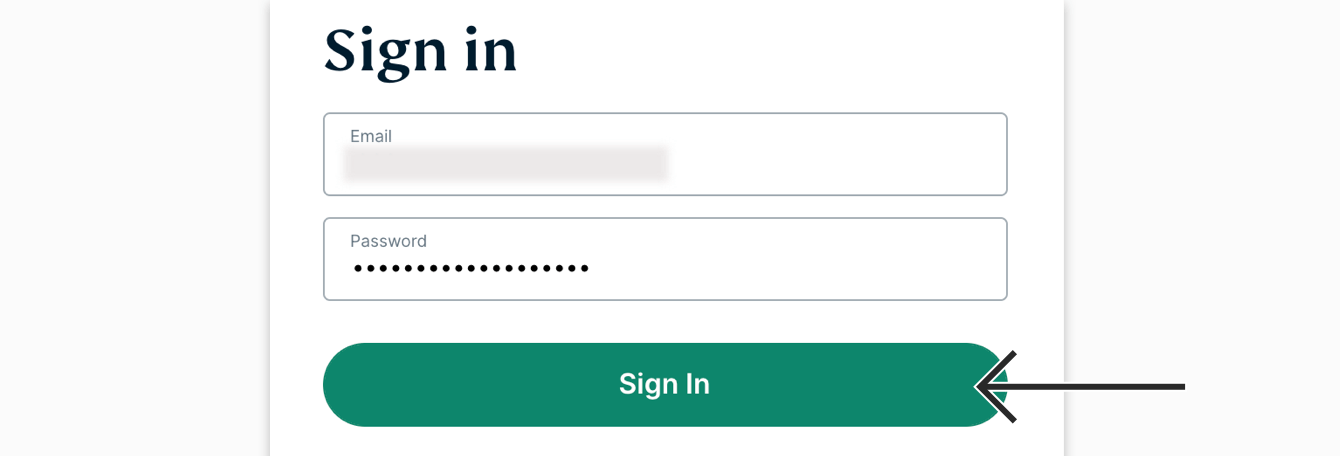
1. Find your ExpressVPN account credentials
Go to the ExpressVPN setup page. If prompted, enter your ExpressVPN credentials and click Sign In.
Enter the verification code that is sent to your email.
On the right, with OpenVPN already selected for you, you will see your username, password, and a list of OpenVPN configuration files.
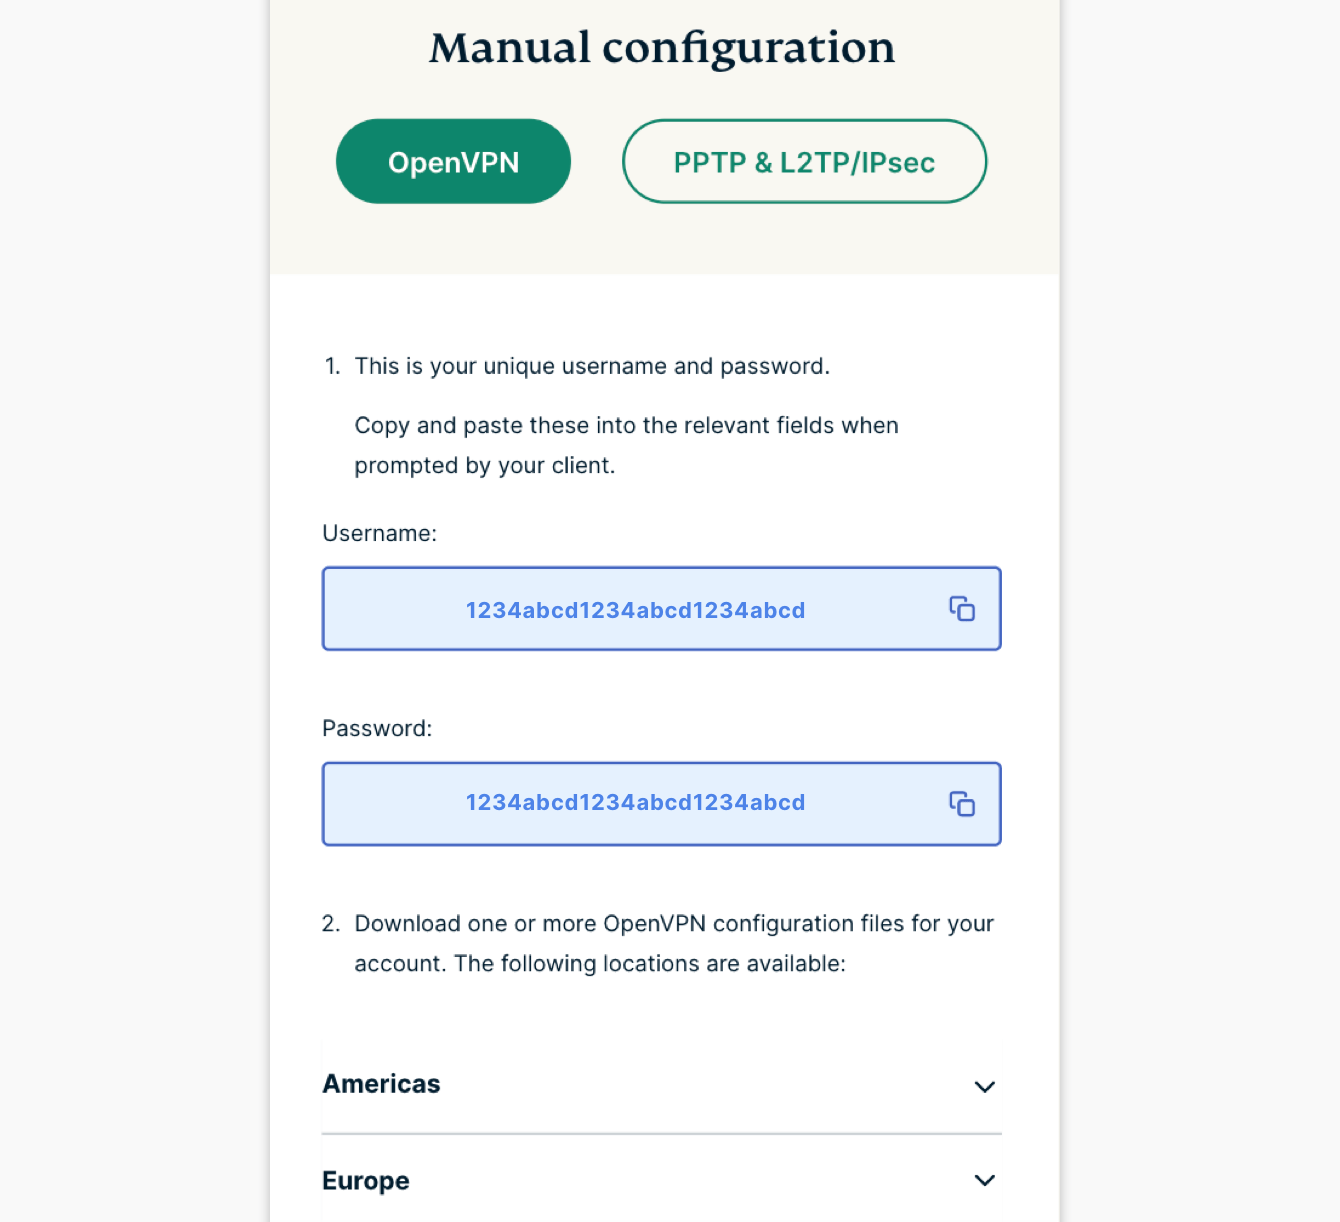
Click the location(s) you want in order to download the .ovpn file(s). Keep this browser window open. You will need this information for the setup later.
Next, download this ZIP file which contains the VPN keys and certificates.
After, go to the Downloads folder (or the location you saved the file to). Locate the file, right-click it, and select extract here to unzip it for later.
2. Set up the VPN
On your desktop, click ⋮⋮⋮. In the search bar, type Network.
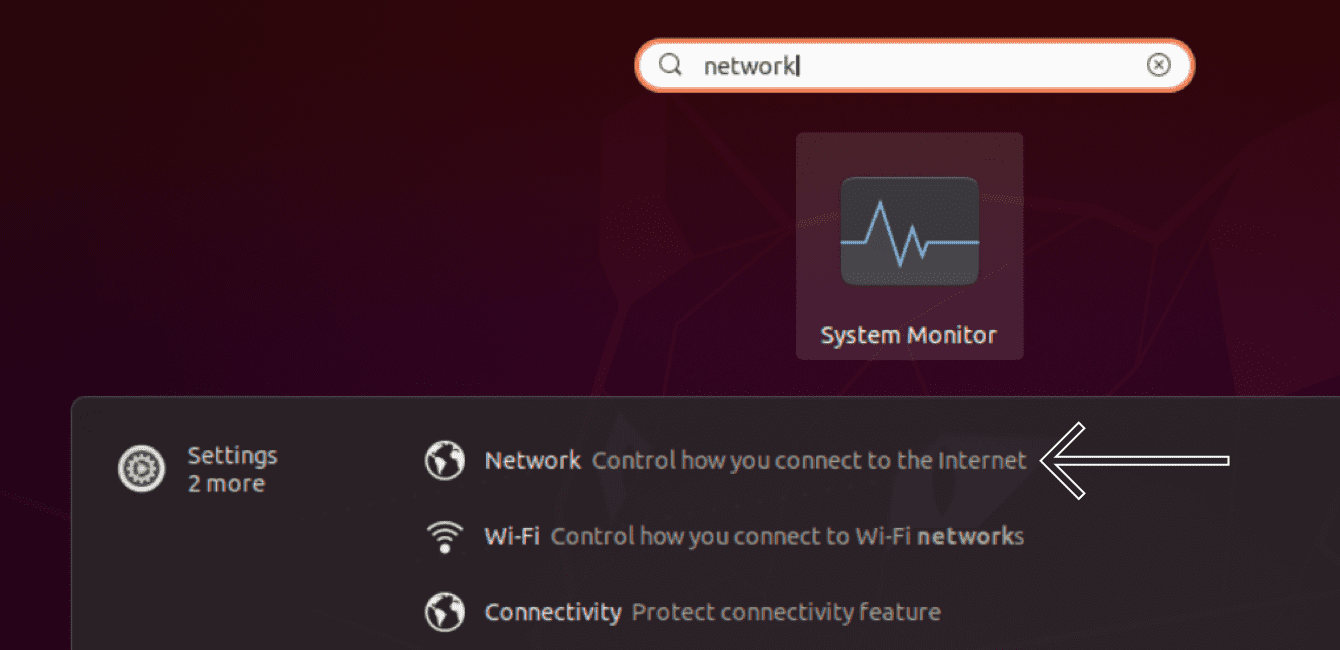
Select Network.
Next to VPN, click .
![]()
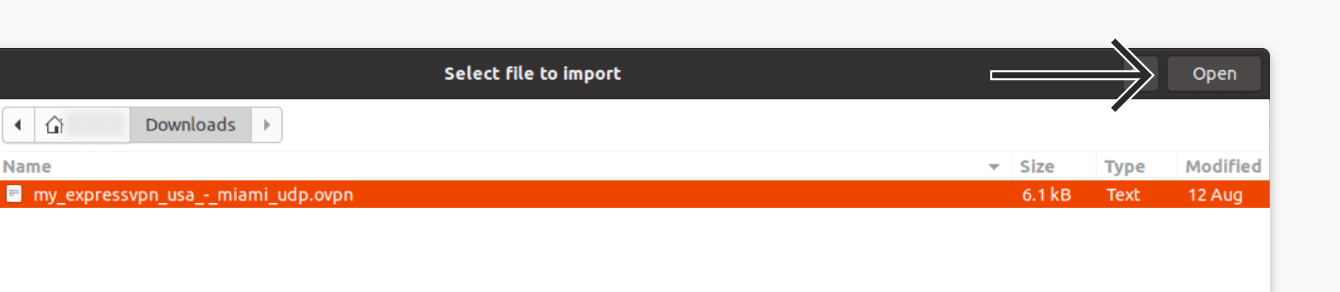
Click Import from file…
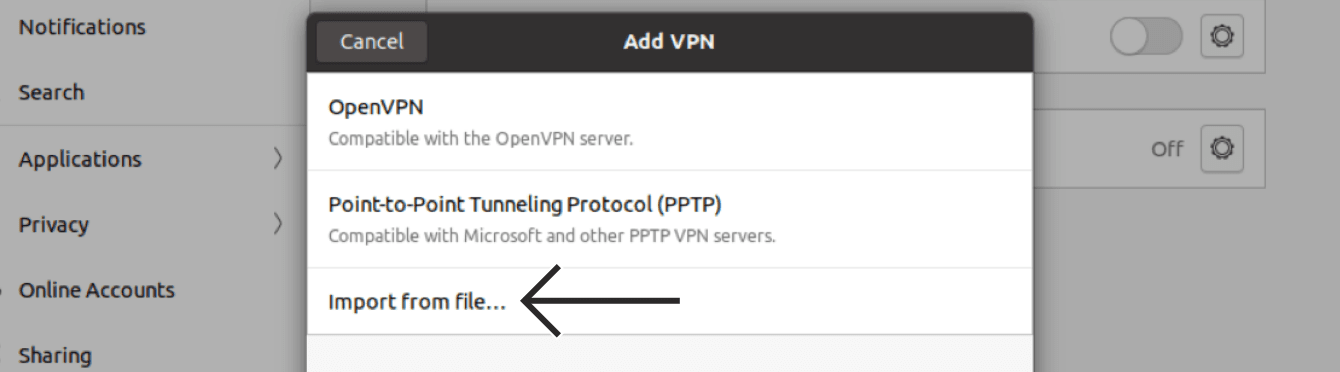
Select the ExpressVPN OpenVPN configuration file you downloaded earlier. Click Open.
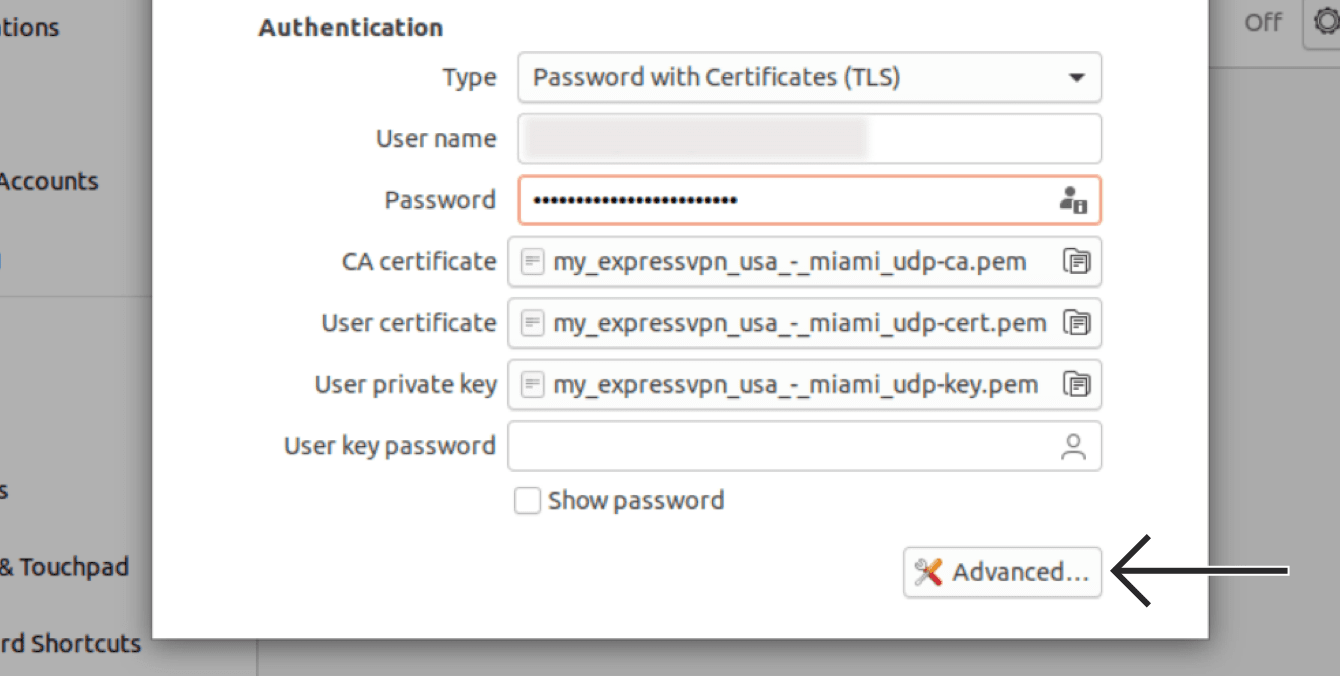
In the Identity tab, under Authentication, enter the following details:
- Type: Select Password with Certificates (TLS).
- User name: Enter the username you found earlier.
- Password: Enter the password you found earlier.
Next, click Advanced…
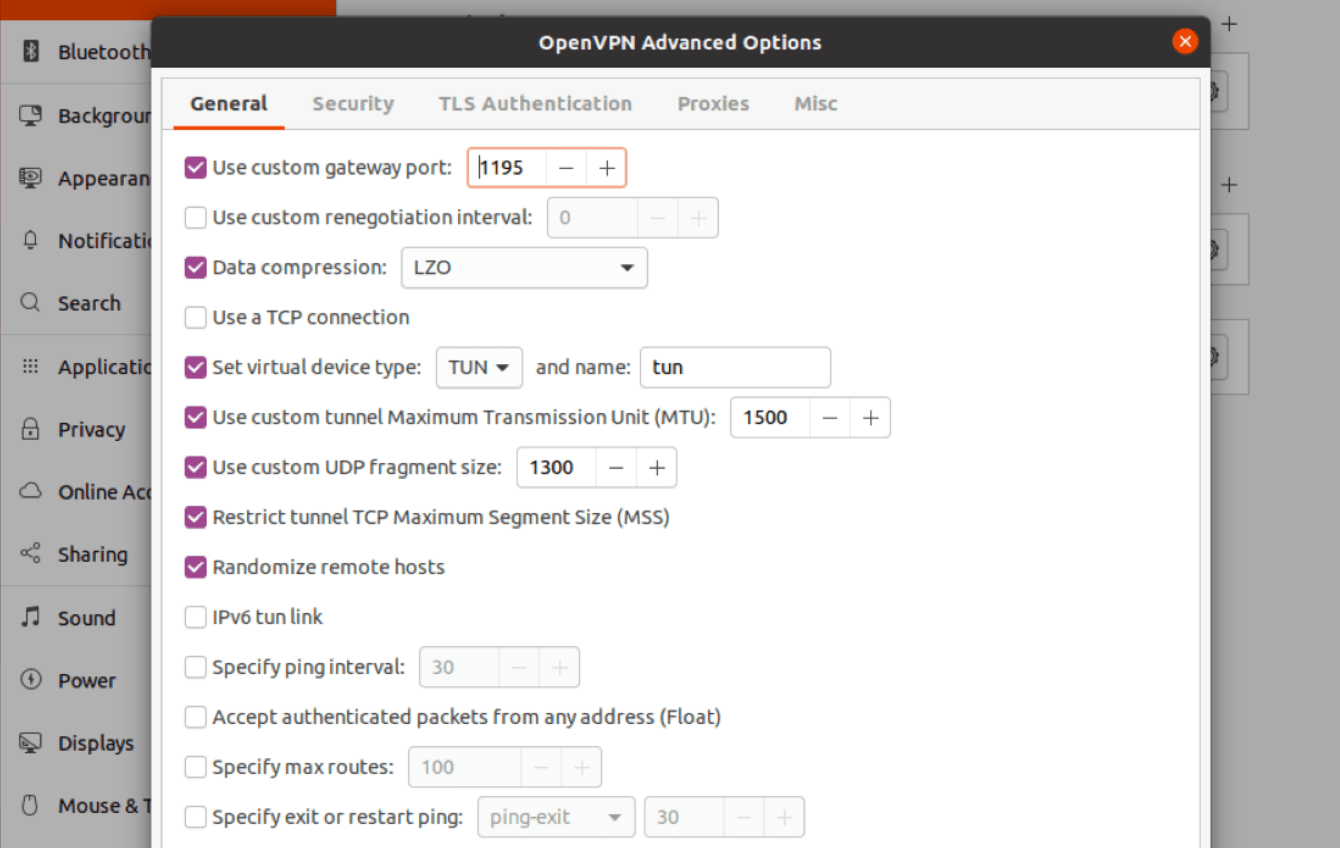
Under the General tab, enter the following details:
- Use custom gateway port: Check this box, then enter 1195.
- Data compression: Select LZO.
- Use custom tunnel Maximum Transmission Unit (MTU): Check this box, then enter 1500.
- Use custom UDP fragment size: Check this box, then enter 1300.
- Restrict tunnel TCP Maximum Segment Size (MSS): Check this box.
- Randomize remote hosts: Check this box.
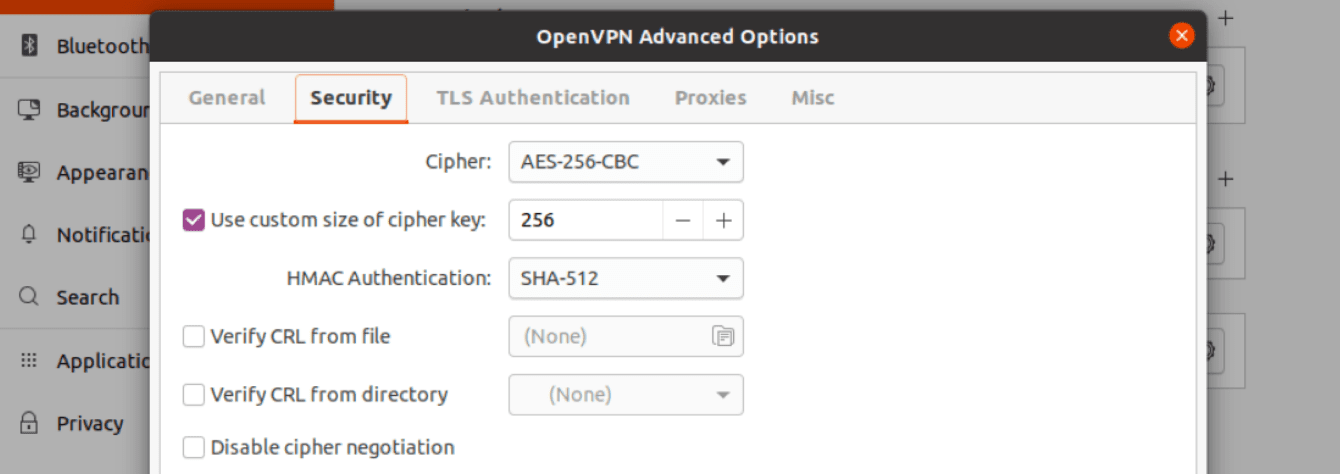
Select the Security tab. Make sure the following options are selected.
Select the TLS Authentication tab. Under Additional TLS authentication or encryption, enter the following details:
- Key File: Locate the folder where the ZIP file was saved earlier, then select the ta.key file. Click Open.
- Key Direction: Select 1.

3. Connect to a VPN server location
To connect to a VPN server location, go to Network, then toggle the new VPN profile on.
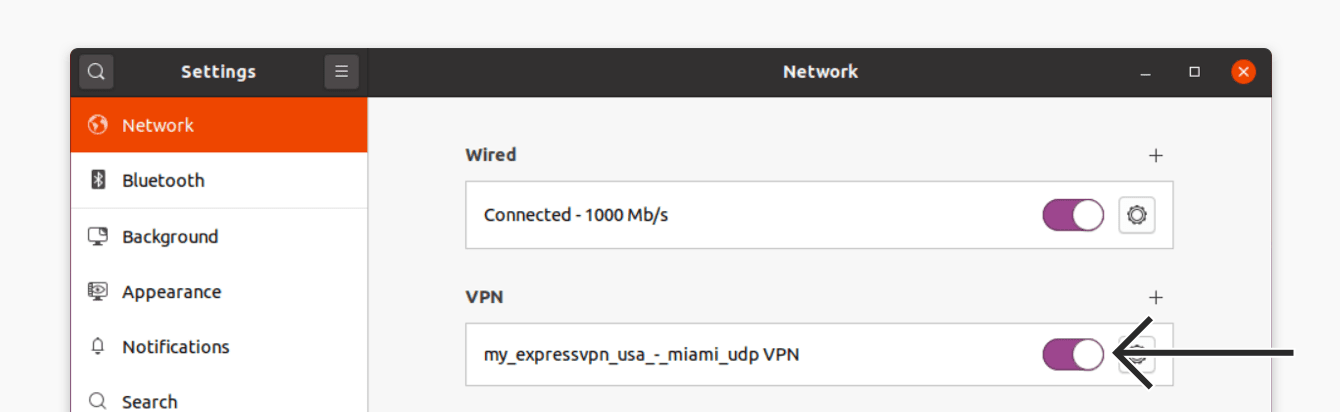
If prompted, enter the password provided for the OpenVPN configuration.
Once you are connected to ExpressVPN, you will see an icon that says “VPN” at the top right corner of your desktop.
![]()
Check your location and IP address to confirm the VPN connection is working.
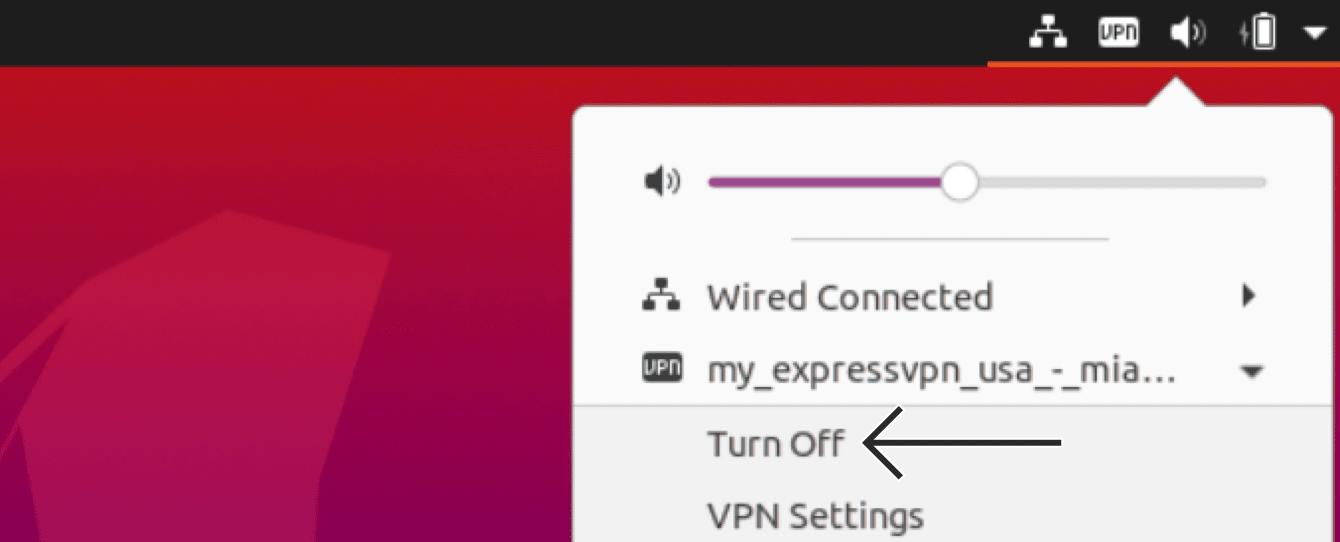
Disconnect from a VPN server location
To disconnect from a VPN server location, click the VPN icon at the top right corner of your desktop. Select the VPN profile, then click Turn Off.
Was this article helpful?
We’re sorry to hear that. Let us know how we can improve.
A member of our Support Team will follow up on your issue.