- Install Samba on Linux Mint to share files with Windows
- Install and Configure Samba Server on Linux Mint 20
- 1. Run system update
- 2. Install Samba on Linux Mint
- 3. Allow samba in Linux Mint Firewall
- 4. Add your user to the Samba group
- 5. Share some Linux Mint folder
- 6. Access the shared folder on Windows or Linux
- Extra tip- Linux Mint SambaShare User
- 8 thoughts on “Install Samba on Linux Mint to share files with Windows”
- Как сделать общую сетевую папку в Linux (настройка SMB в Linux)
- File share linux mint
Install Samba on Linux Mint to share files with Windows
Samba is a popular, open-source networking software that computers with a Unix or Linux – operating system allow the sharing of network resources from Windows -networks, such as files and printers. However, it is not limited to Windows only, we can install and use on Unix / Linux- based servers pr Desktop to share resources over the network. The common protocols Server Message Block (SMB) and Common Internet File System (CIFS, an open version of SMB) are the basis on which Samba is based. The name ” Samba ” is just a name given to represent “SMB”.
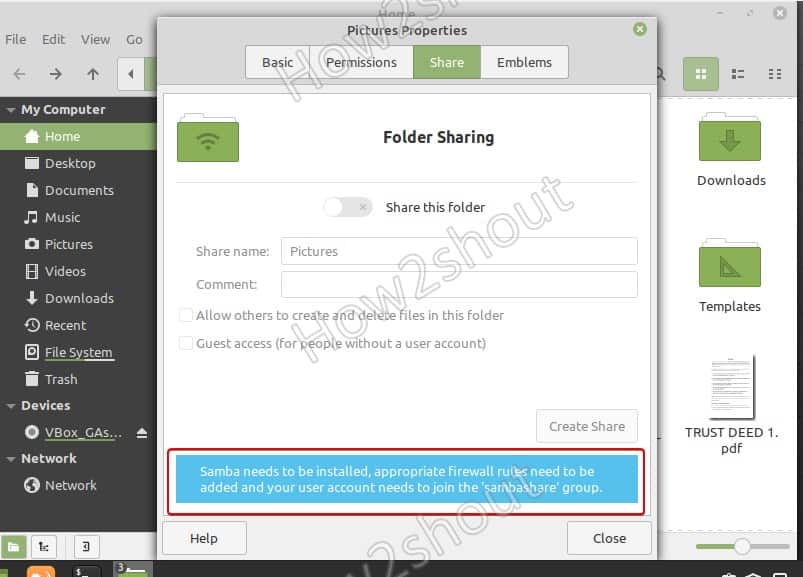
If you are using Linux Mint and want to share some folder, then right-click on it and select properties. And then the Share Tab. However, you will not able to enable this option because samba is not there yet. To confirm, you can see a message given at the bottom “Samba needs to be installed, appropriate firewall rules need to be added and your user account needs to join the ‘samba share group“.
To solve this let’s follow the given steps in this article…
Install and Configure Samba Server on Linux Mint 20
1. Run system update
Well, it is not a necessary step, however, run the system update command to rebuild the repo cache and make sure all the system installed packages are up to date.
2. Install Samba on Linux Mint
Next, in your command terminal use the APT package manager to install Samba on your Linux Mint. The packages to set it up are already there in the system repository, thus we don’t need to add anything extra.
Check its service is active and running:
sudo systemctl status smbd
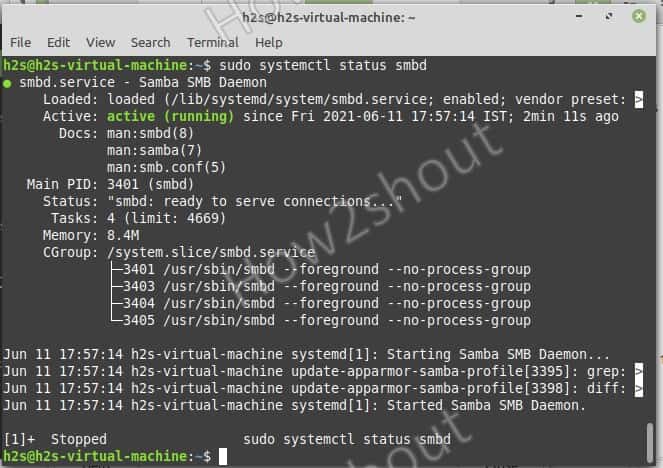
If it is not active then run:
sudo systemctl --enable now smbd
3. Allow samba in Linux Mint Firewall
To connect and access the shared files over SMB protocol, we have to first whitelist and allow its service to get accessed from the outside of the computer. Thus, allow it in the firewall
4. Add your user to the Samba group
Let’s add the current System user to the SambaShare group, so it can access all files and folders shared under it.
sudo usermod -aG sambashare $USER
set the password for share: This will be different from your system password.
Note: $USER means your current user, if you want to set some other user then change $USER with the particular user name. Also, the file or folder you want to share must be accessible to that particular user.
Alternatively, if you want to add some other users to the SAMBA group use:
sudo usermod -aG sambashare your-user
sudo smbpasswd -a your-user
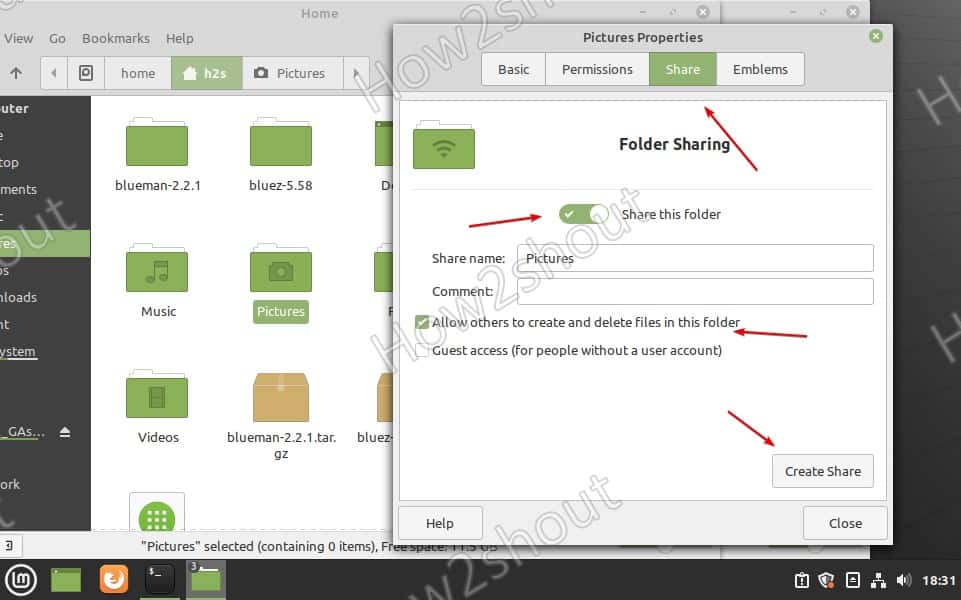
5. Share some Linux Mint folder
Lets’ say I want to share the Pictures folder or any other on my Linux Mint that is owned by my current user. So, for that simply go to that folder, right-click on it and select the Share tab.
6. Access the shared folder on Windows or Linux
Now, we can mount the Linux Mint shared folder on other Windows or Linux systems available in the same network or domain.
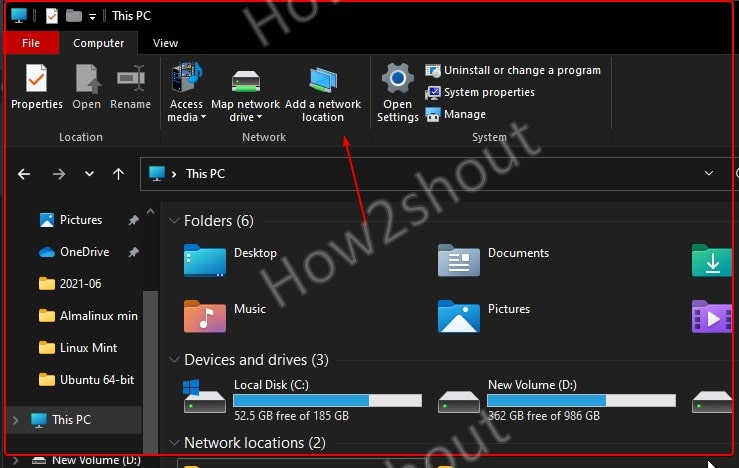
On Windows 10/8/7
- Open My Computer or This PC
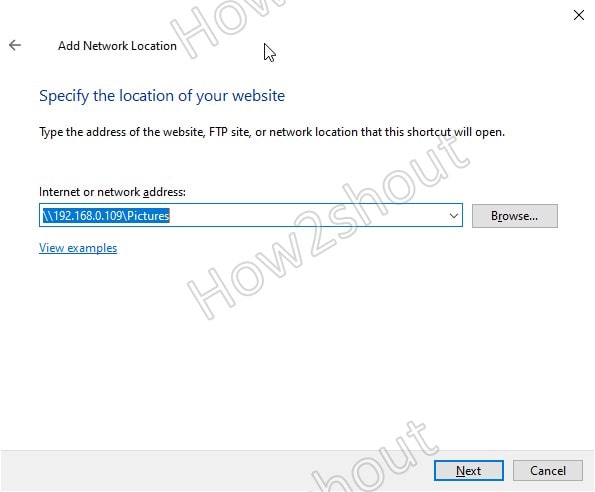
- Select Add network location icon given in the top menu.

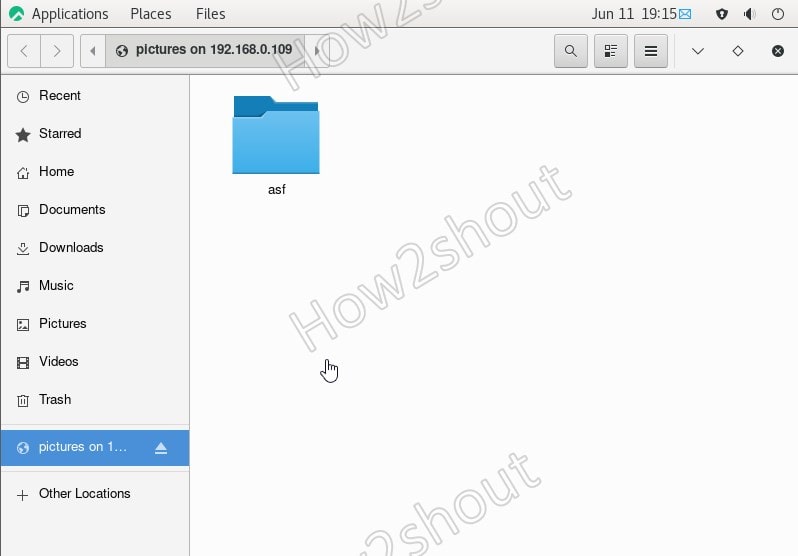
- Add your Linux Mint \\server-ipaddress\shared -folder-path– For example, here we have shared the Pictures folder, the path will be like this- \\192.168.0.109\Pictures

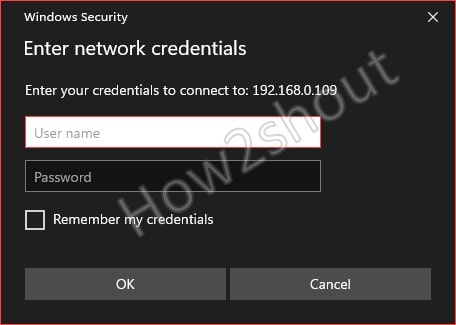
- Enter Samba User and password

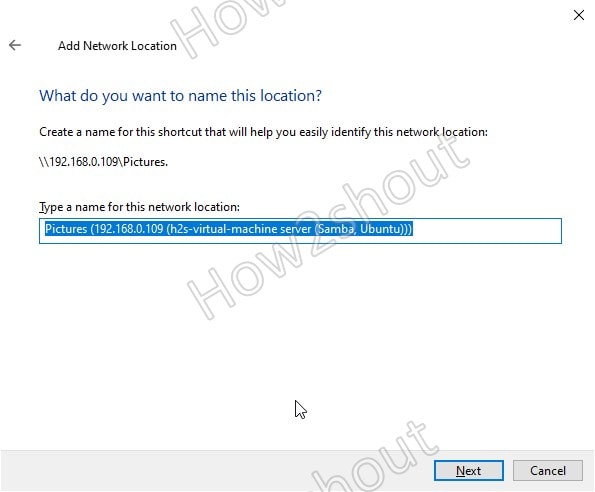
- The system will set a random name for your shared folder, however, you change to something easy to remember.
- Finally, you have the shared folder with read and write access.


On Linux systems such as Ubuntu, CentOS, and others…
The place to connect the samba server can be different from Linux to Linux, depending upon the desktop environment.
Here we are showing an example for Ubuntu and CentOS using GNOME.
- Open File Manager
- Select Other Locations from the right side given panel.
- At the bottom, in the “Connect Server” box type- smb://server-ip/shared-folder-path

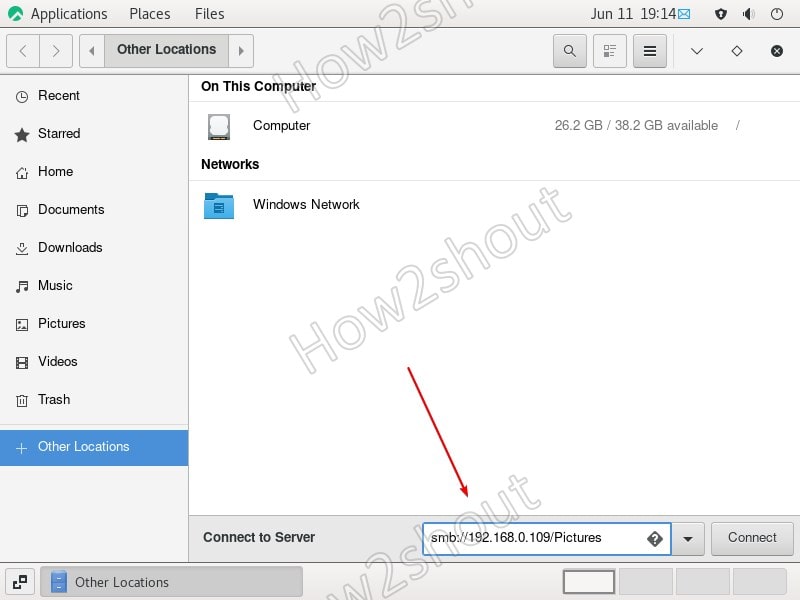
- Click on Connect.
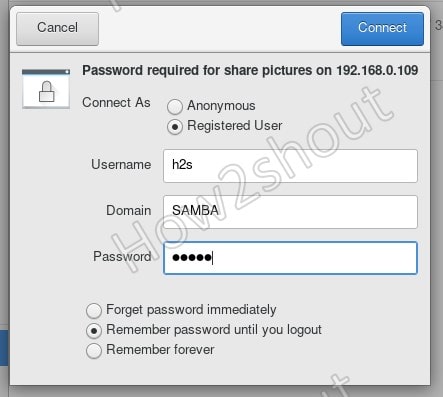
- Select Registered User and enter that username and password


Extra tip- Linux Mint SambaShare User
If you want to create a new user to access the folder you want to share except it cannot access anything else then follow the below steps:
Create users:
Add user to Sambashare group
sudo usermode -aG new-user sambshare
Change the folder rights of a folder that you want to share to read and write for all users. So, that our new user can access that.
sudo chmod 777 folder-path
Now, you can access the shared folder using the new user and its password.
8 thoughts on “Install Samba on Linux Mint to share files with Windows”
I had to use “sudo smbpasswd -a $USER” otherwise I got the error “Failed to find the entry for user …”
Otherwise, a very straightforward setup. Many thanks. Reply
Awesome walkthrough, thank you!| One minor typo in the “Add user to Sambashare group” step:
Command should be `sudo usermod -aG sambashare new-user` …and then it might be good to set the password for that new user immediately following: `sudo smbpasswd -a new-user` Reply
For the command line “sudo systemctl –enable now smbd”
in my version – Linux Mint 17.3 “Rosa” Cinnamon – I had to shorton to “sudo enable now smbd” to work. Reply
Everything working fast, I have an old gateway DX4200 with 8 GB, and a tablet with Windows 10. Your tutorial was accurate and worked for me. Thanks so much, would please provide a xfer link and send you $ufficient grace. Reply
step 4 is missing instructions on how to create the user in the first place.
step 5 is bad. nemo sharing is terrible. it won’t let you specify who you share what with, it just shares it with everyone Reply
Как сделать общую сетевую папку в Linux (настройка SMB в Linux)
Начните с установки пакетов samba и smbclient.
В Debian, Linux Mint, Ubuntu, Kali Linux и их производных для установки samba выполните команду:
sudo apt install samba smbclient
В Arch Linux, BlackArch и их производных выполните команду:
sudo pacman -S samba smbclient
Следующая команда не сработает, если отсутствует файл /etc/samba/smb.conf. Если у вас тоже нет этого файла, то создаёте его заглушку — к настройке самого файла smb.conf мы вернёмся позже:
sudo touch /etc/samba/smb.conf
Теперь нужно добавить пароль для пользователя Samba. Действует следующее правило: имя пользователя должно быть таким же, как у вашего текущего пользователя, а пароль можно установить иной, отличный от вашего системного пароля.
Для установки пароля Samba, выполните следующую команду:
Если вы хотите, чтобы у пользователя не было пароля, то укажите опцию -n.
Создайте папку, которая станет совместно используемой:
Узнаем абсолютный путь до папки ~/linuxshare:
Откройте для редактирования файл /etc/samba/smb.conf:
sudo gedit /etc/samba/smb.conf
Добавьте туда строки вида:
[ИМЯ_ПАПКИ] comment = Samba на Linux path = /home/ИМЯ_ПОЛЬЗОВАТЕЛЯ/ИМЯ_ПАПКИ valid users = ИМЯ_ПОЛЬЗОВАТЕЛЯ read only = no browsable = yes
Обратите внимание, что все пробелы в строках выше являются обязательными.
Для моих данных это строки:
[linuxshare] comment = Samba на Linux path = /home/mial/linuxshare valid users = mial read only = no browsable = yes
Теперь запустим службу SMB:
sudo systemctl start smb.service
Для добавления службы в автозагрузку выполните:
sudo systemctl enable smb.service
Для подключения к этой общей сетевой папке на Linux нужно использовать IP адреса компьютера Linux.
Создадим файл, чтобы сетевая папка не была пустой:
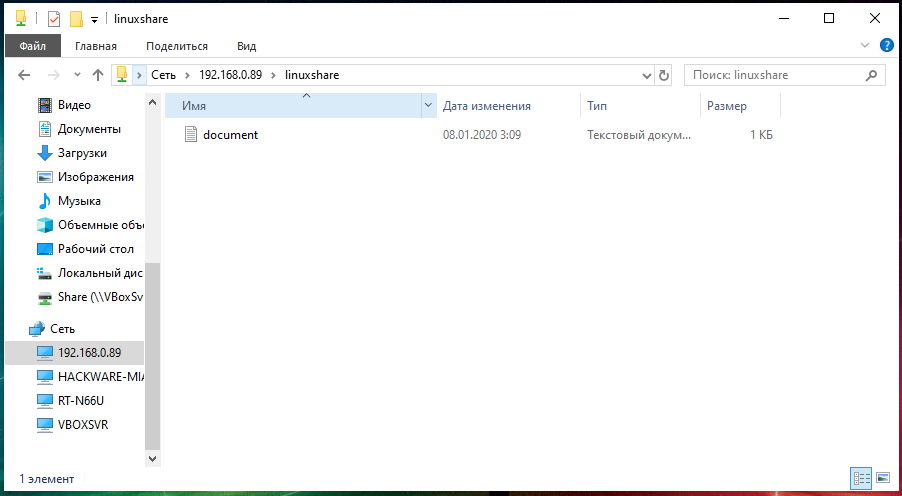
echo "Документ на Linux" > ~/linuxshare/document.txt
Посмотрите локальный IP адрес компьютера, на котором запущена Linux:
У меня этим IP является 192.168.0.89, а папку, как мы помним, я создал с именем linuxshare, тогда в Windows я перехожу в проводнике во вкладку «Сеть» и подключаюсь к этой папке следующим образом:
Вводим учётные данные (которые мы установили командой smbpasswd):

Видим содержимое совместно используемой папки, размещённой на Linux с помощью SMB:
Для подключения к сетевой папке из консоли Linux, запустите команду вида:
sudo smbclient //IP_АДРЕС/Папка -U ПОЛЬЗОВАТЕЛЬ
sudo smbclient //192.168.0.89/linuxshare -U mial
После ввода пароля нам становится доступным содержимое сетевой папки.
File share linux mint
Using Nemo to share files via SMB, or Windows style fileshares
You can share any user directory you wish by using Nemo, the file browser provided by default in Linux Mint. Start Nemo, the file browser and navigate to a directory somewhere below your home that you want to share. Rt-Click the directory of choice and select Properties. Then take a close look at the «Sharing» tab.
— Select «Share this Folder»
This will let you access the folder from another system as a SMB share. Before you can actually access this you will need a samba password. So create one by going to the command line and typing
$ sudo smbpasswd -a user
. where user is your user name on the Linux system.
. Now you can go to a Windows or OS X, or another Linux machine and access the share on your Linux system. Use the credentials of your Linux username and the smb password you provided when you ran the command above.
Keep in mind that your Linux Mint password and your smb password are independent. They do not need to be the same.
You can always change your samba password on your Linux Mint system by going to the command prompt and simply entering:
$ smbpasswd
..it will prompt you for the old password then prompt you twice for the new password.
Going back to revisit the share Properties; you can select guest access, such that you don’t need to have an account to view the share. Anyone can then browser to the SMB share on the Linux box to read files. This presents a very open share.
Revisiting the share Properties yet again, you can also create the share such that you must have an account on the Linux system (and a smb user), but would have read-only access to the share.
$ sudo adduser shareuser
$ sudo smbpasswd -a shareuser
..Now shareuser can access the share you created, BUT will only have read access. Guests with no local smb account entry will not have access at all. This type of share lets you share data with others who have the smb credentials you provide them. You can even create the account such that it has no login permission on the system by using the «—disabled-login» command line option.
I have seen lots of convoluted and confusing ways to accomplish fileshare on Linux. This is by far the most simple that I have discovered.