- How to Use the sync Command in Linux?
- What is a sync Command in Linux?
- Options Available in Sync Command
- How to Use the sync Command in Linux?
- Example 1: Sync User Cache Data
- Example 2: Sync User File Sytems
- Example 3: Sync File Data Only
- Example 4: Sync Multiple Files Data
- Example 5: Sync File System
- Example 6: Sync Multiple File Systems
- Example 7: Sync File System of a Specific Partition
- Example 8: Sync Directory and Sub-Directories
- Conclusion
- Keeping Linux files and directories in sync with rsync
- Great Linux resources
- Source and targets
How to Use the sync Command in Linux?
In Linux, the sync command utility synchronizes the data from the cache to the permanent memory. The temporary data on Cache can corrupt or be lost in case of a sudden shutdown of the system. To avoid losing the important cache data, it’s better to sync it with the hard disk. Considering the importance of the sync command, this post will illustrate the working and usage of the sync command in Linux. The outline of this post is provided below:
What is a sync Command in Linux?
Before using the sync command in Linux, let’s check the syntax and options/flags for the sync command.
The sync command syntax is given below:
Options Available in Sync Command
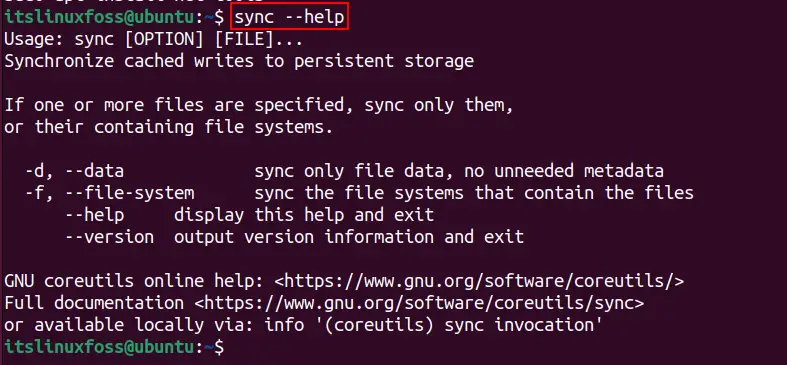
The following options are available with the “sync” command, which can be checked with the “sync –help” command:
| -d –data | This option syncs the file’s data only. |
| -f –file-system | It allows to sync all the system data files (including metadata and other system files ) of a file. |
| –version | To get the installed version. |
The options and the syntax-related support of the sync command can be retrieved using the following command:
Let’s get into the usage of the sync command.
How to Use the sync Command in Linux?
This section provides a detailed usage of the sync command with various examples:
Example 1: Sync User Cache Data
This command syncs the cache data to the hard disk. To sync all the data of the current user, use the following command:

Example 2: Sync User File Sytems
When you give the “sudo” privileges to the sync command in Linux, it will sync all the mounted file systems on the hard disk:

To get the file systems of a user, execute the “$ df” command:
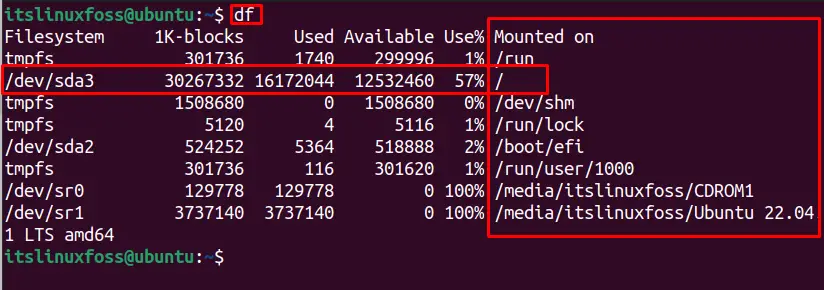
The above figure shows “57%” of data is mounted on the “/” root directory, and the partition is “/dev/sda3”.
Example 3: Sync File Data Only
The sync command provides the “d” or “–data” options to sync/copy the cache data of the file (excluding other data files, i.e., metadata) to the hard disk. To copy the data files of a particular file named “testfile1.txt”, the below command is exercised:
$ sync -d /home/itslinuxfoss/testfile1.txt

Example 4: Sync Multiple Files Data
To sync cache data of multiple files including a text file“/home/itslinuxfoss/testfile1.txt” and an mp4 file “~/Desktop/”, you can use the sync command as follows:
$ sync -d /home/itslinuxfoss/testfile1.txt ~/Desktop/Samplevideo.mp4

Example 5: Sync File System
The “f” or “–file-system” options allows the user to sync the data along with the file systems. To sync the file systems of the “/home/itslinuxfoss/Documents”, we used the command:
$ sync -f /home/itslinuxfoss/Downloads/testfile2.txt

Example 6: Sync Multiple File Systems
The sync command can sync/copy multiple file systems with a single command. To sync the file systems for “/home/itslinuxfoss/test1.txt” and “~/Desktop/Samplevideo.mp4”, use the command as shown below:
$ sync -f /home/itslinuxfoss/file1.txt ~/Desktop/Samplevideo.mp4

Both the file systems are sync to the hard disk.
Example 7: Sync File System of a Specific Partition
We can sync the file system of a specific partition of the system. For instance, to sync the file system of the “/dev/sda3”, we executed this command:

Example 8: Sync Directory and Sub-Directories
To sync a directory named “/var/log/syslog” and its sub-directories, the following command is used:

Conclusion
The sync command is used to sync the cache data and file systems of a user. To sync all the cache data for the user, execute the “sync” command, and to sync all the file systems, use the “sudo sync” command. To sync the data of a single file, run the “sync -d ” and for file systems, use the “sync -f ” commands. Apart from these commands, you have learned a detailed usage of the sync command in Linux.
Keeping Linux files and directories in sync with rsync

Admins (or normal users) often need to back up files or keep them in sync between multiple places (including local and remote) without transferring and overwrite all files on the target every time. One of the most useful tools in a sysadmin’s belt for this kind of task is rsync .
The rsync tool can recursively navigate a directory structure and update a second location with any new/changed/removed files. It checks to see if files exist in the destination before sending them, saving bandwidth and time for everything it skips. Also, rsync provides the ability to synchronize a directory structure (or even a single file) with another destination, local or remote. To accomplish this efficiently, by default, it will check the modification times of files. It can also do a quick hash check of files on the source and destination to determine whether or not it needs to transfer a new copy, possibly saving significant time and bandwidth.
Since it comes packaged with most Linux distributions by default, it should be easy to get started. This is also the case with macOS, *BSDs, and other Unix-like operating systems. Working with rsync is easy and can be used on the command line, in scripts, and some tools wrap it in a nice UI for managing tasks.
Great Linux resources
On the command line, rsync is generally invoked using a handful of parameters to define how it should behave since it’s a flexible tool. In its simplest form, rsync can be told to ensure that a file in one location should be the same in a second location in a filesystem.
It’s ordinarily desirable to pass rsync a few parameters to ensure things behave the way a human would expect them to. Passing parameters such as -a for “archive” is quite common as it is a “meta-parameter” that automatically invokes a handful of others for you. The -a is equivalent to -rlptgoD , which breaks down to:
- -r : Recurse through directories (as opposed to only working on files in the current directory)
- -l : Copy symlinks as new symlinks
- -p : Preserve permissions
- -t : Preserve modification times
- -g : Preserve group ownership
- -o : Preserve user ownership (which is restricted to only superusers when dealing with other user’s files)
- -D : Copy device files
Often this works how the user wants and no significant changes are necessary. But, some of those might be contrary to what a user needs, so breaking it out into the specific functionality might be the right answer.
Other noteworthy options include:
- -n : Dry run the command without transferring files
- —list-only : Only show the list of files that rsync would transfer
- -P : Show progress per file
- -v : Show progress overall, outputting information about each file as it completes it
- -u : Skip updating target files if they are newer than the source
- -q : Quiet mode. Useful for inclusion in scripting when the terminal output is not required
- -c : Use a checksum value to determine which files to skip, rather than the modification time and size
- —existing : Only update files, but don’t create new ones that are missing
- —files-from=FILE : Read list source files from a text file
- —exclude=PATTERN : Use PATTERN to exclude files from the sync
- —exclude-from=FILE : Same as above, but read from a file
- —include=PATTERN : Also used to negate the exclusion rules
- —include-from=FILE : Same as above, but read from a file
My personal default set of parameters for rsync end up being -avuP (archive, verbose output, update only new files, and show the progress of the work being done).
Source and targets
The source and target for the sync are files and directories. Also, rsync provides the functionality to interact with remote systems over SSH, which keeps the user from needing to set up network shares to be able to sync files from one place to another. This means you can easily script rsync jobs after configuring SSH keys on both ends, removing the need to manually login in for remote file sync.