- How to print tree directory structure in linux/unix
- Let’s see how to use Linux commands to print the tree directory structure of the code.
- Print the tree directory structure using the linux tree command
- Print tree directory structure using command combinations
- How to print a multilevel tree directory structure using the linux find and awk combined commands
- Linux Find Recursive
- Using Find
- Using fd Command
- How to Search and Find Files Recursively in Linux
- Finding Files Recursively in Linux
- Conclusion
- About the author
- David Adams
How to print tree directory structure in linux/unix
In the daily development process, we often need to use linux commands to print the code directory tree structure or the system directory tree structure.
This liunx tutorial mainly teaches you to print the directory tree structure using linux commands.
Let’s see how to use Linux commands to print the tree directory structure of the code.
There are two ways for Linux to print the tree structure of the file system: one is through the linux tree command, and the other is through the combined command of linux find, awk and sed commands.
Print the tree directory structure using the linux tree command
Here to test the wordpress blog source code.
➜ wordpress tree -dL 1 . ├── wp-admin ├── wp-content └── wp-includes➜ wordpress tree -dL 2 . ├── wp-admin │ ├── css │ ├── images │ ├── includes │ . ├── wp-content │ ├── ew_backup │ ├── languages │ ├── plugins │ . └── wp-includes ├── ID3 ├── IXR ├── Requests . Print tree directory structure using command combinations
➜ find . -type d | awk -F'/' 'else if(NF==3) >'This command, like the tree command, is a directory tree structure with a print depth of 2.
|-- wp-admin | |--css | |--images | |--js | . |-- wp-includes | |--blocks | |--ID3 | |--SimplePie | . |-- wp-content | |--upgrade | |--wflogs | |--plugins | . 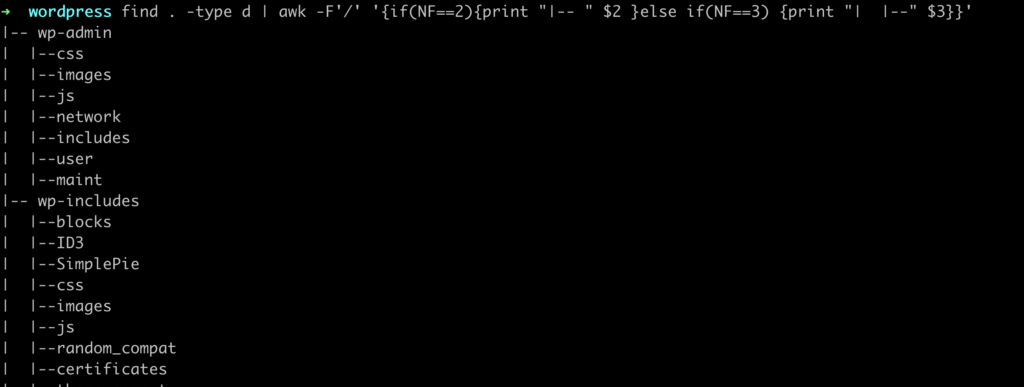
First, list all directory structures under the current directory.
➜ find . -type d . ./wp-admin ./wp-admin/css ./wp-admin/css/colors . ./wp-includes ./wp-includes/blocks ./wp-includes/ID3 . Then, use the awk command to separate them according to “/”.
If the number of separated fields is 2, which represents the root directory of the tree structure, print “|–“;
if the number of separated fields is 3, it represents the leaf nodes of the tree structure , Print “| |–“
ok, so you can print a two-level tree directory structure.
What if we need to print a multilevel tree directory structure? Is it necessary to write multiple if else?
How to print a multilevel tree directory structure using the linux find and awk combined commands
depth: Number of levels to print
Linux Find Recursive
![]()
Recursive directory listing allows you to view and find files that are nested inside other subdirectories.
One of the commands that are built for that purpose is the tree command. A tree is a simple and powerful directory listing utility. You can specify the level of depth that you wish to show in a single command.
Tree, as the name suggests, allows you to show files in nested directories in a tree-like format. It also gives you details about the specified path, including the total number of files and directories, etc.
To install it, use your system package manager:
You can then use the tree command followed by the path to the target directory.
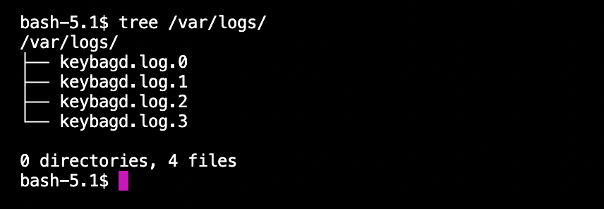
For example, the command below shows all the files and directories inside the /var/logs directory:
To find all the files and directories, including hidden files, you can use the -a flag with the tree command:
Using Find
You can also use the find command followed by the target directory and the file you wish to locate.
For example, to locate the file access.logs in the root directory, use the command:
The command will start in the root directory and recursively search all the subdirectories and locate any file with the specified name.
To find any files ending with a specific extension, run the command:
The command will start in the current working directory as specified by the period and recursively search for all files ending with the .txt extension.
Using fd Command
The fd command is a free, open-source utility that is developed as an alternative to the find command.
It is very fast and user-friendly and has incredible functionality. It’s a great tool when you need to locate a file that is nested inside a series of subdirectories.
To install it, run the commands:
How to Search and Find Files Recursively in Linux
![]()
This brief tutorial explains how to search and find the files recursively in the Linux operating systems.
After reading this article, you will be able to find any file recursively using the different techniques including a single file search, multiple files search, find files by permissions, and more. This document is optimized for both new and experienced Linux users. All methods are valid for every Linux distribution.
All examples in this tutorial contain screenshots to make it easy for any Linux user to understand and reproduce them.
Finding Files Recursively in Linux
The find command does not need flags to search the files recursively in the current directory. You only need to define the main directory and the file name using the –name option. This command will search the file within the main directory and all subdirectories.
The syntax is simple, as shown in the following:
If you want to find the 27.jpg file within your home directory and subdirectories, run the following command as shown in the following screenshot:

As you can see, the file was found in the /home/linuxhint/Downloads/recur subdirectory.
An alternative to the previous command is the tree command shown in the following example where you search the same file named 27.jpg within the current directory:
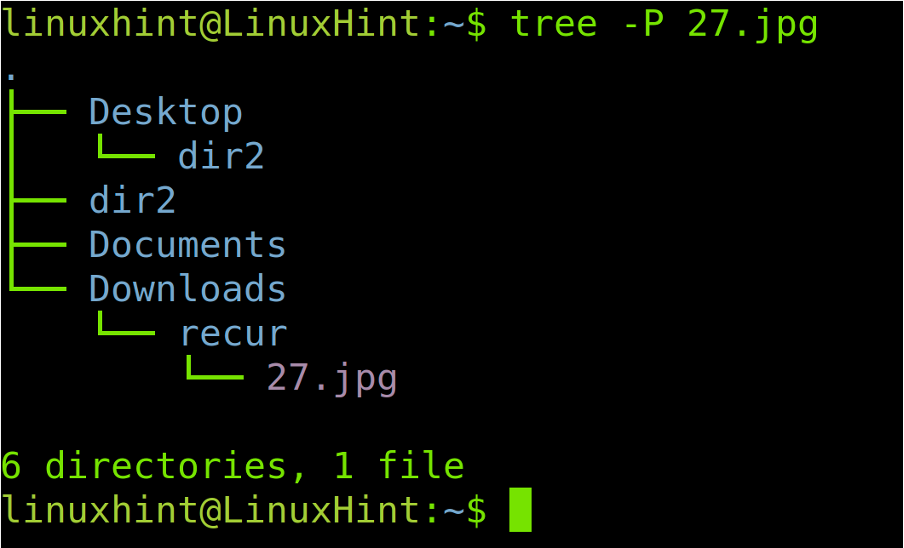
As you can see in the previous figure, the format is pretty different. It seems to be more user friendly or nicer as long as you don’t need to copy the full path to paste it.
The following screenshot shows how to use the find command to recursively search more than a file.
The syntax to search multiple files recursively is the following:
Note that there is a –o flag before the second file name. You can add more than one file by adding more –o –name flags. For example, to find 4 files with the same command, use the following syntax:
In the practical example described in the following image, use this command to find a file named 27.jpg and a file whose name begins with “DIAGRAM” but without specifying its extension. Instead, use a wildcard (*) to find any file named DIAGRAM independently of its type.

As you can see in the previous image, both files were found recursively.
The next example describes how to find the files by extension using the find command. In the following figure, you can see how to recursively find all the .jpg files using the wildcard again. The syntax is pretty simple:
Thus, to find all the .jpg files recursively, run the following command:
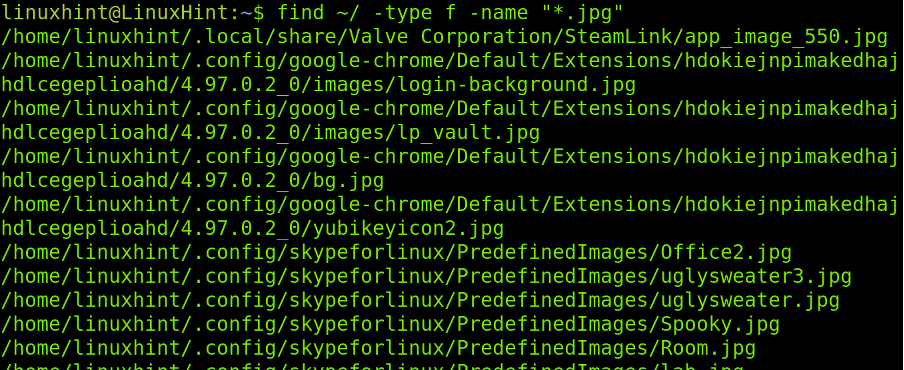
As shown in the previous image, all the jpg files including their path are listed successfully. You can replace the .jpg extension for any extension that you want to search like .png, .txt, .c and more.
Now, let’s assume that you don’t want to find a file but a directory recursively. All you need to do is to use the same command that was shown in the first example of this tutorial then add the -type d option. The syntax as follows:
In the following practical example, use the previous syntax to find the recur directory.

As you see in the previous figure, the directory named “recur” was found successfully.
You also can find the files by size using the following syntax where is the main directory containing the subdirectories and the is the size of the files that you can list with their full path.
The following example describes how to find the 10 MB size files. You can replace the M defining units in MB with c for bytes, w for two two byte words, k for kibytes and G for gibibytes (note units are case sensitive).
To find the 10 mebibytes files, execute the following command:

All 10M files were properly listed with their paths.
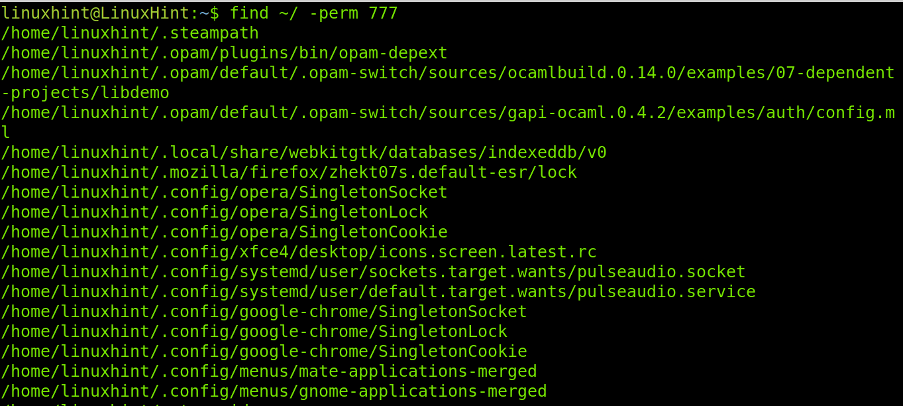
The syntax to find the files based on their permissions is shown in the following:
Let’s assume that you want to identify and list the files with read, write, and executing permissions (777). The command to run is the following:
The last example of this tutorial shows how to find and list the files and directories by size.
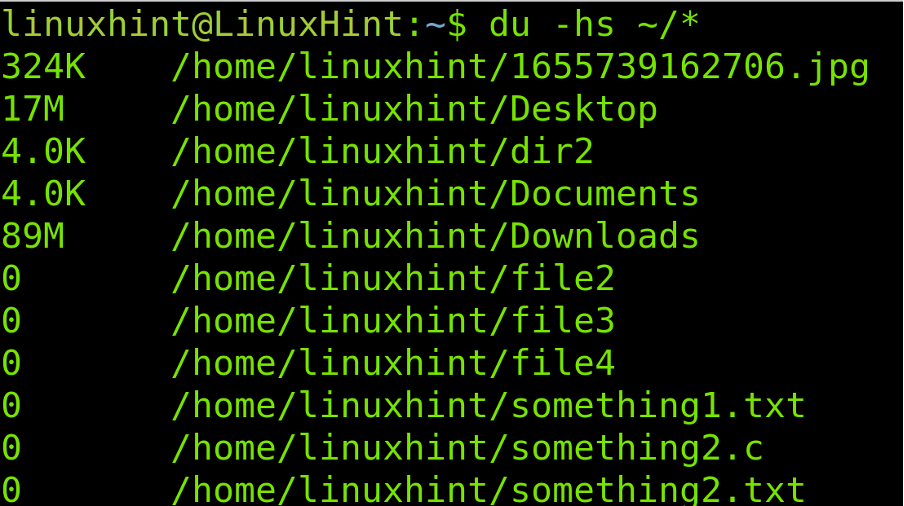
As shown, the files are listed by size with proper units. The 0 size directories and files are empty.
Conclusion
Linux versatility and flexibility allows to find the files (and other functions) recursively in many ways. They can easily be executed by all the Linux users independently of his knowledge level, from the new users to the system administrators. All techniques previously described are valid for all the Linux distributions and even to some Unix systems. According to their man pages, some flags may vary in some distributions, but most of them are universal. In case your Linux distribution does not match any of the previously explained commands, you can read the man page. It is highly recommended to the readers to practice the examples to incorporate this knowledge.
Thank you very much for reading this Linux tutorial. Keep following us for more Linux professional tips.
About the author
David Adams
David Adams is a System Admin and writer that is focused on open source technologies, security software, and computer systems.