- How to Find Text in Files in Linux
- Finding text in files
- Find text in files using grep
- Basic search
- Regular expression
- Extended regular expression
- Finding text in files
- Grep GUI
- Find text in files using nano
- Find text in files using Vim
- Find text in files using GNOME Text Editor
- Find text in files using VS Code
- Final thoughts
- About the author
- Sidratul Muntaha
- Команда find в Linux – мощный инструмент сисадмина
- Поиск по имени
- Поиск по типу файла
- Поиск по размеру файла
- Единицы измерения файлов:
- Поиск пустых файлов и каталогов
- Поиск времени изменения
- Поиск по времени доступа
- Поиск по имени пользователя
- Поиск по набору разрешений
- Операторы
- Действия
- -delete
- -exec:
- Заключение
How to Find Text in Files in Linux
![]()
For a system administrator, working with text files is a common phenomenon. Maybe need to find a specific section from piles of log files for troubleshooting something? Or, need to find the document that contains essential information quickly?
In the case of Linux, there are numerous methods to find texts in files. It’s possible using both built-in tools and 3rd-party apps. Check out how to find texts in files in Linux.
Finding text in files
Depending on the number of files you have to perform a search on, there are two ways to perform the text search: automated or manual. If you have to work with a couple of text files, the manual search is more suitable. However, if there are hundreds of text files, then the automated search is the most efficient.
For automated search, we’ll be using grep. Grep comes pre-installed on any Linux distro. As for manual search, any modern text editor will do the job.
Find text in files using grep
In Linux, grep is the default tool for searching texts. Its name is derived from the ed command g/re/p that stands for “globally search for a regular expression and print matching lines.” It’s available on any modern Linux distro.
Grep is a command-line tool. Its command structure is as follows.
As the name of grep suggests, the pattern to search for is described using a regular expression. The regular expression is a special type of string that describes a pattern to match, locate, and manage. To learn more about grep and regular expression, check out using grep and egrep with regular expression.
For demonstration purposes, grab a sample text file. In this example, download the GNU General Public License v3.0 text file.
Basic search
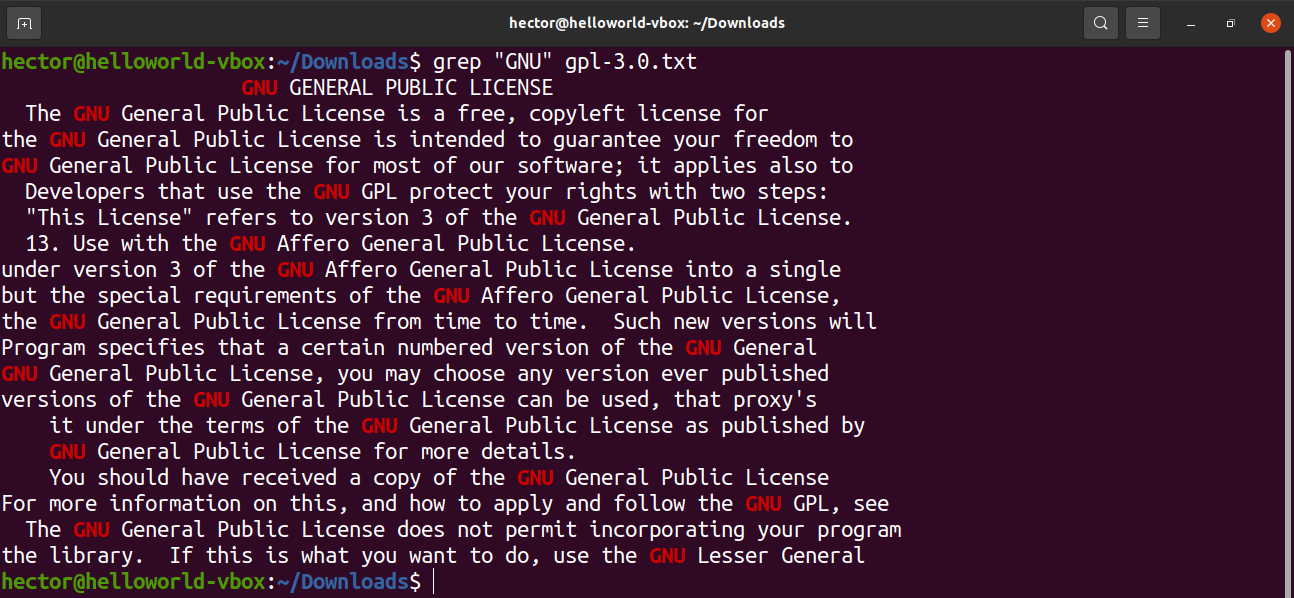
The fundamental way of using grep is to search for a basic string.
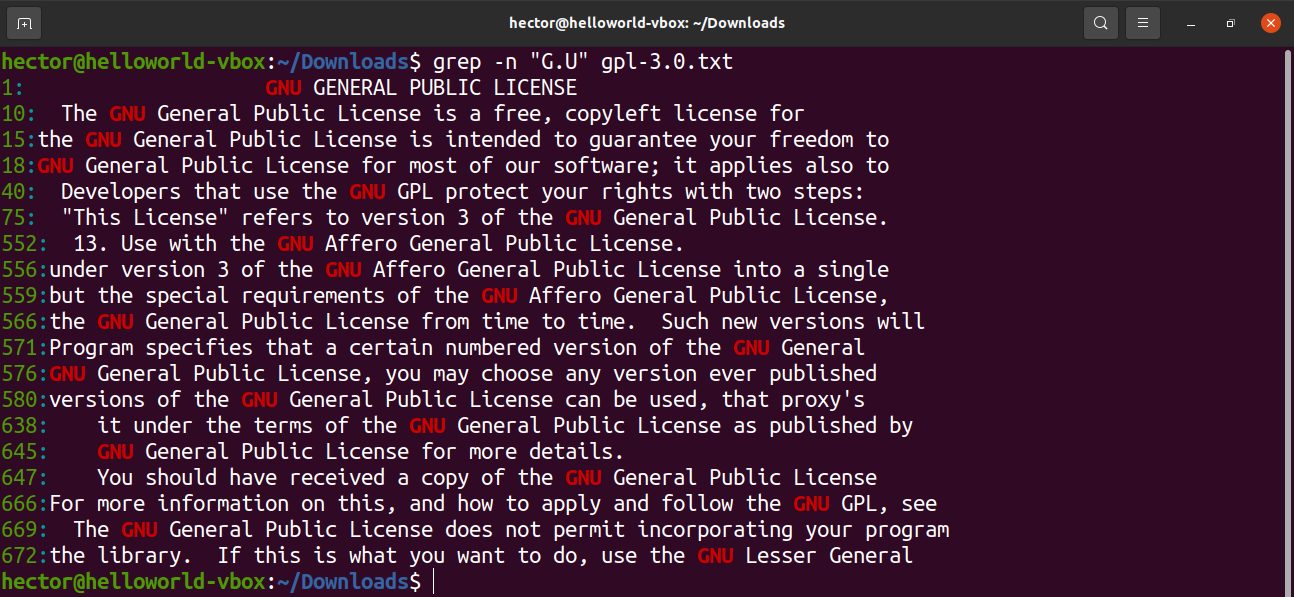
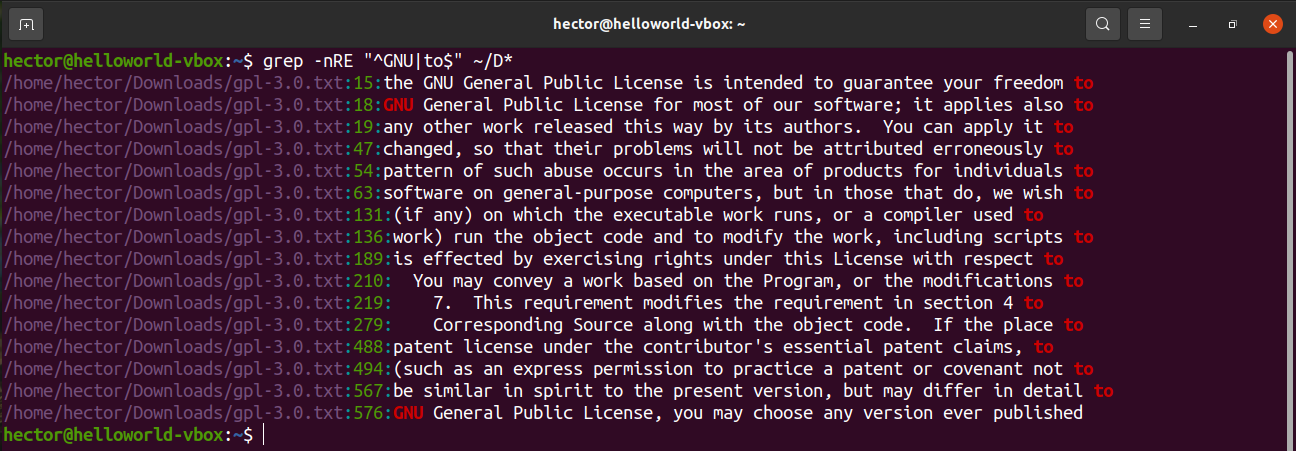
Take a look at the following grep command. It’ll search for the word “GNU” in the text file.
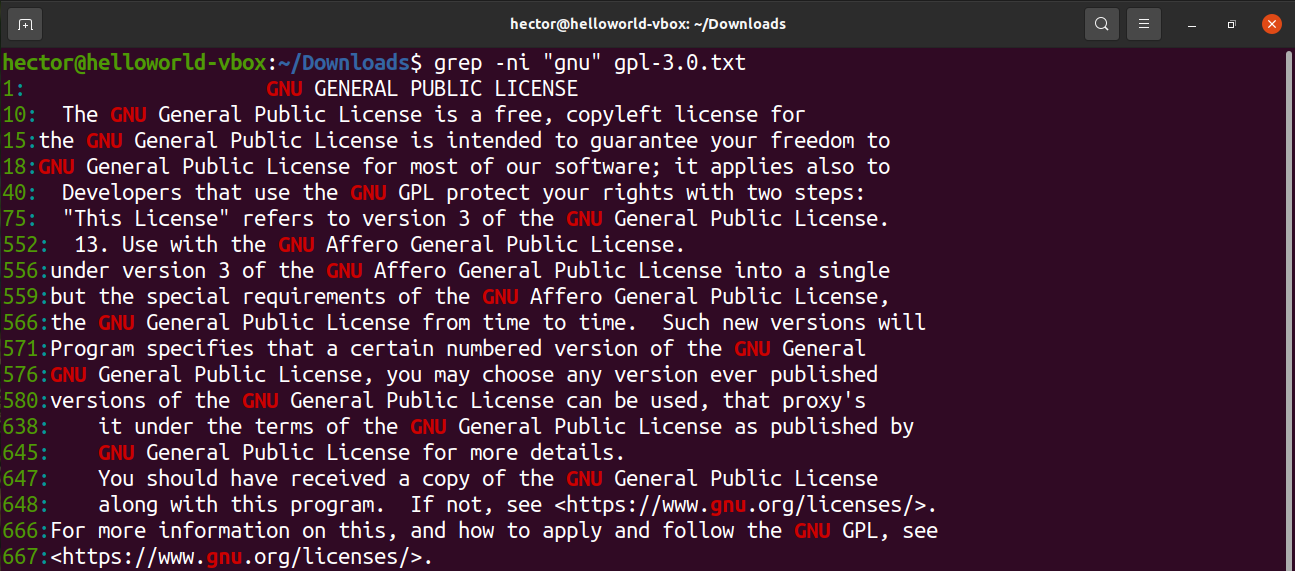
To show the line number, use the “-n” flag.

To perform a case-insensitive search using grep, use the “-i” flag.
You may not want to see the search matches but only the file name where the match happened in some situations. To print only the filename, use the “-l” flag. Here, the asterisk denotes to use all the text files in the current directory.

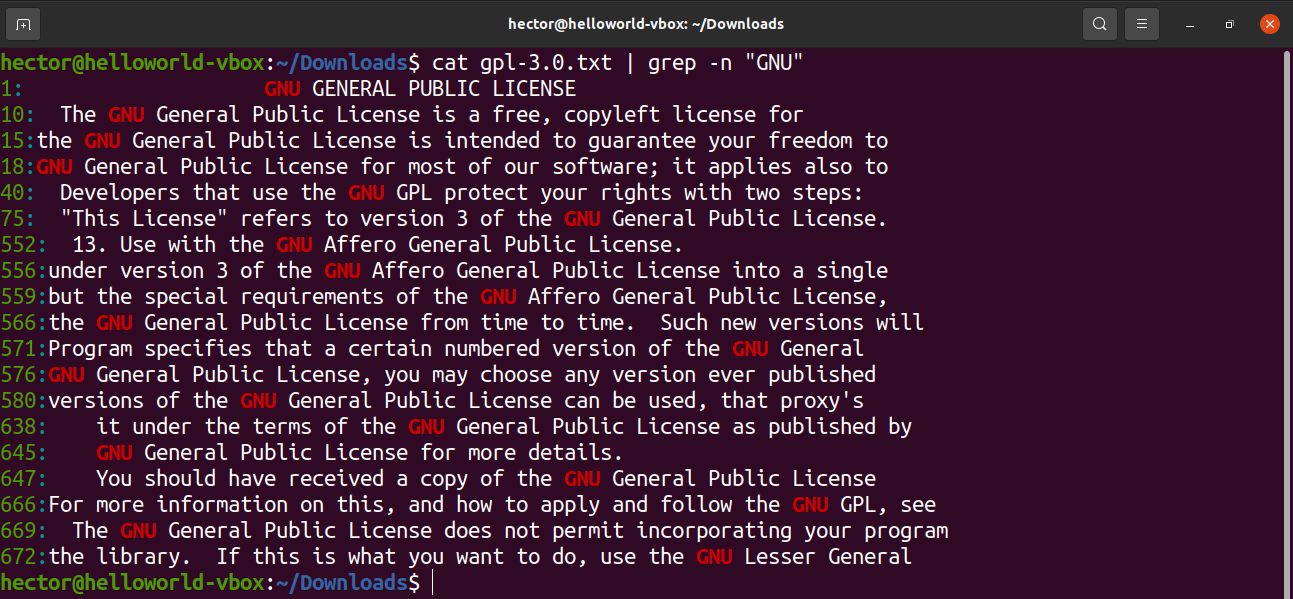
We can also pipe the output of other commands to grep.
Regular expression
Regex offers a smart way of fine-tuning the search. It has its own rules. However, different applications and programming languages implement regular expression differently. Here are a couple of examples that you can use with grep.
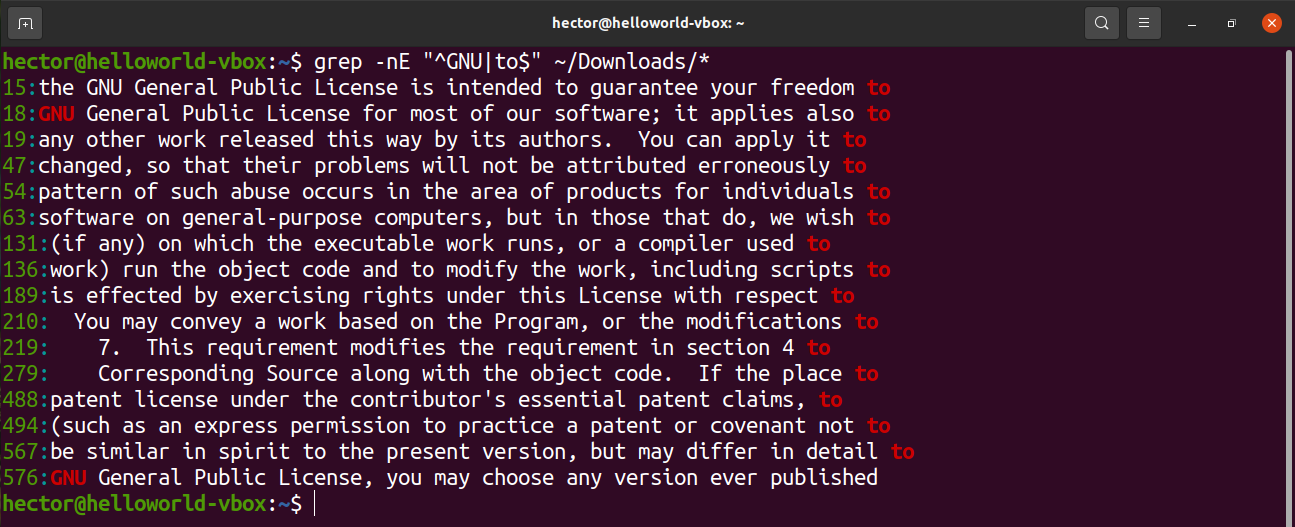
To define that the string is to be found at starting a line, use the caret (^) symbol.

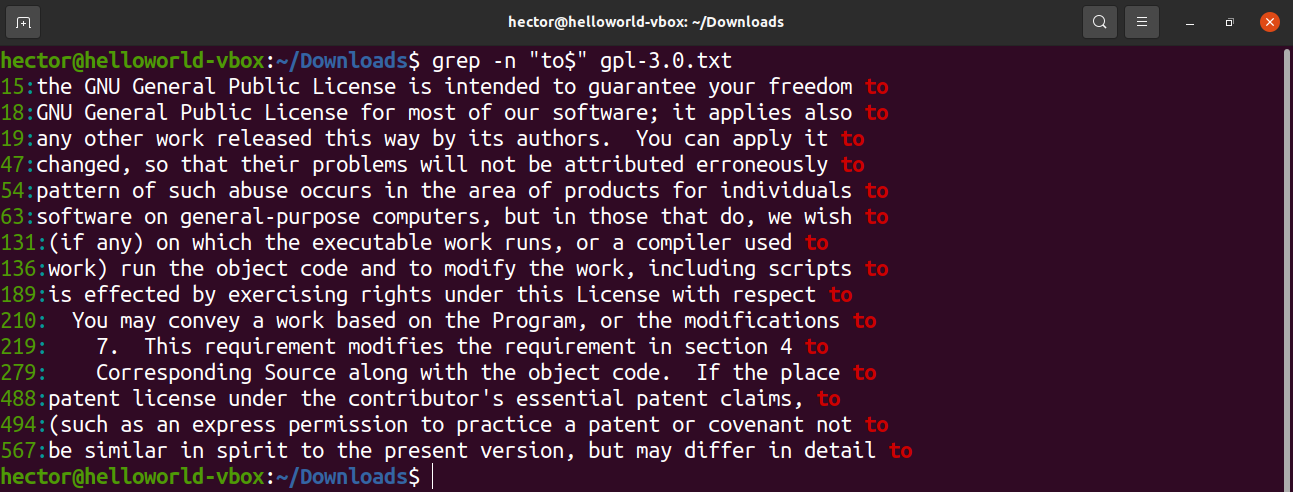
To define that the string is to be found at the end of a line, use the dollar sign ($).
To describe that there can be any character at a certain location of the pattern, use the period character (.). For example, the expression “G.U” is valid if there’s any character between “G” and “U”.
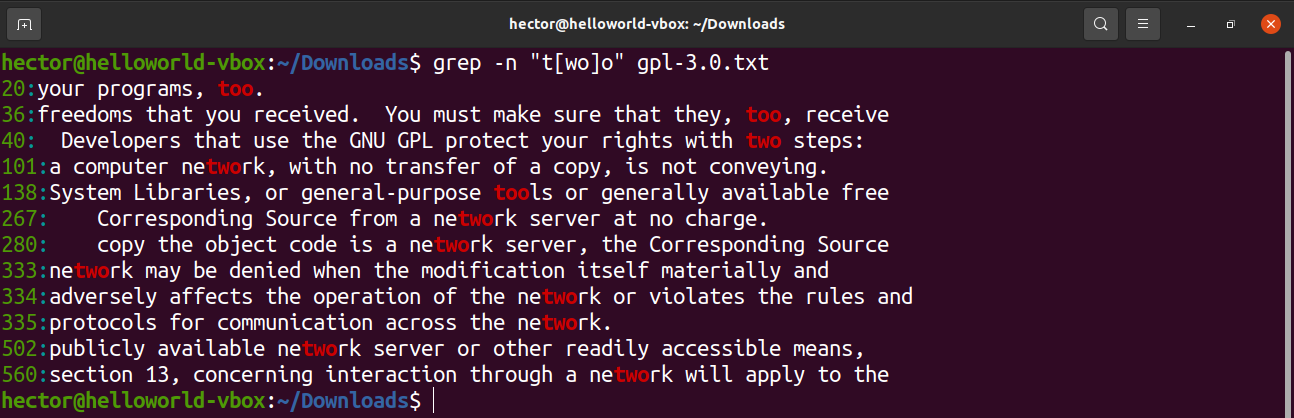
To describe that there can be a subset of characters at a particular location of the pattern, use the brackets ([]). For example, the expression “t[wo]o” tells that the match is valid for “two” and “too” only.
Extended regular expression
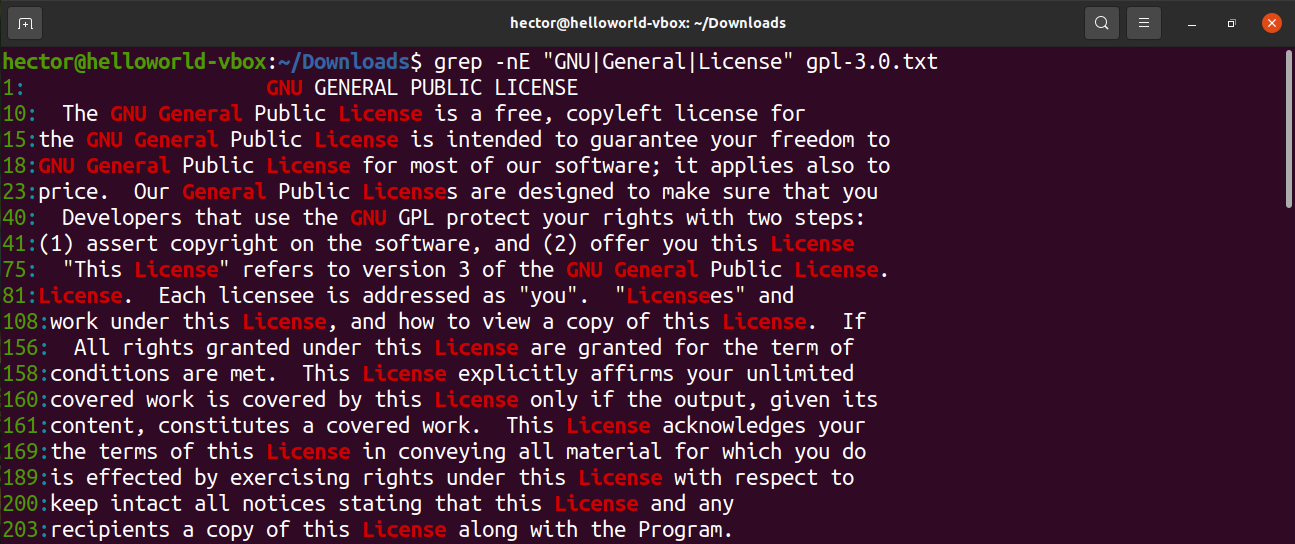
As the name suggests, an extended regular expression can do more complex things than basic regular expressions. To use extended regular expression with grep, you have to use the “-E” flag.
To search for two different strings, use the OR operators (|).
Finding text in files
Now comes the main part. Instead of manually telling grep the file to perform the search on, grep can do it automatically. In the following command, grep will use all the available text files in the current directory for searching the pattern.
If you want to grep to perform the search on a different directory, then you have to specify the location.
If there are folders, grep doesn’t explore them by default. To tell grep to search recursively, use the “-R” flag.
Grep GUI
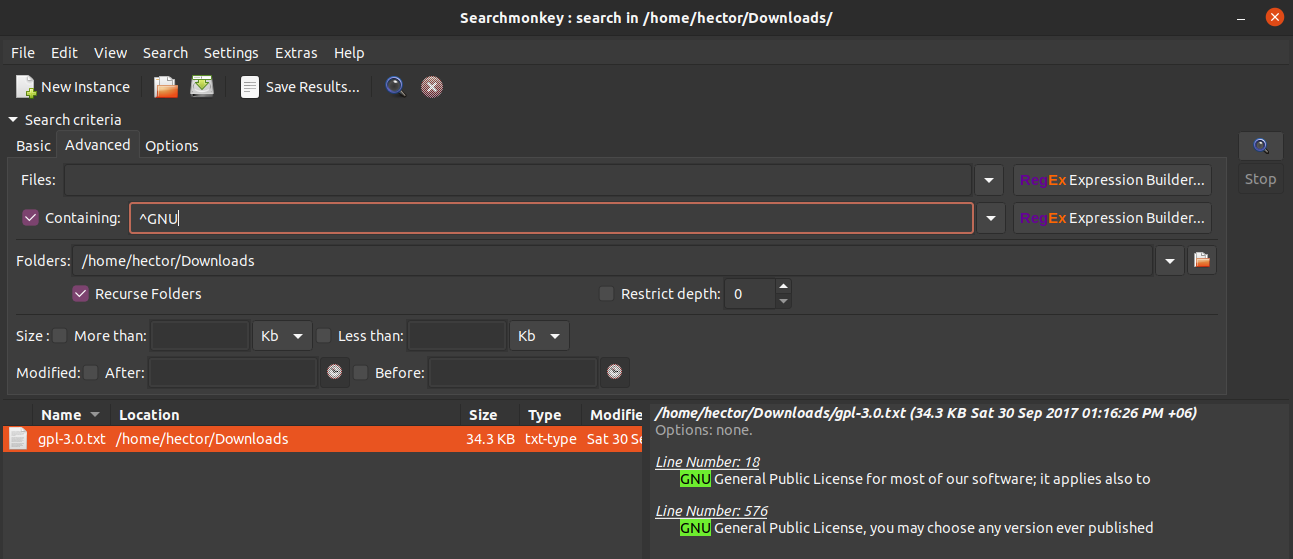
If you prefer to work with GUI but still want to enjoy grep’s features, then check out searchmonkey. It’s a front-end solution for grep. The package is available on almost all the major Linux distros.
Find text in files using nano
GNU Nano is a simple and powerful text editor that comes with any Linux distro. It has built-in features to search for text in a text file.
Note that in this method, you have to open the text file, and search manually. It’s doable if there’s only a handful of text files to work with. If there’s more, then using grep is the most optimal choice.
Open the text file in nano.
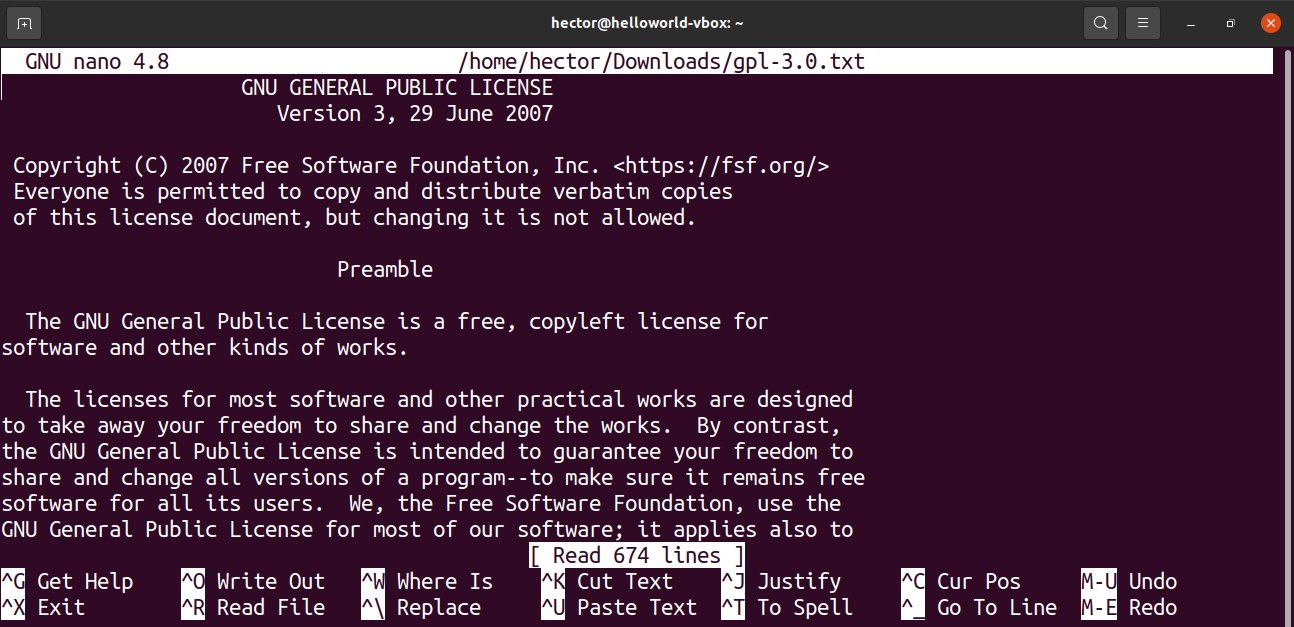
To search for a string match, press “Ctrl + W”. After typing the string to search for, press “Enter”.

Find text in files using Vim
Vim is a well-known and reputed text editor. It’s the command-line equivalent of a modern text editor. Vim comes with numerous advanced features like plugins, macros, auto-completion, filters, etc.
Similar to nano, Vim works with a single file at a time. If you have multiple text files, then using grep is the most optimal way to go.
To search in a text file, first, open it in Vim.
Enter the following Vim command and hit “Enter”.

Find text in files using GNOME Text Editor
The GNOME Text Editor is the text editor that comes with the GNOME desktop. It’s a simplistic text editor with all the basic features you’d expect. It’s a nice alternative to the command-line text editors.
Similar to nano and vim, the same caution applies to this method. If the number of text files is large, then you better stick with grep.
Open the text file in Text Editor. Press “Ctrl + F” to bring up the search bar.
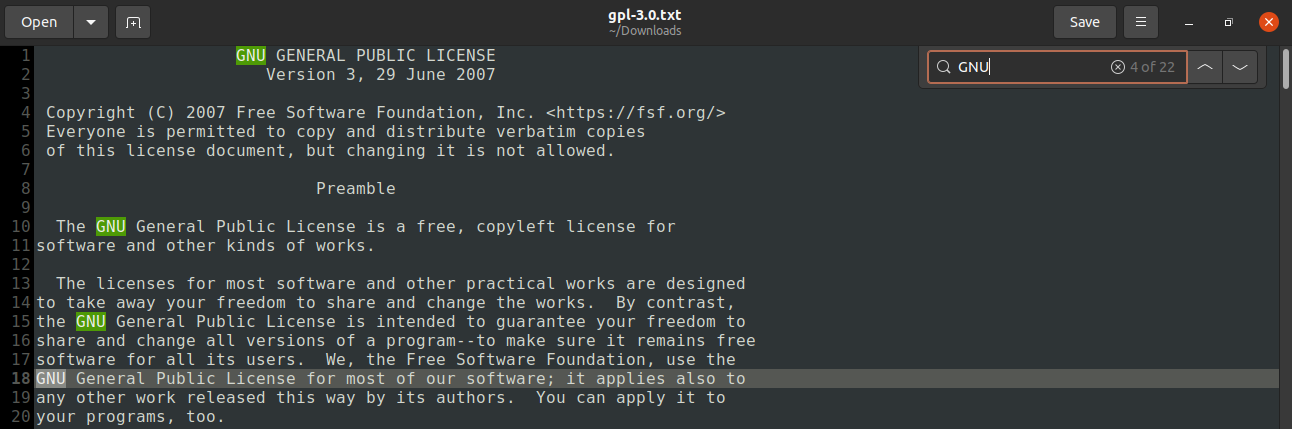
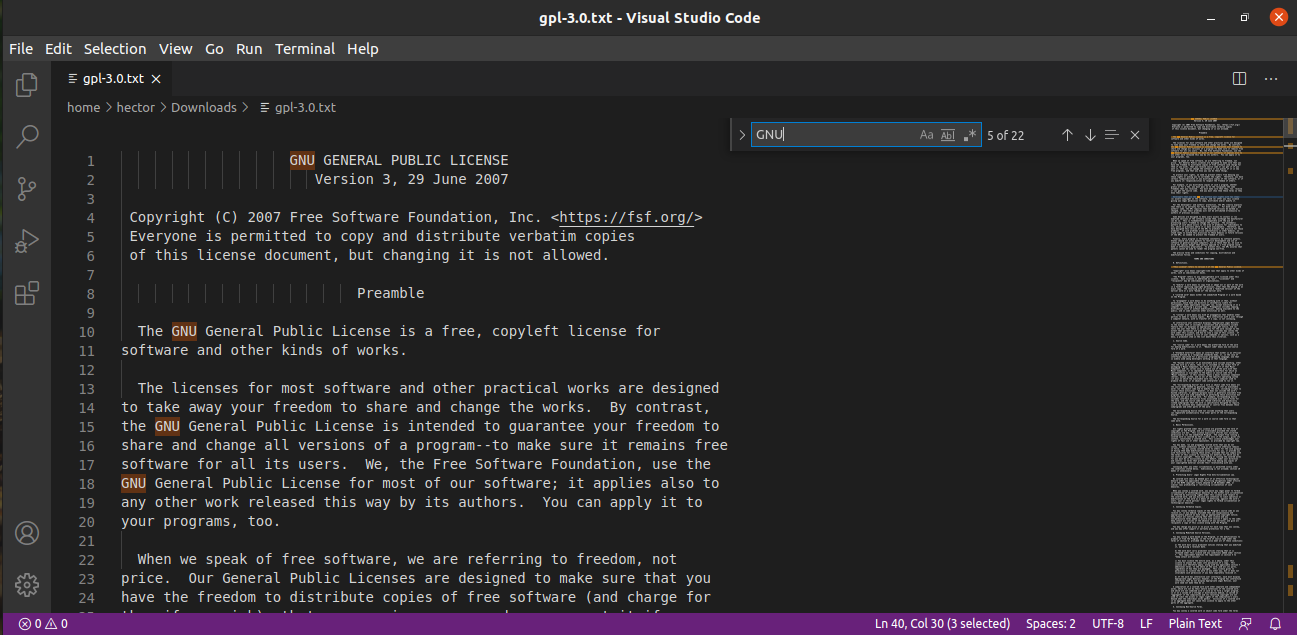
Find text in files using VS Code
Visual Studio Code is a powerful text editor with tons of features. It’s optimized for programmers to be used as if it’s a full-fledged IDE. It’s available on almost all the major Linux distros.
Install the Visual Studio Code snap package.

Open the text file in VS Code. Press “Ctrl + F” to start searching.
Final thoughts
There are numerous ways to search text in files. It’s an easy task to master. It’s strongly recommended to master the grep command because it offers the most value in terms of efficiency and ease-of-use.
If you prefer GUI, then there are numerous text editors to choose from. Any modern text editor will provide the text search option.
About the author
Sidratul Muntaha
Student of CSE. I love Linux and playing with tech and gadgets. I use both Ubuntu and Linux Mint.
Команда find в Linux – мощный инструмент сисадмина

Иногда критически важно быстро найти нужный файл или информацию в системе. Порой можно ограничиться стандартами функциями поиска, которыми сейчас обладает любой файловый менеджер, но с возможностями терминала им не сравниться.
Команда find – это невероятно мощный инструмент, позволяющий искать файлы не только по названию, но и по:
Данная команда будет очень полезна системным администраторам для:
Команда find в Linux производит поиск файлов и папок на основе заданных вами критериев и позволяет выполнять действия с результатами поиска.
Синтаксис команды find:
$ find directory-to-search criteria action- directory-to-search (каталог поиска) – это отправной каталог, с которой find начинает поиск файлов по всем подкаталогам, которые находятся внутри. Если не указать путь, тогда поиск начнется в текущем каталоге;
- criteria (критерий) – критерий, по которым нужно искать файлы;
- action (действие) – что делать с каждым найденным файлом, соответствующим критериям.
Поиск по имени
Следующая команда ищет файл s.txt в текущем каталоге:
- . (точка) – файл относится к нынешнему каталогу
- -name – критерии по которым осуществляется поиск. В данном случае поиск по названию файла.
В данном случае критерий -name учитывает только символы нижнего регистра и файл S.txt не появиться в результатах поиска. Чтобы убрать чувствительность к регистру необходимо использовать –iname.
$ find . -iname "s.txt" ./s.txt ./S.txtДля поиска всех изображений c расширением .png нужно использовать шаблон подстановки *.png:
$ find . -name "*.png" ./babutafb.png ./babutafacebook.png ./Moodle2.png ./moodle.png ./moodle/moodle1.png ./genxfacebook.pngМожно использовать название каталога для поиска. Например, чтобы с помощью команды find найти все png изображения в каталоге home:
$ find /home -name "*.png" find: `/home/babuta/.ssh': Permission denied /home/vagrant/Moodle2.png /home/vagrant/moodle.png /home/tisha/hello.png find: `/home/tisha/testfiles': Permission denied find: `/home/tisha/data': Permission denied /home/tisha/water.png find: `/home/tisha/.cache': Permission deniedЕсли выдает слишком много ошибок в отказе разрешения, тогда можно добавить в конец команды – 2> /dev/null. Таким образом сообщения об ошибках будут перенаправляться по пути dev/null, что обеспечит более чистую выдачу.
find /home -name "*.jpg" 2>/dev/null /home/vagrant/Moodle2.jpg /home/vagrant/moodle.jpg /home/tisha/hello.jpg /home/tisha/water.jpgПоиск по типу файла
Критерий -type позволяет искать файлы по типу, которые бывают следующих видов:
- f – простые файлы;
- d – каталоги;
- l – символические ссылки;
- b – блочные устройства (dev);
- c – символьные устройства (dev);
- p – именованные каналы;
- s – сокеты;
Например, указав критерий -type d будут перечислены только каталоги:
$ find . -type d . ./.ssh ./.cache ./moodleПоиск по размеру файла
Допустим, что вам необходимо найти все большие файлы. Для таких ситуаций подойдет критерий -size.
- «+» — Поиск файлов больше заданного размера
- «-» — Поиск файлов меньше заданного размера
- Отсутствие знака означает, что размер файлов в поиске должен полностью совпадать.
В данном случае поиск выведет все файлы более 1 Гб (+1G).
$ find . -size +1G ./Microsoft_Office_16.29.19090802_Installer.pkg ./android-studio-ide-183.5692245-mac.dmgЕдиницы измерения файлов:
Поиск пустых файлов и каталогов
Критерий -empty позволяет найти пустые файлы и каталоги.
$ find . -empty ./.cloud-locale-test.skip ./datafiles ./b.txt . ./.cache/motd.legal-displayedПоиск времени изменения
Критерий -cmin позволяет искать файлы и каталоги по времени изменения. Для поиска всех файлов, измененных за последний час (менее 60 мин), нужно использовать -60:
$ find . -cmin -60 . ./a.txt ./datafilesТаким образом можно найти все файлы в текущем каталоге, которые были созданы или изменены в течение часа (менее 60 минут).
Для поиска файлов, которые наоборот были изменены в любое время кроме последнего часа необходимо использовать +60.
Поиск по времени доступа
Критерий -atime позволяет искать файлы по времени последнего доступа.
Таким образом можно найти файлы, к которым не обращались последние полгода (180 дней).
Поиск по имени пользователя
Опция –user username дает возможность поиска всех файлов и каталогов, принадлежащих конкретному пользователю:
$ find /home -user tisha 2>/dev/nullТаким образом можно найти все файлы пользователя tisha в каталоге home, а 2>/dev/null сделает выдачу чистой без ошибок в отказе доступа.
Поиск по набору разрешений
Критерий -perm – ищет файлы по определенному набору разрешений.
Поиск файлов с разрешениями 777.
Операторы
Для объединения нескольких критериев в одну команду поиска можно применять операторы:
Например, чтобы найти файлы размером более 1 Гбайта пользователя tisha необходимо ввести следующую команду:
$ find /home -user tisha -and -size +1G 2>/dev/nullЕсли файлы могут принадлежать не только пользователю tisha, но и пользователю pokeristo, а также быть размером более 1 Гбайта.
$ find /home \( -user pokeristo -or -user tisha \) -and -size +1G 2>/dev/nullПеред скобками нужно поставить обратный слеш «\».
Действия
К команде find можно добавить действия, которые будут произведены с результатами поиска.
- -delete — Удаляет соответствующие результатам поиска файлы
- -ls — Вывод более подробных результатов поиска с:
- Размерами файлов.
- Количеством inode.
-delete
Полезен, когда необходимо найти и удалить все пустые файлы, например:
Перед удалением лучше лишний раз себя подстраховать. Для этого можно запустить команду с действием по умолчанию -print.
-exec:
Данное действие является особенным и позволяет выполнить команду по вашему усмотрению в результатах поиска.
- command – это команда, которую вы желаете выполнить для результатов поиска. Например:
- rm
- mv
- cp
С помощью –exec можно написать альтернативу команде –delete и применить ее к результатам поиска:
Другой пример использования действия -exec:
$ find . -name "*.jpg" -exec cp <> /backups/fotos \;Таким образом можно скопировать все .jpg изображения в каталог backups/fotos
Заключение
Команду find можно использовать для поиска:
- Файлов по имени.
- Дате последнего доступа.
- Дате последнего изменения.
- Имени пользователя (владельца файла).
- Имени группы.
- Размеру.
- Разрешению.
- Другим критериям.
С полученными результатами можно сразу выполнять различные действия, такие как:
Команда find может сильно облегчить жизнь системному администратору, а лучший способ овладеть ей – больше практиковаться.