- How to purge disk I/O caches on Linux?
- Solution 2
- Solution 3
- Solution 4
- Solution 5
- How to Clear Cache on Linux
- How Linux File System Cache Works
- Using Free command to view Cache Usage
- Proc Sys VM Drop Caches Command
- Experimental Verification that Drop Caches Works
- Conclusion
- About the author
- Linux Wolfman
- How to properly flush disk cache using ioctl (raw partition) in linux
How to purge disk I/O caches on Linux?
Sounds like you want the sync command, or the sync() function.
If you want disk cache flushing: echo 3 | sudo tee /proc/sys/vm/drop_caches
Solution 2
# sync # (move data, modified through FS -> HDD cache) + flush HDD cache # echo 3 > /proc/sys/vm/drop_caches # (slab + pagecache) -> HDD (https://www.kernel.org/doc/Documentation/sysctl/vm.txt) # blockdev --flushbufs /dev/sda # hdparm -F /dev/sda # NEXT COMMAND IS NOT FOR BENCHMARKING: # should be run before unplug, flushes everything possible guaranteed. # echo 1 > /sys/block/sdX/device/delete You may use strace to see that these are three different syscalls
Also, it may be desirable to turn off HDD cache using hdparm, not sure what thing you benchmarking.
In any way, you cannot prevent HDD to cache last 64/32/16 MB of recently used data. In order to kill that cache, just write some amount of zeroes (and flush) + read some unrelated place from HDD. This is required since cache may be divided to read-part and write-part. After that you can benchmark HDD.
Solution 3
Disk cache purging: echo 3 | sudo tee /proc/sys/vm/drop_caches
Writing to this will cause the kernel to drop clean caches, dentries and inodes from memory, causing that memory to become free.
To free pagecache:
echo 1 > /proc/sys/vm/drop_caches
To free dentries and inodes:
echo 2 > /proc/sys/vm/drop_caches
To free pagecache, dentries and inodes:
echo 3 > /proc/sys/vm/drop_caches
As this is a non-destructive operation, and dirty objects are not freeable, the user should run «sync» first in order to make sure all cached objects are freed.
Solution 4
Short good enough answer: (copy paste friendly)
DISK=/dev/sdX # /proc/sys/vm/drop_caches blockdev --flushbufs $DISK hdparm -F $DISK Explanation:
sync : From the man page: flush file system buffers. Force changed blocks to disk, update the super block.
echo 3 > /proc/sys/vm/drop_cache : from the kernel docs this will cause the kernel to drop clean caches
blockdev —flushbufs /dev/sda : from the man page: call block device ioctls [to] flush buffers.
hdparm -F /dev/sda : from the man page: Flush the on-drive write cache buffer (older drives may not implement this)
Although the blockdev and hdparm commands look similar according to an answer above they issue different ioctls to the device.
Long probably better way:
(I’ll assume that you have formatted the disk but you can adapt these commands if you want to write directly to the disk)
Run this only once before the 1st benchmark:
Run this every time you want to empty the caches:
DISK=/dev/sdX # /proc/sys/vm/drop_caches blockdev --flushbufs $DISK hdparm -F $DISK # read the file with pseudo-random data to fill any read-cache # the disk may have with garbage dd if=$MOUNT/temp-hddread.tmp of=/dev/null Explanation:
The disk will probably have some H/W cache. Some disks by design or due to bugs may not clear their caches when you issue the blockdev and hdparm commands. To compensate we write and read pseudo-random data hopping to fill these caches so that any cached data are removed from them. How much data you need to fill the cache depends on its size. In the commands above I’m using dd to read/write 16*64MB=1024MB, adjust the arguments if your HDD may have bigger cache (data sheets and experimentation are your friend and it doesn’t hurt to specify values above the actual size of the cache). I’m using /dev/urandom as a source for random data because it’s fast and we don’t care about true randomness (we only care for high entropy because the disk firmware may be using compression before storing data to the cache). I’m creating /mnt/test/temp-hddread.tmp from the start and use it every time I want to read enough random data. I’m creating and deleting /mnt/test/temp-hddwrite.tmp each time I want to write enough random data.
I’ve wrote this answer based on the best parts of the existing answers.
Solution 5
Unmounting and re-mounting the disk under test will reset all caches and buffers.
How to Clear Cache on Linux
![]()
The linux file system cache (Page Cache) is used to make IO operations faster. Under certain circumstances an administrator or developer might want to manually clear the cache. In this article we will explain how the Linux File System cache works. Then we will demonstrate how to monitor the cache usage and how to clear the cache. We will do some simple performance experiments to verify the cache is working as expected and that the cache flush and clear procedure is also working as expected.
How Linux File System Cache Works
The kernel reserves a certain amount of system memory for caching the file system disk accesses in order to make overall performance faster. The cache in linux is called the Page Cache. The size of the page cache is configurable with generous defaults enabled to cache large amounts of disk blocks. The max size of the cache and the policies of when to evict data from the cache are adjustable with kernel parameters. The linux cache approach is called a write-back cache. This means if data is written to disk it is written to memory into the cache and marked as dirty in the cache until it is synchronized to disk. The kernel maintains internal data structures to optimize which data to evict from cache when more space is needed in the cache.
During Linux read system calls, the kernel will check if the data requested is stored in blocks of data in the cache, that would be a successful cache hit and the data will be returned from the cache without doing any IO to the disk system. For a cache miss the data will be fetched from IO system and the cache updated based on the caching policies as this same data is likely to be requested again.
When certain thresholds of memory usage are reached background tasks will start writing dirty data to disk to ensure it is clearing the memory cache. These can have an impact on performance of memory and CPU intensive applications and require tuning by administrators and or developers.
Using Free command to view Cache Usage
We can use the free command from the command line in order to analyze the system memory and the amount of memory allocated to caching. See command below:

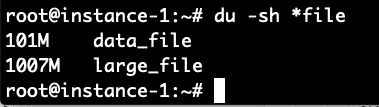
What we see from the free command above is that there is 7.5 GB of RAM on this system. Of this only 209 MB is used and 6.5 MB is free. 667 MB is used in the buffer cache. Now let’s try to increase that number by running a command to generate a file of 1 Gigabyte and reading the file. The command below will generate approximately 100MB of random data and then append 10 copies of the file together into one large_file.
# dd if=/dev/random of=/root/data_file count=1400000
# for i in `seq 1 10`; do echo $i; cat data_file >> large_file; done
Now we will make sure to read this 1 Gig file and then check the free command again:

We can see the buffer cache usage has gone up from 667 to 1735 Megabytes a roughly 1 Gigabyte increase in the usage of the buffer cache.
Proc Sys VM Drop Caches Command
The linux kernel provides an interface to drop the cache let’s try out these commands and see the impact on the free setting.

We can see above that the majority of the buffer cache allocation was freed with this command.
Experimental Verification that Drop Caches Works
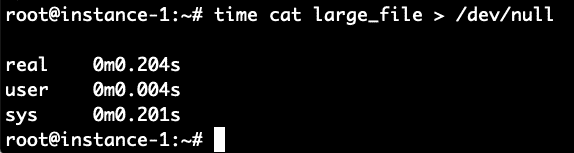
Can we do a performance validation of using the cache to read the file? Let’s read the file and write it back to /dev/null in order to test how long it takes to read the file from disk. We will time it with the time command. We do this command immediately after clearing the cache with the commands above.

It took 8.4 seconds to read the file. Let’s read it again now that the file should be in the filesystem cache and see how long it takes now.
Boom! It took only .2 seconds compared to 8.4 seconds to read it when the file was not cached. To verify let’s repeat this again by first clearing the cache and then reading the file 2 times.
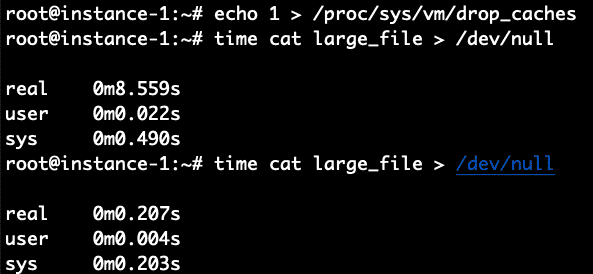
It worked perfectly as expected. 8.5 seconds for the non-cached read and .2 seconds for the cached read.
Conclusion
The page cache is automatically enabled on Linux systems and will transparently make IO faster by storing recently used data in the cache. If you want to manually clear the cache that can be done easily by sending an echo command to the /proc filesystem indicating to the kernel to drop the cache and free the memory used for the cache. The instructions for running the command were shown above in this article and the experimental validation of the cache behavior before and after flushing were also shown.
About the author
Linux Wolfman
Linux Wolfman is interested in Operating Systems, File Systems, Databases and Analytics and always watching for new technologies and trends. Reach me by tweeting to @linuxhint and ask for the Wolfman.
How to properly flush disk cache using ioctl (raw partition) in linux
I am trying to use ioctl to make sure changes written directly to the volume are hitting the disk. fsync() obviously not available in raw partition. sync() is horrible solution too (in order to flush 64MB, i need entire life time to wait in sync) so.. here is what i am trying to do — getting errno 25. /dev/sda3 is a raw unmounted partition on ssd drive
open(_fd, "/dev/sda3", . ) pwritev(_fd, . ) ioctl(_fd, BLKFLSBUF, 0) What do you mean, "fsync() obviously not available in raw partition"? fsync(_fd) and fdatasync(_fd) should flush the contents to the underlying device even if _fd refers to a block device. The actual flushing is done by fs/block_dev.c:blkdev_fsync() (via fs/sync.c:fdatasync() → do_fsync() → vfs_fsync() → vfs_fsync_range(), then blkdev_fsync() via file_operations structure).
@MarkPlotnick - I'm opening /dev/sda3. not /dev/raw. I took another machine where hdparam -W 0 worked. Still ioctl fails with errno=25. So my question is - can I use ioctl BLKFLSHBUF on /dev/sdxN ?
@NominalAnimal - fsync gives me rates of memory. not disk. it seems it does nothing. My scenario: 1) create unmounted partition 2) fd = open("/dev/sdaxN", ..permissions..) 3) writes .. now fsync does nothing and ioctl(fd, BLKFLSBUF) fails. What am I missing ? I want to make sure data is written physically
1 Answer 1
I cannot duplicate ioctl(fd, BLKFLSBUF) errors in Ubuntu 14.04.4 LTS on x86_64 using 4.2.0-42-generic kernel.
I tested both full block devices, and individual partitions on them. Could you try the following minimal test program?
Save the following as e.g. block-flush.c:
#include #include #include #include #include #include #include #include int main(int argc, char *argv[]) < int arg, descriptor, result; if (argc < 2 || !strcmp(argv[1], "-h") || !strcmp(argv[1], "--help")) < fprintf(stderr, "\n"); fprintf(stderr, "Usage: %s [ -h | --help ]\n", argv[0]); fprintf(stderr, " %s BLOCK-DEVICE-OR-PARTITION . \n", argv[0]); fprintf(stderr, "\n"); return EXIT_FAILURE; >for (arg = 1; arg < argc; arg++) < do < descriptor = open(argv[arg], O_RDWR); >while (descriptor == -1 && errno == EINTR); if (descriptor == -1) < const int cause = errno; fprintf(stderr, "%s: Cannot open device: %s [%d].\n", argv[arg], strerror(cause), cause); return EXIT_FAILURE; >errno = 0; result = ioctl(descriptor, BLKFLSBUF); if (result && errno) < const int cause = errno; fprintf(stderr, "%s: Cannot flush device: %s [%d].\n", argv[arg], strerror(cause), cause); return EXIT_FAILURE; >else if (result) fprintf(stderr, "%s: Flush returned %d.\n", argv[arg], result); else if (errno) < const int cause = errno; fprintf(stderr, "%s: Flush returned zero, but with error: %s [%d]. Ignored.\n", argv[arg], strerror(cause), cause); >result = close(descriptor); if (result == -1) < const int cause = errno; fprintf(stderr, "%s: Error closing device: %s [%d].\n", argv[arg], strerror(cause), cause); return EXIT_FAILURE; >fprintf(stderr, "%s: Flushed.\n", argv[arg]); > return EXIT_SUCCESS; >
gcc -Wall -O2 block-flush.c -o block-flush
and run it (as root), specifying the partition(s) or block device(s) at the command line:
For me, this outputs /dev/sdxN: Flushed. for unmounted partitions, as well as the disks ( /dev/sdx ) themselves. (Also, adding fdatasync(descriptor) before the ioctl() does not change anything, and it too succeeds without any errors.)
Also, I happened to test this using an external USB SATA docking station and a "loud" 3.5" drive (such docks needing external power; USB power not being sufficient for these larger drives with spinning platters). I could easily hear that the ioctl() does access the physical device, so it is not a no-op (and, again, the minimal test program never reported any failures in my tests). After closing the descriptor, the disk is also quiescent until the disk or partitions are opened for further accesses. Of course, these observations are only valid for USB-connected hard drives, and only on this particular kernel and hardware architecture, but in my opinion, it does indicate that the ioctl(descriptor, BLKFLSBUF); should work for unmounted partitions and full block devices, in the expected manner.