- How to Format Disk Partitions in Linux
- Checking the Partitions
- Formatting Disk Partition in Linux
- Formatting Disk Partition with ext4 File System
- Formatting Disk Partition with FAT32 File System
- Formatting Disk Partition with NTFS File System
- Mounting the Disk Partition in Linux
- Understanding the Linux File System
- How to Format a Drive in Linux
- Formatting a Drive in Linux
- Formatting a Partition using the GUI Method
- Formatting a Partition Using the CLI method
How to Format Disk Partitions in Linux
A disk partition must be formatted and mounted before use. The formatting process can also be done for several other reasons, such as changing the file system, fixing errors, or deleting all data.
In this tutorial, you will learn how to format and mount disk partitions in Linux using ext4, FAT32, or NTFS file system.
- A system running Linux
- A user account with sudo or root privileges
- Access to a terminal window / command line (Activities >Search >Terminal)
Checking the Partitions
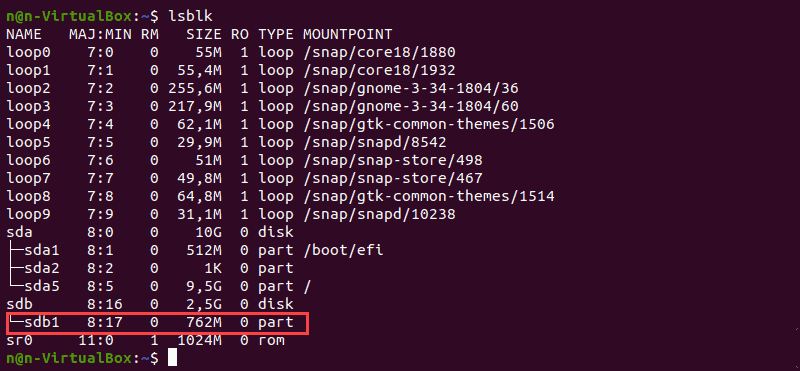
Before formatting, locate a partition you wish to format. To do so, run the lsblk command that displays block devices. Block devices are files that represent devices such as hard drives, RAM disks, USB drives, and CD/ROM drives.
The terminal prints out a list of all block devices as well as information about them:
- NAME – Device names
- MAJ:MIN – Major or minor device numbers
- RM – Whether the device is removable (1 if yes, 0 if no)
- SIZE – The size of the device
- RO – Whether the device is read-only
- TYPE – The type of the device
- MOUNTPOINT – Device’s mount point
We will use the /dev/sdb1 partition as an example.
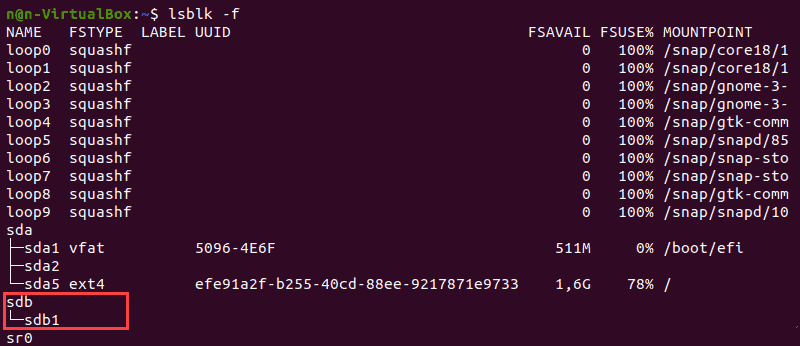
The lsblk command without additional options does not display information about the devices’ file systems.
To display a list containing file system information, add the -f option:
The terminal prints out the list of all block devices. The partitions that do not contain information on the file system in use are non-formatted partitions.
Note: Consider learning how to create partitions in Linux.
Formatting Disk Partition in Linux
There are three ways to format disk partitions using the mkfs command, depending on the file system type:
The general syntax for formatting disk partitions in Linux is:
mkfs [options] [-t type fs-options] device [size]Formatting Disk Partition with ext4 File System
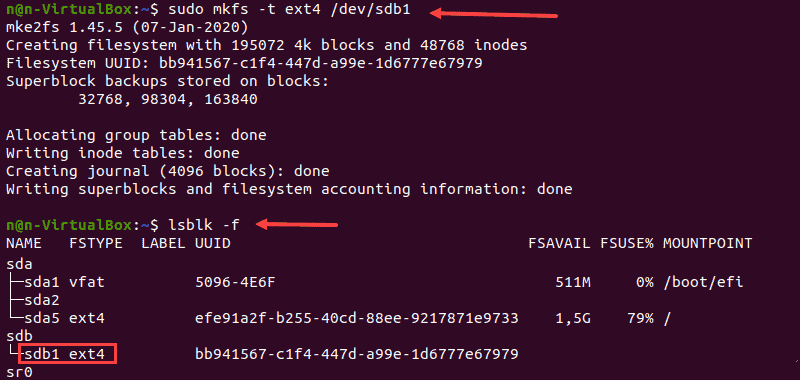
1. Format a disk partition with the ext4 file system using the following command:
2. Next, verify the file system change using the command:
The terminal prints out a list of block devices.
3. Locate the preferred partition and confirm that it uses the ext4 file system.
Formatting Disk Partition with FAT32 File System
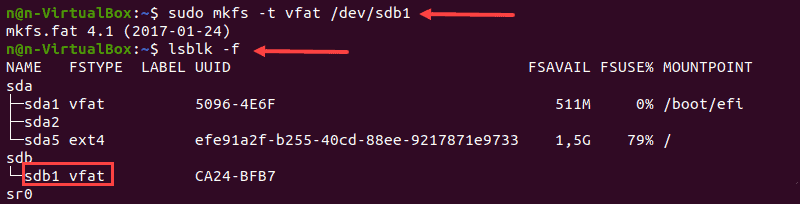
1. To format a disk with a FAT32 file system, use:
2. Again, run the lsblk command to verify the file system change and locate the preferred partition from the list.
Formatting Disk Partition with NTFS File System
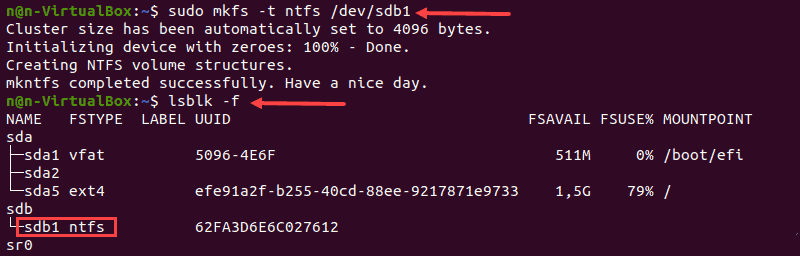
1. Run the mkfs command and specify the NTFS file system to format a disk:
The terminal prints a confirmation message when the formatting process completes.
2. Next, verify the file system change using:
3. Locate the preferred partition and confirm that it uses the NFTS file system.
Mounting the Disk Partition in Linux
Before using the disk, create a mount point and mount the partition to it. A mount point is a directory used to access data stored in disks.
1. Create a mount point by entering:
2. After that, mount the partition by using the following command:
sudo mount -t auto /dev/sdb1 [mountpoint]Note: Replace [mountpoint] with the preferred mount point (example: /usr/media ).
There is no output if the process completes successfully.

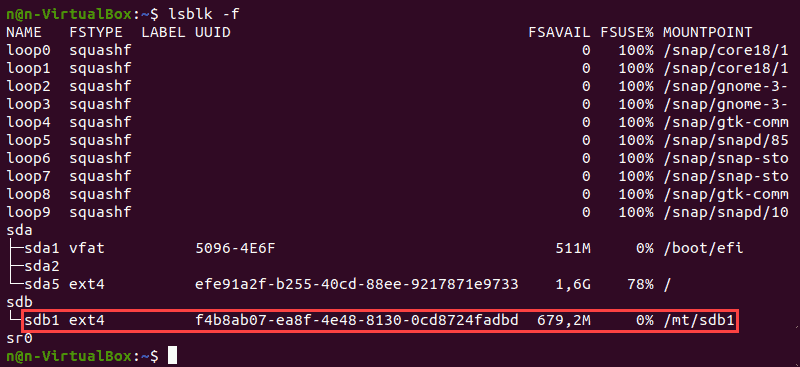
3. Verify if the partition is mounted using the following command:
Understanding the Linux File System
Choosing the right file system before formatting a storage disk is crucial. Each type of file system has different file size limitations or different operating system compatibility.
The most commonly used file systems are:
Their main features and differences are:
| File System | Supported File Size | Compatibility | Ideal Usage |
| FAT32 | up to 4 GB | Windows, Mac, Linux | For maximum compatibility |
| NTFS | 16 EiB – 1 KB | Windows, Mac (read-only), most Linux distributions | For internal drives and Windows system file |
| Ext4 | 16 GiB – 16 TiB | Windows, Mac, Linux (requires extra drivers to access) | For files larger than 4 GB |
Note: Refer to our Introduction to Linux File System article to learn more about the evolution and features of different Linux file systems.
After following this tutorial, you should be able to format and mount a partition in Linux in various file systems. Partition manipulation is essential for efficient data management, and next, we recommend learning how to delete a partition in Linux.
How to Format a Drive in Linux
![]()
Formatting a drive is necessary whenever you are trying to erase data on a drive or partition or to create a new partition. Before formatting a partition or drive, it is strongly recommended to make sure that there is nothing important there, as formatting may erase the data for good.
This guide shows you how to format a drive in Linux.
Formatting a Drive in Linux
There are two primary ways of formatting a drive in Linux: using the CLI and using the GUI. For general users, using a GUI tool may be more comfortable, whereas advanced or professional users may find the CLI method better suits them.
Either way, performing a disk format requires root access or sudo privileges. However, in certain situations, a different user can perform drive format if there is write permission for that drive. This article was written with the assumption that you have root access to your system.
The drive formatting process can be a bit tricky. To use the device storage, a drive must have a partition table with or without partitions. The partitions will allow the OS to access the storage. By formatting the drive, we are formatting the partition. If there are multiple partitions, then you have to perform the formatting process for all of them.
Formatting a Partition using the GUI Method
For managing disks and partitions (and related functions), GParted is the best option. GParted is a free and open-source tool used for managing disk partitions. This tool comes with tons of features and support for numerous file systems.
There are two ways to use GParted. You can install GParted on the running system or use the bootable image to perform the disk format. Both methods come with their own pros and cons. The good part is, whichever method you follow, the UI of GParted works the same.
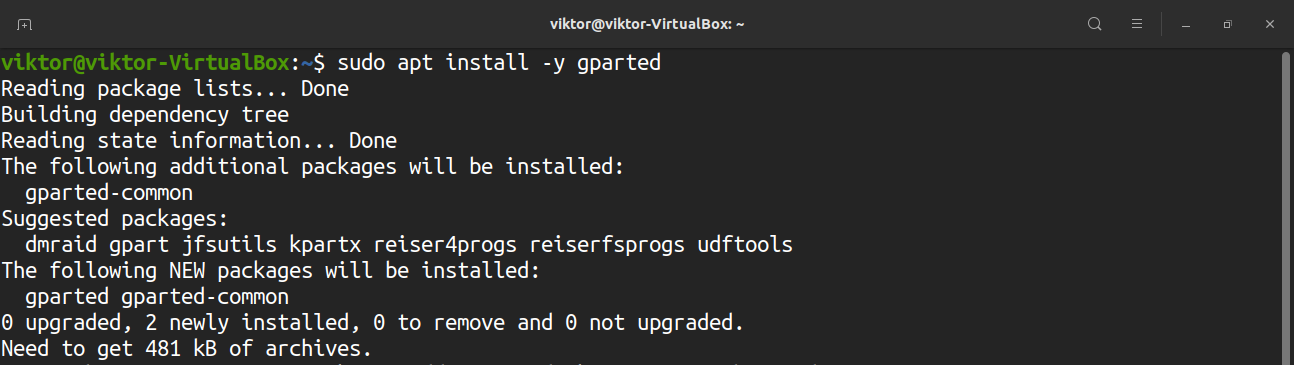
First, we will show you how to install GParted onto your system. Depending on the Linux distro that you are running on your system, use the appropriate one.
For Debian/Ubuntu and derivatives:
For Fedora and derivatives:
For openSUSE and derivatives:
To use GParted from the boot, download the GParted bootable ISO here. You can also make a bootable CD, DVD, or USB flash drive. Check out how to make a bootable USB flash drive on Linux here. Once you have prepared the system, boot into the CD, DVD, or USB flash drive.
From this point on, GParted behaves the same. For convenience, I will be demonstrating using GParted installed on Ubuntu.
Launch GParted, and it will ask for the root password.

From the top-right corner, select the device on which the operation is to be performed.
Next, you must decide the target partition. For an in-depth guide on how to create and manage partitions using GParted, check out how to use GParted here. In this case, the target partition is the /dev/sda5 partition.
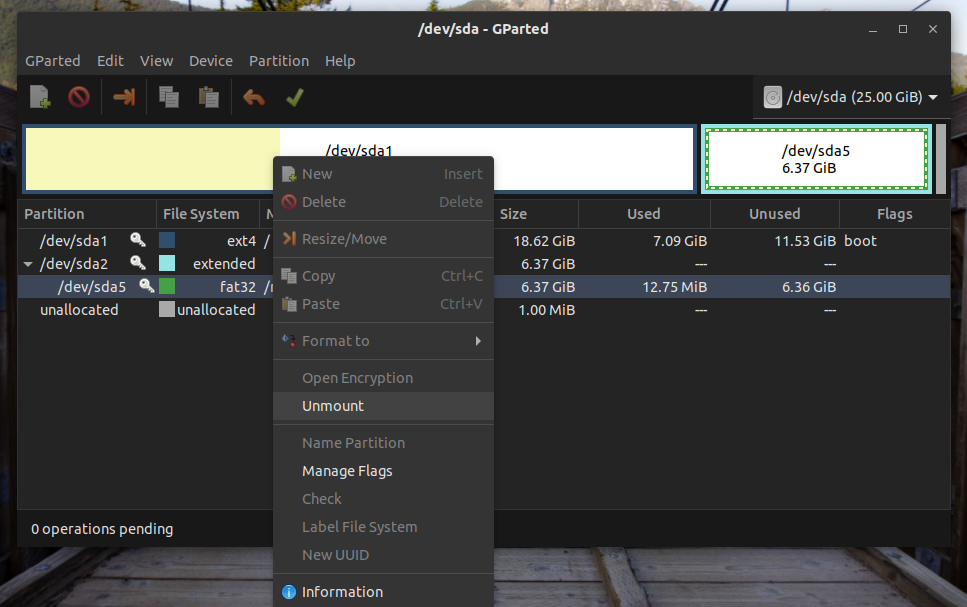
As you can see, the partition is currently mounted. Before performing any action, the partition must be unmounted. Right-click and select “Unmount.”
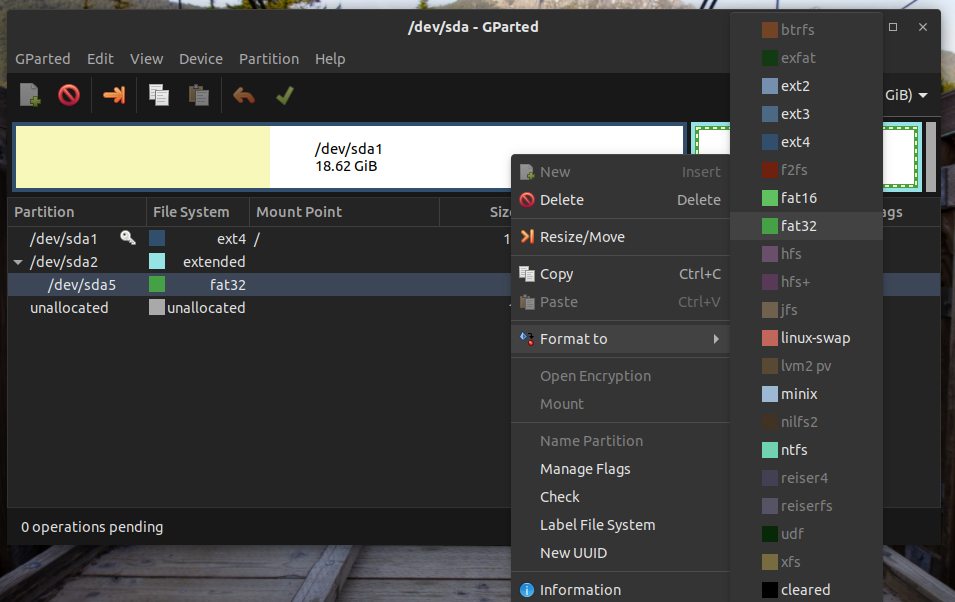
Now, the partition is ready to be formatted. If the device is a USB flash drive, then file systems like FAT32, NTFS, and EXT4 are generally the best option. If the device is an HDD, then it is better to go for EXT4. You can also go for a different format if there is a need for a specific file system. In my case, I will right-click and select “Format to” >> “fat32.”
An interesting feature of GParted is that it does not write the changes to the drive instantly. This way, even if you misconfigure the drive, you can easily discard the changes. To make the changes permanent, click “Apply All Operations.”

GParted will now ask you for confirmation. In this example, after performing the formatting, the partition will lose all its data. Click “Apply” to confirm.
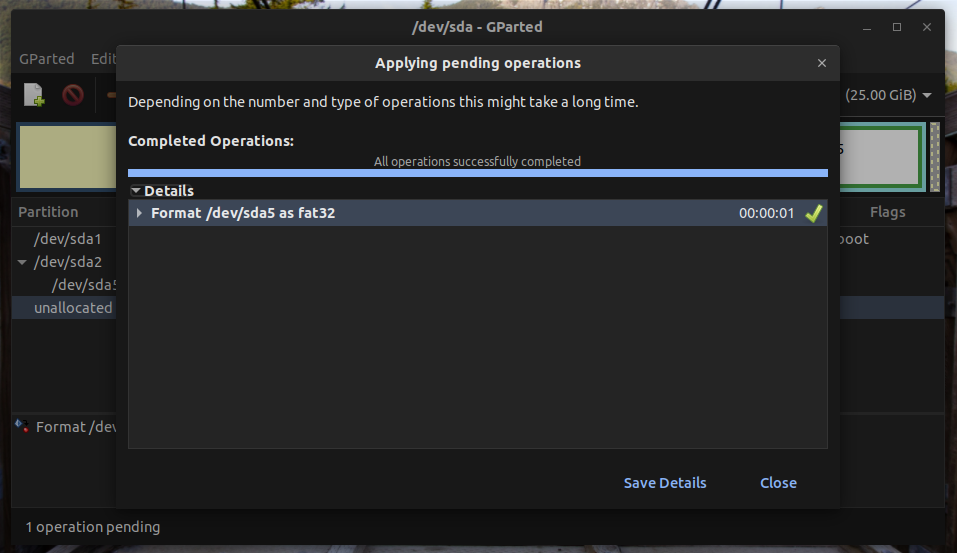
Voila! The partition has been formatted successfully!
Formatting a Partition Using the CLI method
This method is relatively shorter than the previous one. However, this method is only recommended for advanced users, as it comes with a higher chance of damage to the system. This method is less failsafe than GParted, so you must be super careful.
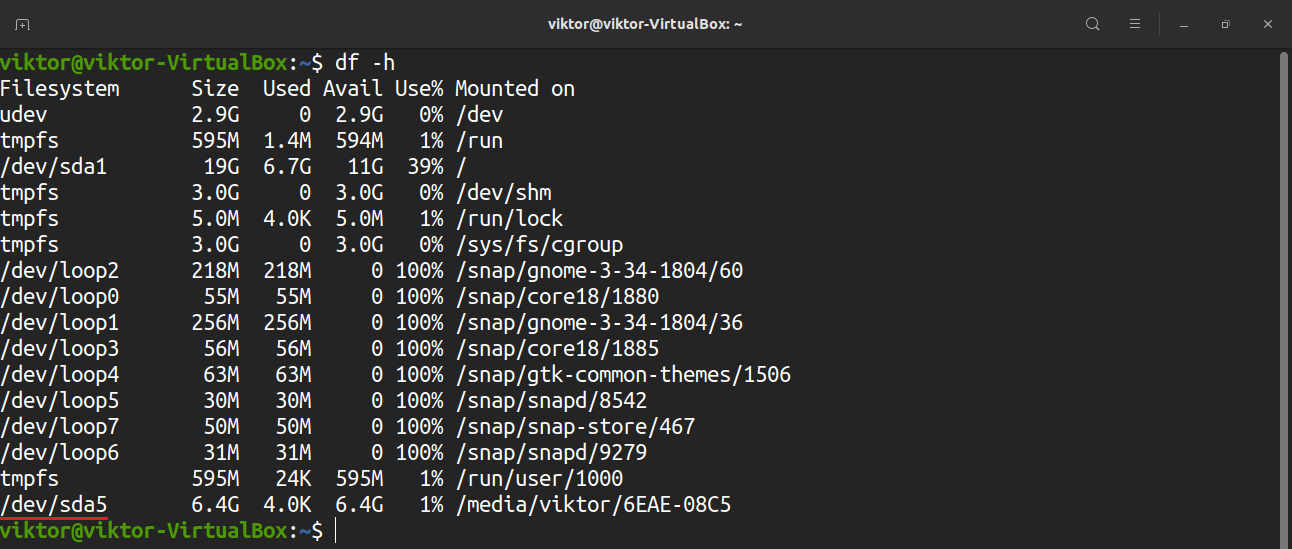
Connect the device to the computer. By default, most Linux distros will mount all the partitions of the device. Assuming it hosts a single partition, it will be mounted automatically. Check out the list of mounted filesystems below.
It is not allowed to format a partition that is currently mounted. To unmount the partition, run the following command.

Now, you can format the partition with your desired filesystem. Run the command that suits your needs.