- How can I run fsck on ntfs partitions on my hard drive? [duplicate]
- How to Check/Repair Linux File System on Boot
- The FSCK Linux Command
- FSCK Command Usage
- Repairing A Corrupted Linux File System
- Repairing Linux File System on Boot-Time
- Linux File System Repair on Boot
- Live CD/USB File System Repair
- fsck диск ntfs в Linux
- @Update — vm решение
How can I run fsck on ntfs partitions on my hard drive? [duplicate]
A few years ago I switched from Windows to Ubuntu 14.04 LTS for my desktop PC. I installed the Ubuntu operating system (root+home+swap) in the space previously assigned to the C partition, while the other partitions (D,E,F and G) were left undisturbed. Thus the partitions containing the new operating system now have the ext4 file system while the other partitions continue with ntfs. This has been serving my purpose well enough. Recently, however, for the first time I made several attempts to run fsck on the ntfs partitions of the hard drive, and I received the following message:
fsck from util-linux 2.20.1 fsck: fsck.ntfs: not found fsck: error 2 while executing fsck.ntfs for /dev/sda5 When I try to run fsck on my external hard drive, which also has ntfs, the message that is returned is:
fsck from util-linux 2.20.1 e2fsck 1.42.9 (4-Feb-2014) ext2fs_open2: Bad magic number in super-block fsck.ext2: Superblock invalid, trying backup blocks. fsck.ext2: Bad magic number in super-block while trying to open /dev/sdb The superblock could not be read or does not describe a valid ext2/ext3/ext4 filesystem. If the device is valid and it really contains an ext2/ext3/ext4 filesystem (and not swap or ufs or something else), then the superblock is corrupt, and you might try running e2fsck with an alternate superblock: e2fsck -b 8193 or e2fsck -b 32768
Can anybody please throw any light on what is happening and how I can run fsck on ntfs partitions and devices?
How to Check/Repair Linux File System on Boot
An operating system user that is still a learner in the OS world can never escape the challenges the current elite users have overcome. The user impact of such challenges depends on the operating system flavor or distribution you are under.
For Linux users, you might think you are facing an impossible challenge only to realize that there are multiple valid solutions for every single OS problem faced.
The Linux file system is a maze that most users hesitate to enter. It is because this file system is responsible for the performance consistency of your Linux operating system and any slight modification to its hierarchy or file system structure can be a nightmare for any user.
The FSCK Linux Command
The Linux operating system handles file system issues through the fsck command-line utility. It is a prepackaged file system check toolkit that interactively checks and repairs corrupted files that might affect the performance of your operating system.
Most of the time, it is these corrupt files that are responsible for failed system boots and partition mounts.
FSCK Command Usage
The standard syntax for fsck command-line utility is as follows:
You need to be a sudoer user or have sudo privileges to effectively use the FSCK tool.
FSCK adheres to some predefined rules.
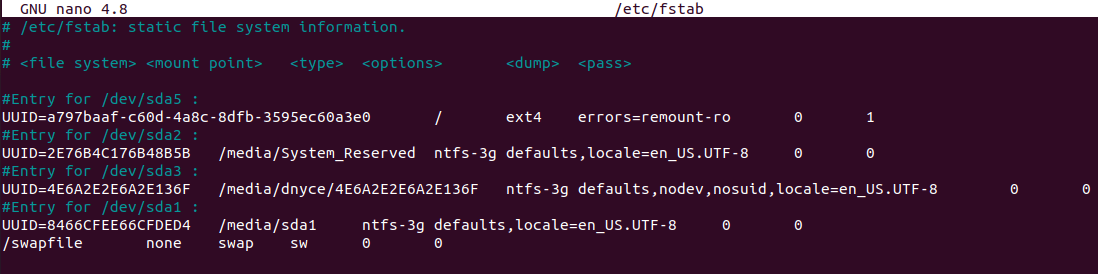
- It references the /etc/fstab file when a user does not provide [FILESYSTEM] as a command argument.
The column for the (/) and (ext4) is set to 1 because its file system checks and repair are prioritized.
It is not recommended to use the fsck command with mounted partitions as there is a high likelihood of permanent file system damage.
Repairing A Corrupted Linux File System
The first step is to identify the device partition that holds the Linux file system you would like to check and repair.

The second step is to unmount the device whose file system you want to check and repair. e.g.
The third step is to check and possibly repair the device’s file system using FSCK.
The -p command option is for automatic repair without any user intervention.
The final step is to re-mount your device once the fsck file system check and repair is complete.
Repairing Linux File System on Boot-Time
On a running machine, it is not possible to simultaneously check and repair your Linux file system while using the OS. In this case, we have the options of using a live CD/bootable usb drive or checking and repairing the Linux file system on boot (For installed Linux systems).
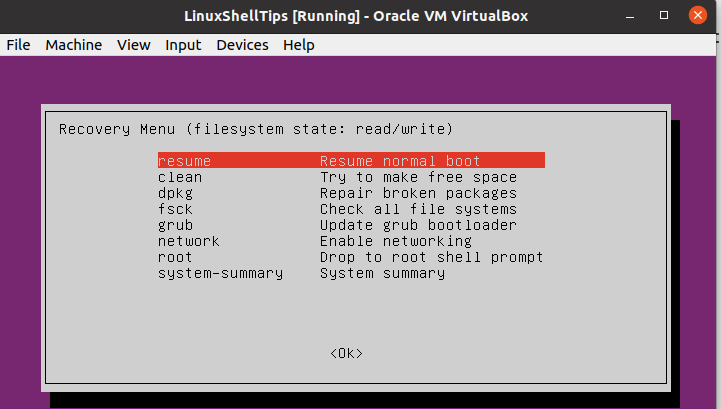
Linux File System Repair on Boot
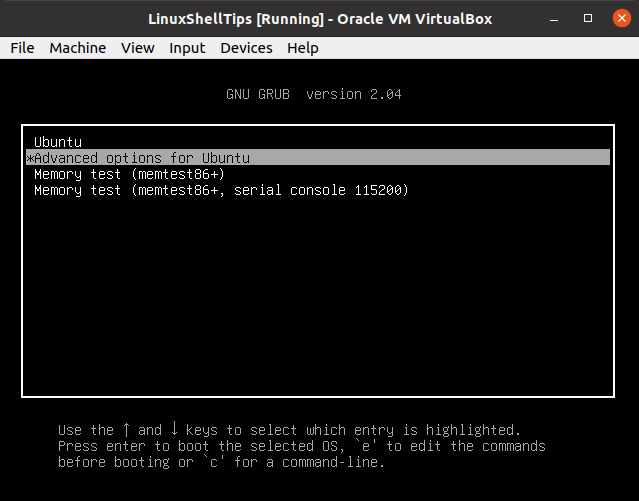
1. Restart your machine, press [Esc] or [Shift] and select Advanced Options on the resulting boot menu.
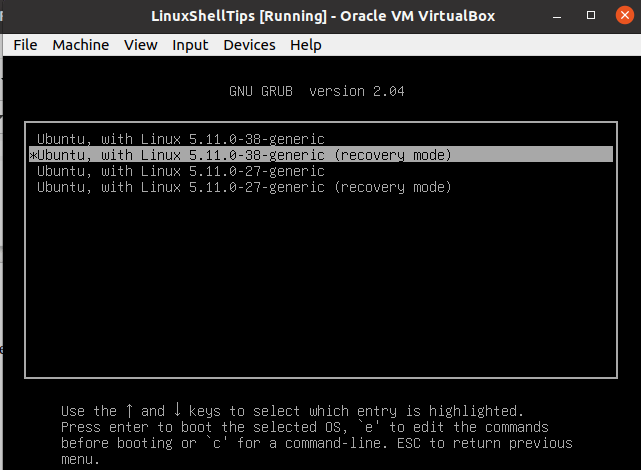
2. Select Recovery Mode and choose the fsck option from the resulting list of menu options.
3. Hit [Enter] and choose the fsck menu option.
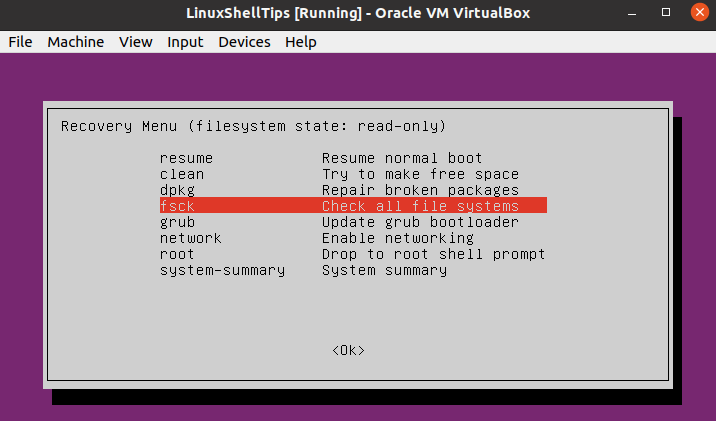
4. Choose Yes when asked whether to remount your OS root file system.

5. Once the file system check and repair is complete, direct your system to resume normal boot.
Live CD/USB File System Repair
- Boot into your machine from the live distribution (CD or USB).
- Open the Linux terminal and use sudo fdisk -l command to find the targeted Linux root partition name.
- If the root partition is identified by a name like /dev/sda1, running the following command will check and possibly repair its associated file system.
FSCK is a very effective tool to get you started on understanding the nature and performance of your Linux system. The man fsck command has more options on using the FSCK utility to check and optionally repair broken or corrupt Linux file systems.
fsck диск ntfs в Linux
Да. Это было обработано fsck в некоторых выпусках. Если раздел не указан в /etc/fstab , вам, вероятно, потребуется указать тип раздела. Я использовал это с компакт-диска Linux для восстановления раздела, с которого не будет загружаться Windows. Основываясь на комментариях ниже, фактическое исправление выполняется программой ntfsfix . Он должен быть доступен, даже если нет программы для запуска fsck и файловой системы NTFS.
К сожалению, инструмент ntfsfix очень ограничен по сравнению с Microsoft chkdsk. Попробуйте запустить установку Windows — желательно с самой новой версией Windows, поскольку Microsoft, по-видимому, постоянно совершенствует chkdsk (я надеюсь ..) Новые версии Windows часто доступны бесплатно в качестве пробных версий. Если проблема связана с USB-диском, вы можете попробовать установить Windows на что-то вроде VirtualBox и предоставить виртуальную машину USB-устройству.
Если у вас установлены NTFSProgs, вы можете запустить fsck.ntfs или fsck -t ntfs для fsck NTFS-диска.
fsck /dev/sdg1 fsck from util-linux 2.21.2 Mounting volume. OK Processing of $MFT and $MFTMirr completed successfully. Checking the alternate boot sector. FIXED NTFS volume version is 3.1. NTFS partition /dev/sdg1 was processed successfully. lrwxrwxrwx. 1 root root 13 May 22 22:13 /usr/sbin/fsck.ntfs -> ../bin/ntfsck - Проверьте идентификатор плохого диска. например, g
- Откройте терминал cmd окон.
- Введите chkdsk : /f чтобы исправить это.
Где — это идентификатор, например, chkdsk d: /f - Тогда это будет исправлено в течение нескольких секунд (для диска размером 1 Тб).
Спустя годы, наконец, я нашел то, что Windows может сделать легко, но Linux не может;)
@Update — vm решение
Вы также можете создать windows vm (например, win 7), затем смонтировать мобильный диск в windows vm, затем вы также можете использовать chkdsk для исправления диска, это похоже на загрузку на машине с windows.