- How to Install and Configure FTP Server on Linux Mint 20
- To Install and Configure FTP Server on Linux Mint 20
- Installation:
- Install and configure FTP server on Linux Mint 20
- Installing FTP server
- Step 1: Install VSFTPD
- Step 2: Configure VSFTPD
- Step 3: Allow ports in firewall
- Step 4: Enable and run VSFTPD
- Step 5: Create an FTP user
- Step 6: Test FTP connection
- About the author
- Karim Buzdar
- Установите и настройте FTP-сервер на Linux Mint 20
- Установка FTP-сервера
- Шаг 1. Установите VSFTPD
- Шаг 2. Настройте VSFTPD
- Шаг 3. Разрешите порты в брандмауэре
- Шаг 4. Включите и запустите VSFTPD
- Шаг 5. Создайте пользователя FTP
- Шаг 6. Проверьте FTP-соединение
How to Install and Configure FTP Server on Linux Mint 20
To Install and Configure FTP Server on Linux Mint 20
FTP stands for File Transfer Protocol. It is used to transfer files from one directory to another directory through the Internet which provides an individual user name and password to the users. The FTP server has the port numbers that is 20,21. This tutorial covers the installation process of FTP Server on LinuxMint 20.
Installation:
Let check the version of OS by using the following command
[email protected]:~# cat /etc/os-release NAME="Linux Mint" VERSION="20 (Ulyana)" ID=linuxmint ID_LIKE=ubuntu PRETTY_NAME="Linux Mint 20" VERSION_ID="20" HOME_URL="https://www.linuxmint.com/" SUPPORT_URL="https://forums.ubuntu.com/" BUG_REPORT_URL="http://linuxmint-troubleshooting-guide.readthedocs.io/en/latest/" PRIVACY_POLICY_URL="https://www.linuxmint.com/" VERSION_CODENAME=ulyana UBUNTU_CODENAME=focal Now, install the vsftpd service by using the following command
[email protected]:~# apt-get install vsftpd -y Reading package lists. Done Building dependency tree Reading state information. Done The following NEW packages will be installed: vsftpd 0 upgraded, 1 newly installed, 0 to remove and 363 not upgraded. Need to get 115 kB of archives. . . . Created symlink /etc/systemd/system/multi-user.target.wants/vsftpd.service → /lib/systemd/system/vsftpd.service. vsftpd.conf:1: Line references path below legacy directory /var/run/, updating /var/run/vsftpd/empty → /run/vsftpd/empty; please update the tmpfiles.d/ drop-in file accordingly. Processing triggers for man-db (2.9.1-1) . Processing triggers for systemd (245.4-4ubuntu3) . Once the installation is completed, now check the IP by using the following command
[email protected]:~# ip a 1: lo: mtu 65536 qdisc noqueue state UNKNOWN group default qlen 1000 link/loopback 00:00:00:00:00:00 brd 00:00:00:00:00:00 inet 127.0.0.1/8 scope host lo valid_lft forever preferred_lft forever inet6 ::1/128 scope host valid_lft forever preferred_lft forever 2: ens33: mtu 1500 qdisc fq_codel state UP group default qlen 1000 link/ether 00:0c:29:be:4b:b2 brd ff:ff:ff:ff:ff:ff inet 192.168.7.236/24 brd 192.168.7.255 scope global noprefixroute ens33 valid_lft forever preferred_lft forever inet6 fe80::960a:2495:896e:6cd1/64 scope link noprefixroute valid_lft forever preferred_lft forever Now, add the user id by using the following command
[email protected]:~# adduser test Adding user `test' . Adding new group `test' (1001) . Adding new user `test' (1001) with group `test' . Creating home directory `/home/test' . Copying files from `/etc/skel' . New password: Retype new password: passwd: password updated successfully Changing the user information for test Enter the new value, or press ENTER for the default Full Name []: Room Number []: Work Phone []: Home Phone []: Other []: Is the information correct? [Y/n] y After the user id is created, now create a directory in the home directory by using the following command
[email protected]:~# cd /home/test/ [email protected]:/home/test# mkdir demo [email protected]:/home/test# cd demo [email protected]:/home/test/demo# touch test.txt Once the directories is created, now restart the FTP service by using the following command
Open FTP on browser and enter the credential of the user 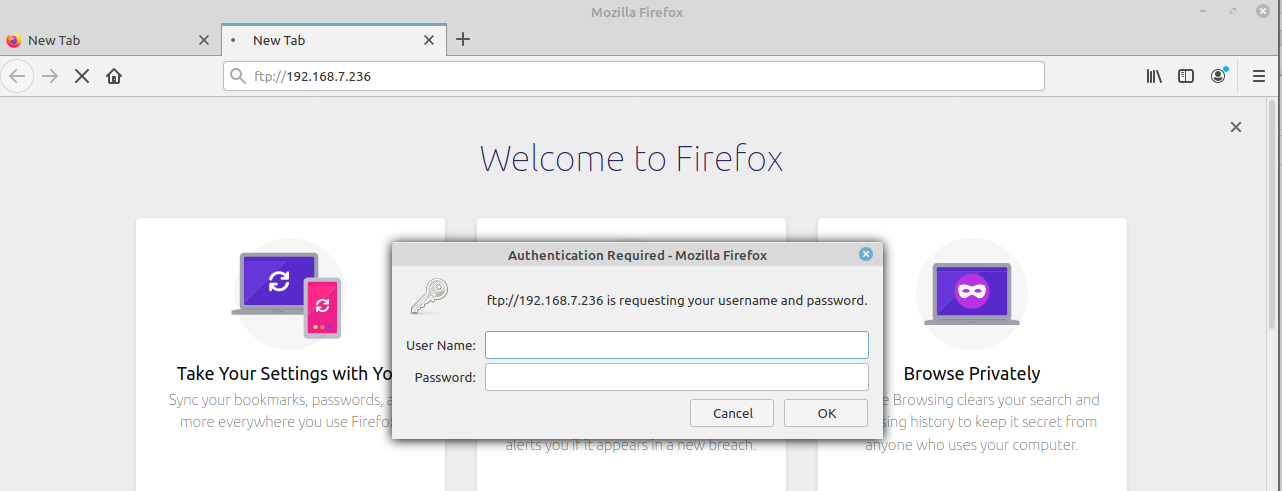 The directories of the FTP server is shown here
 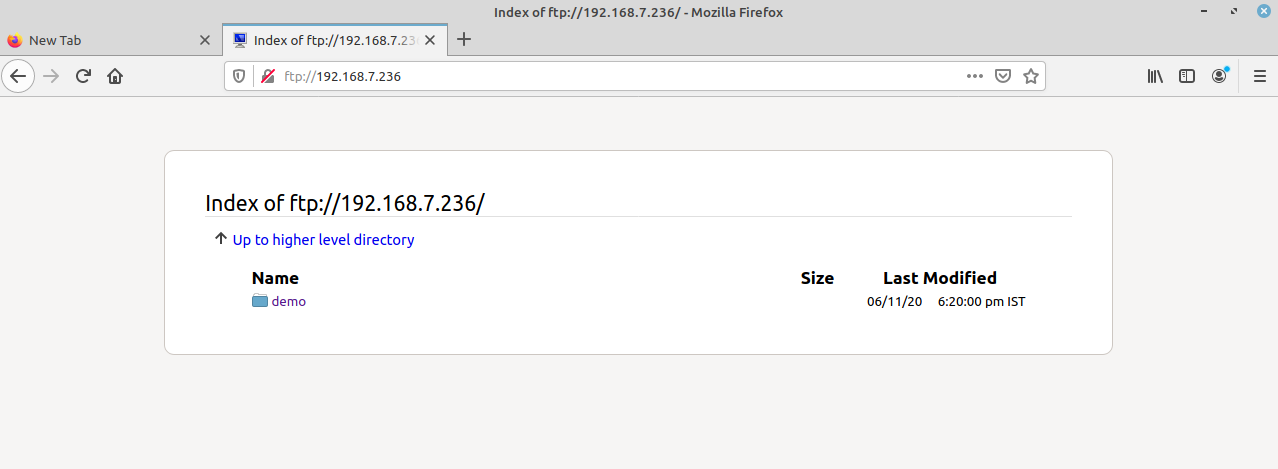 The text file of the demo directories is shown here
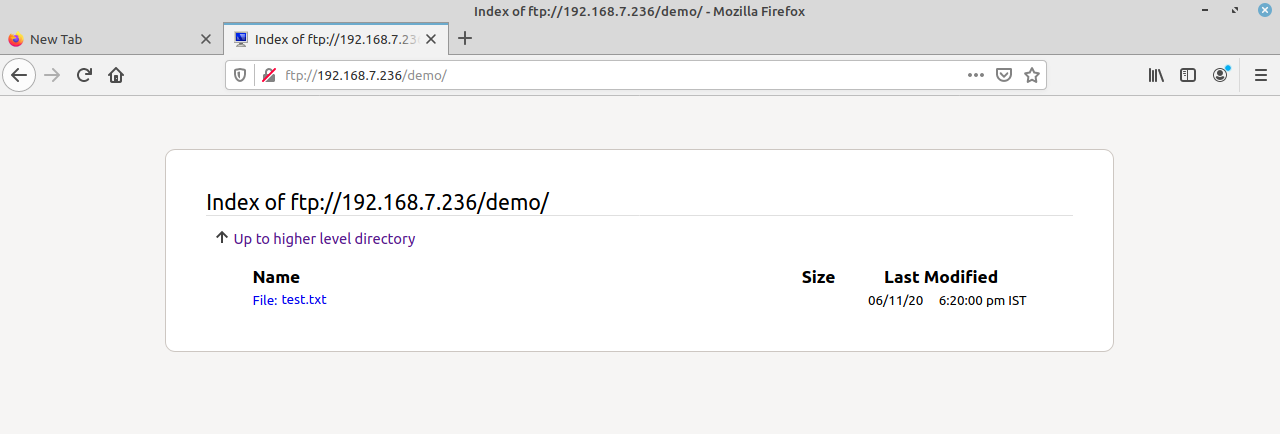
The installation process of FTP Server on LinuxMint 20 comes to an end.
Install and configure FTP server on Linux Mint 20
![]()
FTP or the File Transfer Protocol is the most popular network protocol that is used to transfer files and information between two systems over a network. However, the FTP by default does not encrypt the traffic, which is not a secure method and can result in an attack on a server. This is where VSFTPD comes which stands for Very Secure FTP Daemon and is a secure, stable, and fast FTP server. VSFTPD is licensed under GNU GPL. For most of the Linux distributions, VSFTPD is used as a default FTP server. In this article, you will learn how to install and configure the FTP server on Linux Mint OS.
Note: We have explained the procedure and commands on Linux Mint 20 OS. More or less the same procedure can be followed in older Mint versions.
Installing FTP server
To install an FTP server on Linux Mint, follow the below steps:
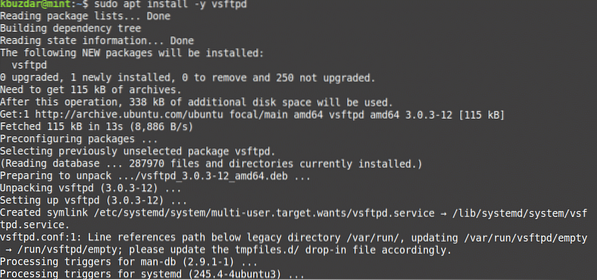
Step 1: Install VSFTPD
Our first step will be to install VFTPD on our system. To do so, launch the Terminal in Mint OS by using the Ctrl+Alt+T keyboard shortcut. Then issue the following command in the Terminal to update the system repository index:
Then install VSFTPD using the following command in Terminal:
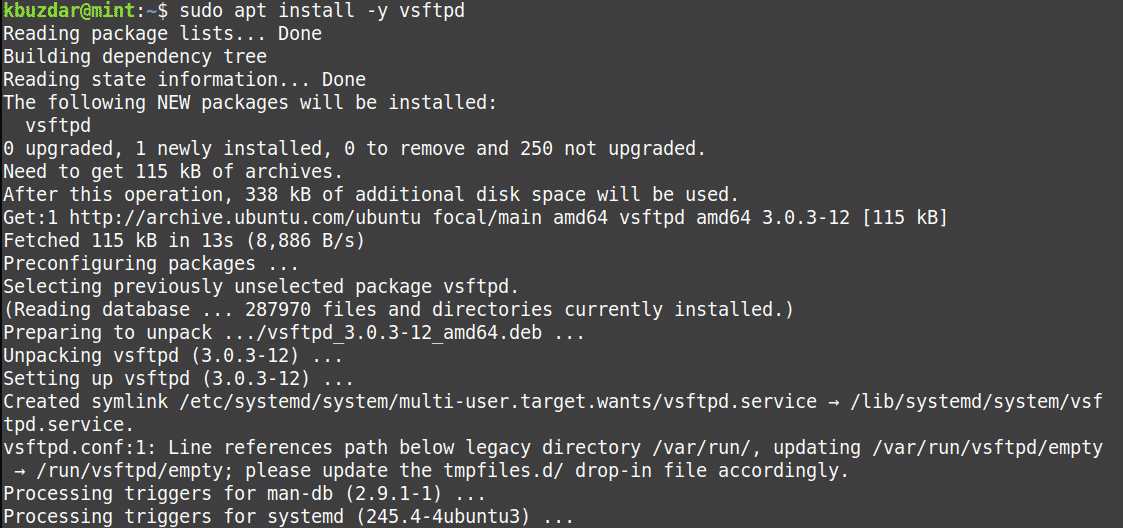
After the installation of VSFTPD is completed, we will move towards configuration.
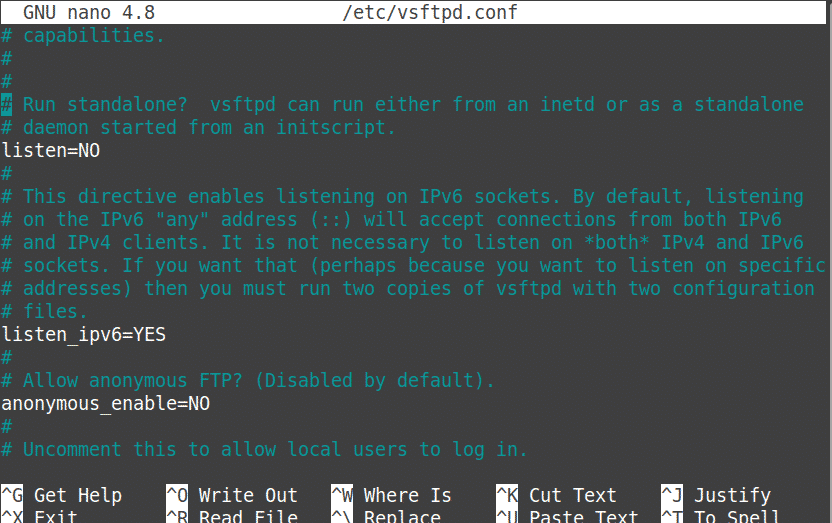
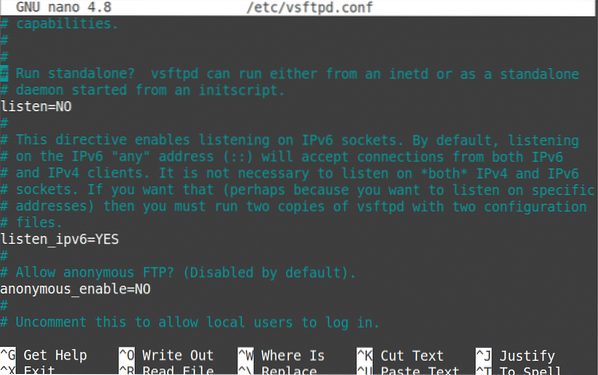
Step 2: Configure VSFTPD
The VSFTPD can be configured through the /etc/vsftpd.conf file. Edit the /etc/vsftpd.conf file using the following command in Terminal:
Now add or uncomment the following lines (if already added in the file):
listen=NO
anonymous_enable=NO
local_enable=YES
write_enable=YES
local_umask=022
dirmessage_enable=YES
use_localtime=YES
xferlog_enable=YES
connect_from_port_20=YES
chroot_local_user=YES
secure_chroot_dir=/var/run/vsftpd/empty
pam_service_name=vsftpd
rsa_cert_file=/etc/ssl/certs/ssl-cert-snakeoil.pem
rsa_private_key_file=/etc/ssl/private/ssl-cert-snakeoil.key
ssl_enable=Yes
pasv_enable=Yes
pasv_min_port=10000
pasv_max_port=10100
allow_writeable_chroot=YES
ssl_tlsv1=YES
ssl_sslv2=NO
ssl_sslv3=NO
Once done, save and close the /etc/vsftpd.conf file.
Step 3: Allow ports in firewall
If a firewall is running on your system, you will need to allow some FTP ports through it. Issue the following commands in Terminal to allow the ports 20 and 21:
You can verify whether the port has been allowed in the firewall or not using the following command in Terminal:
Step 4: Enable and run VSFTPD
Now the VSFTPD is configured and allowed in the firewall; now we can enable and run the VSFTPD services. Here are the commands to do so:
To enable the VSFTPD service to start on boot, issue the following command in Terminal:
To run the VSFTPD service, issue the following command in Terminal:
If you need to restart the VSFTPD service after making any configuration changes, issue the following command in Terminal:
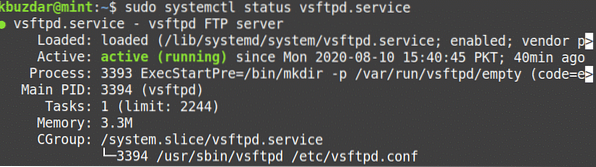
To verify if the VSFTPD is active and running, issue the following command in Terminal:

Step 5: Create an FTP user
Next, create a user account that will be used to test the FTP connection. Issue the following commands in Terminal to create a user account and set a password:
Step 6: Test FTP connection
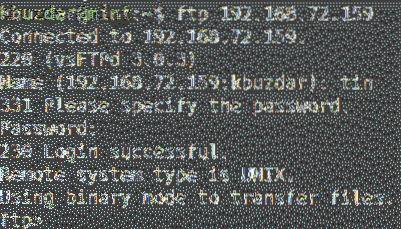
Now our FTP server is ready, so it’s time to test the FTP connection.
To test FTP connection locally, issue the following command in Terminal by replacing the by the actual IP address of your FTP server:

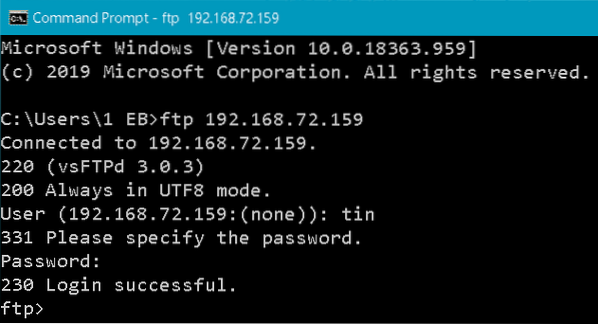
You can also test the FTP connection remotely by using the same above command from the remote system. I have tested the FTP connection from the Windows machine on the network.

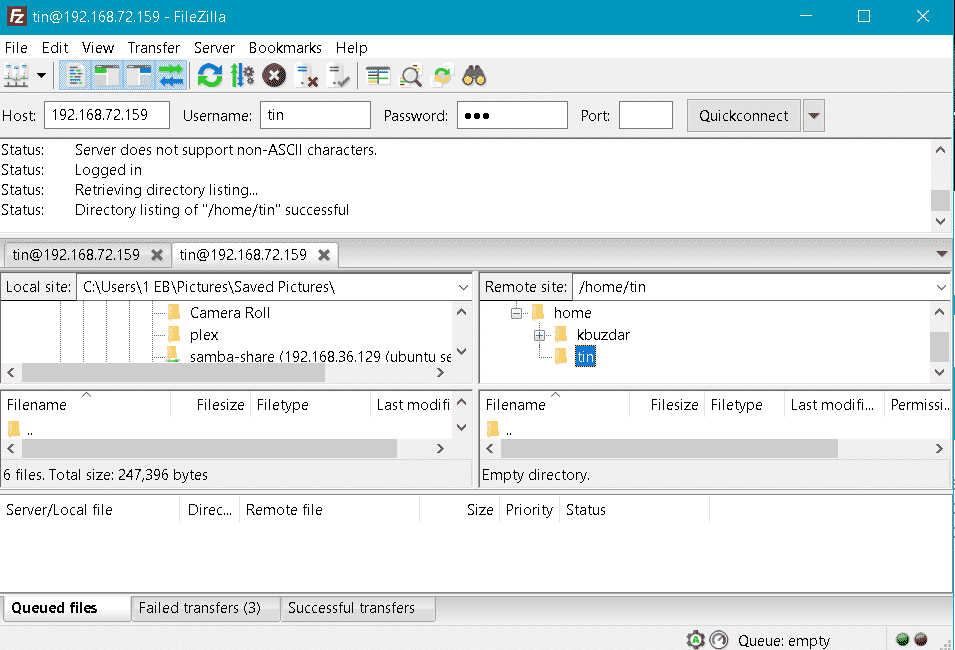
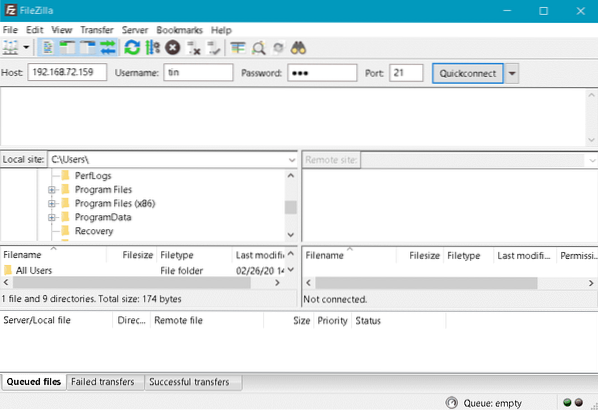
You can also use the FTP client like Filezilla to connect to the FTP server. To use the Filezilla application for connecting to the FTP server, provide the IP address of FTP server, username and password that you have set earlier, and port number 21 and then click the Quickconnect button.

Once connected, you will be successfully signed in to the FTP server and will be able to access remote server files and folders.
There you have the installation and configuration of the FTP server on the Linux Mint 20 system. By following the above described simple steps, you can easily setup the FTP server and transfer files through it.
About the author
Karim Buzdar
Karim Buzdar holds a degree in telecommunication engineering and holds several sysadmin certifications. As an IT engineer and technical author, he writes for various web sites. He blogs at LinuxWays.
Установите и настройте FTP-сервер на Linux Mint 20
FTP или протокол передачи файлов — самый популярный сетевой протокол, который используется для передачи файлов и информации между двумя системами по сети. Однако FTP по умолчанию не шифрует трафик, что не является безопасным методом и может привести к атаке на сервер. Именно здесь появляется VSFTPD, который расшифровывается как Very Secure FTP Daemon и является безопасным, стабильным и быстрым FTP-сервером. VSFTPD находится под лицензией GNU GPL. Для большинства дистрибутивов Linux VSFTPD используется в качестве FTP-сервера по умолчанию. В этой статье вы узнаете, как установить и настроить FTP-сервер в ОС Linux Mint.
Примечание: мы объяснили процедуру и команды в ОС Linux Mint 20. Более или менее такая же процедура может выполняться в более старых версиях Mint.
Установка FTP-сервера
Чтобы установить FTP-сервер на Linux Mint, выполните следующие действия:
Шаг 1. Установите VSFTPD
Нашим первым шагом будет установка VFTPD в нашей системе. Для этого запустите Терминал в Mint OS с помощью сочетания клавиш Ctrl + Alt + T. Затем введите следующую команду в Терминале, чтобы обновить индекс системного репозитория:
$ sudo подходящее обновление
Затем установите VSFTPD, используя следующую команду в Терминале:
$ sudo apt install -y vsftpd
После завершения установки VSFTPD перейдем к настройке.
Шаг 2. Настройте VSFTPD
VSFTPD можно настроить через / и т.д. / vsftpd.conf файл. Отредактируйте / и т.д. / vsftpd.conf файл, используя следующую команду в Терминале:
Теперь добавьте или раскомментируйте следующие строки (если они уже добавлены в файл):
слушать = НЕТ
anonymous_enable = НЕТ
local_enable = ДА
write_enable = ДА
local_umask = 022
dirmessage_enable = ДА
use_localtime = ДА
xferlog_enable = ДА
connect_from_port_20 = ДА
chroot_local_user = ДА
secure_chroot_dir = / var / run / vsftpd / пусто
pam_service_name = vsftpd
rsa_cert_file = / и т. д. / ssl / certs / ssl-cert-snakeoil.pem
rsa_private_key_file = / и т.д. / SSL / частный / SSL-сертификат-змея.ключ
ssl_enable = Да
pasv_enable = Да
pasv_min_port = 10000
pasv_max_port = 10100
allow_writeable_chroot = ДА
ssl_tlsv1 = ДА
ssl_sslv2 = НЕТ
ssl_sslv3 = НЕТ
После этого сохраните и закройте / и т.д. / vsftpd.conf файл.
Шаг 3. Разрешите порты в брандмауэре
Если в вашей системе запущен брандмауэр, вам необходимо разрешить через него некоторые FTP-порты. Выполните следующие команды в Терминале, чтобы разрешить порты 20 и 21:
$ sudo ufw allow 20 / tcp
$ sudo ufw разрешить 21 / tcp
Вы можете проверить, разрешен ли порт в брандмауэре или нет, используя следующую команду в Терминале:
Шаг 4. Включите и запустите VSFTPD
Теперь VSFTPD настроен и разрешен в брандмауэре; теперь мы можем включить и запустить службы VSFTPD. Вот как это сделать:
Чтобы разрешить запуск службы VSFTPD при загрузке, введите в Терминале следующую команду:
$ sudo systemctl включить vsftpd.услуга
Чтобы запустить службу VSFTPD, введите в Терминале следующую команду:
$ sudo systemctl start vsftpd.услуга
Если вам нужно перезапустить службу VSFTPD после внесения каких-либо изменений в конфигурацию, введите следующую команду в Терминале:
$ sudo systemctl перезапуск vsftpd.услуга
Чтобы убедиться, что VSFTPD активен и работает, введите в Терминале следующую команду:
$ sudo systemctl status vsftpd.услуга
Шаг 5. Создайте пользователя FTP
Затем создайте учетную запись пользователя, которая будет использоваться для проверки FTP-соединения. Выполните следующие команды в Терминале, чтобы создать учетную запись пользователя и установить пароль:
$ $ sudo adduser
$ sudo passwd
Шаг 6. Проверьте FTP-соединение
Теперь наш FTP-сервер готов, пора протестировать FTP-соединение.
Чтобы протестировать FTP-соединение локально, введите следующую команду в Терминале, заменив по фактическому IP-адресу вашего FTP-сервера:
Вы также можете протестировать FTP-соединение удаленно, используя ту же команду из удаленной системы. Я протестировал FTP-соединение с компьютера Windows в сети.
Вы также можете использовать FTP-клиент, например Filezilla, для подключения к FTP-серверу. Чтобы использовать приложение Filezilla для подключения к FTP-серверу, укажите IP-адрес FTP-сервера, имя пользователя и пароль, которые вы установили ранее, и номер порта 21, а затем щелкните значок Быстрое соединение кнопка.
После подключения вы успешно войдете на FTP-сервер и получите доступ к файлам и папкам удаленного сервера.

Здесь у вас есть установка и настройка FTP-сервера в системе Linux Mint 20. Выполнив описанные выше простые шаги, вы можете легко настроить FTP-сервер и передавать файлы через него.

Мышь
Большинство дистрибутивов Linux по умолчанию поставляются с библиотекой libinput для обработки событий ввода в системе. Он может обрабатывать события .

Мышь
Может быть, вам нужен инструмент, который мог бы изменять управление вашей мышью с каждым приложением, которое вы используете. В этом случае вы можете.

Мышь
Я недавно прочитал о Microsoft Sculpt Touch беспроводная мышь и решил ее купить. Побывав некоторое время, я решил поделиться своим опытом с ним. Эта б.
Свежие статьи об операционных системах. Множество интересных гайдов и полезных советов. Почувствуйте себя своим в мире современных технологий