Saved searches
Use saved searches to filter your results more quickly
You signed in with another tab or window. Reload to refresh your session. You signed out in another tab or window. Reload to refresh your session. You switched accounts on another tab or window. Reload to refresh your session.
The hard ware of SD WIFI PRO
FYSETC/SD-WIFI-PRO
This commit does not belong to any branch on this repository, and may belong to a fork outside of the repository.
Name already in use
A tag already exists with the provided branch name. Many Git commands accept both tag and branch names, so creating this branch may cause unexpected behavior. Are you sure you want to create this branch?
Sign In Required
Please sign in to use Codespaces.
Launching GitHub Desktop
If nothing happens, download GitHub Desktop and try again.
Launching GitHub Desktop
If nothing happens, download GitHub Desktop and try again.
Launching Xcode
If nothing happens, download Xcode and try again.
Launching Visual Studio Code
Your codespace will open once ready.
There was a problem preparing your codespace, please try again.
Latest commit
Git stats
Files
Failed to load latest commit information.
README.md

This is a brand new SD WIFI, we call it SD WIFI PRO, or SWP for short. It is based on ESP32 PICO V3-02 and SD 7.0 size standard, with additional 8MB Flash, 2MB PSRAM, which can provide more possibilities for more creative applications. By default, we provide a set of open source and available websever firmware, which has complete file upload and download functions, and can basically meet the needs of remote management files in the LAN. In addition to the necessary SD transmission pins, SWP also leads out redundant pins. In addition to being used for firmware updates, it can also be used for other device control through the serial port/I2C, so as to realize remote upload files, send control commands and many other operations. It can also be used in scenarios other than 3D printing, such as Flash Air (TOSHIBA), ez Share (Ez Share) and other products on the market, for file sharing, such as quickly transferring photos in the camera without a data cable to the phone. It is not only a completely open source product, but also a wireless SD product development kit, which provides more possibilities according to your imagination.
- Based on ESP32 PICO V3-02, with additional 8MB Flash, 2MB PSRAM
- 2.4G Wifi & Bluetooth
- SD 7.0 size standard, SDIO/SPI compatible golden finger, and additional serial port and I2C interface
- Built-in 8GB high-speed memory
- Comes with SD Reader and Flash Uploader development board
- Fully open source hardware and software
3D printers, and other devices that require wireless access to SD cards.

| Pin | Name | Input | Output | Function |
|---|---|---|---|---|
| 1 | SDIO_D3 | Built-in Flash pin, SPI: CS | ||
| 2 | SDIO_CMD | Built-in Flash pin, SPI:MOSI | ||
| 3 | GND | Ground | ||
| 4 | 3V3 | 3.3V power supply voltage for SWP(3.0-3.6V @300mA+) | ||
| 5 | SDIO_CLK | Built-in Flash pin, SPI: CLK | ||
| 6 | GND | Ground | ||
| 7 | SDIO_D0 | Built-in Flash pin, SPI: MISO | ||
| 8 | SDIO_D1 | Built-in Flash pin, SPI: NC | ||
| 9 | SDIO_D2 | Built-in Flash pin, SPI:NC | ||
| 10 | GPIO_32 | OK | OK | ADC1_CH4, TOUCH9, RTC_GPIO9 |
| 11 | GPIO_26 | Ok | OK | GPIO26, DAC_2, ADC2_CH9, RTC_GPIO7, EMAC_RXD1 |
| 12 | GPIO_2 | OK | OK | must be left floating or LOW to enter flashing mode ADC2_CH2, TOUCH2, RTC_GPIO12, HSPIWP, HS2_DATA0, SD_DATA0 |
| 13 | GPIO_0 | pulled up | OK | outputs PWM signal at boot, must be LOW to enter flashing mode ADC2_CH1, TOUCH1, RTC_GPIO11, CLK_OUT1, EMAC_TX_CLK |
| 14 | ESP_EN | Enable (EN) is the 3.3V regulator’s enable pin. It’s pulled up, so connect to ground to disable the 3.3V regulator. This means that you can use this pin connected to a pushbutton to restart your ESP32, for example. | ||
| 15 | GPIO_3 / RX0 | OK | RX pin | HIGH at boot |
| 16 | GPIO_01 / TX0 | TX pin | OK | debug output at boot |
| 17 | GPIO_22 / I2C_SCL | OK | OK | GPIO22, VSPIWP, U0RTS, EMAC_TXD1 |
| 18 | GPIO_21 / I2C_SDA | OK | OK | GPIO21, VSPIHD, EMAC_TX_EN |
| 19 | GPIO_19 | OK | OK | GPIO19, VSPIQ, U0CTS, EMAC_TXD0 |
4.2 Uploader & Card Reader Board (SWP Dev Board) Instructions


- SD7.0 21Pin Socket
- All pins out Of SWP
- Card reader chip (USB2.0) & USB switch chip
- USB Type-C Connector
- Firmware automatic download and serial debugging circuit (CH340)
- Mode/function selection DIP switch, It is defined as follows:
4.2.2 USE the dev board as a SD socket
For motherboards without SD card sockets, SWP may not be convenient to connect. At this time, you can use the development board as a socket, and only need to connect it to the original SPI interface of the motherboard. For some boards that only have a TF card holder and do not have an SPI interface reserved, it will be more troublesome, but there are many cheap TF to SD card boards available for sale.
The source code is at SdWiFiBrowser, current release is swd 0.x version, the more description about the version at README.md
A new version is coming soon.
Please submit any technical issue into our forum ,github,facebook, Discord。
About
The hard ware of SD WIFI PRO
SD-WIFI by FYSETC: Wireless 3D printing
How do you communicate with your 3D printer? Carrying an SD card between your computer and the printer? This can end now using the SD-WIFI module! If you try to get it running on a Mac, some extra effort may be necessary.
There are a couple of different ways to get 3D-data to your printer. You can do it over LAN or USB, if your printer supports that. You can use an Octoprint server running on a Raspberry Pi. Or you carry an SD card from your computer to the printer.
The Prusa i3 MK3 printer (which I use) uses the SD card method as the default. If you invest in a Raspberry Pi, you can use WLAN and Octoprint. And this is my plan—when Raspberry Pis are affordable again, which is announced to be the case later this year.
However, since plugging the SD-card in and out is not much fun, I decided as a provisional solution to buy an SD-card with WLAN connectivity. There used to be a number of different such cards around for digital cameras. However, now I only found some no-name brands and Canon, which all did not look convincing. And then I found the SD-WIFI module, which looks quite attractive.
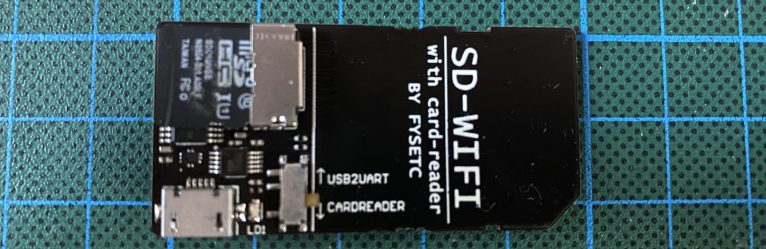
The module and its firmware have been developed by the GitHub user ardyesp. It is an SD card adapter with a microSD slot and an ESP8266 on it. On the ESP8366, a WebDAV server has been implemented. The module is produced and distributed by the Chinese 3D printer company FYSETC. One can buy these cards at eBay and 3D printing online shops for around €20. Getting to the point that all this is usable is not completely easy, though, in particular if you try to do it on a Mac. I spent the better part of an afternoon trying to get the card up and running.
One finds some information about how to configure and start the SD-WIFI module in the FYSETC GitHub repo. I tried the first way to configure the card, which is to put a file SETUP.INI in the root directory of the Micro-SD-card. The file needs to contain the SSID and the password for your WLAN. Plugging the SD-WIFI card into my 3D printer resulted in … nothing. In particular, no new IP address showed up in my WLAN.
So, I tried the second way. It consists of connecting over USB to the card using a serial connection. In order to do so, you need to set the switch on the card to the position USB2UART and put a USB cable into the card and your computer. Then you need a serial terminal window. On a Mac, you can do that with the program screen . Under Windows, people usually use PuTTY . Unfortunately, the instructions do not tell you, what baud rate you should select. Inspecting the code, it seems that 115200 is the right baud rate. However, when you connect and press the reset button, then the output of the module looks as follows.
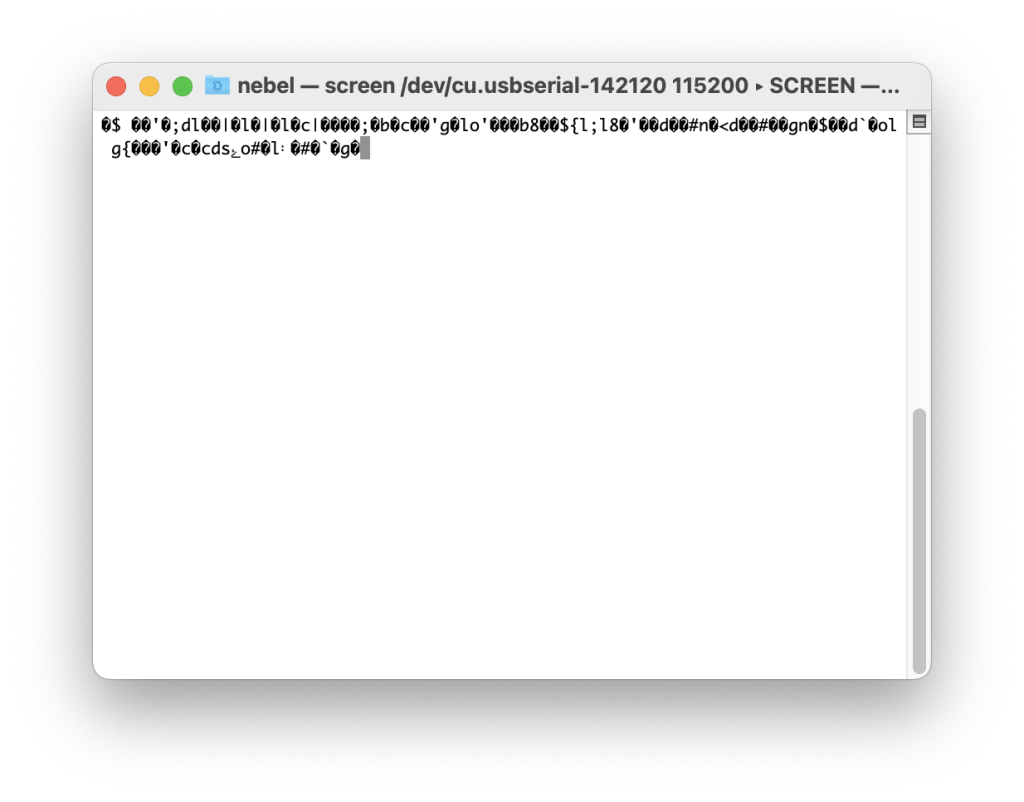
This looks suspiciously as if the wrong baud rate has been chosen or perhaps one of the other communication parameters, e.g., parity, is wrong. However, if you are patient, after a while some reasonable things seem to happen.

The module tried to connect to the local WLAN and failed. The instructions state that you can set the SSID and WLAN password using the prefix M50 and M51 respectively. So I typed M50fogsnet (capital M!), where fogsnet is the SSID of my WLAN. However, nothing happened. In particular, the input is not shown in the terminal window. Pressing then gave the response fogsnetok . OK, we are in business now. So, I followed up with M51 and the WLAN password and again a . Finally, M 52 in order to start up the WebDAV server.

Obviously, the user interface has not been designed for a plain serial terminal, but probably for something line-oriented with local echo. But who cares. Now it works.
The LED on the card blinks every second, and one expects that everything is in order. Indeed, you can unplug the USB cable from your card and put it into your 3D printer. Now, the 3D printer is able to read the files that are on the card. After a while, the LED will again start blinking because the SD-WIFI card has remembered the WLAN parameters and connected again.
Connecting to the WebDAV server
Now you should be able to connect to the SD-WIFI card using the WebDAV protocol, which allows mounting a file system from a remote server into the local file system. Under macOS, you use the Go->Connect to Server command. Just specify the IP address, which was displayed in the last step above, and the http protocol, when asked for the server address, as in http://192.168.X.Y . Then you will be asked for user credentials, or you can specify that you want to login as a guest. Unfortunately, one always gets strange error messages. You can also try the https protocol. Again a failure.
Under Windows, you can type \\192.168.X.Y\DavWWWRoot\ into the Explorer input line, and … wham … the content of the microSD card is shown. Similarly, when using Ubuntu, the microSD card can be reached via dav://192.168.X.Y/ .
So what is wrong with macOS? I have no idea! Even intensive googling did not help. As a last resort, I tried out programs that connect to cloud storage, such as CloudMounter and ocsmount. And with both, I was finally able to connect to the microSD card. Hurrah! So, I bought the latter one, and I am now a happy user, who does not have to carry the SD-card around. I still have to walk over to the printer to start it, though.
Finally, I should mention another potential pitfall, I fortunately did not encounter. You may need to install a driver for the USB-serial IC, the CH340. Sparkfun has a good tutorial on that.
Conclusions after 2 months of usage
So far, I have used the card quite often. Unfortunately, recently, I experienced some WebDAV disconnects and file transfer errors, leading to printing errors. So, I am back to carrying the SD-card between computer and printer.