- Как установить GCC (необходимое для сборки) на Ubuntu 20.04
- Установка GCC в Ubuntu 20.04
- Компиляция примера Hello World
- Установка нескольких версий GCC
- Выводы
- Installing the GNU C compiler and GNU C++ compiler
- Installing the GNU Java compiler
- Installing the GNU Fortran compilers
- Installing the GNU autotools
- 32-bit Builds on AMD64
- Installing the Intel Compiler Suite Professional Edition 10.x
- Get the License Number and Extract to a path without spaces
- On 64-bit systems you may also need to issue these commands
- Run the Installation Script
- Edit /etc/bash.bashrc to add the installation path to the PATH environment variable
- Installing the X11 development compilers
- Установка GNU GCC Компилятора и среды разработки на Ubuntu Linux
- Вам необходимо установить следующие пакеты на Debian и Ubuntu Linux:
- Установка компиляторов с помощью команды apt
- Проверка установки
- Установка страниц dev man на Ubuntu Linux
- Установка компиляторов разработки X11
- Оставьте ответ Отменить ответ
Как установить GCC (необходимое для сборки) на Ubuntu 20.04
Коллекция компиляторов GNU (GCC) — это набор компиляторов и библиотек для языков программирования C, C ++, Objective-C, Fortran, Ada, Go и D. Многие проекты с открытым исходным кодом, включая ядро Linux и инструменты GNU, скомпилированы с использованием GCC.
В этой статье объясняется, как установить GCC в Ubuntu 20.04.
Установка GCC в Ubuntu 20.04
Репозитории Ubuntu по умолчанию содержат метапакет с именем «build-essential», который включает коллекцию компиляторов GNU, отладчик GNU и другие библиотеки и инструменты разработки, необходимые для компиляции программного обеспечения.
Чтобы установить пакеты средств разработки, выполните следующую команду от имени пользователя root или пользователя с правами sudo :
sudo apt updatesudo apt install build-essential
Команда устанавливает множество пакетов, включая gcc , g++ и make .
Вы также можете установить справочные страницы об использовании GNU / Linux для разработки:
sudo apt-get install manpages-devУбедитесь, что компилятор GCC успешно установлен, выполнив следующую команду, которая выводит версию GCC:
Репозитории Ubuntu 20.04 предоставляют GCC версии 9.3.0 :
gcc (Ubuntu 9.3.0-10ubuntu2) 9.3.0 Copyright (C) 2019 Free Software Foundation, Inc. This is free software; see the source for copying conditions. There is NO warranty; not even for MERCHANTABILITY or FITNESS FOR A PARTICULAR PURPOSE. Вот и все. В вашей системе Ubuntu установлены инструменты и библиотеки GCC.
Компиляция примера Hello World
Скомпилировать базовую программу на C или C ++ с помощью GCC довольно просто. Откройте текстовый редактор и создайте следующий файл:
// hello.c #include int main() printf("Hello, world!n"); return 0; > Сохраните файл и скомпилируйте его в исполняемый файл:
Это создает двоичный файл с именем hello в том же каталоге, где вы запускаете команду.
Запустите программу hello с помощью:
Программа должна напечатать:
Установка нескольких версий GCC
В этом разделе приведены инструкции по установке и использованию нескольких версий GCC в Ubuntu 20.04. Новые версии компилятора GCC включают новые функции и улучшения оптимизации.
На момент написания этой статьи репозитории Ubuntu по умолчанию включают несколько версий GCC, от 7.xx до 10.xx
В следующем примере мы установим последние три версии GCC и G ++.
Установите нужные версии GCC и G ++, набрав:
sudo apt install gcc-8 g++-8 gcc-9 g++-9 gcc-10 g++-10Приведенные ниже команды настраивают альтернативу для каждой версии и связывают с ней приоритет. Версия по умолчанию — это версия с наивысшим приоритетом, в нашем случае это gcc-10 .
sudo update-alternatives --install /usr/bin/gcc gcc /usr/bin/gcc-10 100 --slave /usr/bin/g++ g++ /usr/bin/g++-10 --slave /usr/bin/gcov gcov /usr/bin/gcov-10sudo update-alternatives --install /usr/bin/gcc gcc /usr/bin/gcc-9 90 --slave /usr/bin/g++ g++ /usr/bin/g++-9 --slave /usr/bin/gcov gcov /usr/bin/gcov-9sudo update-alternatives --install /usr/bin/gcc gcc /usr/bin/gcc-8 80 --slave /usr/bin/g++ g++ /usr/bin/g++-8 --slave /usr/bin/gcov gcov /usr/bin/gcov-8
Позже, если вы захотите изменить версию по умолчанию, используйте команду update-alternatives :
sudo update-alternatives --config gccThere are 3 choices for the alternative gcc (providing /usr/bin/gcc). Selection Path Priority Status ------------------------------------------------------------ * 0 /usr/bin/gcc-10 100 auto mode 1 /usr/bin/gcc-10 100 manual mode 2 /usr/bin/gcc-8 80 manual mode 3 /usr/bin/gcc-9 90 manual mode Press to keep the current choice[*], or type selection number: Вам будет представлен список всех установленных версий GCC в вашей системе Ubuntu. Введите номер версии, которую вы хотите использовать по умолчанию, и нажмите Enter .
Команда создаст символические ссылки на определенные версии GCC и G ++.
Выводы
Мы показали вам, как установить GCC в Ubuntu 20.04. Теперь вы можете посетить официальную страницу документации GCC и узнать, как использовать GCC и G ++ для компиляции программ на C и C ++.
Если вы столкнулись с проблемой или хотите оставить отзыв, оставьте комментарий ниже.
Installing the GNU C compiler and GNU C++ compiler
To install the gcc and g++ compilers, you will need the build-essential package. This will also install GNU make.
build-essential contains a list of packages which are essential for building Ubuntu packages including gcc compiler, make and other required tools.
$ sudo apt-get update $ sudo apt-get upgrade $ sudo apt-get install build-essential $ gcc -v $ make -v
Now, you should able to compile software using C / C++ compilers.
To install the manpages for c and c++ development, install the manpages-dev package.
Installing the GNU Java compiler
Note that GNU’s Java compiler is not the same as the one developed and distributed by Sun Microsystems, and will not provide Java to the firefox browser. For that, please see Java. To install gcj, the GNU Java compiler, install the following package: gcj.
To install the GNU Java bytecode interpreter, you need the gij package.
To have gcj compile to executables, install libgcj6-dev (otherwise an error during compilation occurs: libgcj.spec: No such file or directory). Use synaptic to install libgcj6-dev.
Installing the GNU Fortran compilers
To install the GNU Fortran 77 compiler — g77, you need the g77 package.
To install the GNU Fortran 95 compiler — gfortran, the package is: gfortran.
Installing the GNU autotools
To install autoconf and automake, you need the autoconf and automake packages.
Apt-get will tell you to explicitly choose a version of automake. If, for example, you decide to use automake1.9, you need to specify the version, such as the automake1.9 package.
32-bit Builds on AMD64
The GNU compilers have options that allow them to create 32-bit object and executable files on 64-bit operating systems, and vica versa. The critical options are -m32 (to build 32-bit) and -m64 (to build 64-bit).
These options will be present when you install the compiler of your choice. However, they won’t actually work unless you install several additional packages.
The first thing you will need is the multilib package for the compiler you are using. For example, to add multilib support to the default version of g++ (4.1 in gutsy), you would install
The multilib packages are compiler runtime packages. Now, you need 32-bit (or 64-bit) versions of whatever libraries you need to link your application program. 64-bit packages have names that start with lib64. Install these on 32-bit systems to support 64-bit builds. 32-bit packages have names that start with lib32. Install these on 64-bit systems to support 32-bit builds. Whatever else you are doing, you will probably need . If you are using g++, you will need
Installing the Intel Compiler Suite Professional Edition 10.x
- gcc, build-essential, libc6-dev (see above)
- ia32-libs, g++-multilib, and libc6-dev-i386 (for 64-bit systems)
- 32-bit packages starting with lib32 (for 64-bit systems)
- alien and rpm for installing the RPM packages that Intel distributes.
- libstdc++5 and libstdc++5-3.3-dev for good measure because Intel’s builds depend on these runtimes.
before you attempt installing the Intel Compiler Suite.
Get the License Number and Extract to a path without spaces
Ensure that you have obtained the license number for your installation and extracted the downloaded installation archive into a path that does not contain any spaces. This last statement is utterly important. The installer script that comes with the package has a bug that does not allow you to install the compiler suite if you have any spaces in the installer script path.
On 64-bit systems you may also need to issue these commands
# cd /usr/lib32 # ln -s libpthread.so libpthread.so.0 # ln -s libm.so libm.so.6 # ln -s libc.so libc.so.6 # ln -s libdl.so libdl.so.2
because the chklic_32_64 license checking utility from Intel dynamically links to these libraries.
Once you’re done preparing to install the compiler suite, it’s time to go to the installer directory and install the compiler (be sure to also read through accompanying documentation; e.g., README, INSTALL.txt):
Run the Installation Script
$ cd /home/user/intel_compiler_suite $ sudo ./install.sh . Follow the wizard as it guides you through the installation process.
After installing the compiler, you need to tell your shell the location of these executables by adding their parent paths to the PATH environment variable.
Edit /etc/bash.bashrc to add the installation path to the PATH environment variable
export PATH=/opt/intel/cc/10.1.012/bin:/opt/intel/idb/10.1.012/bin:$
Where 10.1.012 is the version of the compiler suite installed.
Installing the X11 development compilers
Install script for X11 development libs
$ sudo apt-get -y install libx11-dev
InstallingCompilers (последним исправлял пользователь cable-31-58 2012-08-10 10:18:50)
The material on this wiki is available under a free license, see Copyright / License for details
You can contribute to this wiki, see Wiki Guide for details
Установка GNU GCC Компилятора и среды разработки на Ubuntu Linux
Как установить компилятор GNU / GCC (C и C ++) и связанные с ним инструменты (например, make, debugger, man pages) в операционной системе Ubuntu Linux с использованием параметров командной строки?
Вам необходимо установить следующие пакеты на Debian и Ubuntu Linux:
Build-essential package — Устанавливает следующую коллекцию для компиляции c / c ++-программ на Ubuntu Linux, включая:
- libc6-dev – стандартная C библиотека.
- gcc – C компилятор.
- g++ – C++ компилятор.
- make – GNU делает утилиту для поддержки групп программ.
- dpkg-dev – Инструменты разработки пакетов Debian.
В принципе, build-essential пакет содержит информационный список пакетов, которые считаются необходимыми для создания пакетов Ubuntu, включая gcc-компилятор, make и другие необходимые инструменты. Этот пакет также зависит от пакетов в этом списке, чтобы упростить установку build-essential пакетов. В этом руководстве вы узнаете об установке компилятора GNU C и компилятора GNU C ++ на Ubuntu Linux.
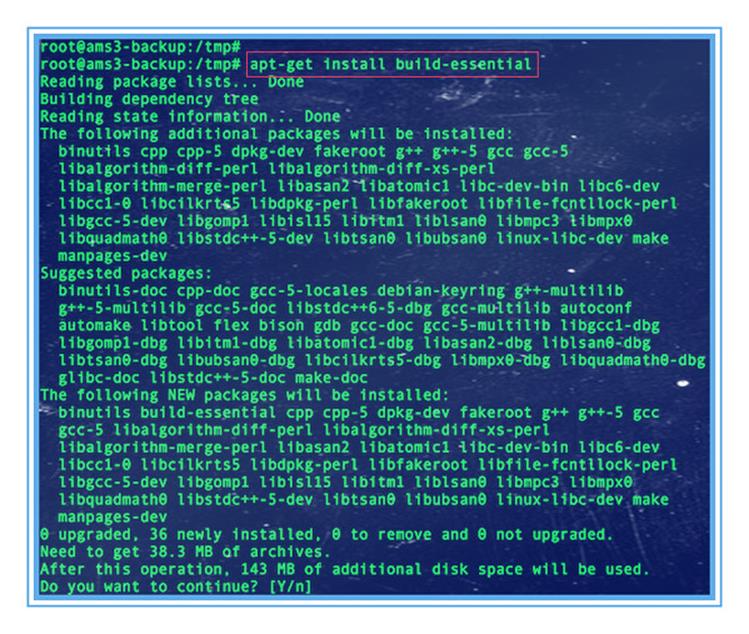
Установка компиляторов с помощью команды apt
Откройте приложение терминала и введите следующее apt command /apt-get command :
$ sudo apt update $ sudo apt upgrade $ sudo apt install build-essential
$ sudo apt-get update $ sudo apt-get upgrade $ sudo apt-get install build-essential

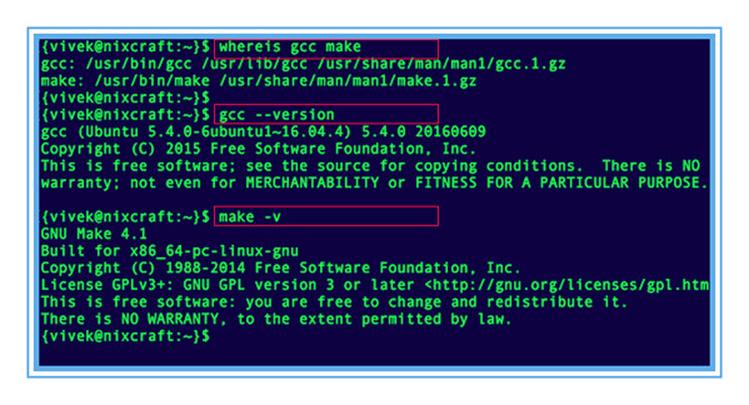
Проверка установки
Введите следующую команду:
$ whereis gcc make $ gcc --version $ make -v

Установка страниц dev man на Ubuntu Linux
Введите следующую команду:
$ sudo apt-get install manpages-dev man-db manpages-posix-dev
Чтобы посмотреть запросы библиотеки (функция в библиотеках программы) введите:
$ man 3 scanf $ man 2 execve $ man 2 fork
Установка компиляторов разработки X11
Введите следующую команду:
$ sudo apt install libx11-dev
Это интересно:
Оставьте ответ Отменить ответ
📅 С 20 по 22 апреля пройдут незабываемые битвы среди кибер-гладиаторов в мире информационной безопасности!
Открыта регистрация команд по ссылке .