- Ghost Phisher – Wireless & Ethernet Attack Software Application
- Supported OS Ghost Phisher
- Prerequisites
- Features
- Installation on Debian Package
- Kali Linux — Wireless Attacks
- Fern Wifi Cracker
- Kismet
- GISKismet
- Ghost Phisher
- Wifite
- Лучшие инструменты фишинга для Kali Linux
- Лучшие инструменты фишинга для Kali Linux
- Socialphish
- Shell Phish
- Ghost Phisher — Kali Linux
- Tags
- SHARE:
- COMMENTS
- SolutionRider Rebrand To myTechMint Click Here To Visit
- Social$type=social_counter
- Categories
- SolutionRider Rebrand To myTechMint Click Here To Visit
- Footer Social$type=social_icons
Ghost Phisher – Wireless & Ethernet Attack Software Application
Ghost Phisher is a Wireless and Ethernet security auditing and attack software program written using the Python Programming Language and the Python Qt GUI library, the program is able to emulate access points and deploy various internal networking servers for networking, penetration testing and phishing attacks.
Supported OS Ghost Phisher
The Software runs on any Linux machine with the programs prerequisites, But the program has been tested on the following Linux based operating systems:
Prerequisites
The following dependencies can be installed using the Debian package installer command on Debian based systems using “apt-get install program” or otherwise downloaded and installed manually.
- Aircrack-NG
- Python-Scapy
- Python Qt4
- Python
- Subversion
- Xterm
- Metasploit Framework (Optional)
Features
Ghost Phisher currently supports the following features:
- HTTP Server
- Inbuilt RFC 1035 DNS Server
- Inbuilt RFC 2131 DHCP Server
- Webpage Hosting and Credential Logger (Phishing)
- Wifi Access point Emulator
- Session Hijacking (Passive and Ethernet Modes)
- ARP Cache Poisoning (MITM and DOS Attacks)
- Penetration using Metasploit Bindings
- Automatic credential logging using SQlite Database
- Update Support
Installation on Debian Package
root@host:~# dpkg -i ghost-phisher_1.5_all.deb
The source code for the program can be fetched using the following command on terminal
Kali Linux — Wireless Attacks
In this chapter, we will learn how to use Wi-Fi cracking tools that Kali Linux has incorporated. However, it is important that the wireless card that you has a support monitoring mode.
Fern Wifi Cracker
Fern Wifi cracker is one of the tools that Kali has to crack wireless.
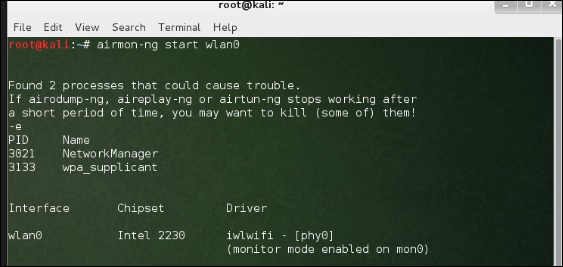
Before opening Fern, we should turn the wireless card into monitoring mode. To do this, Type “airmon-ng start wlan-0” in the terminal.

Now, open Fern Wireless Cracker.
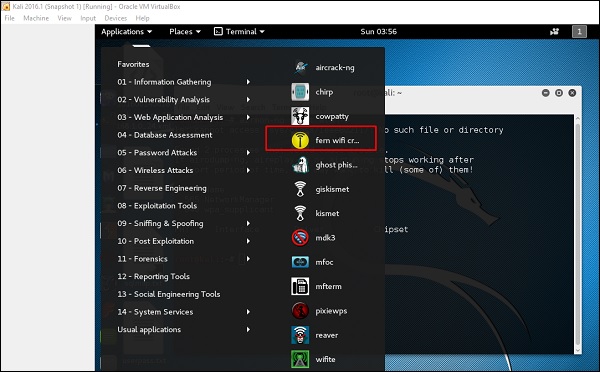
Step 1 − Applications → Click “Wireless Attacks” → “Fern Wireless Cracker”.
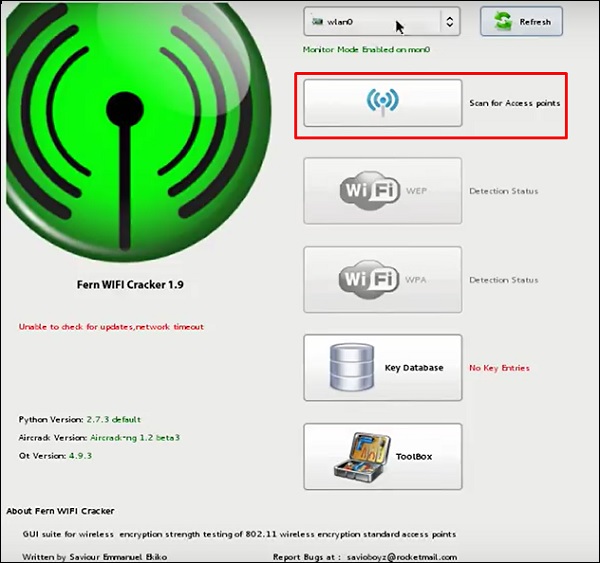
Step 2 − Select the Wireless card as shown in the following screenshot.

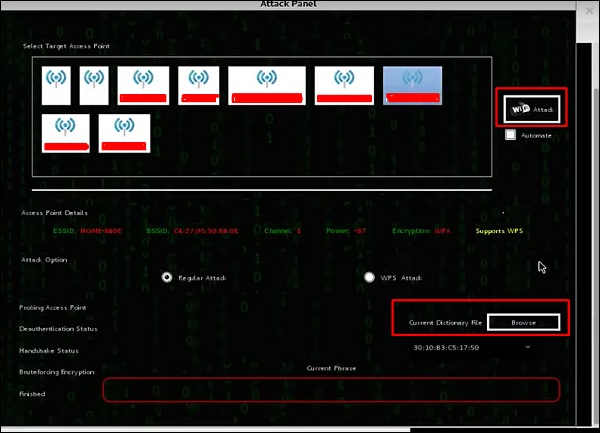
Step 3 − Click “Scan for Access Points”.
Step 4 − After finishing the scan, it will show all the wireless networks found. In this case, only “WPA networks” was found.
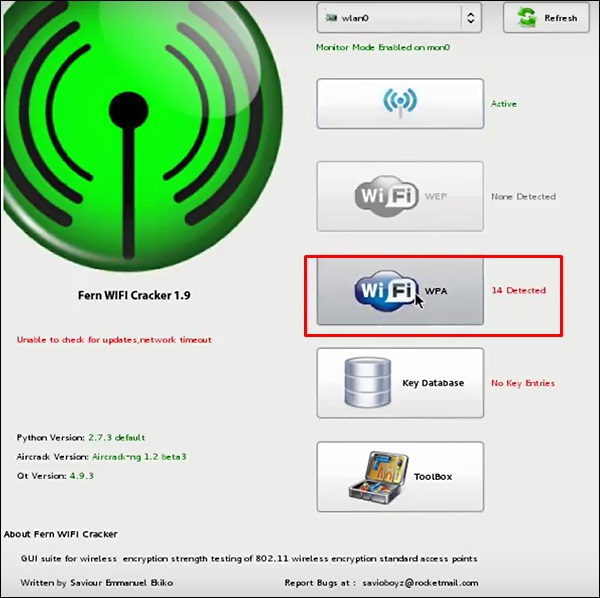
Step 5 − Click WPA networks as shown in the above screenshot. It shows all the wireless found. Generally, in WPA networks, it performs Dictionary attacks as such.
Step 6 − Click “Browse” and find the wordlist to use for attack.
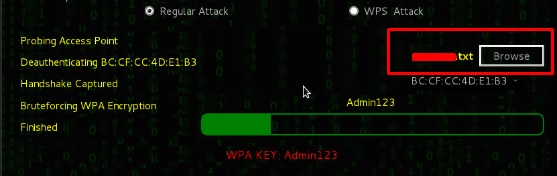
Step 7 − Click “Wifi Attack”.
Step 8 − After finishing the dictionary attack, it found the password and it will show as depicted in the following screenshot picture.

Kismet
Kismet is a WIFI network analyzing tool. It is a 802.11 layer-2 wireless network detector, sniffer, and intrusion detection system. It will work with any wireless card that supports raw monitoring (rfmon) mode, and can sniff 802.11a/b/g/n traffic. It identifies the networks by collecting packets and also hidden networks.
To use it, turn the wireless card into monitoring mode and to do this, type “airmon-ng start wlan-0” in the terminal.
Let’s learn how to use this tool.
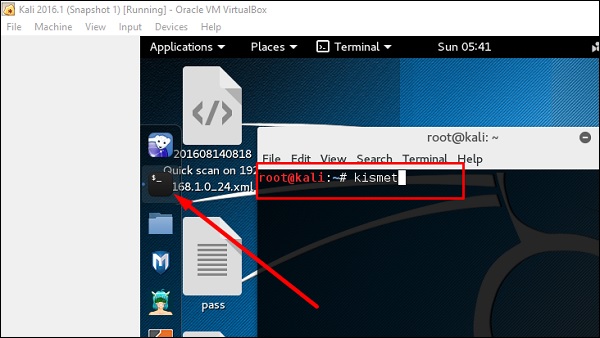
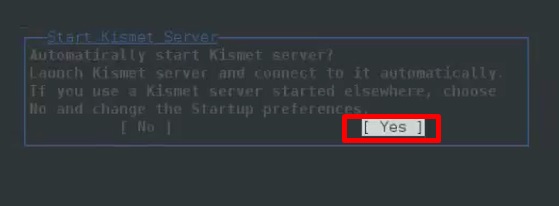
Step 1 − To launch it, open terminal and type “kismet”.
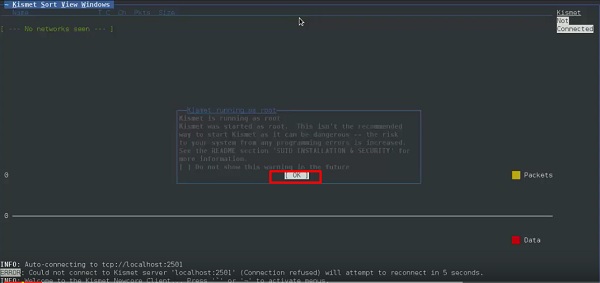
Step 3 − Click “Yes” when it asks to start Kismet Server. Otherwise it will stop functioning.
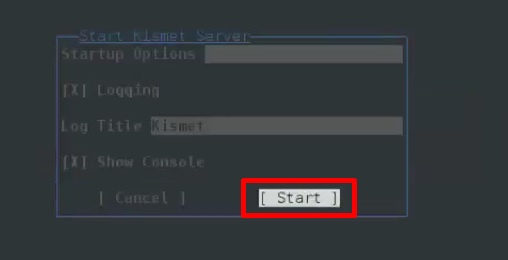
Step 4 − Startup Options, leave as default. Click “Start”.
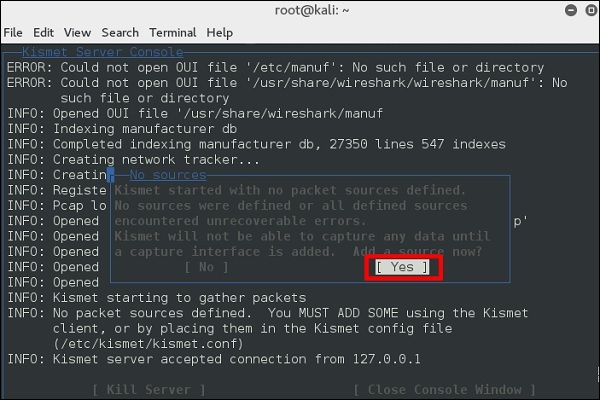
Step 5 − Now it will show a table asking you to define the wireless card. In such case, click Yes.
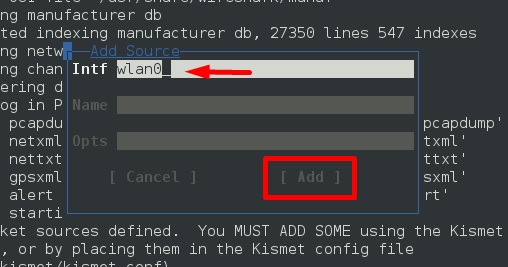
Step 6 − In this case, the wireless source is “wlan0”. It will have to be written in the section “Intf” → click “Add”.
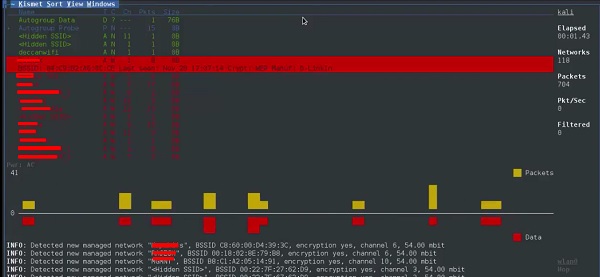
Step 7 − It will start sniffing the wifi networks as shown in the following screenshot.
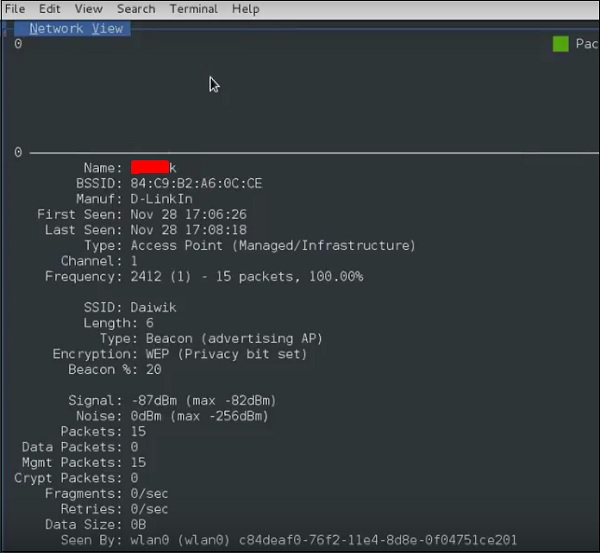
Step 8 − Click on any network, it produces the wireless details as shown in the following screenshot.
GISKismet
GISKismet is a wireless visualization tool to represent data gathered using Kismet in a practical way. GISKismet stores the information in a database so we can query data and generate graphs using SQL. GISKismet currently uses SQLite for the database and GoogleEarth / KML files for graphing.
Let’s learn how to use this tool.
Step 1 − To open GISKismet, go to: Applications → Click “Wireless Attacks” → giskismet.

As you remember in the previous section, we used Kismet tool to explore data about wireless networks and all this data Kismet packs in netXML files.
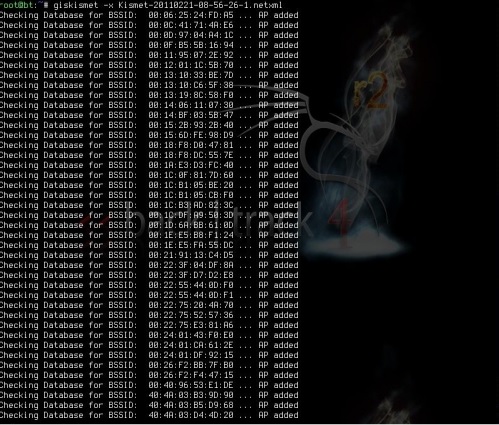
Step 2 − To import this file into Giskismet, type “root@kali:~# giskismet -x Kismetfilename.netxml” and it will start importing the files.
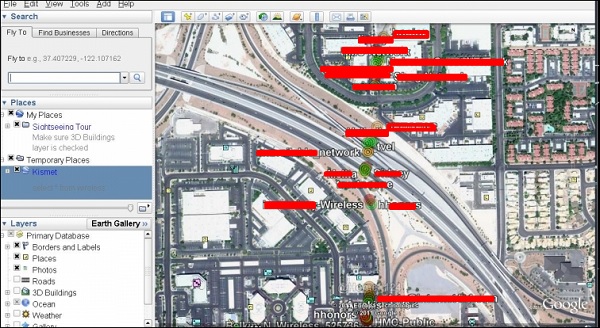
Once imported, we can import them to Google Earth the Hotspots that we found before.
Step 3 − Assuming that we have already installed Google Earth, we click File → Open File that Giskismet created → Click “Open”.
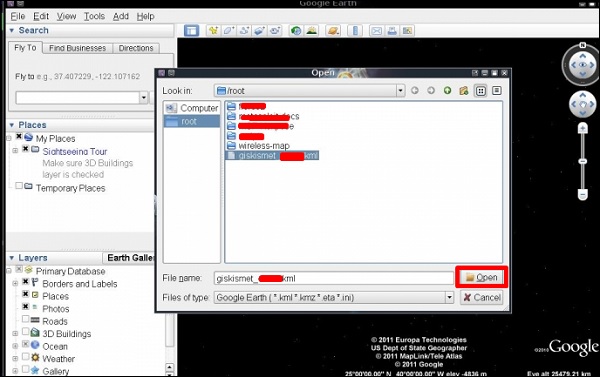
The following map will be displayed.
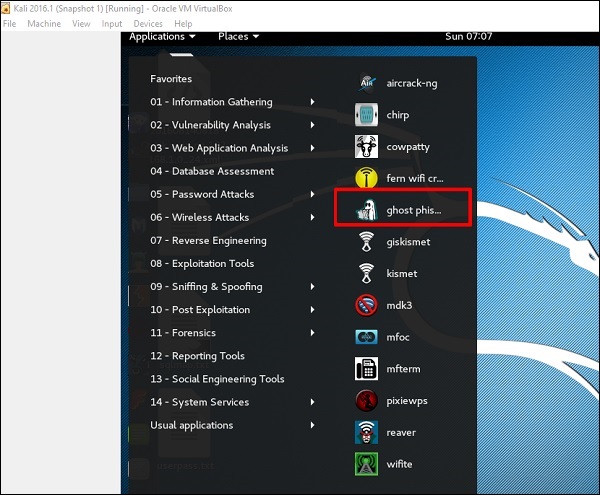
Ghost Phisher
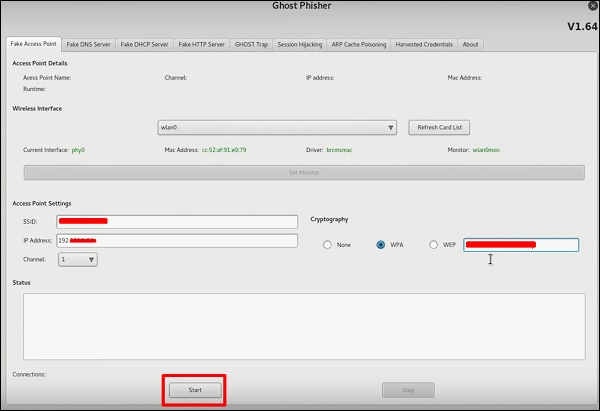
Ghost Phisher is a popular tool that helps to create fake wireless access points and then later to create Man-in-The-Middle-Attack.
Step 1 − To open it, click Applications → Wireless Attacks → “ghost phishing”.

Step 2 − After opening it, we will set up the fake AP using the following details.

- Wireless Interface Input: wlan0
- SSID: wireless AP name
- IP address: IP that the AP will have
- WAP: Password that will have this SSID to connect
Step 3 − Click the Start button.
Wifite
It is another wireless clacking tool, which attacks multiple WEP, WPA, and WPS encrypted networks in a row.
Firstly, the wireless card has to be in the monitoring mode.
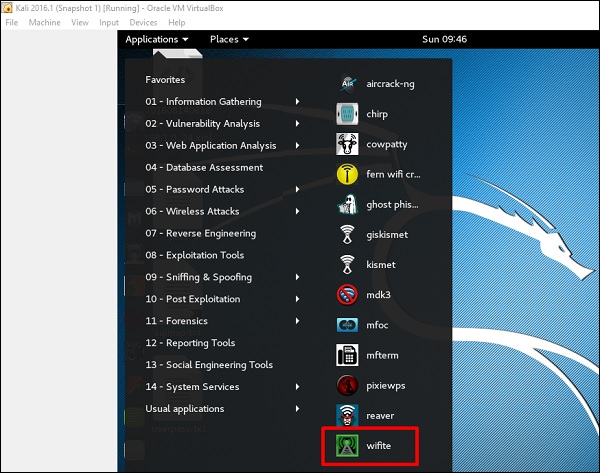
Step 1 − To open it, go to Applications → Wireless Attack → Wifite.
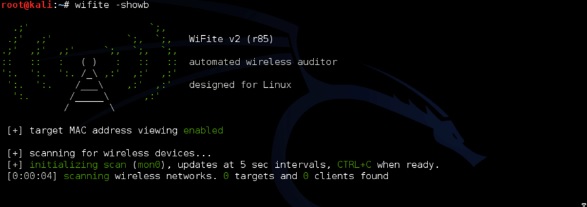
Step 2 − Type «wifite –showb»to scan for the networks.
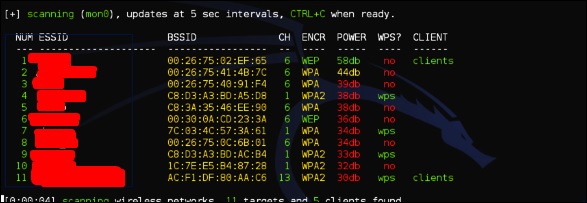
Step 3 − To start attacking the wireless networks, click Ctrl + C.

Step 4 − Type “1” to crack the first wireless.
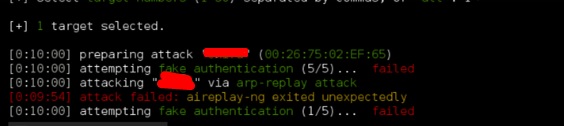
Step 5 − After attacking is complete, the key will be found.
Лучшие инструменты фишинга для Kali Linux
Фишинг — самый популярный способ в хакерстве. Его используют для взлома социальных сети, электронной почты, онлайн-покупки и банковские транзакции, и все они требуют использования нашей информации для входа или личных данных. Фишинг — это когда веб-сайт или приложение кажутся надежным источником, но это не так. В этой статье мы обсудим некоторые фишинговые инструменты для Kali Linux.
Лучшие инструменты фишинга для Kali Linux
Вот список лучших инструментов фишинга для Kali Linux:
Давайте рассмотрим каждый инструмент по отдельности. Но пока дисклеймер!
Статья написана в образовательных целях, для обучения этичных хакеров. Использование рассмотренных инструментов без надлежащего письменного разрешения, является незаконным и будет расцениваться, как уголовное преступление. Ни редакция spy-soft.net, ни автор не несут ответственность за ваши действия.
Socialphish

Socialphish — это инструмент для фишинга с открытым исходным кодом и множеством функций. Socialphish, который используется для проведения фишинговых атак на цели, становится все более популярным. Socialphish проще в использовании, чем Social Engineering Toolkit. Socialphish включает в себя различные шаблоны, созданные другим инструментом под названием Socialphish. Socailphish предоставляет фишинговые шаблоны для 33 известных веб-сайтов, включая Google, Facebook, Github, Yahoo, Snapchat, Spotify, Linkedin, Origin Steam, Microsoft, Yahoo, Github и т. д.
Socialphish также позволяет пользователям использовать собственный шаблон. Этот инструмент упрощает проведение фишинговых атак. Они могут проявить творческий подход, чтобы электронное письмо выглядело как можно более реальным.
Возможности Socialphish:
- Socialphish используется в фишинговых атаках.
- Socialphish создал более 30 фишинговых страниц веб-сайтов.
- Socialphish — это проект с открытым исходным кодом
- Инструмент Socialphish прост в использовании. Это не занимает дополнительного места.
- Социальный фиш написан на питоне
- Socialphish создает фишинговые страницы для популярных веб-сайтов, включая Instagram, Google, Github, Spotify, WordPress, Origin, Steam, Facebook, Snapchat, Netflix, Microsoft, Protonmail, Yahoo и т. д.
Установка Socialphish:
Для установки Socialphish используются следующие шаги:
Шаг 1: Чтобы установить инструмент Socialphish, сначала нам нужно открыть наш терминал Kali Linux и перейти на рабочий стол. Здесь нам нужно создать каталог с именем Socialphish. Мы установим инструмент в этот каталог.
![]()
Шаг 2: Теперь мы на рабочем столе. Здесь нам нужно создать каталог с именем Socialphish. Используйте следующую команду, чтобы создать каталог Socialphish.
![]()
Шаг 3: Каталог создан. Теперь мы должны использовать следующую команду, чтобы перейти в этот каталог.

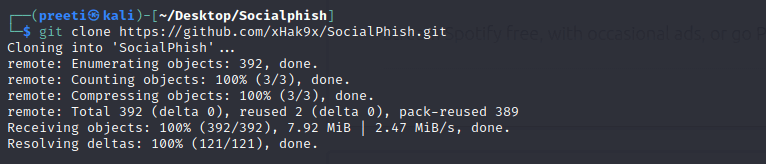
Шаг 4: Теперь мы находимся в каталоге Socialphish. Мы должны загрузить инструмент в этот каталог, что означает, что мы должны клонировать инструмент из GitHub. Чтобы клонировать инструмент с GitHub, выполните следующую команду:
Шаг 5: Инструмент загружен в каталог Socialphish. Используйте следующую команду, чтобы просмотреть содержимое загруженного инструмента.

Шаг 6: Когда мы перечисляем содержимое инструмента, мы замечаем, что он создал новый каталог с именем SocialPhish. Чтобы увидеть содержимое инструмента, нам нужно перейти в этот каталог, чтобы просмотреть содержимое инструмента. Используйте следующую команду, чтобы перейти в этот каталог.
Шаг 7: Затем используйте следующую команду, чтобы просмотреть содержимое этого каталога.
Шаг 8: Теперь с помощью следующей команды нам нужно дать разрешение инструменту.
Шаг 9: Теперь мы можем использовать следующую команду для запуска инструмента. Эта команда откроет меню справки инструмента.
![]()
Инструмент работает. Теперь мы должны предоставить номер опции инструменту, для которого нам нужно создать фишинговую страницу.
Если мы хотим создать фишинговую страницу для Instagram, мы должны выбрать вариант 1. Вариант 2 приведет нас на фишинговую страницу Facebook.
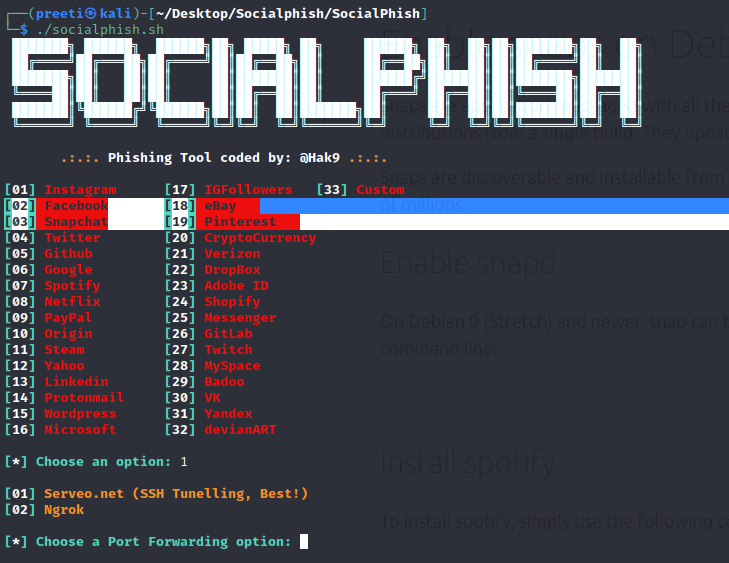
Точно так же мы можем выбрать любой из 33 веб-сайтов инструмента.
Shell Phish

ShellPhish — это инструмент, который мы можем использовать для создания фишинговых страниц для наиболее известных сайтов социальных сетей, таких как Facebook, Twitter и Instagram. Приложение включает в себя фишинговые шаблоны для 18 известных веб-сайтов, большинство из которых являются поставщиками социальных сетей и электронной почты.
Этот инструмент упрощает проведение фишинговой атаки. Мы можем выполнить фишинг в этом инструменте (глобальная сеть). Мы можем использовать этот инструмент для получения учетных данных ID и пароля.
Установка ShellPhish:
Для установки Shell Phish используются следующие шаги:
Шаг 1: Чтобы установить ShellPhish, мы должны сначала открыть наш терминал Kali Linux, а затем перейти на рабочий стол.
Ghost Phisher — Kali Linux


Ghost Phisher is a popular tool that helps to create fake wireless access points and then later to create Man-in-The-Middle-Attack.
- Wireless Interface Input: wlan0
- SSID: wireless AP name
- IP address: IP that the AP will have
- WAP: Password that will have this SSID to connect
Tags
SHARE:
COMMENTS
SolutionRider Rebrand To myTechMint Click Here To Visit
Social$type=social_counter
Categories
SolutionRider Rebrand To myTechMint Click Here To Visit
Footer Social$type=social_icons
11th,2,12th,20,12th Chemistry,5,12th Computer Science,7,12th Physics,1,5th Sem CSE,1,AAI ATC,2,Android,18,Banking,1,Blogger,41,Books,5,BTech,17,CBSE,22,CSE,4,ECE,3,Electronics,1,English,2,ESE,1,Ethical Hacking,61,Exams,5,Games,9,GATE,1,GATE ECE,1,Government Jobs,1,GS,1,How To,27,IBPS PO,1,Information,52,Internet,24,IPU,8,JEE,8,JEE Mains,8,Jobs,1,Linux,65,News,18,Notes,23,Physics,3,Placement,10,PO,1,Poetry,3,RRB,1,SEO,11,Softwares,38,SSC,2,SSC CGL,1,SSC GS,2,Tips and Tricks,46,UPSC,1,Windows,46,
SolutionRider- One Stop Solution for Notes, Exams Prep, Jobs & Technical Blogs.: Ghost Phisher — Kali Linux
Here is the best tutorial in easy steps for Ghost Pisher. Ghost Phisher is a popular tool that helps to create fake wireless access points and then later to create Man-in-The-Middle-Attack. — solution rider
Loaded All Posts Not found any posts VIEW ALL Readmore Reply Cancel reply Delete By Home PAGES POSTS View All RECOMMENDED FOR YOU LABEL ARCHIVE SEARCH ALL POSTS Not found any post match with your request Back Home Sunday Monday Tuesday Wednesday Thursday Friday Saturday Sun Mon Tue Wed Thu Fri Sat January February March April May June July August September October November December Jan Feb Mar Apr May Jun Jul Aug Sep Oct Nov Dec just now 1 minute ago $$1$$ minutes ago 1 hour ago $$1$$ hours ago Yesterday $$1$$ days ago $$1$$ weeks ago more than 5 weeks ago Followers Follow THIS CONTENT IS PREMIUM Please share to unlock Copy All Code Select All Code All codes were copied to your clipboard Can not copy the codes / texts, please press [CTRL]+[C] (or CMD+C with Mac) to copy