- How To Give Root Privileges To A User In Linux
- How do I give root access to user?
- How do you check what privileges a user has in Linux?
- How do I login as root in Linux?
- What is the root user in Linux?
- What does chmod 777 mean?
- How do I check chmod permissions?
- How do I change user privileges in Linux?
- How do I know if I have root access Linux?
- How do I see users in Linux?
- What are root privileges in Linux?
- What are root permissions?
- What is normal user Linux?
- How do I give permission to chmod 777?
- What does chmod 666 do?
- What does chmod 555 do?
- How do I check permissions?
- What does chmod 775 mean?
- How do I read ls permissions?
- How do you add a user in Linux?
- How do I check if a user has sudo permissions?
- How do I know if I have root access?
- How do I see a list of sudo users in Linux?
- Recent Posts
- Как получить права суперпользователя в Ubuntu
- Запуск прав суперпользователя командой sudo
- How To Add a User and Grant Root Privileges on Ubuntu 18.04
- Preflight
- Step 1: Add the Username
- Step 2: Grant Root Privileges to the User
- Step 3: Verify User Has Privileges
- Related Articles:
- About the Author: Justin Palmer
How To Give Root Privileges To A User In Linux
How to Give Root Privileges to a User in Linux Method 1: Adding to Root Group using usermod. Let see how we can grant normal user root access by adding to root group. Method 2: Adding to Root Group using Useradd Command. Method 3: Editing /etc/passwd file. Method 4: Setting as Sudo User.
How do I give root access to user?
For anyone also wanting to liberate their system, this is the solution that worked for me: load the Terminal. type: sudo passwd root. input your user’s password when prompted. create UNIX password when prompted. type: sudo sh -c ‘echo “greeter-show-manual-login=true” >> /etc/lightdm/lightdm. reboot the system.
How do you check what privileges a user has in Linux?
How to View Check Permissions in Linux Locate the file you want to examine, right-click on the icon, and select Properties. This opens a new window initially showing Basic information about the file. There, you’ll see that the permission for each file differs according to three categories:.
How do I login as root in Linux?
If you’re in the desktop environment, you can press ‘Ctrl + Alt + T to start the terminal. Type. sudo passwd root and press ↵ Enter . When prompted for a password, enter your user password.
What is the root user in Linux?
Root is the superuser account in Unix and Linux. It is a user account for administrative purposes, and typically has the highest access rights on the system. Usually, the root user account is called root . However, in Unix and Linux, any account with user id 0 is a root account, regardless of the name.

What does chmod 777 mean?
Setting 777 permissions to a file or directory means that it will be readable, writable and executable by all users and may pose a huge security risk. File ownership can be changed using the chown command and permissions with the chmod command.
How do I check chmod permissions?
4 Answers. If you want to see the the permission of a file you can use ls -l /path/to/file command.
How do I change user privileges in Linux?
To change directory permissions in Linux, use the following: chmod +rwx filename to add permissions. chmod -rwx directoryname to remove permissions. chmod +x filename to allow executable permissions. chmod -wx filename to take out write and executable permissions.

How do I know if I have root access Linux?
If you are able to use sudo to run any command (for example passwd to change the root password), you definitely have root access. A UID of 0 (zero) means “root”, always. Your boss would be happy to have a list of the users listed in the /etc/sudores file.
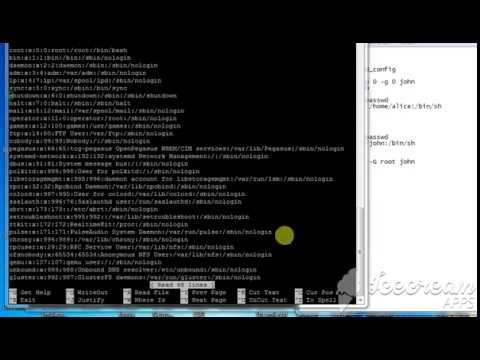
How do I see users in Linux?
In order to list users on Linux, you have to execute the “cat” command on the “/etc/passwd” file. When executing this command, you will be presented with the list of users currently available on your system. Alternatively, you can use the “less” or the “more” command in order to navigate within the username list.
What are root privileges in Linux?
Root privileges are the powers that the root account has on the system. The root account is the most privileged on the system and has absolute power over it (i.e., complete access to all files and commands).

What are root permissions?
Rooting is a process that allows you to attain root access to the Android operating system code (the equivalent term for Apple devices id jailbreaking). It gives you privileges to modify the software code on the device or install other software that the manufacturer wouldn’t normally allow you to.
What is normal user Linux?
Normal users are the users created by the root or another user with sudo privileges. Usually, a normal user has a real login shell and a home directory. Each user has a numeric user ID called UID.
How do I give permission to chmod 777?
If you are going for a console command it would be: chmod -R 777 /www/store . The -R (or –recursive ) options make it recursive. chmod -R 777 .

What does chmod 666 do?
chmod 666 file/folder means that all users can read and write but cannot execute the file/folder; chmod 777 file/folder allows all actions for all users; chmod 744 file/folder allows only user (owner) to do all actions; group and other users are allowed only to read.
What does chmod 555 do?
What Does Chmod 555 Mean? Setting a file’s permissions to 555 makes it so that the file cannot be modified at all by anyone except the system’s superuser (learn more about the Linux superuser).
How do I check permissions?
Step 2 – Right-click the folder or file and click “Properties” in the context menu. Step 3 – Switch to “Security” tab and click “Advanced”. Step 4 – In the “Permissions” tab, you can see the permissions held by users over a particular file or folder.
What does chmod 775 mean?
The chmod 775 is an essential command that assigns read, write, and execute permission to a specific user, group, or others.
How do I read ls permissions?
To view the permissions for all files in a directory, use the ls command with the -la options. Add other options as desired; for help, see List the files in a directory in Unix. In the output example above, the first character in each line indicates whether the listed object is a file or a directory.
How do you add a user in Linux?
How to Add a User to Linux Log in as root. Use the command useradd “name of the user” (for example, useradd roman) Use su plus the name of the user you just added to log on. “Exit” will log you out.
How do I check if a user has sudo permissions?
This is very simple. Run sudo -l . This will list any sudo privileges you have.
How do I know if I have root access?
Use the Root Checker App Go to Play Store. Tap on the search bar. Type “root checker.” Tap on the simple result (free) or the root checker pro if you want to pay for the app. Tap install and then accept to download and install the app. Go to Settings. Select Apps. Locate and open Root Checker.
How do I see a list of sudo users in Linux?
You can also use “getent” command instead of “grep” to get the same result. As you see in the above output, “sk” and “ostechnix” are the sudo users in my system.
Related Posts
- Quick Answer: Your Question How Do I Give A User Root Privileges In Linux Without Sudo
- How Do I Give User Privileges In Ubuntu
- Quick Answer: How Do I Give A User Administrative Privileges
- Question: How Do I Add Root Privileges To A User In Linux
- How Do I Grant Root Privileges To A User In Linux
- How Do I Give Sudo Root Access To User In Linux
- Quick Answer: What Is Root Privileges In Linux
- Quick Answer: How Do I See User Privileges In Linux
- Question: How Do I List User Privileges In Linux
- Quick Answer: How Do I Set User Privileges In Linux
- Quick Answer: Your Question How Do I Give Root Permission To User In Redhat Linux
- Quick Answer: How Do I Add Root Privileges In Linux
Recent Posts
- Question: Is Hyperterminal Available In Windows 10
- How Do I Reset My Sound On Windows 8
- Question: How Do I Reinstall Operating System After Replacing Hard Drive
- Quick Answer: Question Can I Use My Android Phone As A Universal Remote
- Quick Answer: Best Answer Can Windows 10 Run On Intel Pentium
- How Do I Find Out My Motherboard Ubuntu
- You Asked What Happens If I Reset Bios To Factory Settings
- Quick Answer: You Asked How Long Does It Take To Install Ubuntu On Windows 10
- How Do You Repair Windows 7 That Will Not Boot
- How Do I Download Vlc On Linux
- How Do I Change The Font On My Computer Windows 7
- Question Is Windows 8 1 Update Still Available
- Quick Answer: Will Windows 10 Erase My Files
- How Do I Turn My Android Into A Monitor
- Frequent Question Is Debian Better Than Ubuntu
- Question: Question What Operating System Does This Computer Have
- Question How Can I Permanently Activate My Windows For Free
- What Is The Least Android Version
- Question: How Do I Test My Microphone On My Headphones Windows 7
- Question: How Can I Record My Android Gameplay
Как получить права суперпользователя в Ubuntu
В создании этой статьи участвовала наша опытная команда редакторов и исследователей, которые проверили ее на точность и полноту.
Команда контент-менеджеров wikiHow тщательно следит за работой редакторов, чтобы гарантировать соответствие каждой статьи нашим высоким стандартам качества.
Количество просмотров этой статьи: 241 074.
Чтобы запускать административные задачи на Linux, у вас должны быть права суперпользователя (права root). В большинстве дистрибутивов Linux присутствует отдельная учетная запись суперпользователя, но в Ubuntu она по умолчанию отключена. Это позволяет предотвратить случайные ошибки и защитить систему от проникновения. Чтобы запустить команды, которые требуют административный доступ, используйте команду sudo .
Запуск прав суперпользователя командой sudo

Нажмите комбинацию клавиш Ctrl + Alt + T , чтобы открыть окно терминала. Так как в Ubuntu права суперпользователя по умолчанию отключены, вы не сможете воспользоваться командой su и получить административные права, как в прочих дистрибутивах Linux. [1] X Источник информации Вместо этого, вам сначала необходимо запустить команду sudo .

- Пример: команда sudo /etc/init.d/networking stop прекращает работу сети, а sudo adduser добавляет в систему нового пользователя. Обе эти команды требуют прав суперпользователя.
- Перед тем, как sudo выполнит команду, вы должны будете ввести пароль. Linux хранит пароль в течение 15 минут, так что вам не придется вводить их постоянно.

- Пример: введите gksudo gedit /etc/fstab , чтобы открыть файл «fstab» в текстовом редакторе GEdit с графическим интерфейсом.
- Если вы используете KDE Window Manager, вместо gksudo вводите команду kdesudo .

- Введите команду sudo passwd root . Этим вы создадите пароль для root, тем самым «включите» административный доступ. Смотрите, не забудьте этот пароль.
- Введите sudo -i . Введите пароль от root, когда это будет необходимо.
- Значок в терминале изменится с $ на # , указывая на то, что теперь вы обладаете правами суперпользователя.

Предоставьте доступ sudo другому пользователю. Если вы настраиваете учетную запись для того, кто в данный момент не имеет административного доступа, добавьте его имя в группу sudo. Для этого введите usermod -aG sudo username (замените «username» на правильное имя пользователя). [4] X Источник информации
How To Add a User and Grant Root Privileges on Ubuntu 18.04
Adding a user and granting that user root privileges is one of the many tasks of a system admin. Once a user has been added and granted root privileges they’ll be able to login to your Ubuntu VPS and perform vital functions for the upkeep of the system. Afterward, they’ll be able to use sudo before commands to perform elevated tasks. In this quick tutorial, we’ll show you how to add a new user and grant root permissions.

Preflight
- These instructions are intended specifically for adding a user on Ubuntu 18.04 LTS.
- We’ll be working from a Liquid Web Core Managed Ubuntu 18.04 LTS server, and I’ll be logged in as root.
Step 1: Add the Username
In my example, I’ll be adding my cat’s name, Tom, using the adduser command. Replace tom with your desired username. During this time, the system will also ask of me details from my user. Feel free to skip these details by pressing enter and eventually it asks us to confirm that the info is correct, leading us to a new user added.
Example Output:
Adding user `tom’ .
Adding new group `tom’ (1001) .
Adding new user `tom’ (1001) with group `tom’ .
Creating home directory `/home/tom’ .
Copying files from `/etc/skel’ .
Enter new UNIX password:
Retype new UNIX password:
passwd: password updated successfully
Changing the user information for tom
Enter the new value, or press ENTER for the default
Full Name []: Tom
Room Number []:
Work Phone []:
Home Phone []:
Other []:
Is the information correct? [Y/n] Y
Step 2: Grant Root Privileges to the User
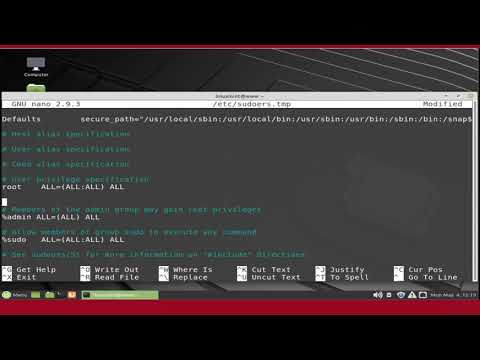
The command above leads us to the /etc/sudoers.tmp file, where we can view the following code: # User privilege specification
root ALL=(ALL:ALL) ALL
After the root user line, you will add in your new user with the same format for us to grant admin privileges.
Once you’ve added the permission, save and exit the file by using the following process. (In Ubuntu 18.04, nano is the default editor, so we need to use the ctrl+x, y keystrokes to save and exit the file.)
hold `ctrl` and press `x`. At the prompt, press `y` and then hit `enter` to save and exit the file.Step 3: Verify User Has Privileges
If you’ve followed the instructions correctly then this user will be able to run commands like, update, using the sudo:
Want to do admin tasks through a control panel? Check out our servers that come with cPanel. We offer assisted migrations and 24/7 support making it effortless to switch to Liquid Web!
Related Articles:
About the Author: Justin Palmer
Justin Palmer is a professional application developer with Liquid Web

Join our mailing list to receive news, tips, strategies, and inspiration you need to grow your business