- Gns3 добавить свой роутер
- вторник, марта 12, 2013
- Знакомимся с GNS3
- How to Add Cisco Router to GNS3 VM
- How to Add Router/Switch to GNS3 Virtual Machine
- How to Install Router on GNS3 Server
- How to Upload Router IOS to the GNS3 VM ⇒ Video
- Final Word
- Related Articles
- How to add Router IOS Image —
- 1. Double click the GNS3 Icon: 2. Once Opened GNS3, in Menu Bar click Edit and select Preferences to open the Preferences window. or Press ( Ctrl+Shift+P)
- 3. Click IOS Router then Click New to add a Router IOS image in GNS3.
- 4. Click Browse and select the Router IOS image that you want to add in GNS3.
- 5. Select Router IOS Image and Click to Open.
- 6. Click Yes.
- 7. In the Name and platform window, specify the name and platform for the IOS image and then click Next.
- 8. In the Memory Window page, leave its Default RAM size and then click Next
- 9. In the Network adapters page, Select the slots and then click Next as shown in the following figure.
- 9. Now Click Idle-PC finder and wait. until found value. (An Idle-pc value is necessary to prevent IOS to use 100% of your System processor.)
- 10. Idle -Pc value found. Now click OK and Finish.
- 11. Click Apply then OK .
- 12. Setup is successfully completed. Click the Router Symbol to Check Added Router IOS.
- Click — How to Install GNS3
- Top Courses
- Usefull Link
- Support
- Contact Info.
- NOIDA
- DELHI
- METRO ROUTE
Gns3 добавить свой роутер
Проводятся технические работы по обновлению компонентов блога. Возможно некорректное отображение некоторых элементов. Приносим свои извинения за временные неудобства. Мы стараемся сделать блог лучше =)
вторник, марта 12, 2013
Знакомимся с GNS3
Добрый день дорогие друзья. Извиняюсь что так долго не писал, только на прошлой недели выписался из больницы после почти трехнедельного пребывания в ней, но слава богу это заточение закончилось и сегодня мы с вами познакомимся с еще одним симулятором сетей – а именно с GNS 3.
Наверное, у вас может появиться резонный вопрос: а зачем нам вообще с ним знакомиться, ведь у нас есть всеми нами любимый Packet Tracer ? Вполне обоснованный вопрос, ведь Packet Tracer позволяет воспроизвести примерно 80, а то и больше процентов функционала реальных устройств фирмы Cisco . Но как говорится 80 не 100, и именно симулятор GNS 3 позволит нам поковыряться практически во всех оставшихся 20%. Столь близкое приближение симулятора GNS 3 к реальным устройствам Cisco происходит из за одной ключевой особенности – данный симулятор способен работать с реальными IOS ами от маршрутизаторов фирмы Cisco ( GNS 3 не предназначен для симуляции коммутаторов фирмы Cisco ), а значит мы можем грубо говоря взять IOS от реальной железки, запихнуть его в GNS 3 и получить доступ к консоли виртуального маршрутизатора, обладающего всеми функциями реального. Кроме того GNS 3 имеет еще одну очень интересную особенность, он позволяет соединить виртуальную сеть, спроектированную в нем, с реальной сетью, но об этом чуть позже, а пока что познакомимся с азами работы с данными симулятором.
Начнем с того, что скачать последнюю версию GNS 3 вы можете по данной ссылке: http://www.gns3.net/download/. После довольно таки простой установки и запуска перед нами предстает вот такое главное окно программы:
В принципе оно имеет довольно стандартный вид. Сверху меню, слева набор устройств в центре рабочая область. Логично предположить, что требуется перетащить устройства в рабочую область, соединить их, поковыряться в настройках и радоваться жизни. Но на самом деле все не так просто. Если вы попробуете перетащить один из имеющихся на левой панели маршрутизаторов на рабочую область, то получить сообщение вида:
Как мы уже говорили ранее, GNS 3 работает с реальными IOS ами маршрутизаторов фирмы Cisco , но есть одна загвоздочка, эти самые IOS ы не идут в комплекте поставки GNS 3, так как они стоят денег и соответственно просто так их никто распространять не будет (Но в этой стране это далеко не проблема и при большом желании используя в поисковом запросе ключевые слова типа Cisco + ios + номер серии маршрутизатора + torrent можно в течении 15 минут раздобыть данный образ). Следовательно для того чтобы использовать GNS 3 нам сначала необходимо раздобыть образы операционных систем устройств, которые мы хотим симулировать.
Допустим у нас есть данный образ, что дальше? Далее нам необходимо добавить маршрутизатор, работающий на данном IOSe в GNS 3. Для этого в главном меню нажимаем на пункт Edit – IOS images and hypervisors . После чего перед нами откроется вот такое прекрасное окно:
В данном окне в поле Image file указываем путь к нашему IOS у (путь не должен содержать русские символы), в поле Base config указываем текстовый файл, содержащий конфигурацию маршрутизатора (Если вы хотите чтобы маршрутизатор запустился со стандартной пустой конфигурацией, то не трогайте это поле). Поля Platform , Model и Default Ram автоматически сконфигурируются в соответствие с выбранным вами IOS ом. Далее нажимаем на кнопку Save , после чего образ нашего маршрутизатора появится в верхней части окна, в которой перечислены образы доступные для симуляции. После этого окно добавления образа можно закрыть.
После этого перетащите из панели Node Types , появившийся там образ вашего маршрутизатора в рабочую область. Если все сделано верно, и образ добавлен правильно, то никаких ошибок не должно возникнуть и в рабочей области окажется маршрутизатор, все это будет выглядеть следующим образом:
Для того чтобы запустить ваш маршрутизатор, щелкните по нему правой кнопкой мыши и выберите пункт Start . Через некоторое время, зависящее от производительности вашего ПК, маршрутизатор запустится. А его значок на панели Topology Summary позеленеет. После этого можно получить доступ непосредственно к консоли маршрутизатора. Для этого щелкните по маршрутизатору правой кнопкой мыши и выберите пункт Console . В результате откроется окно консоли:
Собственно говоря с помощью данной консоли вы можете приступить к конфигурированию своего маршрутизатора и поковыряться в его настройках. Об остальных возможностях GNS3 мы поговорим в следующих статьях.
How to Add Cisco Router to GNS3 VM
![]()

Last Updated: January 15, 2020 | GNS3 | Tolga Bagci
In this article, we will examine how to add Cisco IOS images to the GNS3 VM running on VMware Workstation virtualization program.

How to Add Router/Switch to GNS3 Virtual Machine
As you prepare for Cisco exams, you can easily upload Cisco images to the GNS3 VM program you have installed on your computer for more specific topologies.
Because IOS images stored on the GNS3 Server stores in one place, you can provide centralized IOS storage management.
How to Install Router on GNS3 Server
Follow the steps below to add Cisco’s Router or Switch to your GNS3 server.
After running the GNS3 network simulator software, create a new project.

Step 2
Click Edit / Preferences to activate the GNS3 VM Server.

Step 3
In the Preferences window, click GNS3 VM, and then select Enable the GNS3 VM.

Step 4
After enabling “Enable the GNS3 VM”, click the OK button to save the setting.

Step 5
As soon as you press the OK button, the GNS3 VM will start running.

Step 6
You can check that the GNS3 VM is running smoothly from the Servers Summary section.

Step 7
Check the network connection by pinging the GNS3 Server’s IP address.

Step 8
To add a network device, click Edit / Preferences again.

Step 9
In the window that opens, you can see that the previously installed c7200 Cisco Router stores on the Local Server.
Now, click the New button to add a new Router.

Step 10
From the window that opens, select Run the router on the GNS3 VM and click Next.

Step 11
To install the router, select New Image and click the Browse button to select the IOS image you downloaded to your computer.

Step 12
Wait while the IOS image upload to the GNS3 virtul machine.

Step 13
After adding the image file to the program, click Next to continue.

Step 14
In the Name and Platform window, type the name of the device you added, and then click Next after configuring the platform.

Step 15
The default RAM value of the Router you added will be automatically set as follows. If you wish, you can increase the default amount of RAM here.

Step 16
In the Network Adapters window, select the FastEthernet or GigabitEthernet interfaces you want to add to the Router and click Next.

Step 17
In the WIC modules window, add the WIC-2T unit and click Next.

Step 18
To set the Idle-PC value for the router, click on the Idle-PC finder.

Step 19
Calculating Idle-PC value for Cisco Router…

Step 20
Once the optimal value for the router found, click OK to continue.

Step 21
Close the Idle-PC window by clicking the Finish button.

Step 22
You can verify that the Cisco c3745 Router has added to the GNS3 Server from “Server:” in the IOS Router Templates window.

Step 23
Drag and drop the added Router into the workspace and start it.

Step 24
You can use the show ip int br or show version commands to verify that the Cisco Router is working properly on the server.

How to Upload Router IOS to the GNS3 VM ⇒ Video
You can watch the video below to add a Router to the GNS3 server and also subscribe to our YouTube channel to support us!

Final Word
In this article, we have installed Cisco Router image on the GNS3 virtual machine. And finally, we have verified that the Cisco router is running on the GNS3 Server. Thanks for following us!
Related Articles

TolgaBagci
Hello, I’m Tolga! I am a computer specialist who has been specializing in computer technologies for about 20 years. I provide solutions to problems encountered in many areas such as hardware, system, network, virtualization, server systems, and operating systems, and create relevant content on my website by explaining how to solve these problems. My goal is to be a reliable source of expert, quality, and trustworthy solutions for your computer problems. By following innovations and using the latest technologies, I aim to be successful in my job and provide you with the best service. Don’t hesitate to contact me for any questions or curiosity about technology. Have a nice day, stay up to date 🙂
How to add Router IOS Image
—
1. Double click the GNS3 Icon:
2. Once Opened GNS3, in Menu Bar click Edit and select Preferences to open the Preferences window.
or Press ( Ctrl+Shift+P)

3. Click IOS Router then Click New to add a Router IOS image in GNS3.

4. Click Browse and select the Router IOS image that you want to add in GNS3.

5. Select Router IOS Image and Click to Open.

6. Click Yes.

7. In the Name and platform window, specify the name and platform for the IOS image and then click Next.

8. In the Memory Window page, leave its Default RAM size and then click Next

9. In the Network adapters page, Select the slots and then click Next as shown in the following figure.

9. Now Click Idle-PC finder and wait. until found value.
(An Idle-pc value is necessary to prevent IOS to use 100% of your System processor.)

10. Idle -Pc value found. Now click OK and Finish.

11. Click Apply then OK .

12. Setup is successfully completed.
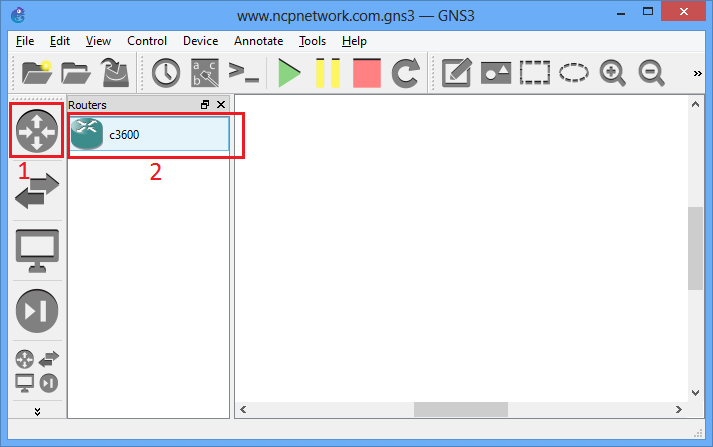
Click the Router Symbol to Check Added Router IOS.
Click — How to Install GNS3
Top Courses
Usefull Link
Support
Contact Info.
NOIDA
Networking Core Program Ground Floor, G. C. Complex, Near Central Bank of India, Sec-15 Noida, INDIA
Near Metro: Noida Sec-15
DELHI
Networking Core Program Shop No.2, D-Block Near Bilal Masjid, Abul Fazal Enclave -1, Jamia Nagar, Okhla,ND-25
Near Metro: Okhla Vihar
METRO ROUTE
Networking Core Program Shop No.2, D-Block Near Bilal Masjid, Abul Fazal Enclave -1, Jamia Nagar, Okhla,ND-25
Near Metro: Okhla Vihar