- How to Create a GNU Hello World RPM Package in Fedora
- Install Development Tools in Fedora
- Building a “Hello World” RPM
- Building the RPM Package
- How to Use the RPM Command in Linux
- Prerequisites
- Linux RPM Command Syntax
- RPM Command Options
- RPM Command Examples
- Install RPM Packages
- Upgrade RPM Packages
- Remove RPM Packages
- Display Package Information After Installing
- Display Package Information Before Installing
- Check Package Dependencies Before Installing
- Verify Packages
- Find Manual Pages
- List All Files of an Installed Package
- List Installed Packages
- List Recently Installed Packages
- Where to Find and Download RPM Packages?
How to Create a GNU Hello World RPM Package in Fedora
RPM (a recursive acronym for RPM Package Manager) is a free and open-source package management system for Linux. Although it was originally created for use in Red Hat Linux, now it is used in many Linux distributions such as CentOS, Fedora, and OpenSuse. Importantly, the name RPM refers to the package manager program and the .rpm is a file format.
In this article, we will explain on writing RPM files, showing how to easily create a simple source and binary software packages, for example, GNU “Hello World” RPM package in Fedora Linux distribution. We assume that you’ve some basic understanding of pre-made RPM packages, and with the Free Open Source Software building process.
Install Development Tools in Fedora
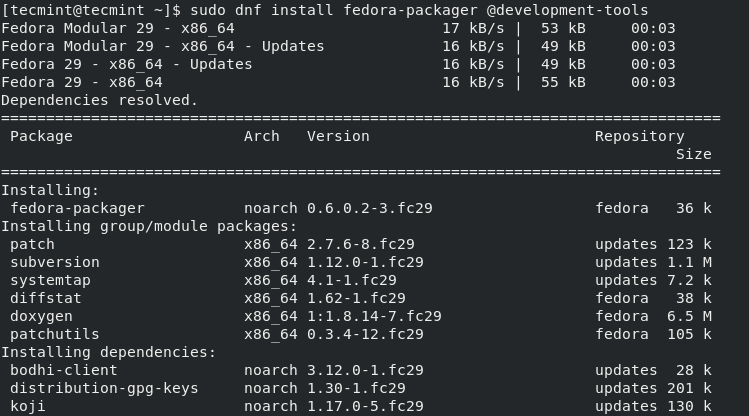
Let’s start by setting up the development environment in Fedora Linux by running the following command to install the necessary tools for building RPMs.
$ sudo dnf install fedora-packager @development-tools
Next, add your non-privileged account to the ‘mock‘ group as follows (replace tecmint with your actual username). This will enable you to test the build procedure in a clean chroot.
$ sudo usermod -a -G mock tecmint
Now, create an RPM build in your ~/rpmbuild directory and verify the build using the following commands. It will show a list of sub-directories, which contains project source code, RPM configuration files and binary packages.
$ rpmdev-setuptree $ tree ~/rpmbuild/
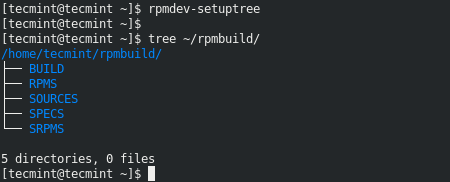
Here is what each directory is meant for:
- BUILD – stores various %buildroot directories when packages are built.
- RPMS – will contain binary RPMs in sub-directories of Architecture.
- SOURCES – stores compressed source archives and any patches, this is where the rpmbuild command will look for them.
- SPECS – stores the SPEC files.
- SRPMS – stores the Source RPM instead of a Binary RPM.
Building a “Hello World” RPM
In this step, you need to download the source code (also known as the “upstream” source) of the Hello World project we are packaging, into the ~/rpmbuild/SOURCE directory with the following wget command.
$ cd ~/rpmbuild/SOURCES $ wget http://ftp.gnu.org/gnu/hello/hello-2.10.tar.gz -P ~/rpmbuild/SOURCES
Next, let’s configure the RPM package using a .spec file (let’s name it hello.spec in this case) in the ~/rpmbuild/SPECS directory, using the rpmdev-newspec program.
$ cd ~/rpmbuild/SPECS $ rpmdev-newspec hello $ ls

Then open the hello.spec file using your favorite editor.
The default template should look like this:
Name: hello Version: Release: 1% Summary: License: URL: Source0: BuildRequires: Requires: %description %prep %autosetup %build %configure %make_build %install rm -rf $RPM_BUILD_ROOT %make_install %files %license add-license-file-here %doc add-docs-here %changelog * Tue May 28 2019 Aaron Kili
Let’s briefly explain the default parameters in a .spec file:
- Name – used to set a name for the package.
- Version – should mirror upstream.
- Release – numbers you work within Fedora.
- Summary – is a brief one-line description of the package, the first letter should be uppercase to avoid rpmlint complaints.
- License – check the License status of the software by inspecting the source files and/or their LICENSE files, and/or by talking to the authors.
- URL – specifies the home page of the software package.
- Source0 – specifies the source files. It can be a direct URL or a path of the software’s compressed source code.
- BuildRequires – specifies the dependencies needed to build the software.
- Requires – specifies the dependencies needed to run the software.
- %prep – is used to create the environment for building the rpm package.
- %build – is used to compile and to build the source codes.
- %install – this is used to install the programs. It lists command(s) to needed to copy the resultant file from the build process to the BUILDROOT directory.
- %files – this section lists the files provided by the package, which will be installed on the system.
- %changelog – should stores the work on preparing the RPM, especially if there are security and bug patches included on top of the base upstream source. It’s automatically generated while creating the hello.spec file. The changelog data is usually displayed by rpm —changelog -q .
Now edit your .spec file and make changes as shown.
Name: hello Version: 2.10 Release: 1% Summary: The "Hello World" program from GNU License: GPLv3+ URL: http://ftp.gnu.org/gnu/% Source0: http://ftp.gnu.org/gnu/%/%-%.tar.gz BuildRequires: gettext Requires(post): info Requires(preun): info %description The "Hello World" program package %prep %autosetup %build %configure make % %install %make_install %find_lang % rm -f %/%/dir %post /sbin/install-info %/%.info %/dir || : %preun if [ $1 = 0 ] ; then /sbin/install-info --delete %/%.info %/dir || : fi %files -f %.lang %/man1/hello.1.* %/hello.info.* %/hello %doc AUTHORS ChangeLog NEWS README THANKS TODO %license COPYING %changelog * Tue May 28 2019 Aaron Kili
You will notice that we have used some new parameters in the above file which have not been explained. These are called macros, used to build system invocations defined by RPM to set installation paths for packages. Therefore, it’s usually preferable to not hard-code these paths in spec files either, but use the same macros for consistency.
The following are RPM build and directory macros together with their definitions and defaults values:
- % – is used in the %build section of the spec file, it runs the make command.
- % – defines package or directory name.
- % – %/%-%-%.%, same as $BUILDROOT
- % – %/info, default: /usr/share/info
- % – %/man, default: /usr/share/man
- % – %/bin, default: /usr/bin
Note that you can find the values for these macros in the /usr/lib/rpm/platform/*/macros or refer to Packaging Guidelines:RPM Macros.
Building the RPM Package
To build the source, binary and debugging packages, run the following rpmbuild command.
After the build process, the source RPMs and binary RPMs wills be created in the ../SRPMS/ and ../RPMS/ directories respectively. You can use the rpmlint program to check and ensure that the spec file and RPM files created conform to RPM design rules:
$ rpmlint hello.spec ../SRPMS/hello* ../RPMS/*/hello*
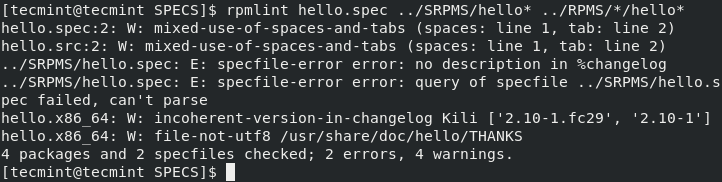
If there any errors as shown in the above screenshot, fix them before you can proceed.
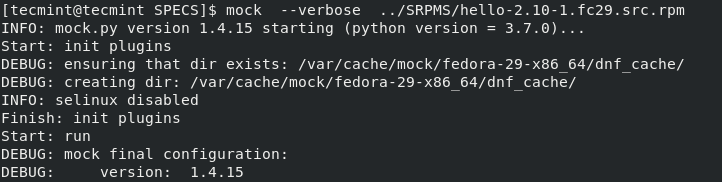
Last but not least, use mock program to check that the package build will succeed in the Fedora restricted build environment.
$ mock --verbose ../SRPMS/hello-2.10-1.fc29.src.rpm
For more information, consult the Fedora documentation: Creating RPM Packages.
That’s all! In this article, we have explained how to step up your Fedora system to create a simple source and binary software package. We also showed how to create a GUN Hello Word RPM package. Use the feedback form below to reach us for any questions or comments.
How to Use the RPM Command in Linux
RPM is a command-line utility for managing packages on Unix/Linux systems. It allows you to install, query, update, verify and remove RPM packages.
It is the default package manager for Red Hat based systems and only works with the .rpm format. You can install such packages using the rpm or the yum command.
In this article, you will learn how to use rpm commands with easy-to-follow examples.

Prerequisites
- A system running Linux.
- Access to the command line/terminal.
- Access to root or an account with sudo privileges.
Linux RPM Command Syntax
The basic syntax for the command is:
sudo rpm [option] [package_name]To see a full list of command options, run:
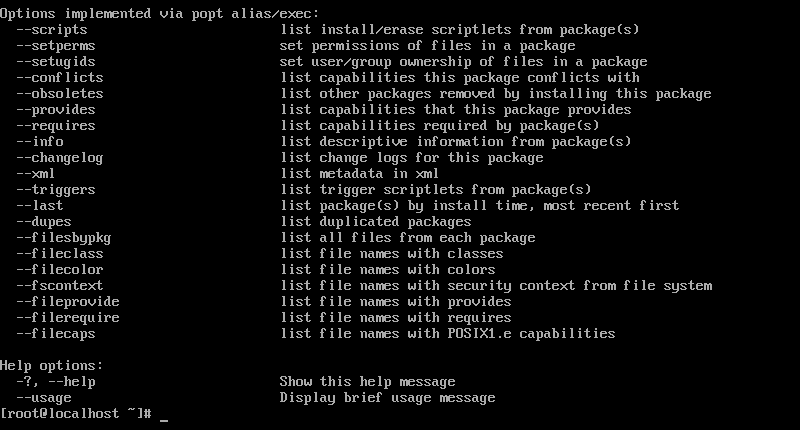
RPM Command Options
Below you will find the most popular command options used with the rpm command and their meaning.
| -e , —erase | Remove (uninstall) package(s). |
| -h , —hash | Print hash marks as the package installs. |
| -i , —install | Install package(s). |
| -l , —list | List files in a package. |
| -q , —query | Query package(s). |
| -s , —state | Display the state of the listed files. |
| -U , —upgrade | Upgrade package(s). |
| -v , —verbose | Provide more detailed output. |
| -V , —verify | Verify package(s). |
RPM Command Examples
The rpm command is simple to use and allows combining multiple options to customize each query. Explore some of the most commonly used commands listed below and try out how they work with a sample package.
Install RPM Packages
To install RPM packages with the rpm command, use the syntax:
sudo rpm -ivh package_nameThe command includes the options:
Before installing, you need to download the appropriate file. The package has to be compatible with the system architecture of the machine.
Note: To download packages, use the curl or wget command.
For instance, to install the MySQL package, you run:
sudo rpm -ivh mysql80-community-release-el7-5.noarch.rpmTo install an RPM package without previously downloading it, provide the URL:
sudo rpm -ivh https://dev.mysql.com/get/mysql80-community-release-el7-5.noarch.rpm
Note: For a more detailed guide on installing RPM packages, check out our guide on how to install RPM packages on Ubuntu.
Upgrade RPM Packages
RPM upgrades a package by uninstalling the current version and installing the latest one.
The command for upgrading a package is:
sudo rpm -Uvh package_name- -U (upgrade)
- -v (verbose mode)
- -h (print hash marks to show upgrading process)
sudo rpm -Uvh mysql80-community-release-el7-5.noarch.rpm
If the new version requires additional dependencies, you must install them manually. RPM lists the missing dependencies in the output after running the command.
To ignore the message and update without the dependencies, add the —nodeps option to the command:
sudo rpm -Uvh --nodeps package_nameRemove RPM Packages
Remove RPM packages using the -e ( —erase ) option:
To see the verbose output, add the -v option to the command:
To delete an RPM package without removing dependencies, add —nodeps :
sudo rpm -ev --nodeps package_nameFor example, to remove MySQL without removing its dependencies, you run:
sudo rpm -ev --nodeps mysql80-community-release-el7-5.noarch![]()
Note: For a more detailed guide on removing RPM packages, check out our guide on how to remove packages in CentOS.
Display Package Information After Installing
To see available information about an installed RPM package, use the -qi option, which instructs RPM to query info :
The output displays the installed information, package version, and a short description.
sudo rpm -qi mysql89-community-release-el7-5.noarch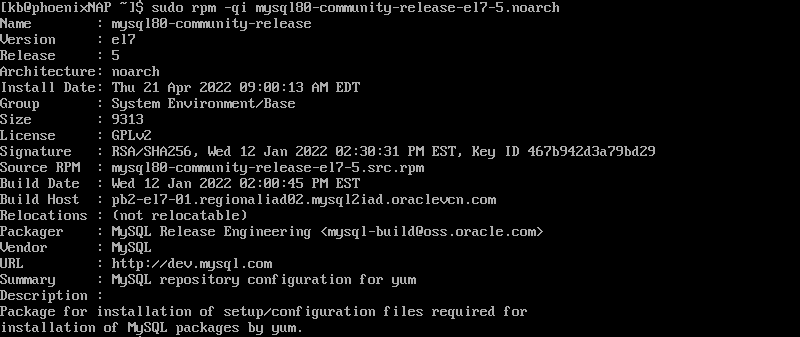
Display Package Information Before Installing
The command for displaying information about a package prior to installation is:
sudo rpm -qip package_nameThe command includes the options:
To display information before installing the MySQL package, use the command:
sudo rpm -qip mysql89-community-release-el7-5.noarch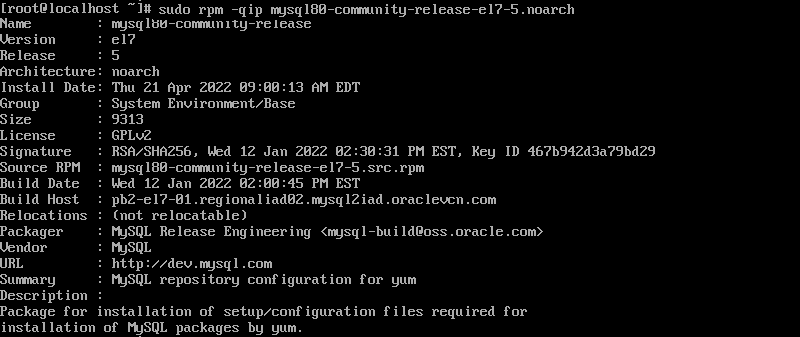
Check Package Dependencies Before Installing
RPM allows you to check the dependencies of packages prior to installing them on the system. Bear in mind, you need to have the RPM package downloaded locally to see a list of dependencies.
The command for doing so is:
For example, to list the dependencies for installing the MySQL RPM package, you run:
rpm -qpR mysql80-community-release-el7-5.noarchVerify Packages
Verifying packages means comparing metadata from the RPM database with the information from the installed files.
You can verify all installed packages using the command:
To verify a specific package run:
Verify the installed MySQL package with:
sudo rpm -Vp mysql80-community-release-el7-5.noarch.rpm![]()
Find Manual Pages
To list available documentation related to an installed RPM package, use the -qdf option:
sudo rpm -qdf package_nameTo find manual pages for MySQL, use the command:
sudo rpm -qdf mysql80-comunity-release-el7-5.noarch.rpm![]()
List All Files of an Installed Package
See detailed information about a package by listing all its files, use the -ql option and instructs RPM to query list :
For example, to list files of the sample MySQL package, you run:
sudo rpm -ql mysql80-community-release-el7-5.noarch
List Installed Packages
List all of the installed RPM packages on the system by running the following:
The command includes the -qa option, which instructs RPM to query all.
List Recently Installed Packages
To display a list of all the recently installed packages, use the -qa (query all) option along with the —last attribute:
The output lists all the installed RPM packages, ordering them by the latest package on top.
Where to Find and Download RPM Packages?
You can find and download RPM packages on the following websites:
In this article, you learned how to use the rpm command for installing, verifying, upgrading, and deleting packages. Still, it is recommended to use the yum or dnf command for such actions as they automatically deal with dependencies.