- How To Install gobuster on Kali Linux
- What is gobuster
- Install gobuster Using apt-get
- Install gobuster Using apt
- Install gobuster Using aptitude
- How To Uninstall gobuster on Kali Linux
- Uninstall gobuster And Its Dependencies
- Remove gobuster Configurations and Data
- Remove gobuster configuration, data, and all of its dependencies
- References
- Summary
- Инструменты Kali Linux
- Список инструментов для тестирования на проникновение и их описание
- Gobuster
- Описание Gobuster
- Справка по Gobuster
- Руководство по Gobuster
- Примеры запуска Gobuster
- Установка Gobuster
- Скриншоты Gobuster
- Инструкции по Gobuster
- Gobuster Guide and examples
- Gobuster kali linux install
- Learn Latest Tutorials
- Preparation
- Trending Technologies
- B.Tech / MCA
- Javatpoint Services
- Training For College Campus
How To Install gobuster on Kali Linux
In this tutorial we learn how to install gobuster on Kali Linux.
What is gobuster
Gobuster is a tool used to brute-force URIs including directories and files as well as DNS subdomains.
There are three ways to install gobuster on Kali Linux . We can use apt-get , apt and aptitude . In the following sections we will describe each method. You can choose one of them.
Install gobuster Using apt-get
Update apt database with apt-get using the following command.
After updating apt database, We can install gobuster using apt-get by running the following command:
sudo apt-get -y install gobuster Install gobuster Using apt
Update apt database with apt using the following command.
After updating apt database, We can install gobuster using apt by running the following command:
sudo apt -y install gobuster Install gobuster Using aptitude
If you want to follow this method, you might need to install aptitude first since aptitude is usually not installed by default on Kali Linux. Update apt database with aptitude using the following command.
After updating apt database, We can install gobuster using aptitude by running the following command:
sudo aptitude -y install gobuster How To Uninstall gobuster on Kali Linux
To uninstall only the gobuster package we can use the following command:
sudo apt-get remove gobuster Uninstall gobuster And Its Dependencies
To uninstall gobuster and its dependencies that are no longer needed by Kali Linux, we can use the command below:
sudo apt-get -y autoremove gobuster Remove gobuster Configurations and Data
To remove gobuster configuration and data from Kali Linux we can use the following command:
sudo apt-get -y purge gobuster Remove gobuster configuration, data, and all of its dependencies
We can use the following command to remove gobuster configurations, data and all of its dependencies, we can use the following command:
sudo apt-get -y autoremove --purge gobuster References
Summary
In this tutorial we learn how to install gobuster using different package management tools like apt, apt-get and aptitude.
Инструменты Kali Linux
Список инструментов для тестирования на проникновение и их описание
Gobuster
Описание Gobuster
Gobuster — это инструмент для брут-форса:
- URI (директорий и файлов) в веб-сайтах;
- DNS субдоменов (с поддержкой подстановочных символов);
- Имён виртуальных хостов на целевых веб-серверах.
Это инструмент командной строки, написанный на Go, он не выполняет рекурсивный брут-форс, позволяет одновременно брутфорсить папки и несколько расширений, компилируется на множестве платформ, работает быстрее интерпретируемых скриптов (таких как Python), не требует среду выполнения.
Справка по Gobuster
Общие опции командной строки
- -fw — Принудительная обработка доменов при обнаружении поддержки групповых символов.
- -m — какой режим использовать, dir или dns (по умолчанию: dir)
- -q — отключить вывод банеров/линий
- -t — количество одновременных потоков (по умолчанию: 10).
- -u — полный URL (включая схему) или базовое имя домена.
- -v — вербальный вывод (показывать все результаты).
- -w — путь до используемого для брут-форса словаря.
Опции командной строки для режима dns
- -cn — показывать CNAME записи (не может использоваться с опцией ‘-i‘).
- -i — показывать в результате все IP адреса.
Опции командной строки для режима dir
- -a — указать строку пользовательского агента для отправки в заголовках запросов.
- -c — отправлять с каждым запросом эти кукиз (симулирование аутентификации).
- -e — расширенный режим, печатает полные URL.
- -f — добавлять / (слэш) для брут-форса директорий.
- -k — Пропустить верификацию SSL сертификатов.
- -l — показать длину ответа.
- -n — режим «без статуса», отключить вывод в результатах кода статуса.
- -o — имя файла для записи вывода.
- -p — прокси для использования со всем запросами (схема должна соответствовать URL схеме).
- -r — следовать редиректам.
- -s — разделённый запятой набор из списка кодов статуса, которые считаются «положительными» (по умолчанию: 200,204,301,302,307).
- -x — список расширений для проверки, можно не указывать.
- -P — Пароль HTTP авторизации (только Basic Auth, если пропущено, появится запрос).
- -U — Имя пользователя HTTP авторизации (только Basic Auth).
Руководство по Gobuster
Примеры запуска Gobuster
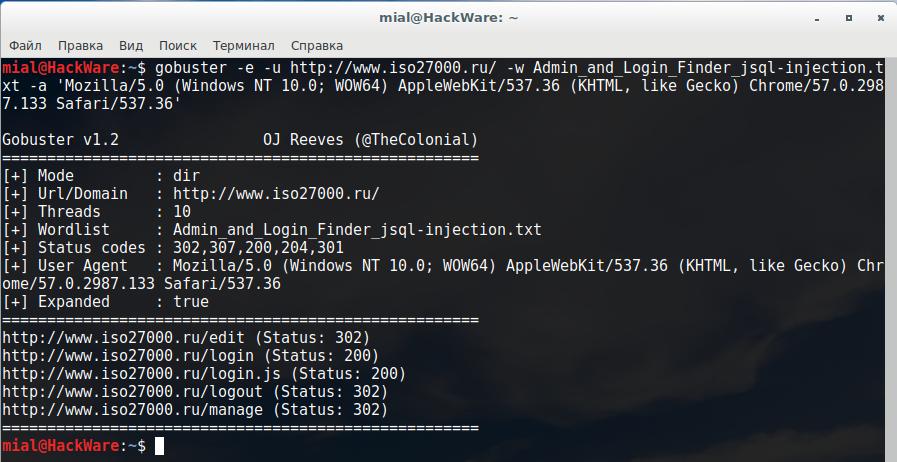
Просканировать в поисках директорий веб-сайт (-u http://192.168.0.155/) используя словарь (-w /usr/share/wordlists/dirb/common.txt) и печатать полные URL обнаруженных путей (-e):
gobuster -e -u http://192.168.0.155/ -w /usr/share/wordlists/dirb/common.txt Gobuster v1.2 OJ Reeves (@TheColonial) ===================================================== [+] Mode : dir [+] Url/Domain : http://192.168.0.155/ [+] Threads : 10 [+] Wordlist : /usr/share/wordlists/dirb/common.txt [+] Status codes : 301,302,307,200,204 [+] Expanded : true ===================================================== http://192.168.0.155/blog (Status: 301) http://192.168.0.155/index.html (Status: 200) http://192.168.0.155/index (Status: 200) http://192.168.0.155/photo (Status: 301) http://192.168.0.155/wordpress (Status: 301) =====================================================
Установка Gobuster
Установка в Kali Linux
sudo apt-get install gobuster
Информация об установке в другие операционные системы будет добавлена позже.
Скриншоты Gobuster
Инструкции по Gobuster
Gobuster Guide and examples
Gobuster is a tool used to brute force URLs (directories and files) from websites, DNS subdomains, Virtual Host names and open Amazon S3 buckets. It can be particularly useful during CTF challenges that require you to brute force webserver data, but also during pentest engagements.
Installation on Linux (Kali)
GoBuster is not on Kali by default. In case you have to install it, this is how.
1. Since Gobuster is written in the Go language, we need to install the Go environment on our Kali machine. Download the Go installer file here from their official site. At the time of writing, the file is called «go1.16.7.linux-amd64.tar.gz». You will need at least version 1.16.0 to compile Gobuster.
2. Navigate to the directory where the file you just downloaded is stored, and run the following command:
# Don’t forget to change the filename in this command to the version you downloaded. rm -rf /usr/local/go && tar -C /usr/local -xzf go1.16.7.linux-amd64.tar.gz
3. Add /usr/local/bin/go to your PATH environment variable.
4. Check if the Go environment was properly installed with the following command:
5. Finally it’s time to install Gobuster. Make sure your Go version is >1.16.0, else this step will not work. The easiest way to install Gobuster now is to run the following command, this will install the latest version of Gobuster:
go install github.com/OJ/gobuster/v3@latest
In case you want to compile Gobuster yourself, please refer to the instructions on the Gobuster Github page.
Cheatsheet
Gobuster can run in multiple scanning modes, at the time of writing these are: dir, dns and vhost.
DIR mode — Used for directory/file bruteforcing
# Syntax gobuster dir -u [target ip] -w [wordlist] # Example gobuster dir -u http://192.168.0.1:8080 -w /usr/share/wordlists/dirbuster/directory-list-2.3-small.txt
DNS mode — Used for DNS subdomain bruteforcing
# Syntax gobuster dns -d [target site] -w [wordlist] # Standard example gobuster dns -d example.com -w /usr/share/wordlists/dirbuster/directory-list-2.3-small.txt # Example with show ip gobuster dns -d example.com -w /usr/share/wordlists/dirbuster/directory-list-2.3-small.txt -i # Example of force processing of a domain that has wildcard entries gobuster dns -d 0.0.1.example.com -w /usr/share/wordlists/dirbuster/directory-list-2.3-small.txt —wildcard
VHOST mode — Used for VHOST bruteforcing
# Syntax gobuster vhost -u [target site] -w [vhost list] # Example gobuster vhost -u https://example.com -w common-vhosts.txt
-h : (—help) Print the global help menu.
-z : (—noprogress) Don’t display progress.
-o : (—output [filename]) Output results to a file.
-q : (—quiet) Don’t print banner and other noise.
-t : (—threads [number]) Number of concurrent threads (default 10).
-v : (—verbose) Verbose output (errors).
-w : (—wordlist [wordlist]) Path to wordlist.
-h : (—help) Print the DIR mode help menu.
-f : (—addslash) Append «/» to each request.
-c : (—cookies [string]) Cookies to use for the requests.
-e : (—expanded) Expanded mode, print full URLs.
-x : (—extensions [string]) File extension(s) to search for.
-r : (—followredirect) Follow redirects.
-H : (—headers [stringArray]) Specify HTTP headers, -H ‘Header1: val1’ -H ‘Header2: val2’.
-l : (—includelength) Include the length of the body in the output.
-k : (—insecuressl) Skip SSL certificate verification.
-n : (—nostatus) Don’t print status codes.
-U : (—username [string]) Username for Basic Auth.
-P : (—password [string]) Password for Basic Auth.
-p : (—proxy [string]) Proxy to use for requests [http(s)://host:port].
-s : (—statuscodes [string])Positive status codes (will be overwritten with statuscodesblacklist if set) (default «200,204,301,302,307,401,403»).
-b : (—statuscodesblacklist [string]) Negative status codes (will override statuscodes if set).
-u : (—url [string]) The target URL.
-a : (—useragent [string]) Set the User-Agent string (default «gobuster/3.0.1»).
—timeout [duration] : HTTP Timeout (default 10s).
—wildcard : Force continued operation when wildcard found.
-h : (—help) Print the DNS mode help menu.
-d : (—domain [string]) The target domain.
-r : (—resolver [string]) Use custom DNS server (format server.com or server.com:port).
-c : (—showcname) Show CNAME records (cannot be used with ‘-i’ option).
-i : (—showips) Show IP addresses.
—timeout [duration] : DNS resolver timeout (default 1s).
—wildcard : Force continued operation when wildcard found.
-h : (—help) Print the VHOST mode help menu.
-r : (—followredirect) Follow redirects.
-H : (—headers [stringArray]) Specify HTTP headers, -H ‘Header1: val1’ -H ‘Header2: val2’.
-c : (—cookies [string]) Cookies to use for the requests.
-k : (—insecuressl) Skip SSL certificate verification.
-U : (—username [string]) Username for Basic Auth.
-P : (—password [string]) Password for Basic Auth.
-u : (—url [string]) The target URL.
-p : (—proxy [string]) Proxy to use for requests [http(s)://host:port].
-a : (—useragent [string]) Set the User-Agent string (default «gobuster/3.0.1»).
—timeout [duration] : HTTP Timeout (default 10s).
** For more information, check out the extra links and sources. **
Gobuster kali linux install
Learn Latest Tutorials


Preparation


Trending Technologies


B.Tech / MCA


Javatpoint Services
JavaTpoint offers too many high quality services. Mail us on h[email protected], to get more information about given services.
- Website Designing
- Website Development
- Java Development
- PHP Development
- WordPress
- Graphic Designing
- Logo
- Digital Marketing
- On Page and Off Page SEO
- PPC
- Content Development
- Corporate Training
- Classroom and Online Training
- Data Entry
Training For College Campus
JavaTpoint offers college campus training on Core Java, Advance Java, .Net, Android, Hadoop, PHP, Web Technology and Python. Please mail your requirement at [email protected].
Duration: 1 week to 2 week
Like/Subscribe us for latest updates or newsletter 


